
Summer Starts Here - Save up to 70%
To see if this custom-fit item will work for you please tell us what vehicle you'll use it with.
Thank you! Your comment has been submitted successfully. You should be able to view your question/comment here within a few days.
Error submitting comment. Please try again momentarily.
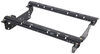
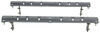
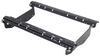
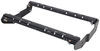
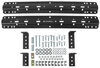
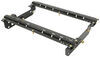
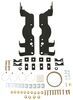
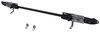
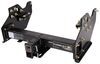
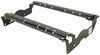
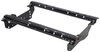
1999-04 Ford Super Duty Fifth Wheel Trailer Hitch Installation Bracket Kit
Features:
Note: The kit works with 1999-2004 F-250 and F-350 SuperDuty trucks with both short and long beds. Cab type does not matter. This custom kit will not work with cab and chassis models.

California residents: click here
Videos are provided as a guide only. Refer to manufacturer installation instructions and specs for complete information.
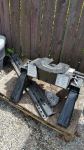
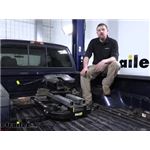
Ryan: Hey everybody. Ryan here at etrailer.com. Today on our 2004 Ford F-250 we're going to be taking a look at, and showing you how to install the Reese fifth wheel trailer hitch with the custom installation kit.Now just to give you guys an idea on how the rails actually look and work, I went ahead and dropped in our fifth wheel. Now the great thing about these rails is that they're going to work with many different types of fifth wheels, as you can see here. And now with the fifth wheel out of the way, we can take a better look at the rails themselves. The rails are going to have three openings here on each side, and that's going to work with most common fifth wheel hitches because that's where those hitches actually drop into place.Now these are made out of steel and they're really heavy duty and should last a long time.
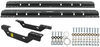
I do understand some accidents can happen, and say your rails get worn out, it's not a huge deal because you can actually pick these rails up separately, and not have to worry about getting the whole kit. Same thing with the frame brackets made out of steel, really thick and well-made. Now for whatever reason, if these do happen to get damaged, you can also pick up your brackets individually, again, not having to worry about getting the whole kit.One thing that I've noticed, that's real common with these trucks, is for the owners to want to have a toolbox back here and still be able to maintain their fifth wheel hitch. Well, you are going to have to think about that distance in between your rail and the front of your bed, that way you can make sure that the toolbox and hitch can work in conjunction with each other. Just to give you an idea, from the front of the bed to the edge of our hitch here, it's going to be about 22 inches.Now this kit is going to have a 18,000 pound maximum gross trailer weight rating.
That's going to be the amount of weight pulling on the rails, that's the weight of your trailer plus anything that you might have on it. This is going to have a 4,500 pound maximum gross tongue weight rating, that's going to be the amount of weight pushing down. I do always like to recommend to check with your trucks owner's manual to see how much weight it can pull. But overall really simple kit that's going to allow you to use multiple different types of fifth wheels to be able to pull your trailer down the road.Now as far as the installation goes, there's really not a whole lot to it, it's relatively straight forward, it shouldn't take you a whole lot of time. Speaking of which, let's go ahead and put this on together now.To begin our install, we're going to come over here to the driver's side of our truck, here the rear wheel opening, and what we're going to have to do is disconnect our e-brake cables from the frame rail.
Now this truck actually had another hitch on it prior to today, and so in our case our one cable has already been disconnected, so we'll just leave that set down to the side for now.But with that being said, if this one was connected, you just take it off with the appropriate size socket, however the front one is still connected, so we'll go ahead and remove that using a 15 millimeter, if you pull that nut off we can push our cable out of the way and push our bolt through. Now you want to try to hang onto this bolt because you can reuse it. Just going to set that off to the side, and what we're going to do now is enlarge this hole here to the amount specified in our instructions, and just be careful, it's not a bad idea to kind of feel back there, or to look back there and make sure that there's nothing tucked up into the frame rail that we could damage. Take our drill bit and open it up. Once we've opened that hole up, it's not a bad idea to take some spray paint, and since there's bare metal there just to put a shot of paint on it to help keep it protected from any rust or anything like that.Now the passenger side doesn't have the brake cables so we're not going to have to worry about those.
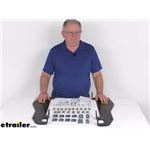
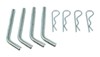
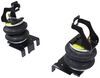
However we are going to do the same thing by opening up this front hole a little bit larger and coating it with some paint.Now we can hop up in the bed of the truck and find our location where our rail is going to sit. There is a few measurements in the instructions and those are what you're going to follow to find that distance. Whenever you do measure the distance here, you want to make sure to measure from the edge of the bed itself and not the tailgate. From this edge all the way up.Now you're also going to want to make sure that the rail is centered, and so there's a couple of ways you can do it. One way that I did it is, I went from the edge of our rail and the edge of this bed line here and made sure that distance was the same on each side. Once you have that in position, it's a good idea just to take a marker and just kind of draw a couple lines, that way you don't lose that position.Then what you can do is grab another marker, and on the very last holes on the edges of our rail, so these two and the same two on the other end of it, just take a marker and place a small dot in the center of that opening. Do that on these two and the other. Then you can kind of move the rail out of the way if you want to, and we're going to drill out those marks. For now I'm using a small drill bit as a pilot hole, and then we can come back with a larger bit and open them up to the correct size. With our pilot holes made, we can come back with our larger drill bit and open them up to the correct size.I went ahead and cleaned up all of our metal shavings from drilling. What I'm going to do is just take some clear spray paint, get a layer of paint onto that bare metal, and once we have this done, then we can move back down to our frame and start to assemble the frame brackets.Now on the driver's side we can take our frame bracket and get it loosely installed. Now the frame brackets are side specific, and the way you're going to know which side is which, is that the single tab, this should always be facing towards the front of the truck, and that's just a quick way to verify which side you have. With that being said, we can push this up against the frame rail, and some of the factory holes in our frame are going to line up with our frame bracket.If you just set this down, we're going to be using this hole, as well as this one that we enlarged, and the hardware is going to pass through this opening in the bracket as well as this opening. We're just going to hold this in place. For this hole, what we're going to do is take a hex head bolt and this large spacer block and come in from the back. If you just kind of reach your hand around the frame rail, feed that hardware through on the other end of the bolt and take a split lock washer and a hex nut. Let's get that started hand tight.Now for this hole, what we're going to do is take the included pull wire here, we're going to take the coiled end of it and pass it through our frame plate as well as the hole in our truck's frame, we can work it through, it'll pass down here to the bottom side of our frame, what we're going to do is take a spacer block like this, slide it over the coiled end of the fish wire, as well as a carriage bolt. Thread the carriage bolt onto the pull wire, and then you can simply just kind of work that hardware up into the frame rail and simultaneously pulling the other end of the fish wire.What'll happen is you can work that bolt through the side of the frame plate, kind of keep working that bolt until you get it fully seated, and can see inside of the frame. Once you do, you can unthread that pull wire, then we're going to put on a split lock washer and a hex nut. Again, we'll just get it hand tight for now. The other side is set up the same way with the same hardware and everything. Once we have this hand tight, we'll repeat this same process over there.Now if you hopped back up in our bed with our frame side plates loosely installed, we can just drop our hardware through our front rail. The hardware we're going to use is these longer carriage bolts. Back over here on the side of our frame, here's our bolts that drop down through our rails from inside of the bed, and you want to make sure that this bolt passed through the opening here on our frame plate. Now we can get it loosely secured, and what we're going to do is take a U-shaped spacer block, and put that in between the frame plate and bed of the truck. We can take an offset spacer block, you can put that on followed by a split lock washer and a hex nut.Now if you run out of bolt length like I did here, one thing you can do is just take your nut, get it going, and you can come back and tighten it down a little bit, and that'll kind of suck everything together. Once it's kind of sucked together, you just take your nut back off and put on the rest of your hardware. I'm going to go ahead and do that, and then once I have the side done, I'm going to use that same hardware combination for this bolt here as well as the other side.Now what you can do is hop up in the bed, and what you're going to do is take your fifth wheel and more or less set it into place. Your fifth wheel will line up with your front rail, and the fifth wheel itself when it's in the front rail, that's going to determine the location of our back rail. I'm going to have it sitting in the front, what you're going to do is take your other rail and slide that underneath your fifth wheel until it falls into place. From there, you're going to want to make sure that the rail is centered in the bed of the truck, just like how we did the front, by measuring the distance side to side, making sure they're the same. You're also going to want to make sure that the rail is pushed up as far forward as possible, that will ensure a nice tight fit.Once you're pushed up all the way forward, centered and everything looks good, what you're going to do is drill out some pilot holes, again in these far outermost holes here on each side. Once our pilot holes we're drilled, I went ahead and moved everything back out of the way and enlarged our holes, just how we did with the front rail. Once the holes are enlarged, put everything back how you had it and then you're able to take your carriage bolts and drop them through.Back to our frame plate, here's our bolts that we put in through our rear rail, come and drop through, as you can see they're dropping right through the tabs on our frame plate. Now we're going to loosely secure them. We're going to do is take a U-shaped spacer block like this, very similar to the front rail, slide that in position, offset the spacer block there on the bottom, split lock washer and a hex nut. I get this one started hand tight, I'm going to use that same hardware combination for the remaining bolts here, as well as the two on the other side of the truck.With everything in place and hand tight, now we can come back and snug down all of our hardware. Now what you're going to want to do is make sure you snug down the carriage bolts that hold the rails inside of the bed to these frame plates. You want to do all of those first.Once you have all of the carriage bolts that attach your rails, the frame plate tightened down, you can come back and tighten down the bolts that are holding the frame plate to the truck's actual frame. Now we can come back in with a torque wrench and torque everything down to the amount specified in the instructions. I'm going to use that same tightening sequence that we did to snug everything down, torquing all of the carriage bolts that hold our rails first, and then come back and do the side of our frame plate bolts.Now at this point, what I've done is just re-secured our e-brake cables. Since ours was missing some of the factory hardware as it was removed, since this did have a gooseneck hitch on it prior, I just used a bolt and a couple of washers to secure it to the bottom of the hitch here, the e-brake cables. Now if he did have those factory bolts and brackets, what you could do is there's some holes here, pre-drilled in the frame plates, and that hardware could come out through there and you could re-secure them in the factory locations. But if you do do that, make sure to put those factory bolts in this first before you put everything together, or else you're not going to be able to sneak them in behind there.That'll finish up our look at, and our installation of the Reese fifth wheel trailer hitch with the custom installation kit on our 2004 Ford F-250.
Average Customer Rating: 4.9 out of 5 stars (23 Customer Reviews)
1999-04 Ford Super Duty Fifth Wheel Trailer Hitch Installation Bracket KitPerfect fit, very fast shipping, and excellent communications, will use them as my go to parts supply.
As of right now they appear correct. Exterior packaging looked fine. When opened the hardware had spilled and I was short one lock washer. I’m not upset about it since I have many of them. Other than that very pleased with the product.

Directions were easy to follow, all the parts I needed where there, I did struggle a bit with the spacers but I'm pretty sure that's because it was damaged by a previous install. if you've got a 2004 f250 I fully recommend these brackets. been using them for a year now pulling a 5th wheel and couldn't be happier with the purchase.
Great product, I was a little worried since my fifth wheel hitch was a different manufacturer, but since I couldn’t source their product anywhere, I had very few options. The staff at etrailer was extremely helpful. Everything was an exact fit, been towing my trailer for a year with no issues. Well done!
Placed the order late Monday evening two hours later got an email that it had shipped. Paid for 4 day shipping, the order was on my door step Thursday afternoon. Great service there, Thank you. The brackets are sturdy. The left one fit great and bolted right up. The front hole on the left one was off a little. Filed the hole on the bracket to get it to fit. Other than that I think its a good product and would purchase again if needed. Will be checking etrailer for future parts needs. Thanks again.
grate product made well and is easy to install. what i like is this product will speed up the time it takes to install your fifth wheel rails by only having to drill one hole a little bigger its easy to install for the diy guys. now i can pull fifth wheel trailers and i all so have a goose neck plate that will snap right in to the rails also. thanks Dawn Z for all the help
Relatively straight forward to install. I already had the rails and hitch but it only came with generic frame brackets. Well made and strong. No issues. Still looks like new.
quick delivery and had all the bolts and nuts at a reasonable price. Others on internet only gave the plates without the accessories which would have added much to the cost and conveyance.
Parts fit perfect, still in use, Great service from etrailer.
It is extremely easy to install I would highly recommend but make sure you have some decent drill bits
Etrailer was great. The service was excellent. I received product a day earlier than scheduled. I received emails about delivery status as well as when I received it. Would recommend or reorder from etrailer anyday.
Instructions very vagueThe brackets seem to provide tremendous strength and holding power for the rails. The instructions are very vague and hard to follow. Take your time and be careful!
I have used this a lot it is still working great !!
Product fit great and seems to very str ong.
Product took longer than expected to install put fit and arrived when expected.
product and service very good and professional thanks, it's great to see
Top notch from what I can tell so far! Need to get them installed now!
Do you have a question about this Accessories and Part?
Info for this part was:
At etrailer.com we provide the best information available about the products we sell. We take the quality of our information seriously so that you can get the right part the first time. Let us know if anything is missing or if you have any questions.


Trever
6/30/2021
The product handles all the weight I can throw at it so far. My truck does need air bags though with my gooseneck.