
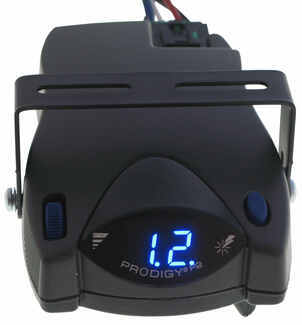
Tekonsha Prodigy P2 Trailer Brake Controller - 1 to 4 Axles - Proportional
Tekonsha Plug-In Wiring Adapter for Electric Brake Controllers - Nissan and Infiniti
Part Numbers: 90885,3050-P
Retail:$384.29
Our Price: $175.82
You Save: $208.47
In Stock
Thank you! Your comment has been submitted successfully. You should be able to view your question/comment here within a few days.
Error submitting comment. Please try again momentarily.


Tekonsha Prodigy P2 Trailer Brake Controller - 1 to 4 Axles - Proportional
part number: 90885
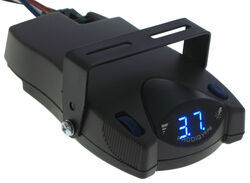
This proportional brake controller keeps it simple with intuitive controls that are easy to use. Includes a large, digital LED display, 3 boost levels, battery protection, and continuous diagnostics.
Features:
- Brake controller activates trailer brakes in proportion to your vehicle's braking action
- Automatically adjusts trailer's braking based on deceleration of tow vehicle
- Simple controls make it easy to operate the controller
- Gain setting lets you adjust the amount of power sent to the trailer's brakes
- 3 Boost levels let you adjust initial braking power and aggressiveness
- Built-in, rotary-style manual override lever is within easy reach for controlling trailer sway or stopping in emergencies
- Auto-dimming, blue LED display is easy to read
- Automatically adjusts screen brightness based on the current lighting conditions
- Built-in safeguards protect your vehicle, trailer, and the controller
- Runs continuous diagnostic checks to alert you to any potential problems
- Minimizes drain on car battery by drawing only 3.6 milliamps when not in use
- Prevents trailer brakes from overheating by reducing power output to them during prolonged stops
- Defends brake controller and trailer breakaway systems against shorts
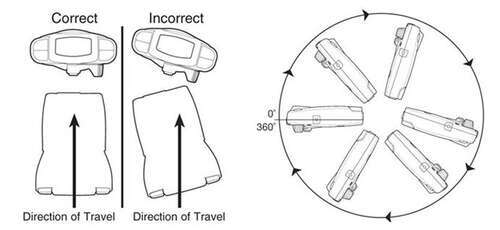
- Automatic leveling lets you mount at any angle up and down for an easy installation
- Controller must be parallel with direction of travel and horizontally level
- Mounting bracket and hardware included
- Included harness hardwires to vehicle and plugs into controller
- Plug-in, vehicle-specific brake-control adapter available for select vehicles to reduce installation time
- Quick-disconnect feature lets you easily remove and store the controller when you don't need it
- Replacement wiring harness (sold separately) and replacement bracket (7686 - sold separately) required to swap controller between vehicles
Specs:
- Application: trailers with up to 4 axles (8 brake assemblies)
- Compatible with electric or electric-over-hydraulic trailer brakes
- Dimensions: 5-1/8" long x 3-1/8" wide x 2" tall
- Length of hardwire pigtail: 30"
- Mounting: 360 degrees vertically
- Limited lifetime warranty
Gain Power Adjustment
You can adjust the gain (also known as output) with the thumbwheel on the front of the controller. Gain lets you set the maximum amount of power that will be applied to your trailer's brakes. A heavier trailer will need more power to achieve smooth, safe braking, while a lighter trailer will need less. Typically, the gain is only readjusted when you experience changing road conditions or if the weight of your trailer changes.
Power Boost for Heavy-Duty Towing
The boost setting controls the aggressiveness of your trailer's braking, meaning how quickly the brakes reach the maximum braking level. You can adjust this when you're towing heavy loads and you need more umph to bring your trailer to a stop. Your tow vehicle doesn't need that much power to brake in time, but your heavy trailer does.
Depending on the level of boost, your trailer brakes can start at either 13 percent or 25 percent of the set gain. What this means is that, instead of starting at 0, the brakes will start at 25 percent and get to100 percent sooner. This keeps the trailer from pushing your tow vehicle forward.
If your trailer weighs less than your tow vehicle, no boost is needed. But, if you want your trailer to lead the braking, you can select level B1.
Boost Levels:
| Approximate Gross Trailer Weight | Boost Level | Increase in Initial Power Output |
|---|---|---|
| Less than tow vehicle GVW | B1 | 13% |
| Equal to tow vehicle GVW | B1 or B2 | 13% or 25% |
| Up to 25% more than tow vehicle GVW | B2 or B3* | 25% |
| Up to 40% more than tow vehicle GVW | B3* | 25% |
*Both B2 and B3 offer a 25-percent boost in initial power. But the braking curve for B3 is more aggressive than that of B2. This means that, even though you will start out with the same intensity when using these boost levels, you will get an overall more aggressive braking experience with the higher level. So if you use B3, you will reach maximum braking sooner than if you use B2.
Safety Features
The Prodigy P2 offers key safety features to prevent damage to various components of your towing setup. Integrated reverse battery protection shields the brake controller and your trailer's breakaway system from shorts. When the P2 is not in use, it will be in power-saving mode. In this setting, it draws only 3.6 milliamps, minimizing drain on your vehicle's battery.
The P2 also comes equipped with a hold feature to prevent wear on your brakes. When you're waiting at a red light, you don't need your trailer brakes on at full power. The longer you sit there, the more they will overheat. But with the P2, any time your tow vehicle and trailer are at a standstill with the brakes applied for more than 5 seconds, the hold feature will kick on and reduce power to just 25 percent. This will keep your trailer in place while saving your brakes.
The P2 keeps the manual override within easy reach, great for stopping sway or controlling your trailer's momentum in emergencies. To engage the manual override, just twist the rotary-style lever from right to left. This will activate the trailer's brakes and brake lights without you having to apply the brakes on your tow vehicle, perfect for limiting trailer movement while you're cruising.
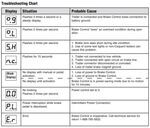
The Prodigy P2 also offers diagnostics such as:
- Open ground
- Overload
- Output short
- Power loss
- No trailer connection
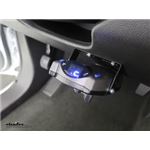
Automatic Leveling and Simple Installation
The self-leveling feature of the P2 ensures that the brake controller continues to function even as you drive up steep hills or through the mountains. Simply mount it in your cab at any vertical angle, and the controller will level itself automatically thanks to its 360-degree rotational range. This makes the installation that much easier. But keep in mind that the P2 must be horizontally level and parallel with the direction of travel to work correctly.
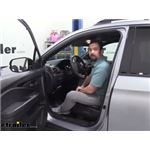
Installation is a snap. After mounting the P2 unit in your cab using the included bracket, hardwire one end of the included pigtail harness directly into your vehicle. The other end plugs into the brake controller. To remove the P2 for storage when you're not using it, just unplug the unit and slide it out of the bracket. With a replacement wiring harness (sold separately) and replacement bracket (P7685 - sold separately), you can even transfer the Prodigy P2 to another vehicle.
Installation Accessories
For even easier installation, a vehicle-specific specific wiring adapter is available for most newer trucks and SUVs. One end of the custom adapter plugs into your vehicle, and the other end plugs into the controller - no hardwiring required.
See also etrailer.com's exclusive 7- and 4-way brake-control installation kit (ETBC7 - sold separately) if you don't already have a 7-way plug at the back of your vehicle.
Note: If a custom brake control wiring adapter is not available for your vehicle, one of the following will be required:
20-Amp circuit breaker (9506P - sold separately) for 2- to 4-brake applications
30-Amp circuit breaker (38630 - sold separately) for 6- to 8-brake applications
Proportional Braking

The Tekonsha Prodigy P2 brake controller comes equipped with proportional braking to give you the best towing experience. Proportional braking means that your trailer brakes mimic your tow vehicle's brakes. If you slam on the brakes in your vehicle, your trailer brakes will activate with the same intensity; if you brake lightly, your trailer brakes lightly too. The trailer's braking is in proportion to your vehicle's braking. This saves wear and tear on the tires and the brakes on both your vehicle and trailer.
The Prodigy P2 uses an internal inertia sensor to detect how your vehicle is braking so it can send the right amount of braking power to your trailer. It measures the inertia of your tow vehicle and activates the trailer's brakes to slow at the same rate. The result is uniform braking across your towing setup. No push-pull action - just smooth, proportional braking every time.
90885 Tekonsha Prodigy P-2 Proportional Brake Controller - 1 to 4 Axles
Replaces Tekonsha 90185
California residents: click here
Tekonsha Plug-In Wiring Adapter for Electric Brake Controllers - Nissan and Infiniti
part number: 3050-P
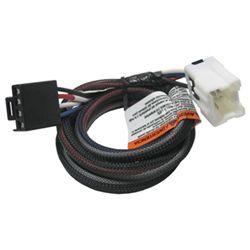
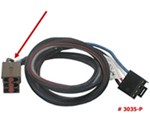
Install your electric brake controller quickly and easily with this custom wiring adapter. Simply plug one end of the adapter into your brake controller and then plug the other end into the junction box beneath your vehicle's dashboard.
Features:
- Wiring adapter eases installation of your electric brake controller
- Custom connector end plugs into the built-in port beneath the dash of your vehicle
- Other end plugs into the back of your electric brake controller
- Compatible time-delayed brake controllers: Draw-Tite Activator I (5100), Draw-Tite Activator II (5500), Draw-Tite Activator III (5520) and Tekonsha PowerTrac (39523)
- Compatible proportional brake controllers: Tekonsha Prodigy (90185), Tekonsha P2 (90885), Tekonsha P3 (90195), Tekonsha Primus IQ (TK90160) and Tekonsha Voyager (39510)
- Limited 1-year warranty
Installation of Tekonsha Brake Controller Adapter
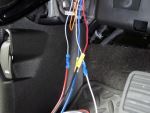
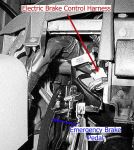
This adapter plugs into the 6-pin connector on your vehicle's built-in brake control wiring harness. Older models will have the harness located underneath the dash, to the left of the steering column, taped to another harness near the emergency brake pedal. Newer models have the harness under the dash, above the gas pedal.
To install your electric brake controller you need to connect the wiring of the controller to your vehicle. Certain manufacturers offer pre-wired options, typically known as tow packages, wherein these wires are run for you from the dash to the trailer connector on the back of your vehicle. Often, a brake controller wiring harness is included with your tow package. This harness plugs into a port beneath your dash and connects to the four wires of the brake controller. If, however, you have a brake controller with a plug in place of the four loose wires, you can use the Tekonsha adapter.
This adapter requires no hardwiring. It is designed to plug directly into your electric brake controller for the simplest installation possible. Because there are no wires to connect, installation is not permanent. You can unplug and remove your brake controller at any time and securely stow it away.
305000 Tekonsha Brake Control Wiring Adapter with 2 Plugs
Replaces 3050-P
California residents: click here
Customer Satisfaction Score:
97% were satisfied with this product
3% of customers were not satisfied
- Wrong item was ordered
- Product did not meet expectations
- Did not arrive in time
Customer Reviews
Tekonsha Prodigy P2 Trailer Brake Controller - 1 to 4 Axles - Proportional - 90885
Tekonsha Plug-In Wiring Adapter for Electric Brake Controllers - Nissan and Infiniti - 3050-P
Average Customer Rating: 4.9 out of 5 stars (3648 Customer Reviews)
This proportional brake controller keeps it simple with intuitive controls that are easy to use. Includes a large, digital LED display, 3 boost levels, battery protection, and continuous diagnostics. Install your electric brake controller quickly and easily with this custom wiring adapter. Simply plug one end of the adapter into your brake controller and then plug the other end into the junction box beneath your vehicle's dashboard.by: Shaun03/17/2024
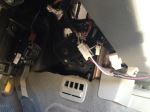
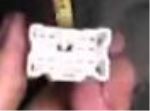
I purchased the brake controller and wiring harness from you all and installed it watching the video on your website. I followed the instructions to an absolute T. Got everything ready and tested the product and got an SH error code for the blue brake wire shorting out. I pinned and measured resistance and everything was coming back fine (4+ ohms resistance). I then hooked a power prope to it to find the short along the frame and nothing. I had power from the female connector all the way up to the brake controller. After 4 hours of troubleshooting, I found that the female trailer connector was shorted internally. See the attached picture. The blue and green ring terminals inside of the female trailer connector were touching. Replaced the trailer connector and now all is well.


by: Albert 01/05/2023
I had a Prodigy P2 controller in my last pickup and was really pleased with it. So wanted to install the same thing in my newer truck Everything worked smoothly on installation. Made the necessary adjustments to controls after hooking to the trailer and it works great!
by: Philip03/04/2016
This is the second one I purchased. The first was 10 years ago and installed in my 06 GMC. It has worked flawlessly allowing for safe and smooth stops from normal braking to a few of the panic stops that had to made over the years. The new owner of the truck likes the way it works too. I have multiple trailers and with one initial setup on the lightest trailer was able to tow all of them without changing anything but the boost setting to compensate for the different trailer weights.
When needing for a controller for my 07 Silverado there was no other unit that would fill the bill. This P2 looks the same except for the blue display instead of the red. The install took 20 minutes using the direct fit cable ordered with the controller. Setup was easy as with the first unit. I wanted the placement above the parking brake pedal so the OBD II connecter had to be moved. I did the same with the 06 GMC. It is a comfortable place to reach and it keeps the light away from the passenger's eyes at night.
As good as the Tekonsha controller is it is even a sweeter deal buying it from etrailer. The quick shipping, excellent pricing and knowledgeable staff are second to none in customer service.


by: Jim10/30/2015
Installed this in my 2015 Jeep Wrangler Unlimited Sport. I thought that I would add some input on installation that would help others.
I found a way to route the power distribution wires in the frame of the Jeep that did not require the use of a fish tape. If you look at the frame just behind the rear tire you will see a hole in the face of the frame. Start pushing the wire bundle foreword. It will rise up and over the U shaped frame portion of the rear axle and then down along the passenger compartment area. About there, you will be running out of pushing stiffness. Look for the wire bundle to appear at a similar hole in the frame in that area. Grab it a and pull out approximately 4 feet and then push it right back in the same hole going foreword. This time you will look for the wire bundle to appear at again a similar hole just foreword of the driver compartment. Now is the time to grab it and start heading up to the engine compartment outside the frame. Do the same procedure for the wire going aft for the plug end of the installation. For the wires going through the firewall, Jeep has conveniently added a nice foam lined hole to route wires through. You will see this hole position in the attached photo with a green wire coming through. The plastic cover around the steering column pulls down from the top and hinges at the bottom. Remove the metal plate with two bolts to get to the brake switch. Twist and pull the brake switch out foreword and go for the brown stripped wire as your brake circuit. Do order the LONG frame bracket adapter for the switch plug at the rear. To drill the steel for the supplied plug bracket just takes too long. Now that you have it installed you will notice that the power will remain on the unit after you turn the key off. Don't sweat this as it will not stay on long. I doubt a few milliamps draw is going to kill your battery!


by: Cain05/10/2024
I am by no means mechanically inclined but the ease of connecting adapter on one end and the other end into the unit was way easy on my 2017 Nissan Titan. Probably no longer than 30 minutes to install.


by: Larry L.04/29/2015
The online video showing the installation of the Prodigy P2 trailer brake control into a 2011 Ford Ranger was excellent! It made the installation into my Ranger simple and straight forth.
I have yet to hook up to my travel Trailer and adjust it for brake setting, but all readout displays thus far are as stated in the instructions.
Having previously installed the trailer connector, I did not purchase the installation kit and in retrospect for cost effective and simplicity would recommend anyone to purchase the kit along with the controller.
I believe I am going to be very pleased with this product.
Thank you


by: Bill G.06/04/2017
2008 Nissan Titan
I purchased the 3050-P quick connect wire harness for the ease of installation.
My 2008 Nissan Titan has the big tow package and I needed an electric brake system.
All I had to do was remove two phillips head screws and the lower dash panel pulls off. Locate the factory brake harness which is taped up at the emergency brake and attach the two together. I routed the harness to the right side of the lower dash because I'm right handed but, there is enough wire to move it to other areas within reason.
I also purchased the pod Pro Series 80500 which serves 1 or 2 axel brake systems. I mounted it to my lower dash on the right side within reach and it plugs right into the wire harness.
I have not had chance to use the new system yet but, am confident that etrailer has sold me a system that will work for me.


by: Duane03/14/2024
I have a Tekonsha controller on my 2001 Chevy Silverado and it worked like a charm for over 18 years.I'm sure that the new Prodigy P2 will do the same.


by: Steven05/09/2024
I have had only one opportunity to test the Tekonsha brake controller, but I was very pleased with its performance. I won't say installation was easy, but got it done in a reasonable amount of time. Watching other how-to videos really helped.
by: Matt02/24/2014
very nice controller, very smooth and you don't have to mount it flat!! e trailer is the best company i ever worked with. they have pics, video, email support(exellent) and just flat out make it easy for you to do it yourself instead of paying some dirt bag $300 to install at your local trailer shop. i also installed kit #ETBC7 and once agian it was awesome. COMPLETE with DETAILED directions. i'm not a mechanic or hack employee at local trailer shop....BUT dealing with etrailer and there parts made my install very easy and CLEAN!!!


by: Carl05/15/2023
the controller has great reviews, I got it because my factory controller wasn't working well with the new camper that has electric/hydraulic brakes and I was experiencing a 5 second lag for the trailer brakes to come on. this controller works better with a 2 to 3 second lag, need to try a couple different combos on settings, have the boost at 3 (per recommendations) and gain at 2.5 and under hard braking it locks up the trailer tires. going to try boost on 2 and bump up the gain and see if that works better.
by: Brad 05/10/2024
Been one year of ownership now and this controller has performed very well. I would by again for sure.
by: Calvin03/14/2024
Great product! Since I pull my goose neck with electric brakes, with my semi truck tractor, it acts as a interface between the air brakes and the electric trailer brakes, and acts as a Johnson bar if I need to get the trailer back under control.
by: Greg08/30/2018
Great product, very easy install especially with the OEM harness. In about an hour had it installed and trailer set up with controller. Thanks,
Greg


by: Kevin P.03/16/2011
I didn’t have a good location that was reachable while driving so I mounted the controller on top of the dash. I leveled the bracket with a spacer and ran the harness by an access panel. I used about 70’ of the duplex wire due to running the cable to front and then back to the house batteries inside the coach.
The access panel made it easy to make the connections and run the wires through the firewall.
I mounted the 40 AMP and 30 AMP circuit breakers up front in the main fuse panel box. I drilled a hole through the box and firewall to run the wires from the brake controller to the breaker and to the blue wire for the tow connection at the back of the coach.
I ran the battery connections to my house batteries up front instead of using the engine batteries in the back.
I found the brake connection wire under the coach in front directly below the brake pedal.
I mounted the converter in a beam in the back with lots of zip ties


by: Alex08/07/2019
Excellent quality of materials, fit perfectly fine on our 2018 Infiniti QX-60. Just make sure to take the cap off from the break connector in order to fit the plug and play wire harness. Cap is attached.
Thanks,


Alex S.

8/8/2020
The product has been working flawless.
by: Mai N.01/26/2012
Great Brake Controller This was my first time using a brake controller and installing one as well. The directions were easy to follow for both the install and setup.
2012 Ram


by: Garry in Indio06/25/2017
Used in conjunction with harness kit for my 2002 tundra, this year has no provisions for towing trailer with electric brakes.
The controler itself has proven itself nicely, with no issues with installation or use, adjust easily.
The mounting location I chose may have some slight interference issues with legs on taller people, but I have not had any @ 5'11". The truck is a midsized so room is more limited. I'm towing a tandem 14' trialer with 4 seat RZR, tracking and stopping is perfect, even under hard breaking.


by: David03/03/2024
The Tekonsha Prodigy P2 Brake Controller arrived on time and is just what I needed. The installation and operating instructions are easy to understand and should make installation a breeze. I'll give an update after I get it installed.
by: Bob Z.12/11/2015
2015 Nissan Xterra
It was easy to use this short wiring harness to connect a Tekonsha Prodigy P3 brake controller to the factory installed under-dash connector on our new 2015 Xterra. ALL 2015 Xterras have that under-dash connector, regardless of trim level or model. Previous years may also, just look for the white 6-conductor connector that is taped to a wire bundle under the dash above the right side of the driver footwell (see my photo). The cable was just the right length to make the connection to the brake controller mounted to the plastic panel just up from the hood release tab (see the other photo). Because the brackets supplied with the controller would have placed the controller about an inch from the dash surface, creating a knee-banger situation, I instead use some industrial quality 3M dual-lock fastener (like velcro on steroids) to mount the controller. The controller is securely mounted right up against the dash panel, but is still is removable, if needed.
If you also need a rear 7-way connector harness and the relays that all plug into the factory installed connectors, I highly recommend #118266. It provides everything you will need except for the bracket to mount the 7-way connector to the bottom lip of the rear bumper, see #TM76474.


by: Nick04/11/2016
Great Brake Controller, used it with the Universal Install Kit for Brake Controllers and No-Drill Mount Bracket, Short - 18140. It only took me 2.5hrs to have it fully installed in my Jeep Wrangler Unlimited 2013. Videos were great. Also having some 1/4in water tubing helped for phishing wire thru frame.
Wish I had watched the video a couple of times before buying and also purchased the extra wire to go from the battery to the brake controller, but had extra wire from another project that worked.
This brake controller works great as we tow a <3500lbs Travel Trailer with our Jeep.
Comes with a great card that helps with settings, keep it in the glove box for future reference.


by: David W02/16/2019
I recently bought a 2018 Chevy Silverado LTZ. It was equipped with a towing package but no brake controller. Not wanting to alter the interior of the truck too much, I called etrailer for advice. Robert S was very helpful. He suggested the Tekonsha Prodigy P2 brake controller and jumper wire that I was able to hide neatly under the dash using an existing screw. I have been very pleased with etrailer and their suggested product.


by: Mike 02/02/2023
ez hook up and install ez setting of co ntroller
by: Rob Rod03/28/2014
I installed this model 90885 Prodigy P2 Brake Controller using the ETBC7 Brake Controller Wiring Kit on my 2007 Dodge Nitro. On a scale of 1 to 10, I consider myself about an 8 where it comes to automotive mechanical and electrical work. I also strive to get as close to perfection as possible. To do the job right, it did take some time and it did require paying close attention to the directions for both the wiring kit and the controller. However, the directions were "right on", and all the needed "goodies" to do the job were furnished. My hat is off to ETRAILER for the informative videos they provide and their customer service, which includes very quick shipments of their products.


by: Michael 02/07/2024
2015 Nissan Titan
I received the Prodigy 3 brake controller very quick. It was a plug and play. Installation was completed in less than 30 minutes. Etrailer are the best.
25
3696
Show More Reviews Ask the Experts about this Trailer Brake Controller
Do you have a question about this Trailer Brake Controller?
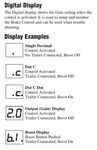
- Single Dot on Display of Tekonsha BRAKE-EVN Trailer Brake Controller After Install
- If you take a look at the instruction manual for a Tekonsha BRAKE-EVN Trailer Brake Controller part # TK63VR, you'll see that a single red dot represents that the brake controller has power but there is no trailer connected. Therefore, if you don't have a trailer hooked up but the truck is on then yes, this is normal. I have attached a list of other displays below for you as well and what they mean. If you're still having issues, check out the troubleshooting section of the instruction
view full answer... - Troubleshooting Service Brake Controller Dash Error Code with No Trailer Connected
- Does error code happen when trailer is disconnected too? Or just when connected?
view full answer... - EOH Trailer Brake Actuator and Brake Controller for Dodge 5500
- You can see our range of electric-over-hydraulic (EOH) trailer brake actuators on the page I linked for you. These are available in the different psi-pressure ratings required for drum and disc brakes. Just click on your brake type, disc or drum, to see the actuator products that are suitable.
Do note that some trailer brake controllers, such as the excellent Prodigy P2 # 90885 and P3 # 90195, will work perfectly well with EOH actuators but this is not true of all brake controllers,
view full answer... - How Does Prodigy P2 Brake Controller Install in 2002 Dodge Ram 1500
- For your 2002 Dodge Ram 1500 to install the Prodigy P2 part # 90885 all you'd need is the install harness part # 3020-P which plugs into the port under the dash and you'd be set. If you wanted to hardware though you could use a circuit tester like part # PTW2993 to test all of the wiring that leads to the brake switch at the pedal till you find a wire that carries voltage only when the brakes are applied.
view full answer... - Wiring Proportional Trailer Brake Controller on 2011 Monaco Diplomat Motorhome
- Among the most popular and reliable proportional brake controllers we offer is the Prodigy P2 # 90885 from Tekonsha, which you referenced. We do not offer a quick-connect brake controller harness for use with Roadmaster chassis-based motor homes so your installation will be a hard-wire application.
If your Monaco is already equipped with a 7-way connector at the rear (which I expect) you will need the wiring kit # 5506 to install the P2. If you do not have the 7-way then instead you
view full answer... - Brake Controller Recommendation For 2003 GMC Envoy
- The most popular brake controller we offer is the Tekonsha Prodigy P2 Brake Controller, part # 90885. This is a proportional brake controller and activates the brakes on your trailer in direct proportion to the brakes on your towing vehicle.
I have attached a link to a video that shows how a brake controller is installed on an Envoy you can check out.
If by chance you do not have the connector at the rear of your vehicle let me know and I can make some recommendations for the components
view full answer... - Location of Brake Control Wiring Harness on 2014 Ford Explorer
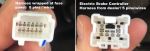
- I spoke with my contact at Tekonsha and he said that the brake controller harness plug should be located just to the left of the hood release cable on your 2014 Ford Explorer. Most of these plugs are a light gray but he has also seen some vehicles with a brown plug. I am including a picture which may help by showing you the pin configuration of the plug that you are looking for.
view full answer... - Brake Controller Has Constant 12V Power But Trailer Brakes Do Not Engage
- First I suggest you double check your wiring from the controller. Typical brake controller wiring is: Red wire goes to the brake switch cold terminal, which gets power only when the pedal is pressed; Blue wire connects to the trailer brake circuit; White wire is ground; Black wire connects to the 12V power source. Please note that we do offer vehicle-specific wiring harnesses that plug into the OEM socket under your dash and provide bare wires on the other end to wire directly to your controller.
view full answer... - How To Replace Factory Installed Brake Controller With Prodigy Brake Controller on 2011 Dodge Ram
- To install an aftermarket brake controller like the Tekonsha Prodigy Brake Controller, part # 90885, in your 2011 Dodge Ram 1500 with a factory Integrated Trailer Brake Module (ITBM) you will first need to disconnect ITBM. This will turn on a warning light on the instrument cluster.
In order to disconnect the ITBM and not get the warning lamp, your local Dodge dealer will have to reconfigure the TIPM (Totally Integrated Power Module), of the truck. Once the TIPM has been reconfigured,
view full answer... - Installing Tekonsha Prodigy P2 Brake Controller on 2012 Chevy Silverado 1500 without Tow Package
- Even on your 2012 Chevy Silverado 1500 that isn't equipped with the tow package the needed wiring is already run and present under the dash. Installing the Tekonsha Prodigy P2 Brake Controller # 90885 that you referenced is just a matter of connecting the controller wiring to this wiring under the dash of your truck. Once the brake controller is in place you may still need to make some connections in the fuse box under the hood to get power to the unit.
I have attached a helpful article
view full answer... - Parts Needed to Add 7-Way to 2002 Toyota Tundra With 4-Way
- There isn't a plug-in 7-way for your 2002 Toyota Tundra but since you already have a 4-way you can add a 7-way by using the following:
- Universal Installation Kit for Trailer Brake Controller # ETBC7
You'll plug your 4-way into the 7-way that comes with the # ETBC7, which also gives you the wiring, circuit breakers, and rest of the hardware needed for installation of a brake controller like the Prodigy P2 # 90885.
I have added a link below to a help article which details the install
view full answer... - Is There A Plug And Play Brake Controller Adapter From Tekonsha For A 2024 GMC Sierra 2500HD
- We have just the thing. You can use the adapter # 3064-P to connect your Prodigy P2 # 90885 to the factory brake control harness. Assuming that your 2024 GMC 2500HD does already have a factory 7 way trailer plug on the back, you will have a connector under the dash that you can plug right in to. Simply mount the controller, plug in and you are good to go. You will not have to run any additional wires. We do carry a replacement mounting bracket # P7685 if you are in need.
view full answer... - Troubleshooting Tekonsha Prodigy P2 Brake Controller Only Working with Manual Override
- When a trailer brake controller like the Tekonsha Prodigy P2 # 90885 that you mentioned only sends power to the brakes when using the manual override, and not when stepping down on the brake pedal, it is usually caused by the brake controller red wire being connected to the wrong side of the vehicle brake light switch.
I recommend using a circuit tester like # PTW2993 to test the wires above the brake pedal to make sure you are connected to the correct wire. The wire you want to connect
view full answer... - Brake Controller and Wiring Recommendation for 2014 Chevy Silverado 1500
- Yes, you can install a proportional brake controller in your 2014 Chevy Silverado 1500 pretty easily actually.
All you need is the install harness part # 3016 which plugs into the port of your truck under the dash.
For a brake controller I would recommend the Prodigy P2 Brake Controller part # 90885. This is our best selling brake controller because of how well it works and how easy it is to setup. This is a proportional brake controller that senses the amount of braking the tow vehicle
view full answer... - Troubleshooting Tekonsha Prodigy P2 # 90885 with S.H Code
- The S.H code that you are seeing on your Tekonsha Prodigy P2 # 90885 is because of a short, just as you said. The installation instructions state that this can be caused by some test lights or non-Tekonsha testers. Check to make sure that you don't have either of those first and foremost.
The next thing that I recommend checking is the connector on your truck. Since you replace the wiring from your brake controller to the 7-Way I would take a closer look at the 7-Way itself and look
view full answer... - Adjusting Brake to Work with Prodigy P2 Electric Trailer Brake Controller
- It sounds to me like the Prodigy P2, part # 90885, is installed properly in your 2012 Subaru Outback. I think you're right that the brakes need to be adjusted.
I've attached an article and a video that may help you adjust your brakes. If you skip ahead in the video to around the 4:40 mark you'll see the installer making the adjustment with our adjustment spoon, part # W80630.
view full answer... - Troubleshooting Trailer Brakes that Engage when Trailer is Connected to a 2002 Chevy Silverado
- It sounds as if there is constant power being supplied to the brake feed circuit on your vehicle, since the trailer is working correctly with another vehicle. Start out by using a circuit tester, item # PTW2993 if needed, to test the trailer connector at the rear of the vehicle. Looking at the connector with the access door up the terminal at the 5 o-clock position will be the brake feed circuit (see link). Ground the tester and touch the probe to this terminal. If there is power on this
view full answer... - What Brake Controller Will Work On A 2007 Toyota Tacoma Double Cab With A Tow Package
- The brake controller I would recommend for your 2007 Toyota Tacoma is the Tekonsha Prodigy 2 Brake Controller, # 90885, that can be installed with the # 3040-P wiring harness that is specific to your Tacoma.
The Prodigy 2 brake controller is our best selling model. It can be mounted in a 360 degree vertical range and will level itself automatically. It is a proportional brake controller which means that the brakes are applied to the trailer at the same time and same strength as the
view full answer... - How to Make a 7-Way Fully Functional on a 2007 Chevy Silverado
- There are two wires under the hood that have to be connected to make the 7-way functional on your 2007 Chevy Silverado. Check out the FAQ I attached that shows the connections that need to be made.
view full answer... - 2017 Nissan Titan Electric Brake Controller Plug Location
- For your 2017 Nissan Titan, the models with the factory 7-way will have the harness under the dash, above the gas pedal. This is a different location from the older models that were found near the emergency brake pedal. If you don't have the harness or controller yet, I recommend the wiring harness # 3050-P and the Prodigy P3 Controller # 90195.
At your 7-way the brake controller output is found at the 5 o'clock pin location.
view full answer... - Location of Brake Controller Connection Port in 2006 Nissan Xterra
- I think you might be looking at the wrong connector.
The connector that the brake controller wiring adapter would plug into is located above the emergency brake pedal. It will be a white rectangular connector with 2 rows of three pins. The connector will be taped to another wiring harness. Sometimes the connector can be behind the harness its taped to, making it difficult to see. The photo shown for the 3050-P is an actual photo, the connector you are looking for will resemble the connector
view full answer... - Mounting the Tekonsha Prodigy Brake Controller on a 2010 Nissan Frontier
- Your P2 brake controller, # 90885, can be mounted a full 360 degrees in the direction of travel. As long as the brake controller is mounted in an easily accessible location and the harness will reach on your 2010 Nissan Frontier, it will work. It does not have to be under the dash on the right of the steering column.
It will not work properly if it is mounted tilted left or right or if it is not parallel to the direction of travel. I have included a link to the installation details
view full answer... - 2017 Nissan Pathfinder Factory Harness for Brake Controller
- Based on the picture you submitted and the info we have on your 2017 Nissan Pathfinder the harness your dealer gave you is correct. It matches the # 3050-P which is the correct harness from Tekonsha. Most likely you have found the wrong harness on your vehicle and you need to check again to find the correct one.
The harness will be located underneath and left of the steering column, taped to another harness near the emergency
brake pedal.
view full answer... - Is a Relay Needed When Installing Tekonsha Prodigy P3 on a 2018 Nissan Titan XD
- If you don't have the factory 7-Way on your 2018 Nissan Titan XD then you will need the kit # N40975 which comes with a 7-Way/4-Way connector and the needed relays to activate the tow package. Aside from this we haven't heard yet about needing to add a relay.
What you might want to do before installing the Prodigy P3 # 90195 and Adapter # 3050-P is check your relays to make sure that they are installed. I tried looking up the locations in the online version of the owner's manual but
view full answer... - Where is Brake Controller Install Port on a 2016 Nissan Titan XD
- I have attached a brake controller installation video on a Nissan Titan for you to check out. It shows exactly where the brake controller harness will be located under the dash. The truck in the video is a 2008 model, but it will be the same for your 2016 model. I have also attached a photo of the under side of the dash that shows where the harness will be located. The harness will be located underneath and left of the steering column, taped to another harness near the emergency brake pedal.
view full answer... - Where to Find Brake Controller Install Connector 2017 Nissan Titan
- The harness is near the emergency brake pedal. I attached a picture that I took from the # 3050-P that shows where you'll find it. It's pointed out as B in the picture. C is the E-brake pedal.
view full answer... - Prodigy Brake Controller Installation in 2015 Infiniti QX60
- Since there can be many connectors under a vehicle dash, I suggest you test the connector you've found to confirm it is indeed for a brake controller. A brake controller port will have four wires/contacts and one of these will carry 12V at all times, and another will carry a signal ONLY when you press the brake pedal. The other two pins should not carry any signal at all. You'll need a tester like # PTW2993 to test the pins. If this is indeed a brake controller connection port then you
view full answer... - Wiring Tekonsha Brake Controller into 2014 Infiniti QX60
- I spoke with my contact at Tekonsha and he confirmed that the wiring harness # 3050-P is the correct harness to install your brake controller in your 2014 Infiniti QX60 with factory Tow Package. Simply plug one end of the adapter into your brake controller and then plug the other end into the junction box beneath your vehicle's dashboard.
For install details and some product demonstration videos, click the provided links.
view full answer... - Tekonsha Plug-In Brake Controller Wiring Adapter for 2013 Nissan Pathfinder
- For your 2013 Nissan Pathfinder, you will need the Tekonsha Plug-In Wiring Adapter for Electric Brake Controllers, # 3050-P. One end of this adapter plugs into the connector located near the top of the emergency brake pedal on your Pathfinder and the other end will plug into the back of your Prodigy brake controller.
view full answer... - Why Does 2012 Nissan Pathfinder Have Trailer Brake Controller Port If It Only Has A 4-way Connector?
- The reason your 2012 Nissan Pathfinder has the trailer brake controller port underneath the dash even though it has a 4-way connector installed is because there is a direct replacement 7-way connector.
The Tekonsha T-On Vehicle Wiring Harness # 118266 plugs in directly to the factory connectors on your Pathfinder and will not require you to run any wires.
To make your universal harness that plugs into the 7-way connector work you will need to run the blue wire from the connector
view full answer... - Installation of Primus IQ Brake Controller on 2022 Nissan Pathfinder
- The Tekonsha Primus IQ Trailer Brake Controller - 1 to 3 Axles - Proportional # TK90160 will need to be hard wired for installation on your 2022 Nissan Pathfinder. The Tekonsha Plug-In Wiring Adapter for Electric Brake Controllers - Nissan and Infiniti # 3050-P is not confirmed to fit the 2022 at this time.
view full answer... - How Do You Install a Tekonsha Trailer Brake Controller In 2019 Nissan Murano W/ Tow Package?
- I would be happy to help, but there is not a Plug-In wiring adapter compatible with your 2019 Nissan Murano as the factory did not install a factory trailer brake controller port nor wiring to install a trailer brake controller.
Based on all of the information I was able to find on your 2019 Nissan Murano its tow package included a 4-way connector which is actually not compatible with electric trailer brakes. You will need to add a 7-way connector to your vehicle using the # ETBC7. This
view full answer... - Brake Controller Install and Recommendation for a 2007 Nissan Frontier
- We had a customer with a 2007 Nissan Frontier just like yours have trouble finding the port to install the brake controller harness needed to plug in the # 3050-P come back and say he was able to find it above the gas pedal.
I attached the picture he sent us that shows where it was.
For a brake controller I would recommend the Prodigy P2 Brake Controller part # 90885. This is our best selling brake controller because of how well it works and how easy it is to setup.
view full answer... - Recommended Mounting Location for Tekonsha Prodigy P2 in 2022 Nissan Frontier
- Looking at pictures of the 2022 Nissan Frontier interior, the best mounting location for your P2 # 90885 is probably to the right of the steering wheel under the dash. The only other spot I could see it going is to the left instead. As you said, space is limited. If you want to run it to the passenger side you can use the # 20160 but that would require splicing. Also, you would want to make sure it isn't so far that you can't easily adjust or use the manual override.
view full answer... - Brake Controller Install Harness Recommendation for 2016 Nissan NV3500 with 7-Way
- The brake controller install harness part # 3050-P that you referenced is the correct harness for installing a Tekonsha brake controller in your 2016 Nissan NV 3500 that has a factory 7-way.
The harness is located underneath the dash, to the left of the steering column, taped to another harness near the emergency brake pedal.
For a brake controller I would recommend the Prodigy P2 Brake Controller part # 90885. This is our best selling brake controller because of how well it works
view full answer... - 7-Way and Brake Controller Recommendation for a 2007 Nissan Pathfinder
- The Prodigy P3 brake controller part # 90195 would be an excellent choice for your 2007 Nissan Pathfinder. That we are aware of all of the Pathfinders made in 2007 had a factory 7-way and would only require the install harness part # 3050-P.
If somehow you didn't have the 7-way all you would need is the part # 118266 and you would have a fully functioning 7-way at the rear of the vehicle that would work well with the controller and harness I mentioned.
view full answer... - Best Electric Trailer Brake Controller for 2017 Nissan Titan
- Electric Brake Controllers are not vehicle specific so they'll work on your 2017 Nissan Titan. What is vehicle specific is the wiring adapter. The # 3050-P adapter is confirmed to fit the 2016 Titans but not the 2017 as of yet because it hasn't been tested. There wasn't a lot of changes for 2017 so there's a good chance it will work. Check under your dash for a harness that has a connector shown in the picture I attached.
For a brake controller I suggest the Prodigy P3 # 90195.
view full answer... - Options to Install a Brake Controller and Trailer Hitch on a 2013 Infiniti JX35
- We can provide you with all of the parts that you will need to install a trailer hitch, 7-way trailer connector and a brake controller on your 2013 Infiniti JX35, however none of the items will work with pre-wired circuits or plug-in ports on your vehicle. I spoke with my contact at Tekonsha and they have not guarantee that the Plug-In Wiring Adapter, # 3050-P will work on your vehicle. I also spoke with my local Infiniti dealer and they told me that the JX35 does not come with a port under
view full answer... - Brake Controller Wiring Harness for a Tekonsha Prodigy and 2013 Nissan Xterra
- If your 2013 Nissan Xterra came with a factory installed 7-Way trailer connector then yes, connector # 3050-P is the correct one for your vehicle and brake controller.
If the Xterra does not have the factory 7-Way or any trailer connector then you will need to add one. First you will need to install a 4-Way, # C56225. If the vehicle already has a 4-Way you can skip this step. Then you will need to add the 7-Way by using the 4 and 7-Way installation kit # ETBC7. I have included some links
view full answer...

Info for these parts were:

Expert Research:
Jackie C

Expert Research:
Mike L

Expert Research:
Robert G

Expert Research:
Michael H

Expert Research:
Jameson C

Expert Research:
John H

Expert Research:
Adam R

Expert Research:
Jeffrey L

Video Edited:
Zack K

Video Edited:
Jacob T

Written by:
Lindsey S

Video by:
Joshua S

Video by:
Dustin K

Video by:
Chris R

Video by:
Schuyler H

Updated by:
Laura H

Updated by:
Wilson B

Updated by:
Alexander C

Updated by:
Isabelle B

Test Fit:
Brent H

Test Fit:
Robert C

Test Fit:
Ryan G

Installed by:
Bradley B
At etrailer.com we provide the best information available about the products we sell. We take the quality of our information seriously so that you can get the right part the first time. Let us know if anything is missing or if you have any questions.
Product Experts Available Now!
Call 1-800-940-8924
Bill G.
6/4/2018
works perfectly