
Part Numbers: SS48GV,C31018
Thank you! Your comment has been submitted successfully. You should be able to view your question/comment here within a few days.
Error submitting comment. Please try again momentarily.

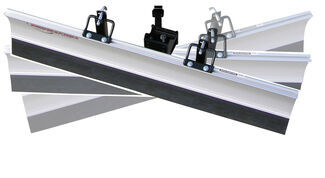
84 x 18 Heavy-duty plow with thick rubber cutting edge self-adjusts up and down to smoothly clear a path over concrete, gravel, and grass. Side scoops catch more snow with each push. Aluminum blade can be manually angled to either side.
Features:
Specs:
Installation is quick and simple - just slide included shank assembly into your 2" receiver and secure with pin.

Then lift the blade, one end at a time, onto the frame's holders and fasten with snap pins.
The SnowSport HD blade is mounted on an angled, 3-position shank assembly, allowing you to plow to the left, to the right or straight ahead.
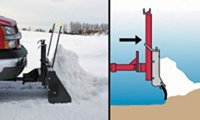
To plow, lower the blade and begin driving; no wiring or hydraulics are needed. The unique push frame on the shank assembly allows the blade to move along the grade of the terrain for easier, more efficient plowing. The heavy-duty rubber cutting edge is effective yet turf friendly, collecting snow and squeegeeing slush without digging into the ground.
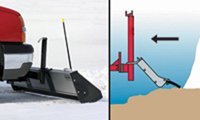
When you reverse direction, the blade lies back, skimming over the surface of the ground so that you can easily take another pass.
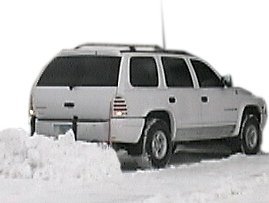
Once you're finished plowing, just lift the blade and refasten into the travel position. The blade is secure enough to travel at highway speeds, and the low-profile design keeps it from blocking your vehicle's headlights. Removal for storage is quick and easy. The plow can be used on the rear of your vehicle, making it a cinch to back out of your snow-packed driveway.
California residents: click here
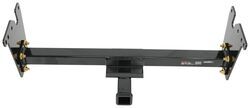
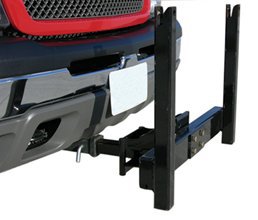
Easily attach a variety of accessories to the front of your vehicle with this corrosion-resistant trailer hitch receiver. Perfect for winches, spare tire carriers and more.
Features:
Specs:
At etrailer.com we're committed to the products we sell, and to our customers. Our experienced and knowledgeable staff are available via both phone and email to address your questions and concerns for the lifetime of your hitch. The technicians at etrailer perform hitch installations on a daily basis, making them a valuable resource for do-it-yourselfers. The one-on-one, personal service you'll receive comes straight from an expert in the towing and automotive field. We've installed it, we've wired it and we've towed with it, so whatever your question, we can answer it.
Videos are provided as a guide only. Refer to manufacturer installation instructions and specs for complete information.
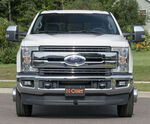
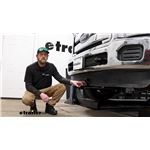
Hey everyone, Ryan here at etrailer, today under a 2016 Ford F-250 super duty. We're gonna be showing you how to install the Curt front-mount trailer hitch. Before we do that though, let's take a minute, check this out, and make sure it's gonna work for you. So by puttin' a front hitch on your truck, it's going to help open up your opportunities on what you're gonna be able to get done. People use these for a variety of different reasons. Some people use 'em for a winch mount, light-duty snowplows, things like that.
You know, you can push trailers around with it if you got a lot and move trailers around a whole bunch, put a ball mount in here and do that. But it seems like nowadays it's getting pretty popular to use different types of accessories on the front. You know, if you're pulling your camper or something around and you want to bring the family's bikes with you, you can put a bike rack in here. What our neighbor's doing today, they're using a spare tire carrier. So they keep their tire up here and still use their other accessories on the back of the truck.
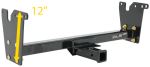
This hitch is going to work with trucks that have a diesel engine or gasoline engine, so, covered there. And it's only compatible with four-wheel-drive models. So keep that in mind, if you have a two-wheel-drive, not a big deal, there's other options available, there's a Draw-Tite and Eco Hitch. And just to compare this one to those, you know, with the Curt and the Draw-Tite, they're gonna be pretty similar in where they're gonna sit. You know, the thing is with the Curt though, it's kind of nice, you can have it where the receiver tube is gonna sit up higher off the ground for more clearance, or you can install it the other way around to where it's gonna hang down a little bit.
So, for those of you that might have a lifted truck where it's way up in the air and you'd rather it be down some, you know, you can always do that with the Curt. And then when it comes to the Eco Hitch, that one's gonna be kind of on its own. That one, the receiver tube is actually gonna be way up here in this opening. And they give you a plate where you connect your license plate to, and when you're ready to use it, you'll pull this piece off and have access to it. As far as the weight capacities go, it's gonna have a 500-pound vertical load limit, which will be the amount of weight pushing down on the hitch, and that's a pretty good number.
You should be able to use just about any accessory that you'd want to in terms of spare tire carrier, bike rack, something along those lines. It's gonna have a 5,000-pound maximum gross trailer weight rating. So something to think about, you know, if you are pushing trailers around, it's gonna be the weight of the trailer plus anything you might have in or on it, and it's going to have a 9,000-pound vertical line pull. So for those of you that might be using a winch or something like that, that's how much the hitch is gonna be able to handle. The opening of the receiver tube is going to be a two-inch by two-inch, which is a good thing, super common size. And the pin hole is actually going to be behind this plastic piece. Ours is broken, so we can kind of bend it out of the way and show you there. It's just gonna use a standard five-eights pin and clip, doesn't come with one, if you need one, not a huge deal, you can grab it here at etrailer. And you got a couple options really, if you set it up this way, you can always go in from behind there, put the pin in, that's probably what I would do. You could always trim a little more out to get access to it, or can completely remove this, or if you flip this, you know, if you end up installing this upside down, you have a little better access to it too. So, regardless of what you do, not really a big deal. You can still get to that pin hole. We'll grab a couple measurements now and these will help you figure out what type of accessories are gonna work best. So going from the ground to the top inside edge of our receiver tube opening, taking into account the lift that we're parked on, that's going to be about 15 inches. And just as a reference too, you know, since it is popular to put bigger tires on these trucks and lift 'em and everything, ours appears to be completely stock in terms of lift kits and things like that. And our tire size is a 285/60R18. So depending on what you got, these could vary a little bit. And if you go from the center of the pin hole to the edge of our bumper, or license plate rather, that's gonna be right at eight inches, and you can use that, if need be, to help figure out exactly if you are using a folding-style accessory, if it'll clear the front bumper. At the end of the day, a good all around front hitch, you know, it's capable and looks pretty good too, so, can't really ask for too much more. As far as the installation goes, pretty straightforward actually. You don't have to drill any new holes or nothin' like that, utilize all the factory openings, fish wire some bolts in there, and it's kind of nice that the hitch is three different pieces, right You got two side plates and then the center section. And so by loosely getting the side plates up there, you know it's a lot more manageable, you can manipulate a little bit more, and especially for those of you that are gonna do this by yourself, you know it's easier than taking one big hitch and trying to get it up in position and everything. So take your time, should be in pretty good shape, but with that said, why don't we go ahead and get started on it now. To begin our installation, we're gonna be here at the front of our truck, and we're gonna be workin' on each one of our frame rails right here in this area. And we're gonna have some brackets that we need to remove. Here's that bracket, and on each side of it you're gonna have two 18-millimeter-head nuts. So go ahead and pull all those out. And from this point on, whatever we do to one side of our truck, we'll also do to the other side. So, it'll be set up the same way. (impact wrench buzzing) Then go ahead, get this removed, get the hardware out. We are actually gonna hold on to two of these bolt plates and on the outside of our frame rail, we're gonna fish wire these back into the original position. So what you can do, take the coiled end of your fish wire, run it through one of those holes, we'll thread that on, and we can use that fish wire to help us pull this back into position. We can take our side plates now, and you can see how it kind of comes down and has this lip here. You're gonna want that to face towards the front of the truck. And how this is gonna work, these two holes are gonna line up with the bolts that you put in. So we can take, move our fish wire, run that through. Push those bolts through it. You can take the factory nut, get one started. And remove the fish wire. Another factory nut on it. And we're gonna have two more pieces of hardware to get in place there and there. So what I like to do, since this does have movement in it, is just take one of the bolts that they give you, kind of put it up into place like that, it helps hold it. We'll take our fish wire, coiled end, run it through there and we're gonna push that towards the front of the truck, and that fish wire comes out the front of the frame, you can take a spacer block and a carriage bolt, thread that on, feed that hardware up into the frame. We'll pull that through, and then remove the the fish wire there. Take a flange nut and get that started hand-tight. Pull that bolt out that we had in there, and I'm gonna do the same exact thing for that attachment point. Got our fish wire, even the same hardware combination. At this point you can determine what way you want the hitch installed. So you can have it to where the receiver tube is gonna be lower towards the ground, and it'll actually sit underneath this plastic fascia piece here. Or if you want more ground clearance, you can flip the hitch over and it'll sit up higher. But if you do that, you're gonna have to trim an area out on this fascia. That's what we're gonna do to maximize our ground clearance and so we can get the hitch roughly in position and figure out where we need to trim. If you can get someone to help you out with this, it'll make it easier. And we're gonna line our hitch up, and I'm just gonna put one bolt in this hole here, that way the hitch will be somewhat supported and we can get a better idea on where we're gonna need to trim. So what I did, and I was able to just kind of raise our hitch up and see where it landed on this plastic piece, and just kinda estimated where we need to trim. So I marked it, and I'll cut this out, we'll raise the hitch up and you know if you have to take a little more material out, not a big deal, you can come back and get that done. So, pretty thick plastic, I like to use a multi-tool to trim this out, but I suppose you could use a Dremel or a pair of snips, something like that. (multi-tool buzzing) So I was able to get this cut out high enough to where if you rotate the hitch into position it's gonna clear everything. And probably went up a little bit more than halfway up this. So now that we verified that, I'm gonna come back and clean up all these rough edges. Can use a utility knife or blade to kind of scrape it clean and make it look a little bit better. That opening cleaned up. You can get this raised into position, and all of the hardware that you're gonna use will be the same. Just a carriage bolt, push through there, and where it comes out the other side, put on a flange nut. Now you come back and snug up all the hardware. Factory nuts, we'll use our 18-millimeter, and for the new bolts, we'll use a 3/4-inch socket. And I'm gonna do the side plates first, and then come back and do the center section. (impact wrench buzzing) Now you wanna make sure and come back with a torque wrench and tighten down all the hardware to the amount specified in the instructions. With everything torqued down, we are good to go. And that'll finish up our look at and our installation of the Curt front-mount trailer hitch on our 2016 Ford F-250 super duty.
Average Customer Rating: 4.8 out of 5 stars (91 Customer Reviews)
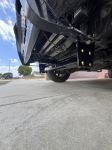
84 x 18 Heavy-duty plow with thick rubber cutting edge self-adjusts up and down to smoothly clear a path over concrete, gravel, and grass. Side scoops catch more snow with each push. Aluminum blade can be manually angled to either side. Easily attach a variety of accessories to the front of your vehicle with this corrosion-resistant trailer hitch receiver. Perfect for winches, spare tire carriers and more.I went with this hitch since I have an after market front bumper. I wasn’t sure if it was going to fit but since this hitch was a bolted connection it gave me 2 options to have a chance it would fit. One I received the package the box was damaged but all the hardware had been taken to the hitch, so everything was there. I installed the hitch by myself and took me about 2 hours but that was due to the aftermarket bumper and dealing with that hardware at the same time otherwise the install went smooth. Tha last phot is to show this hitch worked with this bumper.

Mounted this hitch about a year ago and really like it. We pull a fifth wheel camper so this affords us the ability to haul our bikes or kayaks(tall T stand) up front. Was easy to install and looks good to boot.
Great Front Hitch.
Installed in the upper position so I have plenty of ground clearance. Everything needed to install was supplied, they even supplied a very handy wire snake tool for installing the bolts in the frame, this made the install easy.

Scott

12/14/2020
The hitch works great! I use it for pushing my camper into its tight parking spot next to my garage, wouldn’t be able to get it there with out it. Also use it to put a bike rack on the front of the truck when pulling the camper.
Very Pleased with this Front Mount Hitch I installed on my 2016 F250 Super Duty.
EVERYTHING fit prefect and installation was straight forward.
I did this install myself (1 person), If you take your time, work smart, it is very doable for anyone that can turn wrenches.
Once the side brackets were bolted to the frame, I used a floor Jack to lift the roll & hitch into place. This makes it an easy 1 person job.
I wanted the Hitch in the "upper" position and a nice clean look, so instead of just notching the air dam as is suggested, I took my time and cut a square that allowed the hitch to pass thru from behind. The end result is an install that looks like it was designed to be there.
Also I placed painters tape on the air dam so I could use a black sharpie to mark up my opening and easily redo if needed. And yes I redid it a few times till I was satisfied with the planned location.
Lastly i was able to drill a hole in all 4 corners of my desired opening and then used a utility knife with a new blade to cut out the opening. Took my time and the results were worth the effort. I have and could have used a rotary tool, yet feel I have better control with a sharp knife.
Suggest watching the On-Line Install Video prior to getting started.
2012 install Video was the exact procedure for my 2016.
Working alone with no air tools, planning out the air dam opening location, and just taking my time, it took about 2.5 hours to complete the install......
This item is everything it's claimed to be. Very well designed, great finish and perfect fit. Installation is easy (for one person) however I recommend watching the installation video for the "Tech Tips" which proved very useful. In the video the truck is on a lift which is ideal, however when working on the ground, space is limited when using a long handle torque wrench.
A couple additional tips I found useful are:
First, drive onto ramps for the extra clearance when using the torque wrench.
When re-using the factory nuts and bolts (18-mm in used front two holes of frame) use 2 of the supplied fishing wires together on the bolts; this keeps them from falling away from the frame while lining them up.
Use an 18-mm ratcheted box wrench to remove the inner bolts on the passenger side of the frame when removing factory tie-down brackets
For the receiver extending thru the air dam I wanted it to extend thru a hole and not cut out a notch for a factory look. I covered the area with blue painters tape. I measured up from the bottom 4" and marked the tape; took a straight edge and marked tape up from the sides of the receiver tube to mark a 3" square.
Next I outlined the 3" square with green painters tape to outline the cut-out area. I used a sharp utility knife to make the cut. Take your time and it cuts very easily. (save the cutout plastic)
After installing receiver you can trim the saved cutout to fill in any opening at the bottom. I used with JB Weld to glue the trimmed piece back into place.
Install a receiver cover for a clean finished look.
All this took 2.5 hours without any extra hands.
Thanks etrailer.com!
2014 F-250 FX4. Ordered this hitch on Friday, and received it on Tuesday. Instructions were simple, it took less that 2 hours to install. It made backing my boat around a corner and into my carport easier than I had hoped. I shoulda installed a front-end hitch a long time ago. My initial concern was losing ground clearance, but the brackets only extend below the air dam by about 1/2".
This fit perfect and e-trailer’s video was easy to follow for the install. Did it myself in a couple hours. Just used a block of wood to help hold up the center section when I was installing it. Installed in the higher position so had to cut a hole in the plastic trim. 2011 f350 crew cab 4x4.
This hitch fit my truck perfectly and was easy to install. I use it for a front mounted e-bike rack and have no complaints.
Great fit. Easy installation. I use it all the time for winch and Motorcycle hitch carrier.
Great product, good installation vieo, perfect fit!
Just installed the Curt front hitch on my 2015 F250 4x4. Easy as pie took about an hour everything fit perfect 100% satisfied.
Exactly what we needed. I ordered this with a short timeline before we were headed out on a big family road trip with our ebikes. We used this to hold the Hollywood Ebike rack in front of our F350. Perfect Fit! This item just barely made it and George J at e trailer made it happen! Thank you from my whole family! This was straight forward to install, the videos are what make it so! and the unit is strong and compact. You almost don't know its there when not in use, exactly as I hoped. The customer service was amazing! I WILL BE BACK to buy from this company,(as I have many times before) they know what it means to take care of a customer. Thank you!
Fit my 2015 Ford F350 perfect. Holds my bike rack so the bikes can go with me when the slide -in camper is on the truck. Mounted with the high mount and cut the cowling for the hitch to fit through. Had to work at tightening the nuts with the torque wrench in the limited work area under the truck. This is the second truck I have put a front receiver hitch on.

Ken
10/5/2014
Did you have to remove the air dam? I have a 2015 f250 2wd.Looks like the Curt mounts lower than the Reese model.Thanks!

Dave C.
10/7/2014
I did not remove anything. My truck is 4WD which might make a difference. I mounted the hitch against the front cowling and cut it out with the hitch pressing against the plastic cowling, afterword. I didnt start out to do that, it just seemed to work after tightening the bolts enough to see where the hole was going to be.
My Curt front mount hitch arrived today and as expected, it is build solid. I’m waiting on weather to install but from the instructions installation seems to be very straight forward as are all the products I buy from etrailer. I value the instructional videos and help from their account managers as much as I do their products.
So far, so good. Very easy to install. My buddy and I did it in under one hour. Put it in the lower position on my F350 and didn’t need to cut the air dam. Using it to carry my Honda Trail 110 when camping in the 5th wheel. Shipping was supposed to take about 7 days. Arrived in 3 days!!! Super happy with that.
The C31018 front hitch for my Ford F-250 fit perfectly. The instructions were clear and brief and the hitch went on without a HITCH. I did not have to remove the front fascia whchi saved me sometime and avoided damaging the mounting hardare Unfortunately the installation of the Curt spare tire carrier C31006 did not meet my satisfaction at all. I intended to mount a bran new spare tire with the Alclad finished and King Ranch Logo but could not due to the improper design for my Ford F-250. I ended up using my steel spare tire with the inward side out and the addition of self fabricated would spacer. I had to settle for an ugly appearing spare tire that hangs out front at an awful angle. I expected that the Cure Spare tire mount would be designed to Fit.. Included are a few picture of what I hoped to have and what I ended up with. If you have a spacer available to mount my original chrome clad spare tire with the clad side facing forward, I would very much getting some information on that device. The poor rating is for the spare tire mount. The front hithc was excellent.
Fast delivery
Snowsport PlowEtrailer.com does it right from start to finish. On top of having a great web site, the staff are the best.
Keeping in mind, I ordered this in December, about 5 days before our first big snow, here in Ohio. Within an hour of ordering my SnowSport HD plow, I was upgraded to special priority shipping, that was a nice surprise! The plow arrived in about two days, in three boxes, as I ordered the front hitch at the same time. I feel bad for my UPS carrier, these boxes were not for the faint of heart. The assembly went smoothly, the manufacturer uses high end parts and everything is well marked and the instructions are easy to follow. I estimate it took me two hours to get everything put together, with a coffee break in between. I am impressed with the construction, wow. Heavy duty is right!
We had four inches of snow yesterday. I opened the garage door and went to work, two pushes to clear the parking spots, and one easy push down the two hundred foot gravel driveway. Like butter.
I was done. It took less then 15 minutes. I put this blade on my 2003 rear wheel drive, not 4x4, Chevy Blazer. I backed into the garage and it looked like I had just put the blade on, this blade could last a long time. I love it. I cant wait until we get a foot or more of snow, my wife wants to plow next time. Plus I have cable chains comming from Etrailer, they should be here any day. Just in case my two wheel drive has tracktion problems in the deeper snow. Thanks a bunch, Etrailer!
We installed this on our 2011 Honda Ridgeline and a week later it snowed... And snowed.... And snowed.. 5 feet in 24 hours ( we live on the lake near Buffalo) and it's still snowing... This wasn't good, it was AWESOME! It was an easy install and assembly and worked absolutely perfect! We have a tough driveway and this kept it clear with no issues, no problems and we used it all day and night! When you spend that much on something you've never even seen before you can have reservations... It's worth every penny. It's solid ( more than we thought it would be) and does the job with ease. No .. It's good, but...... It's exactly as advertised and etrailer not only had the best price, the communication with my order was exceptional. Now... If only the town could send a plow down my street.....
Can’t beat the Curt’s brand, always top of the line and made in the USA putting Americans to work. Sure it a few dollars more but no comparison to the cheaper China crap. Which do you want to put your trailer or anything else behind or in front of your truck? Comes with grade 8 bolts and detailed instructions. Took about a hour to put on and I didn’t pull out the impact, hardest part is cutting the plastic front air dam so it looks good and not like a 3 year old did it - just caulk around it with black adhesive silicone to get a nice look when your done. (2016 f250 perfect fit)
Ken
9/19/2019
It’s still looking fantastic, does the job
Easy to mount. It my wife and me less than an hour to install it in the driveway with hand tools.
I had a few hiccups while assembling (over tightening things early, I think) but once I got it together it’s been awesome. Clears easily and efficiently. Have used to clear as much as 14” of snow (that required pushing off to the side more often) but once you get used to the technique this thing is a lifesaver. I can clear a 300’ long driveway in 15 minutes or so for an average 4-5” snowfall.
very easy to install, directions were clear and accurate. Gives just the proper amount of clearance to slide my 9,000 lb winch into place. ground clearance reduction is very minimal. i didn't want to trim my front fascia to gain the extra inches so mounting it in the lower space made the install much easier and quicker. looks like a factory installed piece.

Ed G.
8/4/2014
Which hitch has the most ground clearance the Curt or the Draw-Tite?

Love it. Perfect fit and easy to install.
We haul a 41' fith wheel around and have a pair of electric bikes. Initially we carried the bikes on the back of the 5th wheel, but they bounced badly as we drove down the highway. The bikes are 70 lbs each plus the carrier and the trailer hitch was only rated for 150 lbs.
The front end receiver is rated at 300 lbs and our bikes ride beautifully. I added an 8" receiver extender so I could easily remove our bike carrier for normal city driving.
Easy instructions and easy to install. End result is amazing we put one of our pretty sizable Ebikes on the front and one on the back
Ask the Experts about this Snow Plow
Do you have a question about this Snow Plow?
Info for these parts were:
At etrailer.com we provide the best information available about the products we sell. We take the quality of our information seriously so that you can get the right part the first time. Let us know if anything is missing or if you have any questions.
Ford F-250 Super Duty Accessories


Dan
6/12/2022
We love it! Great solution.