
Part Numbers: 90885,3035-P
Thank you! Your comment has been submitted successfully. You should be able to view your question/comment here within a few days.
Error submitting comment. Please try again momentarily.
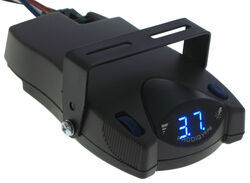
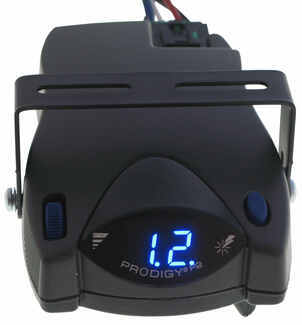
This proportional brake controller keeps it simple with intuitive controls that are easy to use. Includes a large, digital LED display, 3 boost levels, battery protection, and continuous diagnostics.
Features:
Specs:
You can adjust the gain (also known as output) with the thumbwheel on the front of the controller. Gain lets you set the maximum amount of power that will be applied to your trailer's brakes. A heavier trailer will need more power to achieve smooth, safe braking, while a lighter trailer will need less. Typically, the gain is only readjusted when you experience changing road conditions or if the weight of your trailer changes.
The boost setting controls the aggressiveness of your trailer's braking, meaning how quickly the brakes reach the maximum braking level. You can adjust this when you're towing heavy loads and you need more umph to bring your trailer to a stop. Your tow vehicle doesn't need that much power to brake in time, but your heavy trailer does.
Depending on the level of boost, your trailer brakes can start at either 13 percent or 25 percent of the set gain. What this means is that, instead of starting at 0, the brakes will start at 25 percent and get to100 percent sooner. This keeps the trailer from pushing your tow vehicle forward.
If your trailer weighs less than your tow vehicle, no boost is needed. But, if you want your trailer to lead the braking, you can select level B1.
Boost Levels:
| Approximate Gross Trailer Weight | Boost Level | Increase in Initial Power Output |
|---|---|---|
| Less than tow vehicle GVW | B1 | 13% |
| Equal to tow vehicle GVW | B1 or B2 | 13% or 25% |
| Up to 25% more than tow vehicle GVW | B2 or B3* | 25% |
| Up to 40% more than tow vehicle GVW | B3* | 25% |
*Both B2 and B3 offer a 25-percent boost in initial power. But the braking curve for B3 is more aggressive than that of B2. This means that, even though you will start out with the same intensity when using these boost levels, you will get an overall more aggressive braking experience with the higher level. So if you use B3, you will reach maximum braking sooner than if you use B2.
Safety Features
The Prodigy P2 offers key safety features to prevent damage to various components of your towing setup. Integrated reverse battery protection shields the brake controller and your trailer's breakaway system from shorts. When the P2 is not in use, it will be in power-saving mode. In this setting, it draws only 3.6 milliamps, minimizing drain on your vehicle's battery.
The P2 also comes equipped with a hold feature to prevent wear on your brakes. When you're waiting at a red light, you don't need your trailer brakes on at full power. The longer you sit there, the more they will overheat. But with the P2, any time your tow vehicle and trailer are at a standstill with the brakes applied for more than 5 seconds, the hold feature will kick on and reduce power to just 25 percent. This will keep your trailer in place while saving your brakes.
The P2 keeps the manual override within easy reach, great for stopping sway or controlling your trailer's momentum in emergencies. To engage the manual override, just twist the rotary-style lever from right to left. This will activate the trailer's brakes and brake lights without you having to apply the brakes on your tow vehicle, perfect for limiting trailer movement while you're cruising.
The Prodigy P2 also offers diagnostics such as:
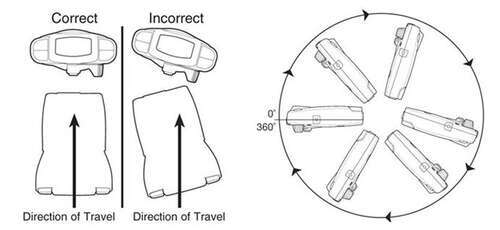
The self-leveling feature of the P2 ensures that the brake controller continues to function even as you drive up steep hills or through the mountains. Simply mount it in your cab at any vertical angle, and the controller will level itself automatically thanks to its 360-degree rotational range. This makes the installation that much easier. But keep in mind that the P2 must be horizontally level and parallel with the direction of travel to work correctly.
Installation is a snap. After mounting the P2 unit in your cab using the included bracket, hardwire one end of the included pigtail harness directly into your vehicle. The other end plugs into the brake controller. To remove the P2 for storage when you're not using it, just unplug the unit and slide it out of the bracket. With a replacement wiring harness (sold separately) and replacement bracket (P7685 - sold separately), you can even transfer the Prodigy P2 to another vehicle.
Installation Accessories
For even easier installation, a vehicle-specific specific wiring adapter is available for most newer trucks and SUVs. One end of the custom adapter plugs into your vehicle, and the other end plugs into the controller - no hardwiring required.
See also etrailer.com's exclusive 7- and 4-way brake-control installation kit (ETBC7 - sold separately) if you don't already have a 7-way plug at the back of your vehicle.
Note: If a custom brake control wiring adapter is not available for your vehicle, one of the following will be required:
20-Amp circuit breaker (9506P - sold separately) for 2- to 4-brake applications
30-Amp circuit breaker (38630 - sold separately) for 6- to 8-brake applications

The Tekonsha Prodigy P2 brake controller comes equipped with proportional braking to give you the best towing experience. Proportional braking means that your trailer brakes mimic your tow vehicle's brakes. If you slam on the brakes in your vehicle, your trailer brakes will activate with the same intensity; if you brake lightly, your trailer brakes lightly too. The trailer's braking is in proportion to your vehicle's braking. This saves wear and tear on the tires and the brakes on both your vehicle and trailer.
The Prodigy P2 uses an internal inertia sensor to detect how your vehicle is braking so it can send the right amount of braking power to your trailer. It measures the inertia of your tow vehicle and activates the trailer's brakes to slow at the same rate. The result is uniform braking across your towing setup. No push-pull action - just smooth, proportional braking every time.
California residents: click here
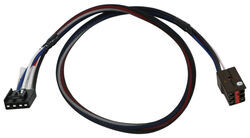
Install your electric brake controller quickly and easily with this custom wiring adapter. Simply plug one end of the adapter into your brake controller and then plug the other end into the built-in harness beneath your vehicle's dash.
Features:
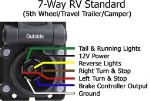
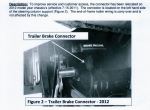
For most applications, the factory plug is located beneath the dash, near the center console. If you have a Ford full-size van, the harness is underneath and to the left of the steering column. The Ford Explorer and Mercury Mountaineer have 6-pin connectors behind the glove box on the passenger's side. On a Ford 2010 Flex, the connection point is under the front edge of the dash directly below the steering column. On a 2013 Ford Explorer, the connection point could be behind the driver's side kick panel. On a 2014 Ford Explorer, the brake controller port is located by the steering column.
To install your electric brake controller you need to connect the wiring of the controller to your vehicle. Certain manufacturers offer pre-wired options, typically known as tow packages, wherein these wires are run for you from the dash to the trailer connector on the back of your vehicle. Often, a brake controller wiring harness is included with your tow package. This harness plugs into a port beneath your dash and connects to the four wires of the brake controller. If, however, you have a brake controller with a plug in place of the four loose wires, you can use the Tekonsha adapter.
This adapter requires no hardwiring. It is designed to plug directly into your electric brake controller for the simplest installation possible. Because there are no wires to connect, installation is not permanent. You can unplug and remove your brake controller at any time and securely stow it away.
California residents: click here
Average Customer Rating: 4.9 out of 5 stars (4381 Customer Reviews)
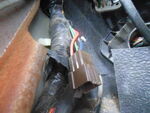
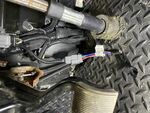
This proportional brake controller keeps it simple with intuitive controls that are easy to use. Includes a large, digital LED display, 3 boost levels, battery protection, and continuous diagnostics. Install your electric brake controller quickly and easily with this custom wiring adapter. Simply plug one end of the adapter into your brake controller and then plug the other end into the built-in harness beneath your vehicle's dash.I purchased the brake controller and wiring harness from you all and installed it watching the video on your website. I followed the instructions to an absolute T. Got everything ready and tested the product and got an SH error code for the blue brake wire shorting out. I pinned and measured resistance and everything was coming back fine (4+ ohms resistance). I then hooked a power prope to it to find the short along the frame and nothing. I had power from the female connector all the way up to the brake controller. After 4 hours of troubleshooting, I found that the female trailer connector was shorted internally. See the attached picture. The blue and green ring terminals inside of the female trailer connector were touching. Replaced the trailer connector and now all is well.
I had a Prodigy P2 controller in my last pickup and was really pleased with it. So wanted to install the same thing in my newer truck Everything worked smoothly on installation. Made the necessary adjustments to controls after hooking to the trailer and it works great!
I ordered the trailer brake adapter harness for my 2010 full size Range Rover.
It fit great and its well made to do the swap,
for others that will read this here is how.
I found the brake connector in the truck was hidden behind the fat harness thats next to the inside left kick panel, just behind the hood release panel
By pulling on the OBD 2 wire harness, I found it was tied to the OBD harness.
Some say that the connector is on the left side of the steering column , in my truck is was on the far side of the fat harness so it was hard to see.
I had to remove the left side console, I removed the screw, then pulled the bottom of the wood panel towards the left door, the 2 pins released, then the panel slides to the rear of the truck to dislodge the top pin.
5 screws secured the lower panel , remove the lamp ,unplug it,
then remove the OBD 2 connector from its mount , slide the gray collar to the left kick panel then the harness pushes up out of its holder.
Plug in your new adapter harness for your trailer brake controller,
Assemble is the reverse of taking it apart.
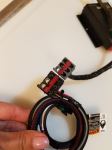
in the picture the new harness is connected to the gray connector
I ordered a Draw-Tite 5535 Brake Controller & adapter cable 3035-P from etrailer for my 2011 Ford Holiday Rambler F53 Chassis RV to tow my Tow Dolly with electric brakes. I ordered the parts on Saturday and received them on Thursday using economy shipping rate which was great. I received just what I ordered and installed them today (Friday) everything worked perfect and the install was very quick and easy.
0543.jpg is my Brake Controller 5535.
0544.jpg is my Adapter Cable 3035-P.
0548.jpg is a picture of the Ford Factory cable in the RV.
0535.jpg is a picture of the end of the Ford Factory cable that the Adapter Cable 3035-P plugs into.
0550.jpg is a picture of the Brake Controller 5535 installed to the right of the steering wheel.
Lester

3/16/2020
Great no problems, Plug & Play made a hard job easy.
This is the second one I purchased. The first was 10 years ago and installed in my 06 GMC. It has worked flawlessly allowing for safe and smooth stops from normal braking to a few of the panic stops that had to made over the years. The new owner of the truck likes the way it works too. I have multiple trailers and with one initial setup on the lightest trailer was able to tow all of them without changing anything but the boost setting to compensate for the different trailer weights.
When needing for a controller for my 07 Silverado there was no other unit that would fill the bill. This P2 looks the same except for the blue display instead of the red. The install took 20 minutes using the direct fit cable ordered with the controller. Setup was easy as with the first unit. I wanted the placement above the parking brake pedal so the OBD II connecter had to be moved. I did the same with the 06 GMC. It is a comfortable place to reach and it keeps the light away from the passenger's eyes at night.
As good as the Tekonsha controller is it is even a sweeter deal buying it from etrailer. The quick shipping, excellent pricing and knowledgeable staff are second to none in customer service.
Installed this in my 2015 Jeep Wrangler Unlimited Sport. I thought that I would add some input on installation that would help others.
I found a way to route the power distribution wires in the frame of the Jeep that did not require the use of a fish tape. If you look at the frame just behind the rear tire you will see a hole in the face of the frame. Start pushing the wire bundle foreword. It will rise up and over the U shaped frame portion of the rear axle and then down along the passenger compartment area. About there, you will be running out of pushing stiffness. Look for the wire bundle to appear at a similar hole in the frame in that area. Grab it a and pull out approximately 4 feet and then push it right back in the same hole going foreword. This time you will look for the wire bundle to appear at again a similar hole just foreword of the driver compartment. Now is the time to grab it and start heading up to the engine compartment outside the frame. Do the same procedure for the wire going aft for the plug end of the installation. For the wires going through the firewall, Jeep has conveniently added a nice foam lined hole to route wires through. You will see this hole position in the attached photo with a green wire coming through. The plastic cover around the steering column pulls down from the top and hinges at the bottom. Remove the metal plate with two bolts to get to the brake switch. Twist and pull the brake switch out foreword and go for the brown stripped wire as your brake circuit. Do order the LONG frame bracket adapter for the switch plug at the rear. To drill the steel for the supplied plug bracket just takes too long. Now that you have it installed you will notice that the power will remain on the unit after you turn the key off. Don't sweat this as it will not stay on long. I doubt a few milliamps draw is going to kill your battery!
Multiple products which I purchased from Etrailer to upgrade my Capri Rodeo truck camper. The steps are well made, easy to setup, and extremely helpful in entering and exiting. I set them next to the door when travelling. The trailer brake controller smoothed out the jerking that was a problem for far too long and simple to install. The vent cover was definitely needed as the original had a hole in it. The removal and replacement went well.

Ron G.
11/21/2019
All the items are quality products and still working well.
I'd ordered the Tekonsha Prodigy P2 Proportional Trailer Brake Controller (1 to 4 Axles ) on a Monday with a Wednesday delivery date of two days, as I'd specified. I have a Lincoln Navigator that had the factory installed heavy tow package. I had also ordered the adapter connector for Prodigy P2 controller to the Navigator's factory plugin. The entire install took me 15 minutes. I found the video review of the controller quite helpful as it demonstrated how to static set the controller's setting before drive trials and how to set the "boost" settings. Good price and very easy to install.

Michael M.
8/23/2019
The device is still working as advertised!
Connected to factory wiring and to Tekonsha Prodigy P3 Trailer Brake Controller without any issues.
The online video showing the installation of the Prodigy P2 trailer brake control into a 2011 Ford Ranger was excellent! It made the installation into my Ranger simple and straight forth.
I have yet to hook up to my travel Trailer and adjust it for brake setting, but all readout displays thus far are as stated in the instructions.
Having previously installed the trailer connector, I did not purchase the installation kit and in retrospect for cost effective and simplicity would recommend anyone to purchase the kit along with the controller.
I believe I am going to be very pleased with this product.
Thank you
I have a Tekonsha controller on my 2001 Chevy Silverado and it worked like a charm for over 18 years.I'm sure that the new Prodigy P2 will do the same.
I haven't towed with the it yet. But installation on my 2007 Ford F150 was pretty simple. The plastic panel I attached it to had steel behind it. So I removed the plastic panel, mounted the bracket, then trimmed the excess length off the screws, and reinstalled the panel. The wiring harness plugged right into the truck's plug under the steering wheel. It seems like a great product, and having the specifc wiring harness for my truck made it simple to install. Sheila was very helpful too. Thanks.

Stephen
11/25/2018
Ive been using it now for a year. It works great!
very nice controller, very smooth and you don't have to mount it flat!! e trailer is the best company i ever worked with. they have pics, video, email support(exellent) and just flat out make it easy for you to do it yourself instead of paying some dirt bag $300 to install at your local trailer shop. i also installed kit #ETBC7 and once agian it was awesome. COMPLETE with DETAILED directions. i'm not a mechanic or hack employee at local trailer shop....BUT dealing with etrailer and there parts made my install very easy and CLEAN!!!

the controller has great reviews, I got it because my factory controller wasn't working well with the new camper that has electric/hydraulic brakes and I was experiencing a 5 second lag for the trailer brakes to come on. this controller works better with a 2 to 3 second lag, need to try a couple different combos on settings, have the boost at 3 (per recommendations) and gain at 2.5 and under hard braking it locks up the trailer tires. going to try boost on 2 and bump up the gain and see if that works better.
Been one year of ownership now and this controller has performed very well. I would by again for sure.
Great product! Since I pull my goose neck with electric brakes, with my semi truck tractor, it acts as a interface between the air brakes and the electric trailer brakes, and acts as a Johnson bar if I need to get the trailer back under control.
Great product, very easy install especially with the OEM harness. In about an hour had it installed and trailer set up with controller. Thanks,
Greg
I didn’t have a good location that was reachable while driving so I mounted the controller on top of the dash. I leveled the bracket with a spacer and ran the harness by an access panel. I used about 70’ of the duplex wire due to running the cable to front and then back to the house batteries inside the coach.
The access panel made it easy to make the connections and run the wires through the firewall.
I mounted the 40 AMP and 30 AMP circuit breakers up front in the main fuse panel box. I drilled a hole through the box and firewall to run the wires from the brake controller to the breaker and to the blue wire for the tow connection at the back of the coach.
I ran the battery connections to my house batteries up front instead of using the engine batteries in the back.
I found the brake connection wire under the coach in front directly below the brake pedal.
I mounted the converter in a beam in the back with lots of zip ties
Worked out perfectly for me, super easy installation with adapter harness. Work's flawlessly, easy one hand gain control with control's on front. My truck had nice cubby it fit in so out of the way and seamless look. Thanks for a great product and service.

Tom
6/14/2022
Working great, easy install
Great Brake Controller This was my first time using a brake controller and installing one as well. The directions were easy to follow for both the install and setup.
2012 Ram
Used in conjunction with harness kit for my 2002 tundra, this year has no provisions for towing trailer with electric brakes.
The controler itself has proven itself nicely, with no issues with installation or use, adjust easily.
The mounting location I chose may have some slight interference issues with legs on taller people, but I have not had any @ 5'11". The truck is a midsized so room is more limited. I'm towing a tandem 14' trialer with 4 seat RZR, tracking and stopping is perfect, even under hard breaking.
The harness coupled into truck fitting as shown.Installation was easy. Looks nice on dash-board. All-around well made product.
The Tekonsha Prodigy P2 Brake Controller arrived on time and is just what I needed. The installation and operating instructions are easy to understand and should make installation a breeze. I'll give an update after I get it installed.
Easy plug and play installation on my 2007 Mountaineer. So much better than having to wire the whole thing myself.

Wayne S.
8/19/2022
Still working just fine. The Tekonsha controller and adapter performed fine on a long tow from NJ to OK and back last year, and I suspect they will continue to work just fine in the future. Definitely the way to go if the factory wiring is present.
Excellent Company to do Business with, Very Easy Transaction, Shipment very Fast, Tracking was fantastic, I Will Definitely do Business A, All Around a Pleasurable Buying Experience....
Ask the Experts about this Trailer Brake Controller
Do you have a question about this Trailer Brake Controller?

Info for these parts were:
At etrailer.com we provide the best information available about the products we sell. We take the quality of our information seriously so that you can get the right part the first time. Let us know if anything is missing or if you have any questions.


Stan K.
3/12/2018
This harness works as it should, a good product,