
To see if this custom-fit item will work for you please tell us what vehicle you'll use it with.


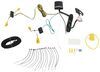
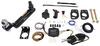
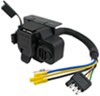
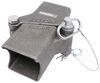
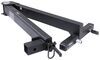
This fully welded trailer hitch receiver bolts onto your vehicle's frame with no welding required. Matte black, powder coated steel is durable and corrosion resistant and creates a rugged look.
Features:
Specs:
The sturdy steel construction is protected with a matte black finish for added durability. This unique powder coating gives etrailer hitches a carbide-like appearance and a rugged look that sets them apart from traditional glossy hitches. In addition to being rust and corrosion resistant, the tough matte coating hides dirt, scuffs, and dings better than a glossy finish.
At etrailer we're committed to the products we sell, and to our customers. Our experienced and knowledgeable staff are available via both phone and email to address your questions and concerns for the lifetime of your hitch. The technicians at etrailer perform hitch installations on a daily basis, making them a valuable resource for do-it-yourselfers. The one-on-one, personal service you'll receive comes straight from an expert in the towing and automotive field. We've installed it, we've wired it and we've towed with it, so whatever your question, we can answer it.

Videos are provided as a guide only. Refer to manufacturer installation instructions and specs for complete information.
Hi, John with Etrailer. Today we're taking a look at Etrailer's Class III Receiver Hitch. We've installed it on our 2018 Mercedes-Benz GLC 300. So let's take a closer look at the Etrailer hitch, how it fits on the Mercedes, and some of the features of it. What we're looking at is, it's gonna be powder coated a flat black. Unlike some of the other trailer hitches out there that have a gloss or a semi-gloss finish, this one's flat black.
It makes it disappear under the car. And I kind of like the way that that looks on these Mercedes. This is gonna be a hidden cross tube style, which means you're only gonna see this receiver portion under here. Everything else is kind of tucked back behind the fascia. Now, this is a class three receiver hitch.
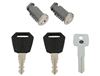
That means the opening here is gonna be two inches by two inches, and our hitch has a reinforced collar on it. That's something that I like. Now keep in mind when you buy this, it's just gonna be the hitch by itself. So if you're new to towing, you're gonna have to pick up a pin and clip. This one takes a 5/8 inch pin and clip.
We have these available here at Etrailer. We also have locking styles if you're looking for more security. Also, if you are in the market for cargo racks and bike racks, a lot of those accessories already include a pin and clip or an anti-rattle device. So just keep that in mind as well. This has a wire loop type chain hanger, and this is plenty of room for your standard S hook style, or even this heavy duty clevis style fits in here nicely.
Now, speaking of accessories like bike racks and cargo racks, let's get some measurements and see how they fit on the Mercedes. From the ground to the top of the inside collar, we're looking at 11 inches. And then from the center of the pinhole to the edge of our fascia here, we're looking at five inches. Now, these numbers are important if you are looking at, say, a ball mount, if you're gonna be doing some towing. You're probably gonna want one with a rise to it to help keep your trailer level. Or if you have accessories like bike racks and cargo racks that have a stowed up fold position, you want to know that those aren't going to impact the back of your fascia here. So let's talk about some of the weight ratings of this hitch. If you're looking for a high-capacity hitch, this is gonna be it. The tongue weight rating on this one, 900 pounds. That's some of our biggest numbers here. And that's gonna be the force pushing down on your hitch. So that's gonna be great if you've got a cargo rack that you wanna load up, or one of those big bike racks, multiple bike racks. As far as the gross trailer weight rating, if you're into towing, we're looking at 6,000 pound gross trailer weight rating. That's gonna be the force pulling on the hitch. Now, this is gonna be the weight of your trailer plus anything that you put in it or on it. And of course you wanna check with your Mercedes owner's manual to find out how much weight you can actually tow. All in all, I think this hitch is a great fit on the Mercedes. As far as installation, what's it like to install this hitch on this car It does get a little bit involved. You're gonna be removing this lower part of your fascia. So if you haven't done that before, that might just be one of your hurdles. There's no drilling, there's no trimming of the outer fascia here. You have to trim some sheet metal underneath the car. That's really not that big of a deal, but everybody's skills are a little bit different. So if you want to see how to install this hitch on the car or what it would take for a shop to install this hitch on your car, stick around, we're gonna go pull it in the shop, and we'll show you. Now to begin our installation, we're gonna come underneath the rear of the Mercedes here. We need to get these chrome tips off. Now, you're gonna need a T-40 socket. You're gonna have two torque screws that are holding these on. (tool whirring) Now once you have the screws out, you're gonna have two tabs. If you back it up slightly, you're gonna have a tab here, and then one over here in this corner. So to get these out, it's a little tricky. But we want to clear this out. These are the tabs I was talking about. So go ahead and get this done on both sides. Have a cam buckle tie down strap, and we could put this and hang it up on the coil springs on the rear, because we don't want the exhaust to hang on its own, it could damage it. Now we've got ours up in the air, that's why we're using this strap, and that's great. If you are on your driveway and you've got the back end up on some ramps or something like that, you can just get a block of wood or whatever you need just to support the exhaust just so it's not hanging on its own. So on either side, we're gonna have a total of three rubber isolators that we need to get loose. And I have silicone spray. You can use soapy water too. But the key to this is to get the lubricant inside, 'cause it's gonna make a big difference when it comes time to loosen these up. So you're gonna have one on the driver's side here. You're gonna have another one on the passenger side over here. Just soak these things. Like I said, soapy water is just fine too, just as long as it gets in there. And then if you follow the exhaust down, you're gonna have one more here at the rear axle. I like to kind of pull down on the exhaust to kind of loosen up and get that lubricant in there. Now, you can take a pry bar and just pry on this bottom flange on this muffler, and this should come off. So we got the one. Now keep in mind, I've got this strap tightened already. And if they don't want to come off, try a little bit more soap and water on it. That really just makes the difference. Okay, so our exhaust is loose. Just gonna lower the strap down slowly. And that's gonna give us the room we need. Now you wanna grab a 10 millimeter socket, and you're going to have three 10 millimeter screws on each side that we need to remove. You can start up here by the wheel well. (tool whirring) Move straight back. There's another one on the heat shield. (tool whirring) Now our car is missing some fasteners today. You may have a push pin fastener that goes right here. We didn't have anything. But the third 10 millimeter screw that we need to get is actually right here on this side. (tool whirring) Towards the middle, and it's the same as the other ones. Now, you have the same exact setup on the passenger side as well. Now open up your rear hatch and get your floorboard out of the way, which is what we've already done. Grab a T-30 socket, and we're gonna have a T-30 screw here that's gonna be holding this rear scuff panel in. (tool whirring) Once this is out of the way, then you can start by prying gently on either side. You're gonna have plastic clips that are all through here holding this down. Set this off. These are the clips. We'll be pulling these out and putting them back in this to snap it back down. The reason we're doing this is there's a wiring harness. If you're gonna see a tiny little tab at the edge here. I'm gonna push down on that, and that'll disconnect our harness. And if you follow that down, you'll see a grommet here. Just kind of peel it and push it with your fingers and feed it through. Next you can turn your attention to this wheel well trim. We need to get this out of here. Now it's gonna have, you'll start at the bottom here. It'll have a tab, and then you're gonna have these clips here. If they're giving you trouble, you can just use a trim panel tool and you'll be pushing down near where this center clip is. That's what holds it up here. This one came off pretty easy. Sometimes these will give you trouble. Now if you fold back the inner fender well on the inside here, we're gonna have another push pin fastener. It's gonna be right here on the inside, but it's facing down. It's gonna be kind of tough to show removing that on camera. So just know it's right here. Okay, we got this out of the way. That's just connecting the two panels together. Once that's done, you'll notice I have blues painter's tape here. This is just to protect the paint from any scratches. You can pull out on this lower fascia, and it's gonna be the same types of clips as up here on the wheel well. So just pull out on 'em And probably gonna need to use your plastic trim panel tool and just work your way around. Now, once you have that done on both sides, you're gonna take your wedge, and you can start by pulling out on this rear fascia. This is gonna have the same types of clips as the fender well trim. So just kind of get in there, and I'm keeping constant pressure, just using the corner of this wedge to dip down. Okay, now, you are gonna have a wiring harness around right here that we need to disconnect on both sides. So don't pull too hard while you're doing this. I'm reaching up from the bottom. If you follow this electrical cable right here, you'll come up to a plug. And that's what it looks like to disconnect it. You have two tabs on either side. I just pinched it and pulled back. So this is gonna be the same for both sides. And you can just continue working your way along the back edge, and just keep a good grip on it as you're working your way across. And like I said, this wedge is probably one of the best ones to use on the Mercedes, especially on the back side back here, 'cause it will unclip these pretty quick. There we go. Carefully pull it back. Remember this is the harness from inside. You wanna be careful. That's why we like to push it through first just so it doesn't catch on anything. So once you have this disconnected, set it off in a safe place. Now we need to remove the rear heat shield here. Grab an eight millimeter socket and you're gonna have a series of nuts under here that are holding this on. (tool whirring) Should be able to pull it out the back. Just have to wiggle the exhaust around. I'm gonna set this off to the side. Now we can remove the bumper beam. It's gonna be an 18 millimeter socket that you need. You're gonna have two bolts on each side. (tool whirring) Now with the flange nuts off, you can take a rubber hammer and kind of just hit it on the back side. A lot of times there'll be an adhesive or a sealant that's holding this bumper beam on. (hammer clanging) And just work it loose and set it off to the side. If your gasket looks like this when you pull your bumper beam off, you're gonna want to scrape this off. And you can either pick up a new gasket from the manufacturer or you can use a black silicone, or that's what I'll be using today. You can use a silicone sealant to seal this up. The reason they do this is that the exhaust is back here, and this is an open frame, and so you don't want any of these exhaust gases going inside the frame. Sometimes you can pull the bumpers off and the gasket's okay, I've had that happen before, but this time was not the case. So I'm gonna scrape this off both the frame of the car and the bumper. Once you get it cleaned up, you can just run a bead of silicone around the hole here. We're gonna do this on both sides on the car. And on the hitch, on the passenger side you're gonna have an opening here. We're gonna run it around this as well so that our bumper beam will seal up with the hitch. Now we can take the hitch and set it into position, hanging it on the studs. Try to keep it centered as best as you can. And then let that hang. You could grab your bumper beam. You may have to take your exhaust isolators and point them down. Mine got pushed up. Okay. And you can take the flange nuts and then reinstall them on the car, and get these snugged up. You could torque 'em down. The torque specs are gonna be in the installation manual. (tool beeping) Now, in the directions you're gonna have a diagram that'll show you how to cut your heat shield. And honestly it's not the best diagram. What they are referring to in it, what you'll see is that this'll be the center point, and they want you basically two inches over from this center point on this side and three inches over here, and then down. The picture is pretty good, so if you just kind of copy what they've got for you, it'll turn out okay. This heat shield can be cut with some tin snips. I'm going to drill out the corners here and here. (drill whirring) And then make sure you wear gloves when you're cutting this sheet metal. The stuff will cut you in a minute. Now once you get it trimmed, it's just gonna be time to reinstall it. And they really just don't make it easy. So you may have to slide it in from the side. (metal banging) So just get this back up into position and reinstall the flange nuts and hold it on. Now we can reinstall our rear fascia. Don't forget, we're going to be feeding this through the rear of the frame in just a second, but we'll take the fascia. Now with the new hitch here, make sure that the bottom part of this fascia goes above the hitch And then just line up the clips with the fascia. Starting in the middle of the bumper, just kind of roll up. Making sure your tail lights go in, make sure all the clips are where they're supposed to go. And once you come over to this side, now it'd be a good time to reinstall the electrical connector that we took off earlier. If you're having trouble doing this from this angle, it is possible to access this from under the car. I don't know if it's necessarily any easier, but you can get to it underneath. Just slowly work your way around until you get all the clips back in. I just wanted to show you something real quick where I've had this happen in the past and this is one of those cars. If you could take a look right here, I've got a gap and the center of this bumper didn't want to go back in for whatever reason, the fascia's here. So I've got my arm, just wanna let you know, you could maybe get your arm back up here, and you can see me pushing back out on the fascia to get this to reconnect. So they should still snap in. But when I was pushing it before, it was just pushing in and not connecting. So I just wanted to let you know that if you're having the same problem, you can get your arm back up here and you can actually feel the tabs and manually lock these in. Now we can run this electrical line back up. So I pulled the whole wire through, and to reset this grommet, you need to pull it all the way through, and that way you can just fit the inside. 'Cause you wanna make sure that's in and not leaking anything. Then you can hook the connector back up inside. One other thing I wanted to mention is when you're pulling out this rear scuff plate, we kind of talked about how the clips need to be with your scuff plate and not in the vehicle. Chances are these clips are gonna break. These are like one-time use clips. If you get some out and they go back into your scuff plate, great. If they don't, we have these available in an entire kit here with other fasteners. And I'm not sure if you really need all of the other fasteners right now for this installation, so you may be able to source these independently online or at another retail store. In any event, just make sure all of your clips are installed on this plate so when it snaps down, it snaps down tight. If they're just in the bumper or in the car itself here, it's gonna be loose when you reinstall it. Now, I didn't push down on this yet. You want to get it set into position and get this rear rubber molding on top. Make sure all your clips are lined up. And it'll be in there nice and snug. And then you can just reinstall your torque screw. (tool whirring) Once you get the panel tight here, don't forget to reinstall the push pin fastener that's holding these two together And you can tuck in the fender well liner, and this is just gonna snap back in. Now, I normally like to take my tape off before I snap this back in. That way we don't trap any tape underneath. We'll do this on both sides and we'll head underneath and reinstall those fasteners as well. Reinstall the 10 millimeter bolt here. (tool whirring) Working our way around. Remember, the heat shield might be a little bent from trying to take it out and put it back in. So if you have to bend it out of the way. (tool whirring) While we're down here, we'll reinstall the plastic rivets back into the fender well. Reinstall our exhaust back into the isolators. I gave 'em another spray of silicone, and just makes it easier for these to be reinstalled. Okay. And while you're here, don't forget to remove tie down strap if you used one. Then we can reinstall our exhaust tips. Make sure you hook the tabs in correctly and then you can line 'em up before you tighten these screws down. And that was a look at some of the features and the installation of Etrailer's Class III Receiver Hitch on our 2018 Mercedes-Benz GLC 300.
Average Customer Rating: 5.0 out of 5 stars (3 Customer Reviews)
This fully welded trailer hitch receiver bolts onto your vehicle's frame with no welding required. Matte black, powder coated steel is durable and corrosion resistant and creates a rugged look.
This hitch has definitely held up & there is no rust. Excellent product for the price. I’ve used this hitch so many times for our bikes. Highly recommend.
The hitch was for my bike rack. Works perfectly. Was a bit of a challenge to install, took the installer longer than anticipated, but no problems.
Hitch was installed on our 2020 MB GLC AWD at local Farm & Fleet Auto shop for a reasonable price ~$[XX]. Once installed, I was very happy with the concealed appearance of the hitch and accessibility for a 1UP hitch mounted bike rack. The bike rack barely has enough reach to install without an extender as the hitch is recessed 3-5/8 inches from the bumper. I keep a hitch plug in when the bike rack is not on. After one year, including a Wisconsin winter, I have noticed a small rust spot on the interior corner of the receiver. I plan to spray with rust inhibitor paint and coat with Fluid Film to hopefully address that small issue and keep the receiver looking new.
So far, this Curt Trailer Hitch receiver has worked quite well for me. It seems to be extremely durable and reliable. This was a custom fit for my Mercedes GLC300 4Matic, so it was designed to have a hidden/discreet look. It is tucked nicely under the body of the vehicle once installed. At the moment, I have only used it for attaching a rear cargo steel carrier, but future plans are to hitch other things like a small travel trailer, small 4x6 enclosed cargo trailer also.
Excellent design and manufacturing. The product has performed flawlessly. The installation was bit of a challenge, but the instructions were great and and I got through it. I would recommend this product.
This is my 2nd hitch from etrailer. Love it! I can't say enough about the support that etrailer gives when you buy one of their products. After I bought a new car, I bought a new hitch for my mountain bike rack. I was worried because I had never worked on a Mercedes before. But the video tutorial walked me through the entire thing (without a hitch...ha ha).
I'm submitting photos to show you my 2.5 hours of work it took (start to finish). I followed the instructions that etrailer gave, watched the video on my tablet while I was installing and everything turned out great! Just look at my pictures man! :O)
1. Use a small screwdriver to get the plastic rivets out.
2. make sure you use zip ties when reinstalling the back rubber housing so you keep cables out of the way.
3. Use ramp/blocks to bring up the back end. It's waaaaay easier when you have the room to work...and you will need it.
4. WATCH the videos. These guys do great tutorials.
5. Enjoy!
Took me a little bit longer than I thought. Overall, not a bad process of installation and the instruction video was all I needed. Only thing I would add is that a deep 18mm socket is required for the bumper. Love the receiver hitch.
Fits my wife's GLC 300 Coupe perfectly, and the how-to video was priceless! Saved me over $1k from purchasing/installing from the dealer. The bike rack is perfect with the hitch extender. We couldn't be happier with the product and instructional video.
Great Quality and fast service.
I am still thrilled with my hitch. The quality, strength and stability are superior in every way. I had it installed by my local body shop who found the website instructions very useful. I was charged a minimal amount for expert installation. The only issue I have is the interference with the backup system on my Mercedes GLC when a bike rack is inserted into the hitch but that is MB issue. The hitch as I said, is perfect!
Finally, I installed my hitch to 2018 Mercedes GLC SUV. The instructions are almost perfect with a slight adjustment for 2018 cars. It fit perfect and it was easy if you have all the tools. All you need to do raise the back wheels 4-5 inches. It's easier if you have 2 to install.
Looks great, and is exactly what I was looking for, on my Mercedes 300 GLC
The trailer hitch was used to attach a twister. A twister is a step which allows a dog to step into the back of a vehicle. You twist it out from under the car for the dog to use then twist it back under the car to store. The hitch has worked perfectly. I have had no problems. Cost was more than reasonable. The hitch was used on my Mercedes AMG SUV. Had I purchased the trailer hitch directly from Mercedes it would have cost me approximately $2,000.00!
The trailer hitch fits perfectly. I have no problem with the hitch. The factory-installed 1" hitch had a welded piece attached for holding the electrical connection but the new 2" did not have one. I cut off the original metal piece, modified it, and bolted it to the new hitch.
The trailer hitch fit right under vehicle and hide behind the bumper. Love the outcomes. Also the bike rack Is very easy to install and a light weight as well. Install and remove from the hitch is so easy and convenient. Love both products.
Mounted as described for the 2019 GLC350e, works very well.
I have been using my etrailer hitch and mount to pull my 19 foot Bayliner and it pulls beautifully! I had it professionally installed and am very happy with it. Etrailer was fast, easy and affordable. I highly recommend this company.
The hitch fits perfect. Now we can load up the bikes and ride. Thank you for the help making sure we had the right one for our car.
Great process and product!
Installed myself. Video instructions were very good and very helpful. Had to verify (with eTrailer) that this particular trailer hitch is compatible with the MB GLC 300 "COUPE" as the instructions (from Curt mfg. co.) contained in the box did not address "COUPE".
I just received the item yesterday. I'm going to have the professional people to assemble it for me next week. So I'm unable to rate the product, but I can tell you that I was pleased with the fast delivery and easy ordering system. I'll come back and rate the trailer Hitch Receiver after I use it on my carryon trailer.
Purchasing from etrailer was a great experience. Matthew K was knowledgeable and helpful and answered every question I had. He let me know when the item was mailed and when it was delivered. The service was excellent and I highly recommend them and will use them again. Mary
I've had the hitch and wire connections for a year and I am very satisfied with the products. Everything has met or exceeded my expectations. I would recommend etrailer to anyone without reservation.
Do you have a question about this Trailer Hitch?
Info for this part was:
At etrailer.com we provide the best information available about the products we sell. We take the quality of our information seriously so that you can get the right part the first time. Let us know if anything is missing or if you have any questions.


Thank you! Your comment has been submitted successfully. You should be able to view your question/comment here within a few days.
Error submitting comment. Please try again momentarily.