
Draw-Tite Max-Frame Trailer Hitch Receiver - Custom Fit - Class III - 2"
(25 reviews)
Price: $188.49
Draw-Tite Max-Frame Trailer Hitch Receiver - Custom Fit - Class III - 2"
Retail:$303.01
Our Price: $188.49
You Save: $114.52
Will this fit?
To see if this custom-fit item will work for you please tell us what vehicle you'll use it with.
Thank you! Your comment has been submitted successfully. You should be able to view your question/comment here within a few days.
Error submitting comment. Please try again momentarily.


- All Info
- Reviews (25)
- Q & A (0)
- Videos (2)
- Photos
Draw-Tite Trailer Hitch
- Class III
- 2 Inch Hitch
- 4500 lbs GTW
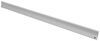
- Concealed Cross Tube
- Draw-Tite
- 675 lbs TW
- Custom Fit Hitch
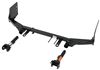
Fully welded vehicle trailer hitch is strong and durable. Draw-Tite's Tested Tough guarantee ensures that this hitch exceeds industry standards. The combination of an e-coat base and a powder coat finish provides excellent rust protection.
Features:
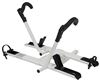
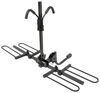
- Custom-fit trailer hitch lets you tow a trailer or carry a bike rack or cargo carrier with your vehicle
- Computer-aided, fully welded steel construction ensures strength and durability
- Tested Tough - safety and reliability criteria exceed industry standards
- Easy, bolt-on installation - no welding required
- Installation instructions included
- Uses existing hardware
- Lifetime technical support from the experts at etrailer.com
- Black powder coat finish covers e-coat base for superior rust protection
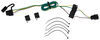
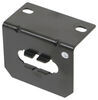
- Integrated mounting point lets you attach a bracket for a 4-way or 7-way plug (sold separately)
- Sturdy, square-tube design
- Ball mount, pin and clip sold separately
Specs:
- Receiver opening: 2" x 2"
- Rating: Class III
- Maximum gross trailer weight: 4,500 lbs
- Maximum tongue weight: 675 lbs
- Not rated for use with weight distribution systems
- Limited lifetime warranty

Draw-Tite Tested Tough
Draw-Tite's Tested Tough program provides testing standards far superior to those outlined by the Society of Automotive Engineers (SAE), the go-to source for engineering professionals.
Each Draw-Tite trailer hitch receiver undergoes extensive fatigue testing and static testing with the ball mount that is either supplied or recommended for use with that particular hitch, thus ensuring results that are applicable to real life use. Fatigue testing is also conducted on hitches rated for use with weight-distribution systems.
In addition, Draw-Tite performs static testing on a simulated automobile, as opposed to the rigid fixture used for SAE testing, resulting in a more true-to-life scenario.
etrailer.com Technical Support
At etrailer.com we're committed to the products we sell, and to our customers. Our experienced and knowledgeable staff are available via both phone and email to address your questions and concerns for the lifetime of your hitch. The technicians at etrailer perform hitch installations on a daily basis, making them a valuable resource for do-it-yourselfers. The one-on-one, personal service you'll receive comes straight from an expert in the towing and automotive field. We've installed it, we've wired it and we've towed with it, so whatever your question, we can answer it.
76080 Draw-Tite Class 3 Trailer Hitch Receiver - Max-Frame
Item # 76080
Installation Details

This Product Fits The Following Vehicles
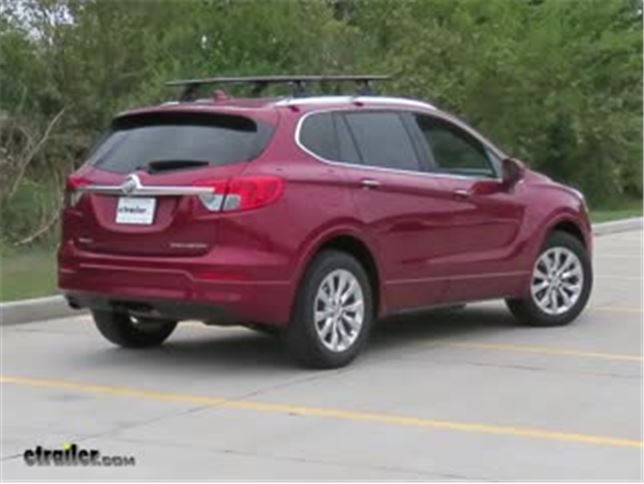
- 2016 - 2018 Buick Envision
California residents: click here


Video of Draw-Tite Max-Frame Trailer Hitch Receiver - Custom Fit - Class III - 2"

Videos are provided as a guide only. Refer to manufacturer installation instructions and specs for complete information.


Video Transcript for Draw-Tite Max-Frame Trailer Hitch Installation - 2017 Buick Envision
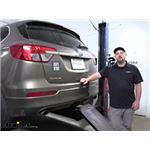
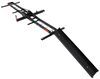
Speaker 1: Today on this 2017 Buick Envision we will be having a look at, and showing you how to install the Draw-Tite Class III trailer hitch receiver, part number 76080. Here's what the hitch looks like installed without our bumper cover back on. This is a really quick and easy installation. It doesn't' take much time at all even though you have to remove the entire fascia in order to get the bumper and the hitch into place. It attaches using factory studs that are already on the vehicle. There is no drilling, no cutting, no welding, no modification required at all.
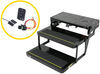
It goes on nice and easily using existing hardware.What I really like about this hitch is that when it's not in use, you can completely hide it on your vehicle without anybody knowing it's there. It tucks up behind this panel here, and when you want to use your hitch, all you have to do is remove two T-15 screws, one on each side, then you can grab the panel, pull it down, and there's your hitch. With this hitch being tucked behind the panel, you don't really need to worry about running your shin into the hitch itself when you're loading cargo into your hatch area. This hitch features a 675 pound tongue weight rating, which is the amount forcing down, and a 4500 pound max gross trailer rating, which is the amount it can pull. You want to make sure you consult with the owner's manual of your Envision, and go by whichever number's less.
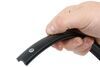
You don't want to exceed the capacity of the vehicle, or the hitch itself.On the side of our receiver you'll find two holes. The larger one closest to the front, that is our industry standard 5/8 inch diameter hitch pin hole, to secure any of your hitch mounted accessories. You can pick up a pin and clip on our website as part number PC3. Towards the rear you find a hole for a J pin stabilization device, and what that does is take away the annoying shake, play and rattle out of what is inserted in your receiver. We have one of those available on our website if you'd like to purchase one as well.
Welded onto the back of our receiver is this nice collar to help give us a nice finished look, and to help give us some more reinforcement at the end of the receiver. Welded on the bottom of our receiver are our rolled steel safety chain loops to attach the safety chains from our trailer. These have a fairly decent sized opening, so we shouldn't have any issues attaching those chains.On the driver's side of our receiver we find a nice attachment point here that's welded onto the frame of the hitch, and what this serves is a place for us to mount any of our electrical connectors, such as a four-pole flat or a seven-way RV connector for any of our electrical connectors that we need in order to tow our trailer. We have several different wiring options available for you on our website.Now for a few measurements to better assist you in choosing any hitch mounted accessory you may need, such as a ball mount, bike rack or a cargo carrier. You're looking at about 16 1/2 inches from the ground to the top of the 2 inch receiver opening, and about 7 inches from center of the hitch pin hole to the rear most part of the back bumper.Now that we've gone over some features, we'll show you how to get it installed.
To being our install, we need to remove our rear fascia. We're in our passenger's side wheel well now. Everything that we're doing on the passenger's side we'll need to do on the driver's side, so just keep that in mind. We're looking back where the fascia attaches to our fender liner. We have two T-15 screws that we need to remove. Now we need to peel back our wheel molding here to gain access to a fastener, so I'll just grab it, pull up on it. We'll find a 7 millimeter screw behind it. Now underneath our fascia we'll find a T-15 torque screw on each side that we need to remove. All right, now we'll open up our rear hatch. At each corner of the lower end of our hatch area we'll find a Philips screw that we need to remove.Now we have plastic covers on our taillights that cover the hardware that hold them in place. We'll use a flathead screw driver to pry them loose, the tether that holds them in place. Behind those covers we'll find two 15 screws. Now we can grab our taillight, pull back. Once you pull back a little bit you can lift up, and we'll find our connector. We'll slide this red tab back and press down on this black on, and pull to separate. We'll unclip the wiring and set the taillight aside where it won't get damaged.Now with an extra set of hands we'll pull our fascia back away from the vehicle. You may need to use a flathead screwdriver near the hatch to help separate the last lock. We'll pull it back, and we'll find our connectors that we need to separate. For all of our electrical connectors, we'll find one main connector on the passenger's side. We'll slide back the red block tab, press on the black tab, and pull to separate. Now we'll set our fascia aside where it won't get damaged.Now, on each side of our bumper beam we'll find three 15 millimeter nuts that we'll need to remove. Now we can slide our bumper beam off. With the bumper beam off we can now slide our hitch onto the studs that the bumper beam was secured on. Now we'll replace the bumper beam, and reinstall the nuts that we remove. Now we'll tighten down our nuts. Now we'll torque our nuts to the amount specified in the instructions. Now we can go ahead and reinstall our fascia, making sure we plug in our wiring the same way that it came out.That completes our look at, and installation of the Draw-Tite Class III trailer hitch receiver, part number 76080 on this 2017 Buick Envision.
Customer Satisfaction Score:
99% were satisfied with this product
1% of customers were not satisfied
- etrailer mistake
Customer Reviews
Draw-Tite Max-Frame Trailer Hitch Receiver - Custom Fit - Class III - 2" - 76080
Average Customer Rating: 4.6 out of 5 stars (25 Customer Reviews)
Fully welded vehicle trailer hitch is strong and durable. Draw-Tite's Tested Tough guarantee ensures that this hitch exceeds industry standards. The combination of an e-coat base and a powder coat finish provides excellent rust protection.by: Harold12/08/2017
2017 Buick Envision
I installed my Draw-Tite Max Frame Trailer Hitch Receiver today. A bit more of a challenge than the video shows! All went as advertised until it came time to attach the bottom of the bumper fascia. The new hitch moves the bumper back far enough that the bumper fascia cannot be attached to the two brackets that originally supported it. Two cable ties were provided to replace the original screws. The cover that is supposed to cover the hitch when not in use does not fit due to the new hitch being too far to the rear. Looks like the custom fit statement leaves a little to be desired. Time for a re-design by the looks of it. Not a happy camper!
by: Eric 05/04/2021
Buick
Draw-Tite makes a great hitch but what this so good was the video provided by etrailer on how to install it on our Buick Envision. Had to remove the bumper coverer and then the bumper but the video walked me right through it. My 16 yr old daughter helped me and the installation went off without any issues. took us about 90 minutes.
A+++

Eric Z.

5/5/2022
I have used and continue to use this hitch regularly. All I can say is that I have not given it a second thought. It does what it is supposed to do and Im comfortable saying this was a great purchase.
by: Woodrow09/20/2017
2017 Ford Edge
I must say the Hitch it's self is ok, however the design has a flaw, it was designed for a 2017 Buick Envision, therefore mounting it onto this vehicle should not be an issue, however the hitch when installed contacts and pushes the two body brackets toward the front of the car resulting in not being able to reinsert the two screws which supports the bottom edge of the fascia (bumper cover) get this, they supply two plastic straps to replace the screws, to me this is poor design by the manufacture, have spoken with them and E-trailer, I wish now I would have purchased a Curtis Hitch instead.

Rachael H.
9/20/2017
Thanks for the review and feedback Woodrow. You are correct the installation instructions indicate that nylon ties may needed to secure the vehicle fascia. They can be found here for reference. The Curt hitch that is also confirmed as a fit for your 2017 Envision has a different profile and does require using a fish wire technique for installing the hardware.
Helpful Links
by: Wes06/03/2018
2017 Buick Envision
Fairly easy to install although it took longer than 40 minutes but installed with hand tools, no pneumatic guns. Video was excellent. Perhaps peculiar to the Envision, when re-installing the rear fascia, had to slightly enlarge the holes to secure the bottom screws to the bumper bracket. The 1/2 inch thick hitch bracket pushes the rear bumper beam rearward 1/2 inch so the hole don't line up properly. Not a big deal but one small hurdle. Otherwise looks great and installation was straight forward.

Heather A.
6/4/2018
When installing a trailer hitch like part # 76080 it is necessary to use a torque wrench to get the bolts to the right tightness. If not, and you just try to tighten them as hard as you can, you can damage the vehicle frame. Too loose and the hitch could fail when you tried to use it. Many auto parts stores lend out tools so you will not have to buy one in most cases. Please make sure the bolts are torqued to specifications in the installation instructions.
by: Charles 12/13/2022
Great construction, easy install and great instructions.
by: Paul02/07/2022
Even though you have to remove the rear bumper cover to install the hitch, the instructions and video make it possible to install it yourself. Excellent communication from all at e trailer. Prompt shipping, great follow up. Thanks E trailer!
by: Robert01/12/2019
2017 Buick Envision
The e-trailer - draw-tite hitch was a great fit for my Buick Envision. It took me a bit longer than estimated to install, but I wasn't in a hurry. One funny and insignificant thing was that the etrailer sticker was installed up side down. since the hitch is almost hidden anyway, I left it that way. ....The customer service at etrailer has always been great. They are the first place I go to look for trailer related parts and products.
by: Robert04/27/2023
Fit perfect , definitely something anyone can install
by: Bob09/29/2018
2016 Buick Envision
Although I have not towed anything yet the installation went smoothly and the hitch is out of sight. My 2016 Envision appearance remains the same as it was before installation. No picture necessary as nothing appears changed.
by: David 07/03/2021
The installation video was for a 2017 Envision, I have a 2018. There were slight differences, but was able to figure it out. A note at end of video would have been helpful. Overall 4 stars.
by: Michael05/15/2022
good fit and video for installation made the job easy
by: Dale M07/22/2022
Only complaint was that I had to file out holes slightly to get over bolts on vehicle. Online install video did an excellent job.
by: Bill06/02/2020
Was easy to install and has worked flaw lessly.
by: Charles12/12/2021
have not used it yet.
by: Clarence 05/20/2021
I have not put it on yet but seems good
by: Mark 11/30/2020
Michelle was very helpful and knowledgeable of the hitch that I ordered. I ordered it on a Friday afternoon and it was delivered on the following Monday.
by: Roger 11/15/2019
Looks good,have not installed yet,fast service
by: Brian 07/12/2023
2017 Buick Envision
by: Dom 07/13/2021
by: Rylie06/07/2023
2018 Buick Envision
by: Hubert 01/12/2023
by: Coopers10/18/2021
2018 Buick Envision
by: Babette11/18/2021
by: Michael03/30/2022
2018 Buick Envision
by: Gevan03/24/2022
25
25
See what our Experts say about this Draw-Tite Trailer Hitch
- Do Curt and Draw Tite Trailer Hitches for 2017 Buick Envision Fit with Dual ExhaustWe checked with Curt and Draw Tite and both hitches fit with single or dual exhaust so the part # C13405 or the Draw Tite # 76080 would fit and work great. I attached the install video links as well as attached a picture that shows what the hitch looks like installed which shows how the hitch fits relative to the exhaust. I'd go with the Draw Tite over the Curt as it has higher capacities and will be a bit less visible once installed.
view full answer...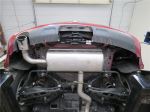
- Hitch for 2018 Buick Envision with Highest Tongue Weight Rating The trailer hitch we offer for your 2018 Buick Envision that has the highest tongue weight rating is the Draw Tite part # 76080 which is rated for 675 lbs of tongue weight. I pulled up the towing capacity of your vehicle and it rated for only 1,500 lbs trailer weight so even if we had a higher rated hitch there wouldn't be a way to put 800 lbs on your hitch.
view full answer... - Determining The Correct Ball Mount For 2017 Buick Envision W/ Draw-Tite Hitch 76080When we installed the Draw-Tite Trailer Hitch Receiver # 76080 on a similar 2017 Buick Envision we found that from the ground to the top inside edge of the receiver was 16-1/2". To determine which ball mount will have the correct rise or drop for your trailer, you will need to level your trailer and measure from the ground to the bottom of the coupler. If the trailer coupler is lower than 16-1/2" you will need a ball mount with a drop that matches the difference, and if the coupler is...
view full answer... - Trailer Hitch and Wiring Recommendation for 2017 Buick EnvisionFor your 2017 Buick Envision the trailer hitch part # 76080 that you referenced is a confirmed fit. Then for a 4-way trailer wiring kit you would want Curt part # C56364 that you also mentioned. If you wanted to do some towing you might be interested in etrailer ball mount kit # 989900. It comes with 2 ball mounts; one with a 3/4 inch rise or 2 inch drop and one with a 2-3/4 inch rise or 4 inch drop. It also includes a 1-7/8 inch ball, 2 inch ball, hitch pin with clip, and a storage bag. If...
view full answer... - Recommended Trailer Hitch Receiver for 2017 Buick EnvisionThe Draw-Tite Max-Frame Trailer Hitch Receiver # 76080 still uses the wire ties to fix the fascia issue. This does solve the issue, but if you prefer an alternative I recommend the Curt # C13292. This hitch receiver does not install in the same manner and will not have the same issue. I've attached the installation instructions and videos for both receivers to assist. For your trailer wiring, I recommend the Curt T-Connector Vehicle Wiring Harness with 4-Pole Flat Trailer Connector...
view full answer...
Do you have a question about this Trailer Hitch?
Info for this part was:

Video Edited:
Zack K

Video Edited:
Joshua S

Video Edited:
Jacob T

Video Edited:
Chris R

Edited by:
Lindsey S

Expert Research:
Jameson C

Updated by:
Leah S

Updated by:
Wilson B

Updated by:
Jenny M

Updated by:
Hannah L

Updated by:
Isabelle B

Written by:
Alexander C

Test Fit:
Brent H

Test Fit:
Ryan G
At etrailer.com we provide the best information available about the products we sell. We take the quality of our information seriously so that you can get the right part the first time. Let us know if anything is missing or if you have any questions.
Product Experts Available Now!
Call 1-800-940-8924
Heather A.
12/23/2017
Harold,Thank you for your review. If you do not use the two cable ties that are included with the hitch when replacing the bumper fascia the cover will not fit over the hitch. Reinstalling the bumper fascia with the two original screws does not give the cover enough room to clear the receiver. I have talked to the manufacturer about this hitch and they are aware of the negative feedback about the design.