
To see if this custom-fit item will work for you please tell us what vehicle you'll use it with.
Thank you! Your comment has been submitted successfully. You should be able to view your question/comment here within a few days.
Error submitting comment. Please try again momentarily.
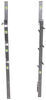
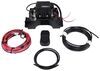
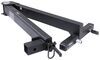
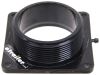
This fully welded trailer hitch receiver bolts onto your vehicle's frame with no welding required. Powder coated steel is sturdy and corrosion resistant.
Features:
Specs:
At etrailer.com we're committed to the products we sell, and to our customers. Our experienced and knowledgeable staff are available via both phone and email to address your questions and concerns for the lifetime of your hitch. The technicians at etrailer perform hitch installations on a daily basis, making them a valuable resource for do-it-yourselfers. The one-on-one, personal service you'll receive comes straight from an expert in the towing and automotive field. We've installed it, we've wired it and we've towed with it, so whatever your question, we can answer it.

Videos are provided as a guide only. Refer to manufacturer installation instructions and specs for complete information.
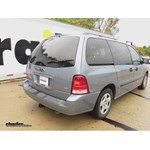
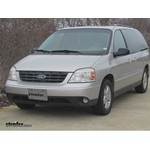
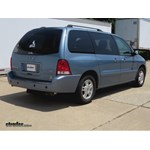
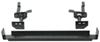
Today on our 2005 Ford Freestar we're going to be installing the CURT 2" receiver tube hitch, part number C13587. Here's what our hitch will look like once it's installed. Next I'll give you a couple measurements to assist you with selecting accessories for your new hitch. From the center of the hitch pinhole to the outermost edge of the bumper is 4-1/4". From the top of the receiver tube opening to the ground is 12-1/4". This will assist you with selecting accessories such as a ball mount, bike rack, or cargo carrier.
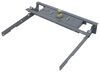
We'll now go ahead and with the installation. Now to begin our install we'll first need to lower the exhaust. The lower the exhaust we'll remove the rubber isolator from the metal hanger. To make it easier to remove we're going to hit it with some spray lubricant and then use a pry bar or pliers to remove the rubber isolator from the metal hanger. Once we have that off we'll be able to pull the exhaust down enough that we can get the hitch in place. Next, using an extra set of hands we're going to want to put the hitch up into position to make sure all our attachment points line up. There are a total of six attachment points, three on each side.
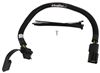
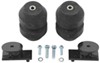
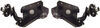
These attachment points are either slots or pre-drilled holes in the frame by the manufacturer. The forward and bottom attachment point is going to be this oval slot here that will get the large spacer block, a 1/2" carriage bolt, and a 1/2" flange nut. Then the side frame attachment points, there will be two of them. The forward one here will get the narrow spacer block with one of the shorter 1/2" carriage bolts and the same 1/2" flange nut. Then the rear attachment point, which is also in the side, is going to get the wide but shorter spacer block, a shorter carriage bolt, and then the flange nut. Now to assist in getting our hardware in the frame we're going to use the 1/2" bolt leader that's provided with the install kit.
Now before we attempt to install the hitch we're going to go ahead and look at the side attachment points. Here you can see where the metal overlaps but there's plenty of room that we'll easily be able to install our fastener. Here where the sheet metal overlaps, if the hole isn't large enough you may need to ream it out to make it a little easier to get the hardware in place. We're just going to use our file bit to open it up a little bit where the sheet metal overlaps. As you can see, the round file bit on the drill will make quick work of the overlapping sheet metal to enlarge to hole enough to get our hardware in place. Now once we have enough clearance for all our hardware we're ready to start putting it in place.
We're going to take the 1/2" bolt leader, go through the bottom frame attachment point, and out the large access hole. There we'll take the large spacer block and the longer carriage bolt, thread it onto the pull wire, feed the block and then the bolt into the frame, and pull them into position. Once in place I'll go ahead and remove the bolt leader and repeat the same process on the other side, because as we stated earlier, the attachment point are the same on each side so each process we do here on the driver side will get repeated identically on the passenger side. We're now ready to go ahead and put our hitch in place. It's a good idea to get an extra set of hands to help you hold the hitch while you install the fasteners. We're going to feed the passenger side up over the exhaust first and then bring our hitch up to the frame and install our flange nut to help hold it in place. We'll install our flange nut here to the bottom frame attachment point finger tight to help hold it in place. Now with our hitch held in place we'll go ahead and take our bolt leader, feed it through the attachment point, and out the same access slot. For the forward side attachment point we're using the narrow spacer block and shorter carriage bolt. We'll again feed them into the frame separately and pull them into place. Once in place we'll go ahead and remove the bolt leader and install the flange nut. We're going to install each fastener finger tight until we have them all in place. Now with all our fasteners installed and secured here on the driver side we'll repeat the same process on the passenger side. Now once we have all the hardware installed we'll go ahead and tighten it down and torque to specifications as indicated in the instructions. Now with the hitch secured and torqued to specification we'll go ahead and reinstall the exhaust. Once we have the hanger back in place that will complete the install of our CURT hitch, part number C13587, on our 2005 Ford Freestar. .
Average Customer Rating: 4.6 out of 5 stars (60 Customer Reviews)
This fully welded trailer hitch receiver bolts onto your vehicle's frame with no welding required. Powder coated steel is sturdy and corrosion resistant.I Purchased a trailer hitch and wiring harness for my Ford van. It was delivered on time, as promised, for my vacation. It installed perfectly just as described in the video. Since my van was pre-wired with the tow package the harness was plug-and-play, very easy. The class III hitch is well-made and looks very strong. I’m excited to hook up my boat and go sailing. I’ll probably be upgrading to a Toyota SUV in the near future. I will definitely contact the etrailer.com if I need another hitch. Thanks again for the great service. I will be recommending your company to anyone who needs a DIY trailer hitch setup.

This trailer hitch has come in handy for pulling my family's camper. It was relatively easy to install but took about three hours. It probably would have gone a little faster if I had put my van up on ramps and had someone to help me lift it. Overall, it has been a useful purchase, and I will likely purchase from this company again!
Customer service is the best I have ever had. The hitch fit snug to the frame (perfect). Make sure you clean and test the bolts in your vehicle frame holes. This is a solid, professionaly built Class III hitch. As an Automotive Tech I have installed alot of trailer hitches over the years. I'm very impressed. Highly recommended. Shipping was awesome. Showed up 2 days early. Ohio U.S.A. to British Columbia Canada, in 5 days. Thank you all, well done.

Jason, C.

3/31/2023
The hitch has been working well. No problems, high quality, durable. I have no complaints.
Delivery was quick, product fit. The fit was very snugged. I had to sand down the hitch and hammer a little on the van. I had to enlarge the driver side factory hole to fish the bolt. I installed this with my son. It took us 1 hour. I made a mistake and thought etrailer forgot to pack the nut and bolt but it was taped around the receiver. Cheap price and free shipping was a no brainer.
The hitch was delivered quickly. It fit well. And came with hardware and fish wire necessary for installation. Excellent product!
Great hitch! Super easy to install, a little snug for last two bolts, but a real nice fit. My 14 year old and I got it up in under an hour.
worked great
Unfortunately I can't find somebody to install the hitch. My mechanic says that the minivan's frame where the hitch is intended to be attached is not very strong. He does not recommend installing the hitch on this minivan. Wish e-trailer had not recommended a hitch for this vehicle.

Mike L.
10/6/2018
According to the owners manual for your vehicle, the 2004 Freestar can tow 2000 lbs, or up to 3500 lbs if equipped with the factory tow package. As long as the underside of the vehicle where the hitch would attach is still structurally sound not excessively corrosioded, theres no reason why the hitch could not be installed. Most folks with basic hand tools can accomplish the installation on their own. Ill link you to an install video you can watch to see if its something youd feel comfortable tackling on your own.
Helpful Links
Installation went well! Fits pretty good. However, one should have a floor jack on hand at time of install to position the hitch while placing the bolts. The fish tool is quite nice! I did use baling wire to fish the fish tool through the forward most part of the frame because the fish tool is difficult to retrieve in that area. Nice product, stout hitch!
Thanx, Jim
Jim J.
6/17/2016
Yes all is well with the hitch! Your spring bolt holder is a work of genius!Thanx,
Product was delivered quickly, as promised.
Unfortunately, the hitch wasn't very close to fitting my vehicle properly. The installation video shows a trailer hitch that slides right into place and bolts in. In reality, lacking the heavy equipment necessary to bend the existing hitch to actually make it fit, and lacking the right-angle close quarter drill necessary (even though the hitch is marketed as a no-drill install), I'll need to have it installed by professionals who have this equipment (unexpected additional cost of $100 and time delay of 4 days). If the installation video had been full disclosure, and mentioned that these possibilities may arise, and listing the additional tools/equipment that may be necessary to complete the install, I'd have been able to make better decisions (from both a financial and time-management point-of-view). Incomplete information leads to poor results, and I wish I'd been given a more realistic set of information about product quality (in terms of fit) and about real-world installation processes.
I should point that my dissatisfaction is purely a product of poorly handled expectations on the part of the manufacturer, and by extension (because they should know better), the supplier. I'm sure the hitch will perform fine once I'm finally able to have it installed. (couldn't get an appointment for the install sooner than several days out)
The wiring kit for the hitch, however, was a complete breeze to install and set up, and worked perfectly with less than 10 minutes work installing the wiring, relays, and fuses.
Mike L.
10/1/2018
In some instances, if the hitch holes dont match up with the holes in the vehicle body, the holes might need to be enlarged. Ill have the notation about no drilling required removed.
I ordered this for my husband to install on our Ford Freestar and he said, it's a solid product, fairly easy to install if you have proper tools, and fitting was tight-no play. However, delivery of the product was poor. The box the hitch came in was beat up and there were several areas that the paint was scratched due to the shipping process. My husband had to paint those areas prior to installation as he didn't want rust to be a factor later on.
Easy ordering, shipping was fast, order was complete and the video was a great help. The fishing wire worked great to pull the bolts through and I wouldn’t have known how to use it properly if it hadn’t been for the video. The instructions in the kit were helpful but vague. My only complaint was that the video made it look too easy. I mean, a brand new, clean vehicle, on a lift, and a tech who’s installed a dozen of them, yah, I could see 40 minutes in that case. I say, add 10 minutes for each year the vans been on the road (dirt and rust)and another 15minutes if the vans on ramps and you’re a first timer installing it from your back. Just sayin’. Great product and good info. Thanks for another notch in this Do- It -Yourselfers tool belt.
I had to widen the hitch a bit to get this to slip on then using a small sledge to position it. I used a 3/8 drive extension in the hole to line up the hitch to the body before pulling the bolt through. I found that putting the fish wire large end through the hitch and frame hole and feeding back to the large opening , then attach the bolt/washer was the way to go. Over all the hitch seems very well built and sturdy. I would recommend the Curt hitch and etrailer did the job with quick shipping.
Very solid product, clean, heavy duty steel, welds are superb and compete (I weld)! Very well made. Holes lined up perfectly... but only with a slight bit of hammer coaxing (the only reason it didn't get 5 stars). The two outer frame mount plates were just a hair too narrow to just slip on up. Easy to fix though with a 2lb hammer. Only needed a quarter inch. Design is perfect. Bolt plates are designed spring loaded with just enough curve to draw it up very tight when the super heavy bolts are torqued down. Super pleased.
Very good product. It will take much longer than 30 minutes to install depending upon how snug the receiver fits to the frame. A floor jack is very handy to help push the receiver into place. Also, check to make sure all the holes in the frame will allow the mounting bolts to freely pass through. I had one hole that was a little small and needed to be drilled. But once in place, all holes lined up perfectly. I couldn't be happier with the end result.
Etrailer.com has the best prices on hitches and related hardware, and free shipping just makes the deal even better. Ordered hitch and four days later it was on on the door step. etrailer.com even has videos to help with installation. The hitch and hardware are of very good quaility and may out last the vehicle.
Quality product. Had a little bit of a difficult time getting holes to align, but think that was more due to the fact that I was putting a hitch on a 2005 body in 2018 and so the body of the van had "changed" a little from factory settings. Watching the installation videos greatly helped.
am very satisfied with the trailer hitch.self-installation was ok with a few minor problems and scrapes.
Transport bent both of the ends of the trailer hitch. Had to bend back then everything fit. On a ford freestar 2006. Overall was great.
Good product overall. A solid piece of hardware with an excellent video for installation on the website. A little difficult with the fishwire on one of the bolts. Also the holes took a little convincing with a hammer to line them up. Other than that, pretty simple installation. Shipping was fast and reasonably priced, free for ground. Thanks again.
Every thing fit great. I watched the video and it saved me lots of time.It took me longer to get the van jacked up and on the jack stands then it did to installed the hitch and wiring.
Received the hitch very promptly. Fit was very snug and took some work getting it into place in order to put in the bolts, but once in place it bolted right up. The fish wire was very useful, what a great idea to include in the kit!
Hitch arrived very quickly. Very good service. Hitch was as described. Install took longer for me because it was only me doing the install. Otherwise it is a great product. Highly recommend etrailer.
The hitch arrived in five days, including the week-end. The instructions were concise and the hitch went on as advertised.
I would recommend the company, etrailer, for a good product and service.
This hitch seems very well built and bolted right up to my Monterey. Install time was about an hour and a half by myself with a floor jack to help. Probably could go faster but a 2 1/2 yr old helper kept running off with tools and parts.
Do you have a question about this Trailer Hitch?
Info for this part was:
At etrailer.com we provide the best information available about the products we sell. We take the quality of our information seriously so that you can get the right part the first time. Let us know if anything is missing or if you have any questions.


Larry
8/14/2020
Still working perfectly. Thanks for a great product at a good price!!