
Summer Starts Here - Save up to 70%
To see if this custom-fit item will work for you please tell us what vehicle you'll use it with.
Thank you! Your comment has been submitted successfully. You should be able to view your question/comment here within a few days.
Error submitting comment. Please try again momentarily.


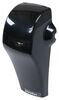
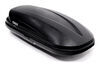
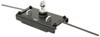
This fully welded trailer hitch receiver bolts onto your vehicle's frame with no welding required. Powder coated steel is sturdy and corrosion resistant.
Features:
Specs:
At etrailer.com we're committed to the products we sell, and to our customers. Our experienced and knowledgeable staff are available via both phone and email to address your questions and concerns for the lifetime of your hitch. The technicians at etrailer perform hitch installations on a daily basis, making them a valuable resource for do-it-yourselfers. The one-on-one, personal service you'll receive comes straight from an expert in the towing and automotive field. We've installed it, we've wired it and we've towed with it, so whatever your question, we can answer it.

Videos are provided as a guide only. Refer to manufacturer installation instructions and specs for complete information.
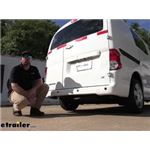
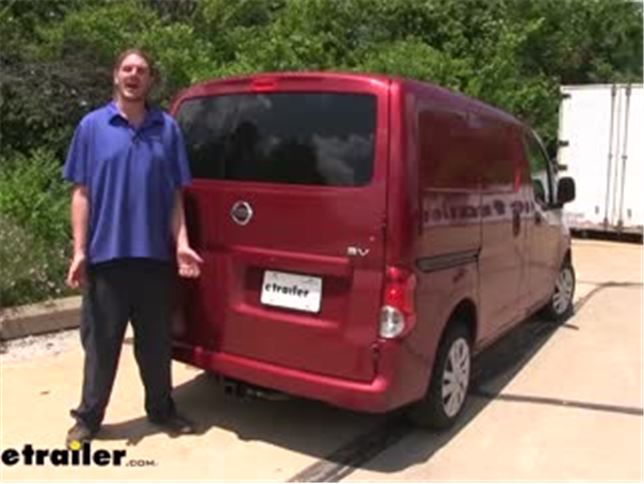
Hi there Nissan owners. Today on your 2014 Nissan NV200 we're going to be installing CURT's Class III 2" Hitch Receiver.Part of the cross tube is going to be hidden behind the bumper but there is going to be a section toward the middle that is going to be visible. It's a Class III 2" x 2" receiver so it's going to be great for just about all of your towing needs, whether you're putting a cargo carrier on the back to haul a generator to the job site or you need to bring your utility trailer along to help clean up a mess.It uses a 5/8" hitch pin and clip. Now one doesn't come included with the hitch but you can pick one up here at eTrailer.com.Below our receiver we'll have plate-style safety chain loops. They do have a fairly large opening. It is a little thicker towards the bottom so some of your smaller safety chains may be a little bit tighter getting them on but it should accommodate most sizes.As always you want to verify in your vehicle's owner's manual to ensure you don't exceed any of its towing capacities.
If you we're wondering if you can use a weight distribution system, it is not rated for weight distribution.Now I'm going to take some measurements for you to help you when deciding on accessories. From the center of the hitch pin hole to the edge of the rear bumper it measures about two inches. This is important when determining if any of your folding accessories can be placed in the upright storage position without contacting the bumper. From the ground to the top inside edge of the receiver tube it measures about 12-1/4 inches. This is important when determining if you need to drop, rise or raise shank on any of your accessories.Now that we've gone over some of the features it's a pretty straightforward installation.
Lets go through it together so you can have the confidence to do it yourself.We'll begin our installation underneath the rear of the vehicle. We've already taken the spare tire out. Now we're going to lower down our exhaust. To lower it down we're going to use some spray lubricant on the rubber isolator. Then you can just pry it off from there.
That'll give us enough clearance there to get our hitch installed.On the bottom side of our bumper, near our exhaust, we'll have two tabs. We want to remove those. You can use a flat bladed screwdriver or a trim panel tool to pop out the center of the tab. Once the center's popped out you can then just pull the tab out.We can then fold this down. We're going to trim along the angled edge here where ...
That you see this straight line because we're going to be re-inserting this tab later but the rest of this we will not. We're going to cut it all the way up to where it flexes. From there we'll just cut across and we're going to be removing this whole section.After you have made that trim you'll want to check your fit. You can see here, that's the hole where our bolts going to go down so we're still going to be covering it up. If you're still covering it you may need to go over further. Since this is going to remove the single tab we have to hold this on, we're just going to continue cutting this entire piece off.We're now ready to fish wire in all of our hardware. We're going to start with the furthest forward mounting location. We're on the passenger side here. We're going to slide our fish wire coil then up into the frame. We're going to bring it towards the back. Then we're going to come out the large hole just to the rear of your relief spring. On the coiled side we'll then slide our spacer on over the fish wire, thread our bolt on. Then we're going to work that back towards the hole. We're now going to repeat that same process for the hole just to the rear of the one we inserted and the large hole here at the back, if you come towards the center you'll find another hole next to that. We're going to be using this hole as well. Totalling three bolts on each side.Now with an extra set of hands we'll start feeding our hitch in place. We want to go up over the exhaust. Once you get over the exhaust you're probably going to need to come down a little bit to go passed the frame so the passenger side can then get up over in place. Once you've got it in place you'll take your fish wires and run them down through your holes. Now we can lift our hitch into position. You can remove the coiled wire. Then thread on one of the flange nuts that come in your kit. Once you get one nut started on each side it'll hold the hitch up making it easier to install the rest of your hardware.If you're having trouble getting all of your hardware installed you may need to install one bolt and then tighten it up some so the other one will poke through far enough to install the nut on it. You can now go back and tighten down all of our hardware. We're going to use a 19 millimeter socket to do so. Then we can go back and torque all of our hardware to the specifications found in your instructions.With our spare tire in place our installations complete.That completes our installation of Curt's Class III 2" Trailer Hitch Receiver on our 2014 Nissan NV200.
Average Customer Rating: 4.7 out of 5 stars (72 Customer Reviews)
This fully welded trailer hitch receiver bolts onto your vehicle's frame with no welding required. Powder coated steel is sturdy and corrosion resistant.The hitch showed up in a timely manner and I installed it immediately based on the video.
In the video, the fishing of the bolts\washers was glossed over. I ended up using a 12 gauge wire to fish around to the openings where I would tape the supplied fish wire. Also, you have to go OVER the hub for the suspension. If your wire goes under, when you fish, the bolt head won't fit. Once the bolts were all fished through, installation went easier than I would have expected.
The instructions was hard to understand, and the middle bolt was was the hardest to install because there was no explanation of how to pull the bolt guide through the frame, instead of a 1hr job took me 3-4hr but I finally figure how it works and the hitch was a super tight fit I had to use my jack to push it up to make it fit in so I can tighten it up,
This was a relatively straightforward install on my 2021 NV200 aside from the fact that I first tried option 1 (as described in the instructions) for fishing bolts from the back and just could not get the bolt and spacer past the suspension shackle. The guy in the video made it look easy but he’s probably done it a hundred times and has the right touch. No matter how many times I tried, over a period of about an hour, the bolt and spacer just got stuck on the suspension shackle (I was lured into a sense of confidence after watching the video and with the knowledge that I am pretty good at fishing wires; the skill did not readily transfer). Then it took me another hour to get the bolt back out again to try option 2. With a titanium unibit, enlarging the secondary frame access hole and fishing from the front was way easier (I just had a standard drill; a right angle drill would have made it easier to work in that tight space). I thought I would save time with option 1 and not having to enlarge the secondary access hole but in retrospect the whole process would have been much simpler if I had begun with option 2. With this one exception, the how to video and the instructions are excellent and I was able to tackle the project with confidence despite never having installed a hitch before. I loved the fish wires that came as part of the kit that were designed to thread onto the bolts (very clever). I of course removed the spare tire before I started to have space to work under the van and get the hitch into position, but could not get the exhaust detached from the rubber isolator. I just gave up on that as there was enough play in the system to get the hitch up and over the exhaust system without fully detaching. I had to remove a small bracket used to hold wiring on the right and cut away some of the trim to expose a rear mounting hole. One other detail I had to address was my van has an aftermarket rear seat installed and the anchor bracket for that interfered slightly with the positioning for the hitch. I used a grinder to cut a small notch in the hitch so it would fit around this bracket.
Pretty easy and straightforward install. I handled it alone in my carport, and it took about 3 hours, total. I didn't need to elevate the van at all, and I used basic tools, the scissor jack that came with the van as an extra hand at the end, and a dremel to enlarge the frame holes to fish the bolts through using method #2, as the process shown in the video was not possible on my '15 Chevy City Express. Enlarging the forward frame holes to fish the bolts through was the toughest part, but wasn't overly difficult, and I sprayed the holes with a little rustoleum paint I already had when I was finished to prevent rust. (Keep that in mind if you don't have any on hand.) I needed to remove one small bracket holding some wires from the frame on the passenger side, and just zip-tied the wire to the hitch in the same spot when I was done. The same wire also needed to be slightly relocated just below the rear bumper to allow the hitch to fit into place. Those two steps were not in the directions, but were obvious and very simple to take care of with 2 zip-ties. Overall, the fit of the hitch was really good, and so far it seems like a high quality piece. The paint looks good, it doesn't protrude from the rear bumper, and it is very sturdy but not excessively heavy. I am happy with the purchase and install. If you're handy and have tools don't waste your money paying a shop to put it on for you, and you don't need a lift, ramps, or jack stands.
Hitch fit my Nissan NV 200 exactly. No cutting or drilling was required to attach hitch. Ingenious method to get the mounting bolts to proper location!
I would surely recommend etrailer to anyone looking to buy a trailer hitch.
Nissan nv200 curt hitch. A great product, but a bit misleading on the ease of mounting. Bolts are 2 big to fish around leaf spring mount. And no demo on the difficulty enlarging hole to access mt. Points.

Sam

3/9/2023
No issues
I was amazed at how well the hitch fit. However I don't see any way to get the bolt and plate over or under the spring shackle (option #1)
Thank you !!! No issues whatsoever

Albert M.
10/12/2018
Perfectly great product A+
This the the 4th hitch I have ordered for a vehicle from etrailer. Service is always fast. Parts are accurate. Installation has never been difficult.
If I ever need another hitch, I'll be back.

Trailer H.
4/2/2018
All works fine. When I need trailer parts for my new vehicles, RV, or trailer, I always shop etrailer.
Fits perfect , only only thing I would highly stress about installation and do believe should be added to footnotes is when you feed the wire thru frame to drag bolt thru make sure the wire is on top of the shackle bolt inside the frame .
I learned the hard way . Fed wire thru , then attached bolt and washer and went to pull thru and it got wedged under the lower bolt shackle inside frame and was stuck . Had to drill a hole inside van right above the area to retrieve bolt .
Really need to add to instructions . After I figured that out rest were fairly easy . But big set back back for one bolt .
Well designed product.
Items to note;
The facia needs trimming but not how the instruction say.
Mine has the bumper proximity sensors which required loosening the wires and cutting a mounting stud.
The instructions show the four frame mounting bolts being feed through the frame with the 1x3" spacers kinked on the wire. This should me more obvious...

Evan
6/3/2020
A year later and still great. I don’t use it much though.
Good heavy hitch, it looked flimsy in the picture.
Don't install this hitch if you're not comfortable with a 1" hole saw (not 7/8" like the instructions say). Wear eye protection. The metal pieces go everywhere!
Don't even try to fish the bolt thru the rear access hole- just do the optional bolt installation. (Enlarge the forward frame access hole to 1" just in front of the hitch bolt holes.)
Have some help and put vehicle on a lift if possible.
Mark and trim the plastic part by holding the hitch up to the bumper and mark what needs to be trimmed before you take the trim fasteners out.

The hitch is solid and is well hidden under the bumper but it has started to rust a little from paint scratches at the receiver. Overall installation was challenging (the hitch had warped during shipoing( but strainer customer service was very helpful.
The hitch is awesome, I had trouble getting the bolt plates thru the side rails in the frame. after a few hours fighting it, I just drilled a hole thru the floor will use the metal that came out with hole saw to plug the holes. the back to bolts were ok to put in. all in all, for a guy that has not put a hitch on in over 20 years, it took me about 4 hours with my Neighbors help.
Is instaled already in the van, look good and I believe will be right for what I need, pull a trailer with 2 motorcycles and my other trailer with my jet ski if I need,but the main purpose is to hold a basket in the hitch to carry 4 or 5 cans with fuel and a small generator in long trips, installation was not difficult when my son and I found the way, fit perfect, look strong and I’m satisfied with my purchase.
The hitch was literally thrown into the box with absolutely NO packaging material wrap. Came in scratched up. Rust will be a problem if I keep this. Returning this to order from someone that knows how to package their orders.

Jenny N.
4/6/2022
I will have our Customer Service team reach out to you. I recommend touching up the affected areas with a rust resistant paint which you will then have on hand for regular hitch maintenance.
Helpful Links
One year later, I am still totally happy with the quality and value of my hitch. It fiits a nissan nv200 cargo van. It is a 2 inch hitch and very heavy.
I am very happy with the simple installation of this trailer hitch. It installed pretty much as shown on the [installation] video. My only problem is that I may have ordered the wrong hitch for my year van. The frame Chanel was almost completely boxed in at the end with only about a 1 1/2” square hole to fish the bolt and plate thru. With a few adjustments I managed. Very happy with the product though.
This is a very good and solid product. Installation can be pretty tough so you definitely need some patience, but once it is in there is no issue at all.
I used this for a bike rack and it worked perfectly.
Great hitch, fits perfect (maybe too perfect). Instructions were lacking. 7/8" hole for fishing won't work with 1" parts, required 1-1/8" holes. Bumper trim that required cuts were wrong. I suggest putting in place to see cuts. Hitch fits so well, I had to remove any extra sealant left by Nissan at factory and use a floor jack to lift in place.
Little trickey installing this but I managed it using a large pneumatic jack I have for working on all sorts of farm equipment. Liked the ingenuity of the wire/threaders for the nuts and bolts. It fit perfectly into the rear space under my Nissan NV200 and does not interfer with the spare tire. I am very pleased with it.
Perfect fit, works as needed. It is very low to the ground so you may want the hitch rise device. I added it and it keeps the basket I put in the hitch from rubbing on the ground when driving out of parking lots.
Wiring harness was super simple. Trailer hitch was also very easy to install. Will be using to tow small utility trailer. Great company to order great products from!
Had the Curt hitch installed and it looks like a good fit. The customer service at etrailer is absolutely the best and has the best prices.
Do you have a question about this Trailer Hitch?
Info for this part was:
At etrailer.com we provide the best information available about the products we sell. We take the quality of our information seriously so that you can get the right part the first time. Let us know if anything is missing or if you have any questions.


Jenny N.
3/8/2022
I recommend using the bolt leader to fish wire the bolts through the hole in the frame towards the rear of the vehicle. The video link below shows this location after mark 3:20.
Helpful Links
tv-install-curt-class-iii-trailer-hitch-2014-nissan-nv200-c13165.aspx