
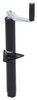
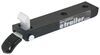
Curt Trailer Hitch Receiver - Custom Fit - Class I - 1-1/4"
(1 reviews)
Price: $201.52
Curt Trailer Hitch Receiver - Custom Fit - Class I - 1-1/4"
Item # C11492
Retail:$328.95
Our Price: $201.52
You Save: $127.43
Will this fit?
To see if this custom-fit item will work for you please tell us what vehicle you'll use it with.


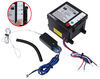
Need help with installation?
Locate installers near me- All Info
- Reviews (1)
- Q & A (0)
- Videos (1)
- Photos
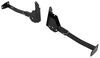
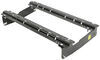
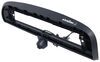
CURT Trailer Hitch - C11492
- Class I
- 1-1/4 Inch Hitch
- 2000 lbs GTW
- Concealed Cross Tube
- 200 lbs TW
- CURT
- Custom Fit Hitch
Perfect for light-duty towing, this custom, vehicle trailer hitch receiver features fully welded, gloss powder coated steel construction. Drawbar sold separately.
Features:
- Custom fit is designed specifically for your vehicle
- Precision, robotic welding maximizes strength and improves fit
- Bolt-on installation - no welding required
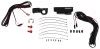
- Complete hardware kit and installation instructions included
- Lifetime technical support from the experts at etrailer.com
- Gloss black powder coat finish over protective base coat offers superior rust resistance
- Sturdy, square-tube design
- Drawbar, pin and clip sold separately
- Hitch assembled in the USA, bolts overseas
Specs:
- Receiver opening: 1-1/4" x 1-1/4"
- Rating: Class I
- Maximum gross trailer weight: 2,000 lbs
- Maximum tongue weight: 200 lbs
- Limited lifetime warranty
etrailer.com Technical Support
At etrailer.com we're committed to the products we sell, and to our customers. Our experienced and knowledgeable staff are available via both phone and email to address your questions and concerns for the lifetime of your hitch. The technicians at etrailer perform hitch installations on a daily basis, making them a valuable resource for do-it-yourselfers. The one-on-one, personal service you'll receive comes straight from an expert in the towing and automotive field. We've installed it, we've wired it and we've towed with it, so whatever your question, we can answer it.
11492 Curt Class 1 Trailer Hitch Receiver
Installation Details
This Product Fits The Following Vehicles
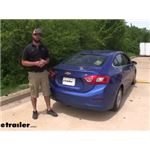
- 2017 - 2018 Chevrolet Cruze Sedan - Diesel


Video of Curt Trailer Hitch Receiver - Custom Fit - Class I - 1-1/4"


Videos are provided as a guide only. Refer to manufacturer installation instructions and specs for complete information.

Video Transcript for Curt Trailer Hitch Installation - 2017 Chevrolet Cruze C11492
Jake: Hey guys, it's Jake here with etrailer. Today we're going to take a look at and I'm going to show you how install the Curt Hitch on our 2017 Chevrolet Cruz.Now our Cruz we have here today is a diesel, so it is going to be designed to fit on the back of your diesel. Down here you'll see that our hitch is an inch and a quarter, by inch and a quarter receiver. This is going to be great for any bike racks, cargo carriers, anything that has that inch and a quarter shank is going to work great with this hitch. It's going to have a steel construction with a black powder coat finish to keep it away from that rust and corrosion. Now one thing I really like about this hitch is that it's going to be tucked up further underneath your bumper, so that you're not going to have to worry about seeing it when not using it.It is going to come with these hooks so you are going to be able to attach your safety chains when hauling a trailer.
So with this hitch you are going to get a max tongue weight of 200 pounds, and a max trailer weight of 2,000 pounds. So you just want to keep that in mind when loading your trailer. Now Curt does recommend that you use their stabilization strap when hauling anything like a cargo carrier, or a bike rack. Now on the side you'll see that you have a through hitch pin hole, that's going to be a half inch diameter. It does not come with a hitch pin, but we do have plenty of those here at etrailer.Now a couple of measurements for you guys, just so you know what you're getting.
From the ground to the top of the receiver it's going to be about 12 1/4 inches. Now that's not going to give you a ton of clearance, so I would recommend any accessory that you pick up, you pick one up that has a raised shank. From the center of the hitch pin to the outermost part of our bumper is going to be about 5 inches. So make sure that you have an accessory that can get out past your bumper. Now that we've gone over some of those details, let's go ahead and take it inside and show you how we got in in place.To start our installation we're going to need to remove, there's four bolts up underneath here, there's one there, here, here, and here.
Remove those. Here we're using a 9/32 socket to get those screws out. Next you're going to remove the three screws in the fender, with a number 25 Torx bit. Once you have those three bolts taken out, you can pull back your fender liner, and we'll need to remove that hex bolt there. And you'll want to repeat the process for the passenger side.Now we're going to have to remove our rear taillight in order to remove the rest of the bumper.
So we're going to have to take out the snap pin, and then you can pull back this fabric, and behind here you're going to see that there's three nuts that you're going to have take off the back of the headlight in order to remove it. Here we're using a 5/16 socket wrench in order to remove those. Once you remove the nuts from the back of each taillight, you're going to then pull out on it. You may need a trim panel remove tool, pull it out, then you can unplug it. These are going to be a twist off, and then set this to the side.Then what you're going to do is pull your bumper until it comes out of those, it's just going to unsnap, slide your hand back in there, pop it off. Then you'll want to remove your brake sensor wiring, you'll pull back on that red tab and pull out on that wire. Then you'll want to set this to the side so it doesn't get damaged. Now we can remove our three nuts from each side of our bumper. Now you can remove your bumper.Now you can set your hitch into place, and we'll take our bumper we just took off, and slide it right back over top. And you can replace your hardware. And then tighten it all back down. Then you'll want to torque these back down to the specifications, there we go.Now we're going to have to trim a little bit out of our rear bumper. So we see that we have ours marked out here. You're going to cut 2 1/4 across, by 4 1/2 inches long. We're just going to use a tin snips and cut right through that plastic. This is what it's going to look like once you got it all cut out. Now we can take our bumper, and slide it back into place. Now make sure you remember to reconnect your sensors. Now we can go ahead and replace out taillights and all the bolts we took out.Now with everything put back in place, that's going to do it for our look and installation of our Curt Hitch on our 2017 Chevy Cruz.
Customer Reviews
Curt Trailer Hitch Receiver - Custom Fit - Class I - 1-1/4" - C11492
Average Customer Rating: 5.0 out of 5 stars (1 Customer Reviews)
Perfect for light-duty towing, this custom, vehicle trailer hitch receiver features fully welded, gloss powder coated steel construction. Drawbar sold separately.by: Kenya05/16/2020
I got a hitch on my chevy cruze and it works flawlessly. I moved cross country and it worked great!!!
1
1
See what our Experts say about this CURT Trailer Hitch
- Does 2017 Chevy Cruze Diesel Have Towing Capacity and Parts Needed to Tow Small TrailerI took a look at the owner's manual for your 2017 Chevy Cruze and on page 261 it states "The vehicle is neither designed nor intended to tow a trailer" so I cannot recommend you do so, though the decision is of course up to you. If you do decide to tow, then you will absolutely want to go with the lightest, smallest of the trailers. For a diesel model of '17 Cruze the available trailer hitch from Curt is part # C11492, and since you mentioned 2" ball I assume you are also using the Euro...
view full answer...
Info for this part was:

Edited by:
Lindsey S

Video Edited:
Jacob T

Video by:
Chris R

Updated by:
Wilson B

Updated by:
Kristina F

Updated by:
Isabelle B

Written by:
Amanda M

Test Fit:
Jacob H
At etrailer.com we provide the best information available about the products we sell. We take the quality of our information seriously so that you can get the right part the first time. Let us know if anything is missing or if you have any questions.
Product Experts Available Now!
Call 1-800-940-8924
Thank you! Your comment has been submitted successfully. You should be able to view your question/comment here within a few days.
Error submitting comment. Please try again momentarily.