
Summer Starts Here - Save up to 70%
Thank you! Your comment has been submitted successfully. You should be able to view your question/comment here within a few days.
Error submitting comment. Please try again momentarily.
Perfect for light-duty towing, this custom, vehicle trailer hitch receiver features fully welded, gloss powder coated steel construction. Standard drawbar included.
Features:
Specs:
At etrailer.com we're committed to the products we sell, and to our customers. Our experienced and knowledgeable staff are available via both phone and email to address your questions and concerns for the lifetime of your hitch. The technicians at etrailer perform hitch installations on a daily basis, making them a valuable resource for do-it-yourselfers. The one-on-one, personal service you'll receive comes straight from an expert in the towing and automotive field. We've installed it, we've wired it and we've towed with it, so whatever your question, we can answer it.

Videos are provided as a guide only. Refer to manufacturer installation instructions and specs for complete information.
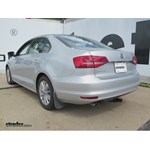
Today on our 2015 Volkswagen Jetta we're going to review and install the CURT Class 1 1-1/4" Receiver Tube Hitch, Part Number C11410. Here's what our hitch is going to look like once installed. As you can see it's a really nice well-built hitch. It's a full steel welded construction with a really nice black powder coated finish. Here on either side we have our chain holddown, and going through our 1-1/4" by 1-1/4" receiver tube is a predrill 1/2" hole. This hitch is capable of up to 200 pounds of tongue weight and a 2,000 pound tow capacity. Next I'm going to give you a couple measurements to assist you with selecting accessories for your new hitch. From the center of hitch pin hole to the outermost edge of the bumper is 5".
From the top of the receiver tube opening down to the ground is 12". This will assist you in selecting accessories such as a ball mount or bike rack. We'll now go ahead with the installation. Now to begin our install, we need to lower the exhaust here on the drivers side. To lower the exhaust we have two options. We can remove the tube bolts that secure the the metal hanger to the frame or the rubber isolater here from the metal hanger coming from the muffler.
We're going to go ahead and remove the isolater from the hanger by spraying it down with a little spray lubricant and then use our pry bar or pliers to remove it. Now once we slide the isolater off the hanger, we can go ahead and let the exhaust come down. Next let's go ahead and point out our attachment points. We're going to have a total of four attachment points here in the rear. These attachment points already have fasteners in them because they're part of the rear bumper structure. We're going to remove two fasteners here on the drivers side and the same two on the passengers side.
Make it a little easier to access them, we're going to go ahead and remove the tow hook cover and then we can see the two here on the passenger side. Now with our attachment points opened up, we need to remove the three torch fit fasteners along the rear bumper fascia. This will help create access so that we can get our hitch behind the rear fascia. Let's go ahead and pull the four fasteners out now. After we remove these three torch fit fasteners, we'll hang on to them as they will get reinstalled. Now for each of our rear bumper attachment points, once we get our hitch in place we use the 8 millimeter hex bolt to secure the hitch. This'll take the place of the older manufacturers hardware.
We're now ready to go ahead and put our hitch in place. It's a good idea to get next to the hands to help you hold the hitch while you install your fasteners. Now that we install our fasteners, we'll install each one finger tight until we have them all in place. Now with our hitch in place we're going to go ahead and tighten it down and torque the four 8 millimeter fasteners to specifications. We're going to go ahead and reinstall the fascia screws to re-secure it. Note, the center attachment point here for the rear fascia is covered up and can no longer be reinstalled. Next we can go ahead and reinstall the exhaust. Next we're going to install the chain loop plate. The chain loop plate attaches here to the bottom of the hitch and then also to the spare tire well. To secure it in position we're going to use the 1/2" carriage bolt and flange nut provided with the install kit. Our carriage bolt will drop down through the hitch, we'll have one for each side, and then we can put the chain loop plate in position and secure it with the flange nut. Now we're not going to fully tighten it up because we'll need enough room to get the rubber plugs out of the spare tire well. Next let's move into the trunk. Remove the contents and the plugs. Now to remove the two rubber plugs we're just going to use our utility knife and cut them away. Once I have them cut I can simply just go ahead and push them through. Now securing these two attachment points we'll have a large block that'll fit down over the top of the hole. 1/2" carriage bolt that will go through the block, through the spare tire well, then through the chain loop plate and get secured underneath with the 1/2" flange nut. Now before we put this hardware in place, we're going to go ahead and use some silicone RTV to seal up around the hole. All right, now with the hardware in place we'll go ahead and put the bracket up, make sure that our carriage bolts line up with it, and then install our flange nut. Now once all our 1/2" hardware is in position, we'll go ahead and tighten it down and then torque to specifications as indicated in the instructions. Now with everything tightened down and torqued to specifications we'll go ahead and reinstall the spare tire and tools. Now with everything installed, tightened down, and torqued to specifications, we're ready to hit the road. That'll do it for the review and install of the CURT Class 1 1-1/4" Receiver Tube Hitch, Part Number C11410 on our 2015 Volkswagen Jetta. .
Average Customer Rating: 4.0 out of 5 stars (1 Customer Reviews)
Perfect for light-duty towing, this custom, vehicle trailer hitch receiver features fully welded, gloss powder coated steel construction. Standard drawbar included.
The trailer hitch here is real good, I ended up having to take it off because of Semi-Truck drivers doing crazy stuff on the highway when I was towing with it, swerving infront of left lane traffic and even at one point pushing me off the main roadway when I had to swerve to avoid collision when entering a construction zone; the Semi-Truck drivers arrogance and disregard for my and my propertys' safety was the problem, because certainly he saw me. The hitch bent at such an angle and was still able to function for me to reach my destination, but I do not feel comfortable using the bent hitch anymore should it decide to snap or something.
I would buy this product again, as it secures to my car very appropriately and is a proper fit.
Take your time while driving and be 110% aware on your journey's.
Info for this part was:
At etrailer.com we provide the best information available about the products we sell. We take the quality of our information seriously so that you can get the right part the first time. Let us know if anything is missing or if you have any questions.


Michael C.
11/3/2017
The hitch worked great on my VW Jetta, it was easy for me to put on, was able to climb under the rear-end of the car and everything matched up to the vehicle perfectly. Even had an incident where a rude tractor-trailer driver swerved suddenly in-front of me, cutting me off, and I had to veer off the driving portion of the road with a loaded trailer behind me, it bent the hitch and tongue assembly, but I was able to continue as-is with no damages to my vehicle, later I certified the bent hitch not–safe for further use because of the bent potions, but I’d buy this hitch again for my VW Jetta because it was a perfect fit. Be careful out there folks, we all have places to be.