bing tracking image
  1. Trailer Brake Controller
  2. CURT
  3. Electric
  4. Electric over Hydraulic
  5. Time Delayed Controller
  6. Up to 4 Axles
Curt Discovery NEXT Trailer Brake Controller w/ Custom Harness - 1 to 4 Axles - Time Delayed

Curt Discovery NEXT Trailer Brake Controller w/ Custom Harness - 1 to 4 Axles - Time Delayed

Item # C25GV
Our Price: $99.95
Trailer Brake Controller
Add to cart
In Stock
zoom in icon
slider vertical icon
zoom out icon
Comment field cannot be left empty.
Name field cannot be left empty.

Thank you! Your comment has been submitted successfully. You should be able to view your question/comment here within a few days.

Error submitting comment. Please try again momentarily.

Product Images

In Use/Installed

Need help with installation?
Locate installers near me
An easy-to-read digital number display, 10 power levels, and a pinch-trigger manual override make this time-delayed brake controller easy to use. Installation is simple with no mounting restrictions. Activates brakes with a preset intensity. Great Prices for the best trailer brake controller from CURT. Curt Discovery NEXT Trailer Brake Controller w/ Custom Harness - 1 to 4 Axles - Time Delayed part number C25GV can be ordered online at etrailer.com or call 1-800-940-8924 for expert service.
  • All Info
  • Q & A (0)
  • Videos (4)
  • Photos

CURT Trailer Brake Controller - C25GV

  • Electric
  • Electric over Hydraulic
  • Time Delayed Controller
  • Up to 4 Axles
  • CURT
  • LCD Display
  • Under-Dash Box
  • Dash Mount
  • Automatic Leveling
  • Up to 360 Degrees

An easy-to-read digital number display, 10 power levels, and a pinch-trigger manual override make this time-delayed brake controller easy to use. Installation is simple with no mounting restrictions. Activates brakes with a preset intensity.


Features:

  • Brake controller activates trailer brakes with preset intensity
  • Adjustable power output control lets you select the amount of braking force
    • Rocker switches located on left front of module for easy access
  • 10 Gain settings and 9 load settings allow you to adapt to various driving conditions
    • Select a higher setting for harder braking and lower for more gradual braking
  • Pinch-trigger manual override is within easy reach for controlling trailer sway or stopping in emergencies
  • Simple LED display shows the amount of power output
    • Self-diagnostics monitor trailer connection and check for shorts
  • LCD display shows power adjustments in 0.5 increments
    • Brightness is adjustable for optimal visibility
  • Auto-sleep mode prevents battery drain after 5 minutes of idle time
  • Quick and easy installation with no mounting restrictions
    • No need to mount level - install anywhere at any angle
    • Included mounting bracket and hardware holds the brake controller flush against the dash
    • No complicated wiring - custom-fit harness lets you plug in and go


Specs:

  • Application: trailers with up to 4 axles (8 brake assemblies)
    • Compatible with low-volt, PWM, ABS, cruise control, and electric-over-hydraulic trailer brakes
  • Dimensions: 4" long x 3-1/8" wide x 1" tall
  • Warranty:
    • Limited lifetime on brake controller
    • Limited 1-year on wiring harness


Gain Adjustment

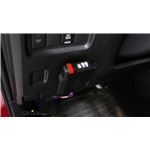
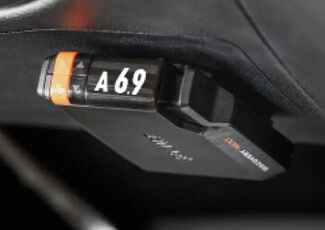
Gain control lets you set the maximum amount of power that will be applied to your trailer's brakes, adjusting in increments of 0.5. How much braking output you need is determined by the weight of your trailer; a heavier trailer will need more power to bring it to a stop. You want to go as high as you can without the trailer brakes locking up. Typically, the gain is only readjusted when you experience changing road conditions or if the weight of your trailer changes. To get more power to your brakes, press the upper orange rocker switch. To decrease the gain, press the lower switch. When you make your adjustment, the gain setting will show on the LED screen for 10 seconds as a series of bars and then go into sleep mode.


Load Control

Once you have the gain set, you can fine-tune your braking by adjusting the load control on a scale of 1 to 9. This controls the aggressiveness of your trailer's braking, meaning how quickly the brakes reach the maximum braking level. Load control can get the braking power to your trailer faster and with more intensity so that it doesn't push your tow vehicle forward. If your vehicle takes too long to come to a stop, increase the setting by pressing the upper black rocker switch. If it stops too abruptly, decrease the setting by pressing the lower switch. You can alter the setting to suit your driving preferences or to improve handling based on changing road conditions or varied trailer loads.


Pinch-Trigger Manual Override

The Discovery comes with a easy-to-reach, pinch-trigger manual override, great for stopping sway or controlling your trailer's momentum in emergencies. To engage the manual override, just push in the trigger. This will activate the trailer's brakes and brake lights without you having to apply the brakes on your tow vehicle, perfect for limiting trailer movement while you're cruising.


LED Display

The LED display on the Discovery is large and easy to read at a glance. It will show you what setting the brake controller is on as well as give you information for troubleshooting. You can adjust the screen brightness or trigger night mode so it won't glare obnoxiously on your dash. Press the control button to cycle through the different modes.


Curt Discovery NEXT

Quick Installation

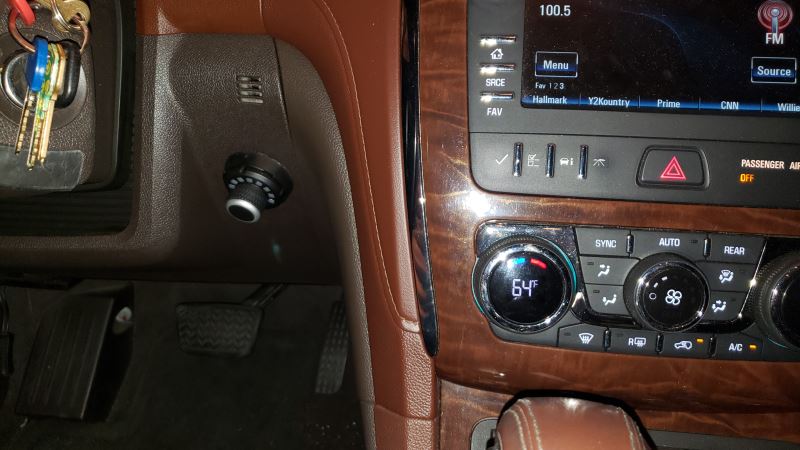
Because inertia plays no role in the functioning of this controller, you do not have to mount the unit at any particular angle. Your mounting options are limitless, so long as you can still easily access the controller and the manual override. The included bracket is designed to mount the brake controller flush to the dash so it takes up almost no space at all.


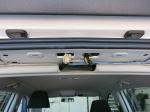
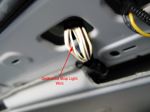
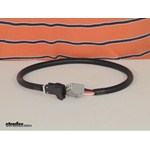
The included custom-fit adapter plugs into the port on your vehicle's built-in brake control wiring harness, which you'll find underneath the dash, to the left of the steering column, taped to another harness near the emergency brake pedal. Once you're plugged into your factory port, just plug the other end of the adapter into the Discovery. Because there are no wires to connect, installation is not permanent. You can unplug and remove the controller at any time to transfer it to another vehicle or securely stow it away.


Note: If you don't already have a 7-way plug at the back of your vehicle, take a look at our exclusive 7- and 4-way brake controller installation kit (ETBC7 - sold separately).


Time-Delayed Braking

what is time-delayed braking

The Curt Discovery comes equipped with time-delayed braking. Every time you apply the brakes in your vehicle, a signal is sent - via the brake switch - to the Discovery. The controller then sends power out to your trailer brakes to activate them with an intensity set by you, at a rate determined by you. Both the amount of braking power (gain) and rate of application (load) can be adjusted to suit your preference, the road conditions, the type of trailer, and the weight of your load. To determine which levels are best for your application, test your towing setup and choose what feels right.


51126 Curt Discovery NEXT Time Delay Trailer Brake Control - 1 to 4 Axles

Replaces Curt 51120

51422 Curt Quick Plug Brake Control Adaptor Harness

Installation Details C25GV Installation instructionsAlternate Instructions C25GV Installation instructions


Video of Curt Discovery NEXT Trailer Brake Controller w/ Custom Harness - 1 to 4 Axles - Time Delayed

Videos are provided as a guide only. Refer to manufacturer installation instructions and specs for complete information.


Video Transcript for Curt Discovery NEXT Trailer Brake Controller Review

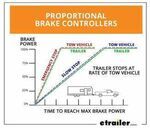
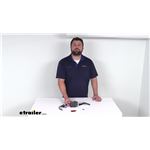
Hi, everyone, Aidan here with etrailer. Today, we're gonna be taking a look at the Curt Discovery NEXT Brake Controller. This is gonna be a time-delayed brake controller. Let's check it out. When it comes to brake controllers, there's gonna be two options you're probably looking at, time-delayed and proportional. Proportional is gonna be the nicer of the two where if you lightly press your brakes, the brakes in your trailer are also going to be lightly applied.

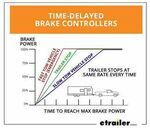
If you slam on the brakes, the brakes in your trailer are also going to match that proportionally. With a time-delayed brake controller, it's gonna be applied at the same rate every time, so you don't get that fine adjustment. You can still adjust the settings, but it's gonna be the same every time. So if we're rolling up to a stop sign, coming to a very slow and predictable stop, and our gain and sensitivity are set kinda high, it's gonna be applying the brakes pretty hard. Same for if we have those set kind of low and we slam on our brakes on the highway, because someone in front of us stopped, the brakes aren't gonna be applied in a similar fashion.

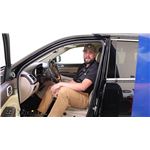
There is the manual override you can always pinch to apply, but that's just something to know with a time-delayed system like this. Let's talk about those controls. The manual override is a pinch style where I'm pressing the button with my thumb. It's pretty easy to reach from the driver's seat where I've got it all set up. So whenever I'm driving, I feel like if I needed to suddenly reach down and get it, I can find that pretty easily every time, and index my thumb well enough to get a good press.

So good to know for emergency situations where you might need that. Now, there's gonna be two sets of controls here for the gain and the load. The orange buttons are going to adjust our gain or our brake power. You can go anywhere from 0.5 up to 9.9, and this is going to signify the different power levels. So 0.5 is the weakest, and as I go up, it's going to get more and more powerful.

So if I have a heavier trailer that needs more stopping power, I'd set it higher. The next one is going to be our load. This is basically how quickly the brakes are applied, so that can go from 1 to 9. At 1, it's going to be the lowest, and at 9, it's going to be the fastest or the quickest application. So basically, ramping from zero to fully applied where we have that gain set. So for demonstration, I'm just going to put the gain all the way up to max, and I'm gonna hit the brakes. And you'll see, slowly, it'll climb up to where we set it. And if I turn that load down all the way to 1, it's going to climb much slower to that designated power level. So you can fine tune this to your own trailer application, and depending on how heavy of a trailer you have and how good the brakes are, that will determine what you want those set at. But generally, that gain is going to be for the weight of the the trailer, and you can kinda determine the load from there. Now, to give a visual indicator of that gain, we've got our vehicle hooked up to a trailer simulator box. I've got the gain set to the absolute lowest it goes, so that's gonna be the lowest brake power, and you can see where the voltage is reading right now. If I turn the gain up to 5, that's gonna be right in the middle, you'll see that voltage will climb up higher. And then if I turn it up to the max, 9.9, you'll see that climb up even higher. So this is just to give you some visual indication of that different power level of the braking. This is designed to work with trailers up to four axles and will work with PWM, ABS, cruise controller, and electric-over-hydraulic brakes. So keep that in mind as you're picking this out if it's gonna work with your trailer. Up to four axles, I'd say for the most part, you're gonna be totally fine. If you don't need one that can go up to four axles and you like this style, Curt does make a similar version that's up to three axles. So that's something to keep in mind too if you don't need this much. Now, the big advantage to something like this, and something you probably noticed if you're familiar with brake controllers already, is going to be the size. It's a lot smaller and a lot more shallow than the brake controller we pulled out of this 4Runner today. And that's great, because even though it's mounted externally, it's not going to be in the way of your knees as you're getting in and out of the vehicle. And as I'm in a normal driving position, I've got plenty of distance between it and my leg. I don't feel like I'm gonna be hitting it all the time, 'cause it doesn't stick out very far. That's thanks to the very low profile bracket. We've got it mounted up with the included double-sided adhesive, but you can also use the included self-tapping screws. Just know that they're pretty long, and you're gonna have to have clearance behind there. But this will just click into place over that bracket. (bracket clicking) You can hear that snap in, and that's what holds it in. One thing to note is that because it's not inertia based, you can mount this really wherever it fits best, so it doesn't necessarily need to be level or facing any certain direction. Now, the installation can vary depending on your vehicle. I'd say check for what your vehicle has in terms of pigtail adapters. That's what we we're able to do with this option from Curt. We offer this pigtail adapter on our site here at etrailer, and that allows us to just plug directly into the vehicle's prep package for this. So just check to see if your vehicle can do that, because that's definitely going to be the easiest option as far as installation goes, 'cause it just plugs right in and all you have to worry about is mounting up that bracket, and then tucking up that wire loom from the adapter. Something else to note is that that LED readout does have a number of different functions. You can adjust the brightness, there's a day and night mode, but it's also gonna give us readouts for different errors. So if something's maybe not fully connected or something, it will tell us here. Your instructions give you a full list of all the different errors that can occur and short descriptions of what they are. But because its screen gives full text readouts, it's pretty easy to tell what's going on based on what it's showing. Like for example, when we first hooked this up to our simulator box, we didn't have the 7-way plugged in all the way, and it told us it wasn't connected. So we went back there, pushed the plug in the rest of the way, and then it worked properly. So that's going to help with just troubleshooting anything that may be occurring in your setup. For me, I think this is a nice middle ground between having the controls, easy to access, and having that LED readout, so you can see those errors and the power, and just have a little bit more control over it while still staying out of the way and being flushed to the dash. But that was just our look at the Curt Discovery NEXT Brake Controller. Thanks for watching.


by:

This brake controller adapter harness fit exactly as described.


by:

I have a 2015 Traverse with V92 Factory tow package. All I had to do was plug this controller into the vehicle harness with the supplied plug and wala, everything worked perfect. Amy placed my order and she was very helpful in choosing what controller I wanted. Good Job Amy!


by:

Took about 10 minutes to install. Have not made all the adjustments yet, but is easy to understand.


by:

Tested . Work fine and advertised


by:

excellent service and delivery.


by:

Made it easy to adapt to the vehicle ha rness.


by:

I haven't installed this yet but it appears to be exactly what I needed. I can always count on Etrailer for my accessories


by:

Like its compact size and simple operat ion.


by:

Very helpful, knowledgeable and friendl y!


by:

Right adaptor wiring for our brake cont roller!


by:

This controller came ready to use out of the box, Watched a YouTube video on the installation just to be sure and installed it myself in about 1/2 hour [I work slow} We used it this weekend and it worked flawlessly, seems like it set itself up and just worked great


by:

Worked as described, harness is a little on short side so your limited as to were you can mount brake controller


by:

Perfect pigtail!
Made the install a breeze.
Excellent
service and delivery


by:

Connected and does what it's supposed to to do. No problems after a year of use.


by:

Plugged it in and everything worked accordingly. Thanks etrailer.


by:

Plug and Play just as stated


by:

Fits perfect can't ask for anything bet ter


by:

Easy to use. Plug and play!


by:

Makes hooking up controlled super easy


by:

Its easy to install yourself. Plug in then your all set. No issues.


by:

Plug right in no problem!


by:

Works great easy to mount


by:

Excellent fit great quality easy install.


by:


by:


25
47
Show More Reviews

See what our Experts say about this CURT Trailer Brake Controller

  • How Does the Curt Venturer Brake Controller and Adapter Install into a 2013 Chevy Traverse
    I checked your order notes and you purchased the Curt Venturer Brake Controller part # C74VV that you referenced plus the Brake Controller Installation Harness part # C51422. One end of the # C51422 will plug into the back of the brake controller and the other end will plug into a port under the dash of your 2013 Chevy Traverse. The harness will be located underneath the dash and left of the steering column, taped to another harness near the emergency brake pedal. There will be a 6-pin...
    view full answer...
  • Brake Controller Install Harness Recommendation for Curt Venturer in 2014 GMC Acadia
    We have just what you need. The custom install harness you need is the part # C51422 which will plug directly into the brake controller install port on your 2014 GMC Acadia and also to your Curt Venturer # C74VV.
    view full answer...
  • Installing Trailer Brake Controller on 2018 Chevy Traverse
    Based on my research it does look like the 2018 Chevy Traverse is equipped with blunt cut wires beneath the dash for installing a trailer brake controller as part of its standard package. To be certain of this you can visit a local Chevy dealer with your VIN and they will be able to tell you exactly what the vehicle was equipped with at the factory or you can simply check the appropriate location inside the Traverse to see if the wiring is present. On the 2018 Traverse the blunt cut wires...
    view full answer...
  • Parts Needed to Install Curt Brake Controller in a 2015 Chevy Traverse with Factory 7-Way
    To install the Curt Venturer part # C74VV in your 2015 Chevy Traverse with a 7-way all you need is the correct install harness, part # C51422. This plugs into the controller and then into the port under your dash and that's all that is required aside from mounting the controller. No visits to the dealer would be required either.
    view full answer...
  • Is It Easy to Install a Curt Venturer Brake Controller in a 2011 GMC Acadia with Plug In Adapter
    Installation for the Curt Venturer Trailer Brake Controller # C74VV in your 2011 GMC Acadia with the Curt Custom Wiring Adapter for Trailer Brake Controllers # C51422 would be very easy. You could definitely do it yourself. It would basically be you plugging the # C51422 into the back of the # C74VV and then plugging the other end to the port located underneath the dash, to the left of the steering column, taped to another harness near the emergency brake pedal. From there you would just...
    view full answer...
  • Brake Controller For 1993 Dodge Ram Truck
    To add a brake controller to your 1993 Dodge Ram truck, a great option is from Curt: - Curt Discovery NEXT Trailer Brake Controller # C84VV I like the # C84VV because it's a no-frills, easy to use, economical option that'll just get the job done - activating your trailer brakes. There are settings for the amount of braking you want, an LED display that shows the power output, and an auto shut-off. So it's really simple but also effective, and the only other thing you will need is the...
    view full answer...
  • Brake Controller Adapter Harness For 2022 Ram 1500 For Curt Discovery Brake Controller
    There is; I checked with Curt and verified for you the correct brake controller adapter harness for your 2022 Ram 1500 and the Curt Discovery Trailer Brake Controller # C84VV is the following: - Curt Custom Wiring Adapter for Trailer Brake Controllers # C51458
    view full answer...
  • Wiring Harness to Install Curt Discovery Brake Controller on 2010 Toyota Tundra
    In order to install the Curt Discovery Trailer Brake Controller part # C84VV on a 2010 Toyota Tundra you'll need the Curt Custom Wiring Adapter for Trailer Brake Controllers part # C51362.
    view full answer...
  • Wiring Adapter for Curt Brake Controller on 2008 Toyota Tacoma
    If your 2008 Toyota Tacoma has a factory 7-way, the only thing you will need to install the Curt Discovery Trailer Brake Controller # C84VV is the Curt Custom Wiring Adapter # C51362 which will plug into the port underneath the dash of your '08 Tacoma. If your truck does NOT have the factory 7-way you would need to add 4-way # 118496 along with Universal Installation Kit for Trailer Brake Controller # ETBC7. You will also need to use Universal Wiring Adapter for Curt Trailer Brake Controllers...
    view full answer...
  • What Is The Difference Between Proportional and Time Delayed Trailer Brake Controllers?
    The Curt TriFlex NEXT Trailer Brake Controller # C24VV you are looking at is a proportional controller. This means when you press on the brakes the controller is going to have an inertia sensor which then factors in how quickly the vehicle is stopping and adjusts the amount of power going to the trailer brakes from your original setting. The easiest explanation I can give you is when you lightly press the brakes to slow down this controller will lessen the amount of power sent to the trailer...
    view full answer...
    Image 1 for Image 2 for
  • Curt Brake Controller Adapter Harness for a 2020 Jeep Grand Cherokee
    In order to install the Curt Discovery Trailer Brake Controller part # C84VV on a 2020 Jeep Grand Cherokee you will need the Curt Custom Wiring Adapter for Trailer Brake Controllers part # C51446 which makes for a plug and play installation.
    view full answer...
  • Adding a 7-Way Trailer Connector and Brake Controller to a 2004 Nissan Xterra
    I will be happy to clear up what all you will need to add the equipment to tow the trailer and activate the electric brakes. First, if your 2004 Nissan Xterra does not already have a trailer hitch you will need to add one. A popular option is Curt trailer hitch # 13183. This is a Class III hitch with a 2 inch receiver. The hitch itself is rated for 400 pounds tongue weight and 4,000 pounds gross trailer weight but limited to the vehicle capacity if lower. I also recommend etrailer ball...
    view full answer...
  • Brake Controller Installation in 2000 Ford F-150 That Had Factory Wiring Removed
    Since your 2000 Ford F-150 came with the wiring under the dash you can install the Curt Discovery # C84VV but I recommend using the Universal Wiring Adapter # C51515 and Butt Connectors # DW05744-5 instead of the Custom Wiring Adapter # C51322. The universal adapter has blunt cut wires that you'll attach per function (see below) while the custom adapter is designed to connect directly to that connector that was cut off from under your dash. Here are the connections you'll make for the...
    view full answer...
  • Complete Brake Controller Set-Up For A 2012 Mazda CX-9
    I wouldn't abandon your T-One Vehicle Wiring Harness with 4-Pole Flat Trailer Connector # 118520 for your 2012 Mazda CX-9. Since you mention that one of your trailers requires a 7-way and one does not, I recommend installing the Universal Installation Kit for Trailer Brake Controller # ETBC7 as well. This kit will give you the functionality of a 7-way and a 4-flat trailer connector so you can easily tow both of your 2 Casita Trailers. Additionally, the only way to be able to use a 7-way...
    view full answer...
  • Curt Brake Controller Wiring Harness for 2018 Ford F-150
    Curt replaced the 51437 with the # C51436 which fits a 2018 Ford F-150 (among other Ford vehicles) and is compatible with the # C84VV Curt Discovery brake controller.
    view full answer...
  • Troubleshooting Trailer Brake Controller that Only Functions When Engine Isnt Running
    That is an interesting problem you are having, but the problem lies somewhere in the wiring of the brake controller/7-way. The only way a brake controller is going to work properly with the key in the ACC position but not when the vehicle is running has to be due to wiring. Check to make sure there are no shorts between the two wires you ran to the rear of the 7-way. It sounds like you ran a wire for the 12 volt accessory circuit and an additional wire for the brake output. You might...
    view full answer...
    Image 1 for
  • Affordable Time Delayed Brake Controller w/ Plug and Play Adapter for a 2022 Ram 2500
    The most affordable, time delayed brake controller, with a plug and play adapter is going to be the Curt Discovery item # C84VV. You will also need the Curt Custom Wiring Adapter item # C51458 to complete your installation. This adapter will allow you to have an easy installation with no cutting or splicing.
    view full answer...
  • How to Wire in a Curt Trailer Brake Controller to a 1999 Ford F-150
    Actually you have a couple of options. First, you could use harness # C51322 in place of the harness for your 1999 Ford F-150. It will plug into the Curt brake controller and the truck. This is the easiest option. The other option is to cut off the plug on the Curt brake controller # C84VV and hardwire it to the Ford harness. You would have to know the functions of the wires on the Ford harness. It may be labeled or printed on the harness. If your Ford harness has Red, Light Green, White,...
    view full answer...
  • Hub/Drums and Brake Assemblies for Use with Timbren 3,500 lb Axle Less
    All of the parts you mentioned would work great with each other. You didn't mention the part numbers but I was able to determine what you were looking at based on title. The Timbren kit looks to be the part # TASR35HDS11 Hubs # AKHD-655-6-EZ-K Brake assembly set # 23-458-459 Curt Discovery # C84VV Install Harness # C51459
    view full answer...
  • Can I Use the Curt Discovery Brake Controller in a 2021 Honda Pilot
    Yes. You could use the Curt Discovery # C84VV on your 2021 Honda Pilot with the plug and play adapter # C51392 to allow for an easier installation that won't require cutting into any wiring. However, the Discovery is a time delayed brake controller, which means that it applied the brakes with the same intensity and with a slight delay in response to the tow vehicle's brakes being pressed. I do typically recommend going with a proportional brake controller, which uses gyroscopes and sensors...
    view full answer...
  • Does 2019 Ram 1500 Need to be Flashed Using Curt Discovery Brake Controller
    Thank you for your purchase from etrailer of the Curt Discovery Brake Controller # C84VV and Wiring Adapter # C51458, we appreciate it. Your 2019 Ram 1500's computer does not need to be flashed/programmed when using this controller it will be plug and play. The exception is if you are replacing the factory brake controller, as you would then need to do so.
    view full answer...
  • Which is Better a Time Delayed or Proportional Brake Controller
    Between the two controller I would go with the proportional Curt Triflex part # C51140 over the time delayed Curt Discovery part # C84VV. A time delay controller is so named because there is a delay between the time that you initially apply the brakes in your tow vehicle and the time that the controller reaches maximum power output. Unlike a proportional brake controller, which activates your trailer's brakes based on the deceleration of your tow vehicle, a time-delayed controller sends...
    view full answer...
  • Brake Controller Install Harness Recommendation for Curt Brake Controller in 2009 Chevy Silverado
    To install the Curt brake controller part # C84VV in your 2009 Chevy Silverado requires the install harness part # C51515 but this is a harness with 4 blunt cut wires that you'd need to wire to the blunt wires under the dash of your truck since a plug and play harness isn't available. It's a pretty simple process though. You'd just need blue butt end connectors like the # DW05744-5 and you'd be set. I attached an install video that shows the install on a similar Silverado for you to check...
    view full answer...
  • Where to Connect Brake Controller Red Wire on a 2009 Volkswagen Tiguan
    It is possible that on your 2009 Volkswagen Tiguan you will need to follow the alternate installation instructions for the Touareg. I have included a link to an article that explains this. That would be if you are unable to locate a proper dedicated brake light only circuit. The first place to check is above the brake pedal. Look for a brake switch with wires going in and out of it. Use a circuit tester such as # PTW2993 to probe the wires (the key may have to be in the on position)....
    view full answer...
    Image 1 for Image 2 for
  • Brake Controller Install Parts Needed for 2014 Ford Van without Trailer Wiring
    To install the Curt brake controller part # C84VV in your 2014 Ford E-350 you will need to install a 4-way with part # 118551 and then use the part # ETBC7 to convert it to a 7-way and install the controller. You are going to have to test all of the wires that lead to the brake pedal switch till you find one that only sees voltage when the brakes are applied.
    view full answer...
  • How to Find and Access the Brake Light Switch Wire on a 2015 Toyota Highlander for Brake Controller
    If you check out the video I attached you will see how we installed a brake controller in a very similar 2014 Toyota Highlander as your 2015 model. We had to remove the lower dash panel (13:00 mark of the video), to make accessing the green wire possible. The kit used for the install in the video is the part # ETBC7.
    view full answer...
  • Why Is Stoplight Circuit Difficult to Find on 2017 Ram 1500 For Installing Brake Controller
    Your generation of Ram truck uses a powernet style of wiring at the brake switch wiring which means the voltage will actually read lower than what a 12 volt circuit tester is going to show. Also if you are trying to hardwire a controller you are going to have issues as we've found that if you don't use a harness designed specifically for your truck's wiring setup you may damage the vehicle. So to install the Curt Discovery part # C84VV you have to use the vehicle specific install harness...
    view full answer...
  • 2014 Cadillac Escalade Wont Start After Curt Brake Controller Installation
    Thanks so much for the purchase from us of the Curt Discovery Trailer Brake Controller # C84VV for your 2014 Cadillac Escalade, and I'm sorry to hear of this issue you are having. This controller, which you'd use with Wiring Adapter for Curt Trailer Brake Controllers # C51515 assuming the Escalade had a factory 7-way already, should not have anything to do with the vehicle starting or not, which means there was a mistake somewhere along the way with the wiring process. I have added a link...
    view full answer...
    Image 1 for
  • Does Dealer Need to Turn on Aftermarket Brake Controller in a 2015 Ford F-150?
    There will be no need for you to go to take your 2015 Ford F-150 to the dealer to have them turn on an aftermarket brake controller. The brake controller I recommend that you need only an adapter for is the Curt Discovery # C84VV. Since you already have the factory tow package, just use the Plug-In Wiring Adapter # C51436. Plug one side into the brake controller and the other side into the wiring on your F-150 and you are done.
    view full answer...


< Previous
123. . .5


Info for this part was:

Employee Lindsey S
Edited by:
Lindsey S
Employee Sabrina W
Written by:
Sabrina W

At etrailer.com we provide the best information available about the products we sell. We take the quality of our information seriously so that you can get the right part the first time.