
To see if this custom-fit item will work for you please tell us what vehicle you'll use it with.


The Supertop for Truck 2 features an improved design that allows for 1-person operation and features removable fabric side panels. When not in use, the top and side panels can be stored in a convenient built-in storage system. Black Diamond fabric.
Features:

Videos are provided as a guide only. Refer to manufacturer installation instructions and specs for complete information.
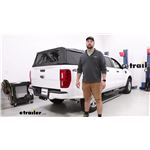
Hey guys, it's Jake here with etrailer. Today we have a 2020 Ford Ranger and we're gonna be taking a look at and I'm gonna show you how to install the Bestop Supertop. This is essentially going to be a soft shell camper shell for the back of your truck. The one benefit about this that compared to a normal camper shell is that you're gonna be able to fold this down kinda like a Bimini top on a boat whenever you need to haul those extended loads in the back of your Ford Ranger. This cover's gonna be made up of an aluminum construction, which is the, actually the ribs underneath. And then you're gonna have a black diamond fabric on top.
It is an extremely, extremely thick and tough fabric. I doubt that this fabric will ever tear unless you run up against maybe a tree or something like that. So just be careful wherever you're driving with it. But it is much stronger than like that of the material of a normal tonneau cover and I think that's because it is going to get a lot of flapping being up here on the top of the truck. So it helps it be a little bit more durable.
The other thing is, is that it's going to be mold and mildew resistant so it's easy to clean and when it gets wet it's gonna dry fast. Our back window here is going to be a very thick plastic material. It's gonna help to resist against scratches and stuff like that over time. I will say this particular window impressed me because it has got a very, very heavy tint on it. I'd say I've got my windows sent on my truck and I would say this is probably a 5% tint on here, so it's very dark.
If it's nighttime, they're not gonna be able to see into the bed at all. And even during the day in our bright shop, I can see in and only through the front windshield of the truck, but I can't see the bed of the truck. So this is gonna help to provide a little bit of security for just people walking by your truck if you've got stuff in the bed of your truck. The cover is gonna help with to be weather resistant. By no means after assembling this, would I say this is waterproof at all.
There's gonna be a lots of areas where water can get in, but that's just part of having a kit that kind of comes apart and goes back together. It is not a very permanently mounted kit, but that's because you want to be able to fold it up to the front of the vehicle. So, but this tint is definitely gonna help to protect the passerby from seeing what you have in the bed of your truck. There is a little slit right here and that is intentional. That is not a tear. That is for if you want to add a third brake light to the back of your truck. When you fold the cover up and in the open position, so if you open it up and fold it up at the cab of your vehicle, if you're hauling those extended loads, they will come with straps so that you can strap the Bimini top. There's gonna be the four braces that will all pile up on top of each other at the cab of your vehicle. You can just use these included hook and loop straps to be able to tie those together so that you don't have to worry about it opening up when you're going on the road. And we did a short comparison earlier of a traditional camper shell compared to this. The other thing that's nice about this is if you don't want the side panels on or the back window, you can take those off. You can think of it a lot like a soft top on a Jeep. It's the same thing. A lot of times they don't want the whole top off the Jeep, they just want the side panels off to be able to get some air in the back of the bed. If you're doing a project around your house or something like that and you're picking up some building materials, it's a lot easier to reach in and out of the bed of your truck without having these panels in the way or the back panel than it is with them on and to be able to access, if you're just at the store or something and you just grab something out of the bed of your truck, you just unzip it, peel this back, you can reach in, grab it. You can do this from either side to front, back sides, whichever. The only thing is, which I think is kind of a pain, but I don't really see any other way they could have done it, is you will have to snap all this stuff back into place after you're done grabbing whatever you need. All in all, I think this is gonna be a great cover for the right application. For me personally, I don't think I would put one of these on my truck. I would either just go full bore into a camper shell or just get a tonneau cover. But if you do not want to fully commit to the life of owning a camper shell, there's a lot of limitations with a camper shell. You can't pick up taller loads anymore. And if you go to pick up something, it's kind of too late. You either have to go back home, take your camper shell off, go back to the store, pick it up, with this, you can drop this in in a couple minutes to be able to pick up those taller loads. So if you like the creature comforts of having a camper shell but don't want to get stuck with not being able to carry what you want to carry in the bed of your truck, this is definitely gonna be the right cover for you. But with that being said, let's go ahead and jump into the install. To begin our installation, you're gonna need to get your side rails assembled. You're gonna have a small section here on the back and a larger section on the front. The small sections have two of these, the clamp attachments on them. All you have to do is take your two set screws. It's going to be an Allen key to get those driven in. You can either use the codes that are on these little stickers and compare them to the codes in your instruction manual. Or you can just set your front rail on top and it's only gonna fit one way. The front rail is the larger one, like I just said, you're gonna have this curvature go into the bed, so you don't want it obviously facing outward. So just put your two side rails together and then we can start prepping our front and rear rails. Now we've got our side rails marked where they need to go. We did that by putting our front and rear rails in place. Your front rail's gonna have the longer rubber flap on it. The rear rail's gonna have the shorter one. We made a few marks on the side of our bed rails. We're just gonna peel this off. Now, this is not adhesive. I thought it was when we started this install, but it is not. But I still cleaned off the edges here. We'll line this up with our marks, get it as close as possible. Then we get our front and rear rail slid into our two side rails. It's a good idea to have an extra set of hands when you do this, makes it a lot faster. On each of our clamps, we'll have to put two of our little rubber blocks on. You'll have to use the pull the adhesive off and or the protective tape stick one block to the other. Have one of the sticky sides facing up. And these, we're gonna want them to eventually touch the top of our rail cap here. So it's essentially designed, I guess to not, so that the, this clamp isn't torquing on the rail so much and that it's putting more support on top of the cap. And we can take our bolts that come in our kit, the hex bolts and the other side of our clamp. And we're just gonna loosely thread these in. We do have specific locations that they need to go. So we'll get it loosely put in place, make sure that our rails are all where we want them to be. And then we can come back and tighten them all down. With your clamps in place, you want the rear clamp to be 10 inches from the end of this rail, not the end of the end cap, but the end of the rail. Your next clamp's gonna go up against this center connecting piece 'cause it can't go any further up. And then your front clamp is gonna go seven inches from the front of your front rail. You're gonna use the 9/16 wrench in order to tighten these up. Next we need to put the ribbing for the top together. You're gonna have these center tube pieces that will connect the two sides. The way that you're gonna know which side is, which is again, you can check that part number on the bracket and compare it to the numbers in your instruction manual. Or you can just know that these side braces here are gonna go towards the front. So it's only gonna go together one way. We've got these little button attachments, you want that cross brace on the front and the back one, and then the two in the center are not gonna have one at all. We did have a little bit of an issue getting these in place because when they drilled the holes out in the factory, it almost looks like they punched the holes out and there was a lot of metal on the inside. So maybe run a file on the inside and that'll help you get these pipes in easier. So we'll lift it up into place and we're gonna take our cover and you wanna slide it up at the same time to get to these front pins and their pins are just gonna be spring loaded and that's what holds this little brace in place. So we'll lean it forward. You may have to go forward and backwards to get it to line up perfectly. So we'll slide it in and then make sure it clips into place. Now we're gonna take the top and open it up. We should be able to adjust it forward and backwards to make sure that it is as even as possible. Once we get our top on, we can make all of our final adjustments. Now we're gonna take our top, you want this clear window to be facing the cab of the truck. Now, through our discovery of messing with this for a little bit, this track on the front is kind of odd shaped and I assume we're probably gonna run into the same issue back there, but it's definitely easier if you just run it in from one side to the other and then push it to the other person on the other side until you get to the end of the rail because these front and rear rails are designed to be removed. So we can take that, we'll get that side put in first and then we'll slide this one in. What we're gonna do is we're gonna go around the edge, the front edge, and then the back. And you've got these plastic clips here along the edge that we need to clip up underneath this rail. And that's what what's gonna help hold the tension. It's definitely good probably for this entire project to have somebody else with you to do one side while you do the other. I will tell you that once you put the sides in or when you're trying to put the sides and the back window on, I would definitely pop these loose and kind of open up the cover a little bit to make it a little bit easier to deal with. But after you get everything clipped into place, you want to go all along the edge and clip that grip tray in there or the trim piece that clips underneath there. You just wanna clip that in all the way around the vehicle. And then that's gonna do it for the installation. Well guys, hopefully this video helped you decide whether or not the Bestop Supertop is right for you and your 2020 Ford Ranger.
Average Customer Rating: 4.0 out of 5 stars (1 Customer Reviews)
The Supertop for Truck 2 features an improved design that allows for 1-person operation and features removable fabric side panels. When not in use, the top and side panels can be stored in a convenient built-in storage system. Black Diamond fabric.
I've now owned my bed cover for a year for my Titan XD. Installation took some time but with two of us working it took about 2 hours. The fit is good, it kept our gear dry on our September 2020 elk hunt and I like the flexibility. The one down side are the zippers don't do well in cold weather and one zipper broke.
Info for this part was:
At etrailer.com we provide the best information available about the products we sell. We take the quality of our information seriously so that you can get the right part the first time. Let us know if anything is missing or if you have any questions.


Thank you! Your comment has been submitted successfully. You should be able to view your question/comment here within a few days.
Error submitting comment. Please try again momentarily.