
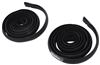
Yakima 60" HD Tracks for Roof Racks, OverHaul HD, and OutPost HD
(19 reviews)
Price: $198.95
In Stock
Yakima 60" HD Tracks for Roof Racks, OverHaul HD, and OutPost HD
Item # Y74MR
Retail:$336.98
Our Price: $198.95
You Save: $138.03
In Stock


Need help with installation?
Locate installers near me- All Info
- Reviews (19)
- Q & A (0)
- Videos (2)
- Photos
- Used (1)
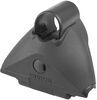
Yakima Roof Rack - Y74MR
- Tracks
- 2 Pack
- Yakima
- 60 Inch Track Length
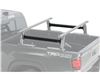
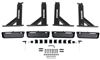
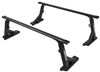
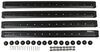
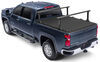
Tracks allow you to mount Yakima Skyline towers, OverHaul HD system, or OutPost HD system to your truck bed rails, overlanding trailers, and more. End caps make it easy to install T-slot hardware. Compatible with Bed Track Kit 2 and Landing Pad 26.
Features:
- Tracks let you mount SkyLine towers, OverHaul, or OutPost systems to truck bed rails, overlanding trailers, camper shells and more
- Works with Landing Pad 26 and Yakima HD track adapter kit (sold separately)
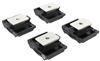
- End caps allow installation of T-slot hardware without having to remove caps
- Tracks mount to camper shells, truck bed rails, gear trailers, and other flat surfaces - drilling required
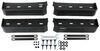
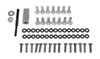
- Mounting hardware included
- Durable aluminum construction is rust resistant
Specs:
- Quantity: 2 tracks
- Dimensions: 60" long x 2" wide x 13/16" tall
- Weight limit per bar: 110 lbs
- Limited lifetime warranty
8001632 Yakima 60" HD Tracks for Roof Racks
Installation Details


Video of Yakima 60" HD Tracks for Roof Racks, OverHaul HD, and OutPost HD


Videos are provided as a guide only. Refer to manufacturer installation instructions and specs for complete information.


Video Transcript for Yakima HD Roof Rack Tracks Installation - 2023 Nissan Titan XD
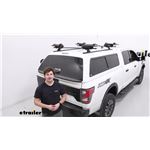
Hi everyone. Aiden here with etrailer. Today we're gonna be taking a look at and showing you how to install these Yakima HD tracks for camper shells or truck beds. This is gonna be an easy way to either add a ladder rack to your truck, or add a roof rack to your camper shell. This is a more custom installation, so drilling will be required, but let's check it out. How you use this track will be dependent on your installation.
If you're installing it on a camper shell like this, it's designed to work with a set of Yakima's landing pads, which will slide into the track and give you attachment points for their skyline towers and some crossbars. Or if you're doing this on the rails of a truck bed, there's some adapters that allow you to attach their ladder rack uprights to this track. I think the more common installation for people is gonna be camper shells like this. But just know that if you are doing it on a truck bed application, or maybe even like a small utility camper, then the HD bars would need that separate installation kit. Each track is gonna be made of aluminum.
It can support 110 pounds on each side. So when paired in conjunction with one another, it's gonna be pretty stout. Just keep in mind, there's gonna be a weight capacity on your camper shell, and whatever bars you put up here will have their own capacity too. So just be careful to not overload them. And you're probably wondering how it installs.
It is a pretty simple setup. It's not like it's hard to drill through the camper shell here. The thing I will say is that it just takes some time. You wanna make sure you get your measurements right because if these bars aren't running parallel to each other, it's gonna mean problems down the road when you try to put crossbars on here. So we'll follow along and show you how we did it.
Just take your time, get the measurements right, and the rest is gonna be pretty straightforward. So let's check it out. At the very beginning of your install is probably gonna be the hardest part, because we need to get these rails up here, and make sure they're square, and just positioned on the camper shell appropriately so that we don't have any weird fitment issues. So a couple of the things that we're gonna do, and keep in mind is you wanna find some sort of center point so that you have a solid place to measure from. So on ours up there, we've got a little piece of painter's tape that we'll check out later that we just marked out the center using that third brake light. That's a great point of reference, because this camper shell isn't necessarily a square on the truck, so using some point on the truck isn't gonna be your best bet. It's gonna be different depending on if you have a different camper shell. So keep that in mind. And then also the taper. This does curve off on the edges, so we can only get it so far to one side before it starts to curve too much. At the same time, though, on the inside of the camper shell, if you look up into the roof line there, there's gonna be this ridge. It might be a little hard to see on camera, but most camper shells are gonna have something like this where this middle is reinforced. And for us, we're trying to operate in a pretty narrow window where that track is sitting to the outside edge of that ridge so we're not drilling through it, but also not so far to the edge that it's falling off the edge of the camper shell. So get that position as close as you can on both, and that's gonna be probably the best fit for you. And up top, here's that painter tape that we laid down with a pen mark on that center line. This is gonna serve as a reference point for us throughout the install. And I do have these tracks loosely set up here. Nothing's really securing them, but I did take a step back earlier and just kind of eyeball it. That's the best you can do right now. Make sure that it's not gonna line up with that ridge underneath. And everything looks good here. The other thing to keep in mind is whether or not your camper shell is tapered. So ours does taper off towards the rear a little bit. So we're gonna start our installation at the back. So we need to drill these holes out, get this loosely mounted, and then we can determine our front mounting locations, get things squared up, all of that. But first I'm gonna lay down painter's tape so that everything is protected, and get my side to side in front to back as close and accurate as I can get it. Now I found that the best way to get your measurements is to use a soft roll tape measure, so that over these curved edges of your camper shell, you can get an accurate measurement. Side to side, we utilize that center mark, and I just went from that mark to the center of each bar where the mounting holes are gonna be. Now every measurement's gonna be different depending on your camper shell. In our case today though, 21 and a half inches worked perfectly side to side, and I made sure to take a step back again and make sure that that wasn't going to affect my spacing underneath. Everything looks good. Then we need to measure front to back. Now for that, that's where this soft row came in really handy, because I went to the end, pulled it tight, and right where the window starts on our camper shell was my flat reference point. And for that, we we inchesre looking at six and a quarter inches each side. Now I know that these back locations are centered and pushed far forward the same amount. I did lay down some painter's tape. So what I'm gonna do is just mark out my edges on all three sides, so I can line this back up later, and I'll make a mark in the middle where my mounting location's going to be. With all the markings made, I can confidently move this and know exactly where to put it back. We're gonna start with a very small pilot hole drilling through that center mark where the mounting location will be. We're gonna go really small at a slow speed, and work our way up in very small increments to our final size of a quarter inch. And the reason we're being so careful is just because of this material, we don't want any spiderweb cracking to happen. Starting small is gonna make it a little bit more friendly, and working in small increments lessens that risk. We had great luck over on the other side, so we're just gonna repeat it over here, and that painter's tape will also help. (tool whirs) And we'll just work our way up. (tool whirs) When the final hole is drilled out, I'll come back through and vacuum up all that debris. With those holes drilled to the final size, I can move my bar back in place, just lining it up over top, and pass some of my hardware through. Your kit's gonna come with these screws, flat washers, and just wanna pass that down through the mounting hole. On the underside, we can barely see those threads poking out. Gonna get one of those hand knobs installed, and it's gonna be helpful if you have an extra set of hands to hold an eight-inch Allen key up top while you twist that hand nut below. This rear location, you can get away with doing it yourself, and just don't worry about it too much right now. You don't need to fully tighten this. We just want enough to anchor it. We'll come back later to fully tighten things. With both of these sides loosely secured, I went ahead and tried to eyeball this as best I can to get these rails parallel to one another. The way you can check, though, is by measuring diagonally across from one corner to the next. I've already got painter's tape down, and what I did is just hooked it on the corner of that track there. Here is where an extra set of hands could help, and I measured over to a fixed point like that bolt over on the other corner. And essentially you just want to take that measurement on both diagonals, and see if they match up. If they match up, then we know that our rails are parallel, or that we may be need to adjust some things. Once we've ensured the rails are parallel, mark your locations the same way we did at the back end. When that's done, you can move it out of the way, and repeat the same drilling process that we already saw. Before you drill, it's a good idea that, even though you've taken those diagonal measurements, take some just directly across the camper shell from side to side, both at the front most mounting location and the back most mounting location, and ensure that those measurements are the same too, 'cause one thing that we ran into, the instructions only tell you to do those diagonal measurements, and ours we inchesre spot on. Well, if your rails, let's say they're running parallel, and now they're flared out the exact same amount, like ours were, yeah, your diagonal measurements gonna be the same from one corner to the other, but that doesn't mean that the rails are parallel to each other. It just means that they're angled the exact same amount by measuring straight across at all corners, as well as that diagonal, it's just more assurance that we've got the right measurement. Do that before you drill your holes, and you don't have to make any mistakes. (tool whirs) With the front locations drilled out, I removed the hand nut from the back, moved the rail out of the way, and used it as a straight edge to lay down a new piece of painter's tape from front to back, basically just covering the entire length that this is going to sit. That way when we drill out all of our middle holes, there's that layer of painter's tape for extra protection, and to allow us to mark our holes. So what we need to do is put the hand nut back on the backside, and just repeat that process on the front side, dropping our hardware through, and securing it from underneath. At this point, you will need that extra set of hands to hold the screw from the top. And here's what that rail looks like now, secured by both ends. The middle here is still loose because nothing's fastening it, fastening it in, excuse me, but it's at least sitting where it's gonna live. We can now mark out all those remaining middle holes, and you're just gonna skip every other one. So the very end has a screw through it, skip the next, then the next will be your mounting, then skip, then mount, then skip, then mount. So it'll go like that on both sides, totaling four additional screws on either end. With all the remaining holes marked, we moved the rail back out of the way. We can drill out all the remaining holes, and when everything's drilled out, we can finally take that painter's tape up, and get ready to attach this for real. So I know it's a lot of back and forth, but this is going to be the best way to make sure everything's lined up properly, and keeps your camper shell safe. So you're in the home stretch now. Just get those remaining holes drilled out. (tool whirs) Now with all the holes drilled and the tape removed, we can make sure all of those holes are weather sealed by just putting some silicone around, and making sure that no water can get in. Then whenever we finally put this back on and pass all the hardware through, there's that protective barrier from any water intrusion. Now your kit does come with silicone, but I'm using a tube that we had down in the shop because it's bigger, and I just wanted to make sure I didn't run out. You could always pick up more if you need it, but it's not entirely necessary if you are smart with the one that comes with the kit. I'm just gonna carefully drop down the rail with the two screws in the very end, trying to line this up as best I can with those holes that we drilled out, and make sure that they pass through. And I'm trying to minimize the shifting around here so that we don't smear all of that silicone that we just laid down, and cause it to move from the spot we want it at. Once both ends are in, though, you can go down the line, and add in the remaining hardware. It's just the same combination as we've been using, one screw and one flat plate. And then we need to go back through and repeat the process with an extra set of hands like we did before. Someone holds each screw from the top with that Allen key, and then another is in the truck bed. And using those hand nuts to tighten it up. Only this time we can fully tighten them. I'm gonna do the two ends first, make sure it's all loosely threaded in, and then we can go through, install the middle ones, and fully tighten everything. And of course, repeat that on the other side. With all the hardware tightened down, I always like to give things a shake test, and make sure that nothing is moving around loosely. But this track feels solid, and at this point, we're ready to start hooking up some gear, and we're ready to hit the road. But that'll do it for our look at and installation of these Yakima 60-inch tracks for your camper shells. Thanks for watching.
Customer Satisfaction Score:
83% were satisfied with this product
17% of customers were not satisfied
- Wrong item was ordered
- Product did not meet expectations
- Did not arrive in time
Customer Reviews
Yakima 60" HD Tracks for Roof Racks, OverHaul HD, and OutPost HD - Y74MR
Average Customer Rating: 4.5 out of 5 stars (19 Customer Reviews)
Tracks allow you to mount Yakima Skyline towers, OverHaul HD system, or OutPost HD system to your truck bed rails, overlanding trailers, and more. End caps make it easy to install T-slot hardware. Compatible with Bed Track Kit 2 and Landing Pad 26.by: Patrick 08/15/2023
Easy to install. Bikes are now o out of the truck bed allowing for a more useable space
by: Randy 07/18/2023
Put them on our 2016 Honda odyssey with roof rack
by: Michael07/23/2022
As in the past everything I’ve ordered has been spot on to that shown and described. For whatever reason the packaging was damaged. The roof tracks are fine but the plastic bag containing the installation bits was torn and hanging out of packaging. Not too bad though. Im only missing one of the fancy lock nuts. Hey, stuff happens.
by: Tommy 08/02/2022
The packaging arrived damaged on one end but the tracks were not damaged. These HD tracks are much sturdier that the regular Yakima tracks I owned previously. I always have good experiences with etrailer.
by: Gary 07/19/2023
Fast shipping and great price
by: Scott03/28/2022
My Yakima order was on back order for a long time. I worked with Ashley and she found a direct replacement that was in stock. I had it in my hands in less then a week. Ashley was very helpful and my project is back on track. I highly recommend e trailer and will use them again in the future.
by: Mike 09/20/2023
by: Bob 09/01/2023
by: Ray 03/20/2024
Easy to install. My 17’ canoe loves this rack!
by: W.C.C08/22/2022
So the tracks were delivered by fed ex with the tape on one end of the shipping tube torn open, best guess is that the provided hardware is somewhere at a fed ex facility. Fortunately the tracks which I desperately needed were to replace a much older version of Yakima track and my existing hardware was able to be used to replace my existing damaged tracks. I would still like to have the hardware kit though I am not able to return the tracks since my truck was unsafe to move until the new tracks were installed. In short the tracks are working as expected but packaging of products sucks
by: R2Sully10/20/2022
The shipping carrier damaged and lost the mounting hardware. ETrailer quickly got the replacement hardware to me. They are a Good company with Great customer service. They have another happy customer that will be back.
by: Mike06/04/2022
Yakima tracks are great but package was not shipped carefully and none of the hardware was in the package. Might have been the carrier but bummed I have to wait another week for the replacement parts. Customer Service was great when calling on the issue. Replacement was shipped with no problem.
by: Richard 08/12/2022
My package was originally lost but they sent out a new one right away
by: Hank03/21/2022
Super fast shipping, easy to install. Had these on my truck less than a week after ordering them.
by: Hans 02/07/2024
by: Andrew 09/08/2023
by: Segundo Manuel03/04/2023
by: George08/11/2022
by: James 09/22/2023
19
19
See what our Experts say about this Yakima Roof Rack
- Are Yakima HD Track Adapters # Y75RR Required to Install OverHaul Ladder Rack On 2021 Jeep GladiatorIf you are wanting to install the Yakima OverHaul HD Adjustable Truck Bed Ladder Rack # Y01151-58 on a set of Yakima 60" HD Tracks # Y74MR then you will need to use the Yakima HD Track Adapter Kit # Y75RR. Those are needed since you are going to have the BAK Revolver X4s Hard Tonneau Cover # BAK88ZR which is mounted on the inside of the bed rails where the Overhaul would typically mount.
view full answer... - Will The Yakima OverHaul HD Ladder Rack Fit With Access Roll-Up Tonneau On 2017 Ram 1500 Short Bed?Yes, you can use your Yakima OverHaul HD Adjustable Truck Bed Ladder Rack # Y01151-58 with the Access TonnoSport Soft, Roll-Up Tonneau Cover # A22040169 on your 2017 Ram 1500 with the 5-1/2' short bed. You will need to install the Yakima 60" HD Tracks(8001632) # Y74MR onto your bed rails. This will require drilling into your bed rails as they are not a custom fit. Then you will be able to use the Adapter # Y75RR to mount the ladder rack. Do understand the Tracks # Y74MR are only rated up...
view full answer... - 1999 Toyota 4Runner 60 Inch Roof Track RecommendationThe Yakima 60" HD Tracks # Y74MR are designed for installation on a flat surface. If these will be positioned on your 1999 Toyota 4Runner so the full 60" is on a flat surface then you're good to go. If you're needing something a little more pliable then check out the 60" Thule Roof Mounted Top Rack System # THTB60. This system is similar to the Yakima HD Tracks when it comes to what products will fit the tracks, but the tracks have a little more freedom with this setup.
view full answer... - How to Mount the Yakima OutPost HD Ladder Rack on a Utility TrailerDepending on the length of your crossbars and the width of your bed yes, there is a way to mount the Yakima OutPost HD ladder rack system on your utility trailer. What you're going to need are the Yakima HD Tracks, like the 60" # Y74MR, along with the Yakima HD Track Adapter Kit # Y75RR. This gives you the base system needed to mount your ladder rack on your trailer. Just be sure to mock up your setup first and make sure the crossbars and legs can reach where the track will be installed.
view full answer... - What is the Difference Between Yakima HD Tracks and Regular Yakima Tracks?The difference between the Yakima HD Crossbars like the # Y74MR and the regular Yakima Tracks like the # Y01135 is that they are compatible with different feet and adapters. With the HD tracks, they will fit the Yakima Skyline towers, OverHaul HD system, or OutPost HD systems. In order to use these components, you need to use the Landing Pad 26 for Yakima SkyLine Towers - Qty 2 # Y75ZR or the Yakima HD Track Adapter Kit for Yakima OverHaul HD and OutPost HD Truck Racks - Qty 4 # Y75RR....
view full answer... - What Is The Narrowest Roof Track?Hi David, I checked the 5 styles of tracks we carry and it looks like the Rhino Rack options will be the most narrow at 1-1/2". In case you were curious about the other style (and brands), I have all my findings listed below. 1-1/2" wide - Rhino-Rack RT-Style Roof Rack Tracks - 66" Long # RRRTV168 1-5/8" wide - Thule Top Tracks for Roof Racks - 60" Long # THTB60 2" wide - Yakima 60" HD Tracks for Roof Racks, OverHaul HD, and OutPost HD # Y74MR 1-5/8" wide - Yakima 60" Tracks for Roof...
view full answer... - Is The Rhino-Rack Roof Rack For Yakima Tracks Compatible With Yakima HD Tracks Hi Ken, The slots are slightly different between the standard Yakima Tracks (42" # Y01126, 54" # Y01127, 60" # Y01135) and HD Tracks (54" # Y64MR, 60" # Y74MR, 72" # Y84MR) so the Rhino-Rack Roof Rack for Thule and Yakima Tracks # Y01-140B-NT would not be compatible with the HD Tracks. If you haven't gotten the Tracks yet then you'll want to go with the standards options. If you already have Yakima HD tracks then you'll need the following components: Landing Pad 26 # Y75ZR (x2) SkyLine...
view full answer... - Is Drilling Required to Install Yakima 60 inch HD Tracks Y74MRThe only way to install the Yakima 60" HD Tracks for Roof Racks, OverHaul HD, and OutPost HD # Y74MR is with drilling. We do not have a different way to install these.
view full answer... - What Platform and Tracks do You Recommend to Use on My Snugtop Camper Shell? I have a solution for you. While the Yakima 60" HD Tracks for Roof Racks # Y74MR will install nicely onto your snugtop camper shell, I cannot confirm for sure whether a Prinsu model can fit directly onto the tracks. This is because different platforms and baskets are compatible with different track channels. We also do not carry any Prinsu models here at etrailer. However, for a definite solution, I recommend using the Rhino-Rack Pioneer Platform Rack for Camper Shells - Track Mount -...
view full answer... - Can the Yakima 60" HD Tracks for Roof Racks Be Used on a 2018 Chrysler Pacifica with a Naked RoofThe Yakima 60" HD Tracks for Roof Racks # Y74MR was designed to be used on truck bed rails or truck bed caps. It was not intended for use on the roof of a vehicle. That being said, it does not mean that you cannot do it. It simply means that there is no guide as to which vehicles it would be a good fitment for. I did take a look and did not see another roof rack option, so installing tracks would be a good option. But, you will need to measure your roof to ensure you have the space. The...
view full answer... - 2019 Ram 1500 Fitment for Yakima HD Tracks and Tonneau CoverAs long as you can fit the 2" wide Yakima 60" HD Tracks # Y74MR so you have no less than 1/8" overhanging the outside of your truck bed side (see attached) you're good to go. This then allows you to use 2 sets of the Landing Pad 26 # Y75ZR and SkyLine Towers # Y53TR for a base system. The 66" Round Crossbars # Y00410 might work but I'm not sure if you'll have the clearance for that since I'm not sure where the Yakima tracks will sit. If they truly can sit in the middle of your rails...
view full answer...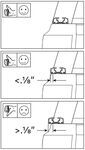
- Have we Test Fit Yakima HD Tracks on 2022 Chevy SilveradoWe have not test fit the Yakima 60" HD Tracks for Roof Racks, OverHaul HD, and OutPost HD # Y74MR on a 2022 Chevy Silverado. That said, they do have wiggle room for positioning, and the cap nuts on the underside are just a 1-1/4" in diameter so they won't take up much space. I've added a link below to the instructions of the # Y74MR which may help decide if these are right for you (the truck bed rail install starts on page 6.
view full answer...
Do you have a question about this Roof Rack?
Used Items Available

Condition: Like New
Notes: May have damaged packaging or minor cosmetic blemishes.
Info for this part was:

Expert Research:
Jameson C

Video Edited:
Chris R

Edited by:
Daron K

Written by:
Alex H

Updated by:
Michael B

Updated by:
Carrie F

Test Fit:
Aidan B

Video by:
John S

Video by:
Thomas T
At etrailer.com we provide the best information available about the products we sell. We take the quality of our information seriously so that you can get the right part the first time. Let us know if anything is missing or if you have any questions.
Product Experts Available Now!
Call 1-800-940-8924
Thank you! Your comment has been submitted successfully. You should be able to view your question/comment here within a few days.
Error submitting comment. Please try again momentarily.