
Summer Starts Here - Save up to 70%
To see if this custom-fit item will work for you please tell us what vehicle you'll use it with.
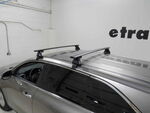
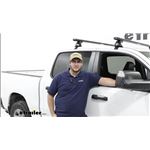
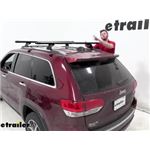
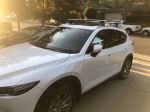
Heavy-duty crossbars mount to Yakima towers (sold separately) to create an aftermarket roof rack. Top and bottom channels let you add channel-mount accessories. Tie-down points in endcaps let you easily secure cargo.
Features:
Yakima HD Bar-SM:Videos are provided as a guide only. Refer to manufacturer installation instructions and specs for complete information.
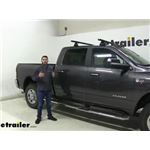
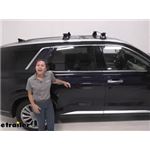
Colin: Hey everyone, it's Colin here at etrailer and today we have a 2019 Ram 2,500. And we're going to go and do a test fit of this Yakima HD crossbar roof rack system. Now this has been designed to Mount to the base roof of your Ram 2,500. So you don't have any raised side rails or fixed mounting points or anything like that. It's just going to clamp on using your door jamb, and it's going to give you a really heavy-duty roof rack to let you load up your favorite rooftop accessories. Whether you've got a couple of bikes, maybe a kayak carrier, or even a cargo basket that you can load up cargo in.
That's going to help you conserve on space in the bed of your pickup and inside the cab. Now, like I said, this is a heavy duty roof rack that Yakima has made with these HD bars up top.These can actually support a load of up to 500 pounds. However, be sure to double check with your vehicle's owner's manual. I already know that that's going to be more weight than what the roof of your ramp can handle. So make sure you don't go over that specification in your owner's manual.
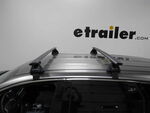
With our baseline towers, these are going to have a weight capacity of 220 pounds. So you're already limited to be able to go up to that 500 pound weight capacity, but still 220 pounds on your roof is a lot of weight. So you can be able to get a lot of stuff loaded up here, whether it's kayaks, cargo baskets, anything to that nature. The only thing I do want to point out about these HD bars is that these have tie-down points on the ends of them. These give you a nice point to be able to secure whatever cargo we might have up there.
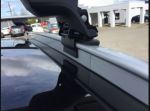
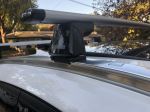
Maybe you just got a paddleboard sitting on your roof rack, and you want to secure it. You can use those tie-down points to get those secured.Now, like I said, this is going to clamp under your door jamb right here. As you can see, we've got a pad and a rubber coated hook bedded right there. I'm just going to open up the door so you can see how it's attaching right now. So attached to our baseline tower, like I said, is that kit that is going to be designed for your Ram.
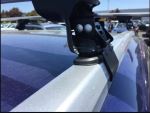
Just take this end cap off so you can see what's going on in the inside. We have that hook coming up and securing into this bracket system right here and then it just pulls up when we tighten down this bolt. It pulls up against the door jamb and just clamps down on top of your roof.And then this rubber pad sitting on top of our roof. That's going to help make sure it doesn't harm or scratch the finish of our Ram, and it's also going to provide a very secure connection. Now I'm going to put the end cap back on which is pretty easy to do. We also have these plastic locks which we can replace with the Yakima same key system. That'll provide more security for your roof racks and no one can come up and remove it.Now this rubber strip up top can actually be removed to utilize T-slot accessories. What you do is just pull it out from this point right here, just like that you would cut it to length for whatever accessory you want to use, or you can just remove it altogether if you don't want to cut it, and then you just slide that accessory through the end cap right there into that desired location, tighten it down and then you're good to go.Now I do want to give you guys a few measurements first from the top of our roof to the bottom of our crossbar, it's about three and one quarter of an inch. That should be plenty of space to get any clamp-on accessories underneath your crossbar without risking damaging your roof. Now, if we go from the top of the roof to the top of the crossbar, it's about five inches. That's something to keep in mind for any low clearance situations that you have that added height to your roof. So maybe pulling into your garage or something like that, make sure that it'll clear before you try to pull into your garage. And again, with the weight capacity, I want to make sure you guys know, make sure that you don't go over any of the weight capacities for baseline tower or your vehicles roof, use the lowest rating.Now that I've gone over some of those features I'll show you, you guys have to get this installed. Now we've got the front crossbar already installed. It's going to be the same process for the rear one. We're going to get it assembled on this table for you guys so you can better see what we're doing. I'm going to flip my crossbar over just to make it easier and a little bit. Now down here, we have our fit kit along with our baseline tower. What we need to do is get the baseline tower ready to go. When you start with these two pieces that come with your HD bars, you're going to go into that top channel right there. You just need push down until it clicks into place, like that and get the front side too, just like that.Now the silver base right here is going to have threads on the inside and it's going to go onto the screw that's in the middle right there. So we're just going to line it up. And then in order to access that screw, we need to flip it over and actually pull out right here to uncover it, right there in the center. With the included tool, we'll just start threading it on. You can kind of see how it's working right there. Now we don't want to go all the way. We just want to get the top edges of this silver piece lined up with our little black tabs on the end right there. We could probably go a little bit more. That should be good.Now with this pad, what we're going to do is just put the bracket onto the piece right there. You want to make sure the arrow is facing out away from the baseline tower. So it just goes on like that and we'll press it down on both sides so it's secure. Now we need to get that screw out of there so we can take the end cap off in order to get our baseline tower into that track. I'm just going to turn it over so that it falls into my hand. There we go. Make sure you hold onto this so we can re-secure our end cap after. But all we're going to do is just feed that piece into the channel.If it's a little tight at first, you may need to come back and loosen up that screw a little bit. Sometimes that'll help out. There we go. Now it's in there. Now, if you look closely, there's going to be a set of numbers on the bottom of our HD bar. Now per our instructions, we need to move it to the measurement specified in the instructions, which is 46 and a quarter. So I'll move it up until the edge is touching 46 and one quarter, just like that. And then we will tighten down that bolt all the way. That'll secure our baseline tower into the HD bar. Want to go until we hear those clicks. Now we also want to make sure that our bolt right here is secured, which when it comes in, it should be already, just like that. Let's go ahead and put our end cap back on, and our screw.And then from here, we're ready to throw it on our roof. And make sure you got both of your rear doors open. We're just going to climb up here and set it on our roof Just needs to sit right there. Now what we're going to do is grab our tape measure and measure our crossbar spread. Now what we're going to do is measure center on center between the bars with the included tape that Yakima provides. And we need to make sure that it's 32 inches, which is the measurement specified in our instructions. Okay, exact 32. So we'll go to the other side and make sure that it's also 32.Now we can get our hooks installed. I'm going to flip open that gray cap right there, and then all that's going to happen with this hook as you're going to slide it up in here until it hooks on just like that. Now you can see that it's really up high off our roof right now. So what we're going to do is come up to this bolt right here and then turn it clockwise and you'll see that that hook starts going lower and lower towards the truck. We're just going to keep going until it makes contact. We don't want to over-tighten it at all. So make contact, get one more turn and that'd be good right there. Now what we're going to do is tighten it up until it's flat on our door jamb. Well, we need to make sure we stop at that point.Just like that. Now what we need to do is repeat this for the other side and then once we have that hook fully making contact with the door jamb, rotate back and forth, going a couple of turns on each side, until it's fully secured. That's going to ensure that our roof rack sits center on our roof. It doesn't pull too much to one side. Now we've gone back and forth on both sides. Our driver's side is fully secured, so we're just going to finish up over here. Once you hear those audible clicks, that you also heard earlier when I was putting the roof rack together, it's going to let you know that the tool has inaudible 00:08:49 correctly. Now we can just shut our door, we'll put our end cap on and from here, we're ready to load up our favorite rooftop accessories and then hit the road. One of the one that's going to about do it for our look at the Yakima HD crossbar roof rack system on our 2019 Ram 2500..
Average Customer Rating: 4.8 out of 5 stars (170 Customer Reviews)
Heavy-duty crossbars mount to Yakima towers (sold separately) to create an aftermarket roof rack. Top and bottom channels let you add channel-mount accessories. Tie-down points in endcaps let you easily secure cargo.etrailer was a great place to order, quick and easy. Yakima products however are over priced and overly complicated.

Placed the order for the rack a year ago. I didn’t like the way it sat on the roof of my vehicle, but because I had already installed it, etrailer customer service refused to take it back. I would’ve gladly paid for the return shipping or some sort of restocking fee, but that wasn’t an option. I’ve had brand new rack and hardware sitting in their original boxes for a year.
The customer service in ordering theses par tea was amazing!! I spoke with a wonderful specialist named Kate F, and she was super helpful and patient answering all my questions and helping me make sure I had the correct parts I needed for my type of car. The bars are very sturdy and have proven very worth the money!!
These adapters were easy to install and made my system fit together nicely.
Your service is nothing short of excellent! Thank you
I ordered the Yakima roof rack for a 2019 Hyundai Ioniq. I went with the heavy duty one for extra strength but it is quite a bit thicker, likely increasing wind noise. So I might have chosen the aerodynamic lighter weight one if I was to do it again. Also, I needed to get larger bolts for my kayak holder to get around the crossbar. The instructions and video on website were very helpful but they did not explain well how to adjust the toe and pitch. For the toe adjustment, you have to push the metal post with the tool before tightening. That was not obvious. For the pitch, it helped to do that once the towers are attached to crossbar. Then you can tilt tower while cross bar is laying flat (upside down). I ended up having to add tilt on both front and back crossbars for them to be flat when installed. Website said only front one would need to be pitched. I am very pleased with the look and sturdiness of the product. My Hyundai Dealer had zero options for this car.
Great secure product though some written instructions on their setup and installation would be helpful.
Easily supports the RoofNest! The Customer Service with Roger was Excellent!
Of all of the many racks I’ve purchased over the years, this, by far, is the worst. Once installed, it is okay, but installing these towers is extremely frustrating. The front and back “clips” fall out requiring multiple attempts. When I contacted Yakima customer support, they acknowledged that they have received complaints about the product. Their solution was to just leave the racks on the car. I asked to be notified when a better product was available but a year later I’ve received no response. If this is the only option available for your vehicle (as it was for mine), then prepare to be frustrated. Otherwise, purchase a different product.
Great company. Fast delivery.
The Yakima products are doing great. Just got home yesterday from a 18 day trip using them in Michigan's upper peninsula. Love them. Great products. Thanks again.
I bought both the roof rack and the cage from etrailer! Put everything on myself...easy peasy!
I loved how easy these towers were to install. Took less than 30 mins total. They look nice and feel very sturdy. I am looking forward to loading the Kayaks up and getting out on the water next weekend.
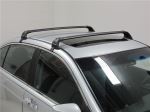
I needed crossbars for my new 2018 Mazda CX5, which came with flush side rails. The RidgeLine Towers for the Yakima crossbars, along with the vehicle specific kit worked great. The installation (10-15 min) is super easy. They look cool, and performed great (I strapped 160-lbs rooftop tent on them!). Removing them is also super easy (10 min tops). Highly recommend.
This part adapted like no other adapter
I chose the Yakima roof rack, because It spanned 50 inches, rather than the leading competitor's 47 inches, making it better for tying down 4 ft x 8 ft sheets of building material. It also seemed to be about half the price. It took me about 2 hours to put it all together and mount it on my car. The instructions were all visual and there was one little pic I didn't understand, but the equipment seemed to go together correctly anyway. Now that it's adjusted, it should be fairly easy to remove and replace next time. I did need to put on super tacky gloves to get the covers off. Although it seemed unnecessarily complicated, I would still choose this product again.
Have worked quite well for what we need. Very happy.
These Yakima crossbars are very HD, just what I was looking for. The Small size was hard to locate but etrailer had them in stock and delivered in short order. Instillation was quick and straight forward.
I had a difficult time identifying whether these were the correct adapters for the rack towers that I was purchasing to fit my tracks but that has more to do with yakima doing everything a-la-cart instead of having kits that include everything you need if I hadn't already had the HD bars on my other rack and wanted to be able to transfer them to this rack I probably wouldn't have went to this expense because I think they are overpriced.AS far as etrailer is concerned I always receive great service and products and they are always well packaged and never damaged by poor delivery care and always fast delivery speed.
The fit is good on the 22 Wilderness but there is definitely wind noise and I will add a diverter soon.
With exception of getting wrong towers (crossbar vs streamline), installation was fairly painless. Pay attention to measurements during install! Looking forward to the Yakima 16 to be fitted shortly and then ROAD-TRIPPING.
Great product and even better was the service with etrailer! These guys make it happen and delivery was super fast. Thanks for a fantastic experience, will be a return customer.
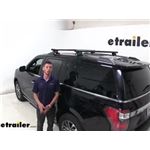
Yakima HD bars 60”
2018 Ford Expedition
Everything arrived in a timely fashion and the instructions were simple to follow. The fit is good and look forward to many years of use. Kayaks are awaiting for racks to arrive. Thanks for a great product
The racks fit well and secure on 2021 Palisade. A little cumbersome to assemble but a little patients goes a long way. Also 4 pieces were robbed from one box.
The people at etrailer made it right by sending the lost part ASAP.
Thank you
Received this Yakima roof rack system for my flush-rail 2019 Mazda CX-5 Signature on Thursday, and installed it on Friday.
It’s not the simplest installation I’ve encountered, and I’d had a number of Thule products before. I found the installation “picto-grams” not that helpful. Also the 3.5 newton-meter torque screwdriver provide would not “click”.
It looks great on the Mazda, but took about 4 hours to install - getting the clips in place was an issue ; I got the outer to clip on, only to find the inner had come off its attachment clips- very frustrating.


Do you have a question about this Roof Rack?
Info for this part was:
At etrailer.com we provide the best information available about the products we sell. We take the quality of our information seriously so that you can get the right part the first time. Let us know if anything is missing or if you have any questions.


Thank you! Your comment has been submitted successfully. You should be able to view your question/comment here within a few days.
Error submitting comment. Please try again momentarily.