
To see if this custom-fit item will work for you please tell us what vehicle you'll use it with.
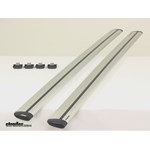
Extremely quiet, aerodynamic crossbars attach to Yakima towers to create a stylish roof rack for your vehicle. Rubber strips in T-slots push down to load carriers or accessories - no need to trim. Full-length aluminum bars maximize carrying capacity.
Features:
Yakima JetStream Crossbars - 60" Long - Silver - Qty 2:Videos are provided as a guide only. Refer to manufacturer installation instructions and specs for complete information.
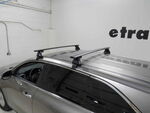
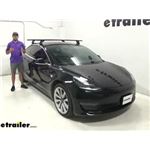
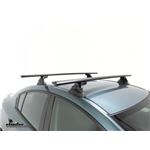
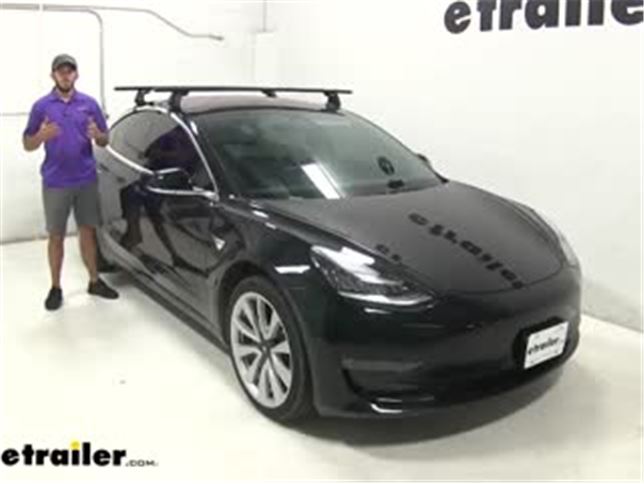
Colin: Hey guys this is Colin here at etrailer. Today we have a 2018 Tesla Model 3. We're going to do a test fit of the Yakima Jetstream roof rack system. This roof rack is going to mount to the naked roof of your Tesla Model 3. It's going to allow you to get your favorite rooftop accessories loaded up on top. Whether you got a bike rack, a kayak carrier, or even a cargo box.
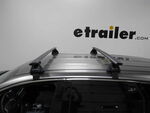
Now up top we're going to have our 60 inch long Jetstream crossbars. These are going to have a nice aerodynamic shape to them. That's going to help cut down on wind noise and drag when compared to your standard square or round bar roof rack systems.We're also going to have a rubber strip up top. It's going to let us know we can utilize T-track accessories. All we got to do is take off the end cap and we have access to that channel.
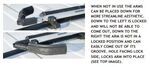
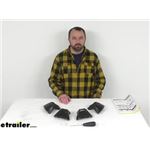
Now instead of having to pull out the rubber strip and then cut it to length for whatever accessory you're using, all you got to do is push down on it like so. You slide your T-slot all the way to the spot you want it on your roof, tighten it down, replace your end cap, and then you're going to be pretty ready to go.These bars while they're in black now are also available in silver. Just see etrailer if that's something you're interested in. We're going to have the Yakima baseline towers connecting our crossbars to our fit kit. This fit kit is going to be custom fit for the Tesla Model 3.
the pad just matched the contours of the edges of the Tesla, and then the hook is actually going to go under the trim piece right here. It's going to hook right up and under on all four of the hooks. Once you tighten those down and it really is going to have a good hold on your roof.Let's go and take the end cap off of our baseline tower. This is the bolt right here where we used to tighten down our roof rack move. Once we cover it up, we can put our end cap on.
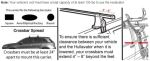
We'll actually see we have some plastic locks right here. We can replace those with Yakima lock cores which are sold separately here at etrailer. That'll provide more security for your roof rack.Now a few measurements for you guys. From the top of our roof to the bottom of our Jetstream crossbars, it's going to be three inches, which is plenty of space to get any of year clamp-on accessories or strap-on accessories under the crossbar without worrying about damaging the glass roof top of your Tesla. Now if we go from the top of the roof to the top of our jet stream bar, that's going to be four inches, which is something to keep in mind that you have added that height to your roof. You shouldn't have too many issues with low clearance situations with the Tesla, but it is something to keep in mind.We're also going to have a weight capacity for this roof rack system of 165 pounds. But be sure to double check with your Tesla's owner's manual and make sure your roof can handle that weight.Now that we've gone over some of those features, let's show you guys how to get this installed. Now we've got everything laid out on our table. We already have it partially assembled. We're going to go to show you how to get the rest of it assembled and it's going to install the exact same way that our front cross bar did.We'll go ahead and flip over our Jetstream bar. We're going to get our fit kit and tower assembled down here. First thing we want to do is pick up this black plastic piece right here. Going to put it in place in that slot. We're going to push down on it. You want to make sure you don't get it on the bolt until you hear those snaps right there. Now we'll take our silver paste and it's going to thread onto the screw that's in there. I'm just going to set it on top of there for now, hold it. I'm going to flip the foot over and the bolt is actually going to be inside that slot. So I'll grab my tightening tool. Begin to tighten that down. You can see that a silver piece going down. You want to keep going until it's in line with the black notches on each side. There we go. Now we'll go ahead and go to the edge of our Jetstream bar. We're just going to feed those notches into the track of our Jetstream bar.Now once you have your tower in the correct spot, you can see the measuring on our jet stream bar, get it in the correct spot at the edge of the foot. We're going to tighten it down, but we need to make sure we adjust it to the correct pitch. What the pitch is, is going to be the bolt in there where we tighten down our silver piece. There's going to be three notches right there. It's going to be labeled A, B, and C from the front of the bar to the back. So this side right here where my hand is, this is the front of our crossbar and we need that bolt at the C notch. So we're going to tilt it forward so that bolt is now in line with that notch. And then we'll tighten it down. Until you hear those audible clicks. That's like that.The second thing we need to do is that just our toe is going to be this notch right here. It's not labeled ABC. This time it's labeled 1, 2 and 3 from the front of the Jetstream bar towards the back. The toe is adjusting the way that pad is going to sit on top of your roof. In our instructions it tells us to adjust the toe to the 2 slot, so we'll have it in the middle and then we'll tighten that down.We're going to take our pad from our fit kit and attach it to this point right here. We need to make sure that the arrow on your pad is facing towards the outside of the book crossbars. You want it facing this way. Go ahead and set that on. We're going to push so we hear it click on. Now we're ready to get it on our roof.Now we're just going to set it in place on our roof in the rough spot that it has to go. We don't need to tighten anything down right now because we need to first measure our crossbar spread to make sure it's sitting in the right spot. Now we're going to get our crossbar spread, which is the front of our back bar to the front of our front bar and you can find this measurement in your instructions. Front to front you want to make sure it's the same on both sides. Once you have one side, go ahead and measure the other side and then double check to make sure that it's even.We'll go ahead and install our hook as well. You can see this small lip right there. It's going to go on that trim. We're just going to push it up and in until it hooks on to that metal piece. Now it needs to be angled down towards it. So we're going to grab our tool and use that bolt right there to do that. We need to loosen it a little bit first though, bring it out a little bit.Now going into that bolt we're going to tighten it and you'll see how it starts to angle down towards the car. Remember, it needs to get under that trim, so it's not quite low enough yet. We'll go ahead and listen to this a little bit more so we can get under. If you've got to kind of wiggle it, you can do so as well. There we go. Now we've got it under like so. Now we can begin tightening it. And hold it there for me to, just make sure it gets under that trim. There we go. Now that we have it a little bit snug, I'm going to go ahead and tighten down this bolt all the way until you hear the clicks and then we'll repeat this process for the other side.Now we have both sides under the trim right there, so now what we can do is begin to tighten it down. We're not going to go too far. We're just going to go a couple of rotations and then making sure that it stays under that lip. We're going to head the other side and do the same thing. You want to go back and forth as much as possible. That's going to prevent from pulling too much on one side and adjusting the rack from the position that you already put it in.Now we've gone back and forth a couple of times on each side. We have the driver's side torque down all the way, so we're just going to finish up over here until we hear those clicks like that. We can now cover up that bolt. And then we'll put our end cap on the end of our tower. Now we're ready to load up our favorite rooftop accessories and then hit the road.Well, thank you all for watching. That's going to do it for our test fit of the Yakima Jetstream roof rack system on our 2018 Tesla Model 3.
Average Customer Rating: 4.8 out of 5 stars (96 Customer Reviews)
Extremely quiet, aerodynamic crossbars attach to Yakima towers to create a stylish roof rack for your vehicle. Rubber strips in T-slots push down to load carriers or accessories - no need to trim. Full-length aluminum bars maximize carrying capacity.Excellent solution for my 2023 Chevy Silverado. In the past, I have had rails installed on the roof of my pickup trucks, but I find the BaseLine towers to be a better solution, since they don't permanently change the truck. Plus, they are much more solid than SkyLine system on the rails.

Love my Yakima roof rack!! It exceeds my expectations.great product. Also thank etrailer for the tec support! great staff always there to help thanks again!!
Follow the instructions, and you can't go wrong on the self installation
Strong, Solid Bars, Super Light, and really easy to install!
Your notice of schemes was a lot better than the yakima site provided. They did not suggest the scheme you did.
But when the products arrived, the instructions were by yakima. Generally worked as instructed except the tower to tower transverse mounting dimensions needed to be tweaked for a perfect fit.
Really easy to install & work as specified. So happy with the customer support/service at etrailer.
Ackage came 2 days early the install was somewhat easy (did it by myself)
Did not get to mount anything to it but seems really sturdy. One thing I can say is mark out your mounting points with provided stickers then put up and make adjustments to the roof rack.
Solid build quality and easy installation on my '21 Mazda CX-5.
Happy with the purchase. Crossbars shipped and received quickly.
So far so good. Purchased these towers to use on a 2022 GMC Canyon with HD bars that I already had, primarily to carry my canoe. Yakima's fitting instructions worked perfectly and the whole system seems really solid.
Well packaged and on time
Roof rack parts were ordered correctly and shipped quickly.
Great product fast shipping
Great! Easy to install!
Work exactly as they should and hold everything securely to my vehicle without interfering with the car’s normal operation. etrailer had best prices based on my research. These bars are much quieter than traditional round bars and worth the added expense.
Easy to install thanks to the etrailer video. I have used the rack system on many long distance trips including driving from South Carolina to Yellowstone.
Easy to install and sturdy. I carry a 9' pontoon boat on my camper shell using this rack at freeway speeds with no problems.
Nicole was beyond helpful!!!
We had to wait on stock a little longer than expected BUT etrailer kept me informed of the progress. Once I received the products installation was a breeze thanks to the instructional videos.
Yakima is always great, the bars are just right for my kayaks and look great too.
Hi, the company, good profesinal service. The product, all I pay was there. Very easy to install. Thanks Bless
Great fit, feels really sturdy, excellent directions
Great product... love that fact that I can take the bars on and off without having to disassemble the system. Very convenient when not its not being used.
Great product, well built and easy to i nstall.
Courtney was excellent. Helped with all my difficulties. Very professional and knowledgeable. She is an outstanding employee and should be commended.


Do you have a question about this Roof Rack?
Info for this part was:
At etrailer.com we provide the best information available about the products we sell. We take the quality of our information seriously so that you can get the right part the first time. Let us know if anything is missing or if you have any questions.


Thank you! Your comment has been submitted successfully. You should be able to view your question/comment here within a few days.
Error submitting comment. Please try again momentarily.