
To see if this custom-fit item will work for you please tell us what vehicle you'll use it with.
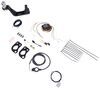
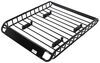
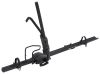
This aerodynamic, flush-mount roof rack lets you carry gear and cargo on your vehicle while maintaining a clean, factory look. Crossbars work with channel-mount and clamp-on accessories. Installs on your vehicle's naked roof.
Features:
Yakima BaseLine FX XL:Videos are provided as a guide only. Refer to manufacturer installation instructions and specs for complete information.
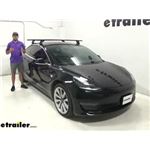
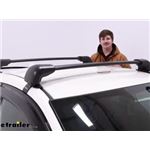
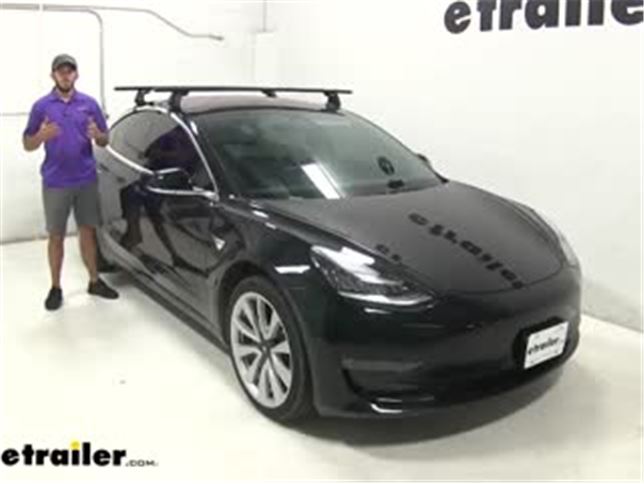
Colin: Hey guys this is Colin here at etrailer. Today we have a 2018 Tesla Model 3. We're going to do a test fit of the Yakima Jetstream roof rack system. This roof rack is going to mount to the naked roof of your Tesla Model 3. It's going to allow you to get your favorite rooftop accessories loaded up on top. Whether you got a bike rack, a kayak carrier, or even a cargo box.
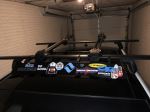
Now up top we're going to have our 60 inch long Jetstream crossbars. These are going to have a nice aerodynamic shape to them. That's going to help cut down on wind noise and drag when compared to your standard square or round bar roof rack systems.We're also going to have a rubber strip up top. It's going to let us know we can utilize T-track accessories. All we got to do is take off the end cap and we have access to that channel.
Now instead of having to pull out the rubber strip and then cut it to length for whatever accessory you're using, all you got to do is push down on it like so. You slide your T-slot all the way to the spot you want it on your roof, tighten it down, replace your end cap, and then you're going to be pretty ready to go.These bars while they're in black now are also available in silver. Just see etrailer if that's something you're interested in. We're going to have the Yakima baseline towers connecting our crossbars to our fit kit. This fit kit is going to be custom fit for the Tesla Model 3.
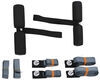
the pad just matched the contours of the edges of the Tesla, and then the hook is actually going to go under the trim piece right here. It's going to hook right up and under on all four of the hooks. Once you tighten those down and it really is going to have a good hold on your roof.Let's go and take the end cap off of our baseline tower. This is the bolt right here where we used to tighten down our roof rack move. Once we cover it up, we can put our end cap on.
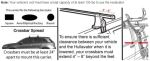
We'll actually see we have some plastic locks right here. We can replace those with Yakima lock cores which are sold separately here at etrailer. That'll provide more security for your roof rack.Now a few measurements for you guys. From the top of our roof to the bottom of our Jetstream crossbars, it's going to be three inches, which is plenty of space to get any of year clamp-on accessories or strap-on accessories under the crossbar without worrying about damaging the glass roof top of your Tesla. Now if we go from the top of the roof to the top of our jet stream bar, that's going to be four inches, which is something to keep in mind that you have added that height to your roof. You shouldn't have too many issues with low clearance situations with the Tesla, but it is something to keep in mind.We're also going to have a weight capacity for this roof rack system of 165 pounds. But be sure to double check with your Tesla's owner's manual and make sure your roof can handle that weight.Now that we've gone over some of those features, let's show you guys how to get this installed. Now we've got everything laid out on our table. We already have it partially assembled. We're going to go to show you how to get the rest of it assembled and it's going to install the exact same way that our front cross bar did.We'll go ahead and flip over our Jetstream bar. We're going to get our fit kit and tower assembled down here. First thing we want to do is pick up this black plastic piece right here. Going to put it in place in that slot. We're going to push down on it. You want to make sure you don't get it on the bolt until you hear those snaps right there. Now we'll take our silver paste and it's going to thread onto the screw that's in there. I'm just going to set it on top of there for now, hold it. I'm going to flip the foot over and the bolt is actually going to be inside that slot. So I'll grab my tightening tool. Begin to tighten that down. You can see that a silver piece going down. You want to keep going until it's in line with the black notches on each side. There we go. Now we'll go ahead and go to the edge of our Jetstream bar. We're just going to feed those notches into the track of our Jetstream bar.Now once you have your tower in the correct spot, you can see the measuring on our jet stream bar, get it in the correct spot at the edge of the foot. We're going to tighten it down, but we need to make sure we adjust it to the correct pitch. What the pitch is, is going to be the bolt in there where we tighten down our silver piece. There's going to be three notches right there. It's going to be labeled A, B, and C from the front of the bar to the back. So this side right here where my hand is, this is the front of our crossbar and we need that bolt at the C notch. So we're going to tilt it forward so that bolt is now in line with that notch. And then we'll tighten it down. Until you hear those audible clicks. That's like that.The second thing we need to do is that just our toe is going to be this notch right here. It's not labeled ABC. This time it's labeled 1, 2 and 3 from the front of the Jetstream bar towards the back. The toe is adjusting the way that pad is going to sit on top of your roof. In our instructions it tells us to adjust the toe to the 2 slot, so we'll have it in the middle and then we'll tighten that down.We're going to take our pad from our fit kit and attach it to this point right here. We need to make sure that the arrow on your pad is facing towards the outside of the book crossbars. You want it facing this way. Go ahead and set that on. We're going to push so we hear it click on. Now we're ready to get it on our roof.Now we're just going to set it in place on our roof in the rough spot that it has to go. We don't need to tighten anything down right now because we need to first measure our crossbar spread to make sure it's sitting in the right spot. Now we're going to get our crossbar spread, which is the front of our back bar to the front of our front bar and you can find this measurement in your instructions. Front to front you want to make sure it's the same on both sides. Once you have one side, go ahead and measure the other side and then double check to make sure that it's even.We'll go ahead and install our hook as well. You can see this small lip right there. It's going to go on that trim. We're just going to push it up and in until it hooks on to that metal piece. Now it needs to be angled down towards it. So we're going to grab our tool and use that bolt right there to do that. We need to loosen it a little bit first though, bring it out a little bit.Now going into that bolt we're going to tighten it and you'll see how it starts to angle down towards the car. Remember, it needs to get under that trim, so it's not quite low enough yet. We'll go ahead and listen to this a little bit more so we can get under. If you've got to kind of wiggle it, you can do so as well. There we go. Now we've got it under like so. Now we can begin tightening it. And hold it there for me to, just make sure it gets under that trim. There we go. Now that we have it a little bit snug, I'm going to go ahead and tighten down this bolt all the way until you hear the clicks and then we'll repeat this process for the other side.Now we have both sides under the trim right there, so now what we can do is begin to tighten it down. We're not going to go too far. We're just going to go a couple of rotations and then making sure that it stays under that lip. We're going to head the other side and do the same thing. You want to go back and forth as much as possible. That's going to prevent from pulling too much on one side and adjusting the rack from the position that you already put it in.Now we've gone back and forth a couple of times on each side. We have the driver's side torque down all the way, so we're just going to finish up over here until we hear those clicks like that. We can now cover up that bolt. And then we'll put our end cap on the end of our tower. Now we're ready to load up our favorite rooftop accessories and then hit the road.Well, thank you all for watching. That's going to do it for our test fit of the Yakima Jetstream roof rack system on our 2018 Tesla Model 3.
Average Customer Rating: 4.3 out of 5 stars (3 Customer Reviews)
This aerodynamic, flush-mount roof rack lets you carry gear and cargo on your vehicle while maintaining a clean, factory look. Crossbars work with channel-mount and clamp-on accessories. Installs on your vehicle's naked roof.
I purchased clips that were stated as being compatible with our 2010 Chevrolet Impala. The front clips fit well, however the rear clips do not.

From start to finish, the folks at etrailer -- and I spoke to several people there, so it was a consistent corporate vibe -- were fantastic to deal with.
There were delays in getting my product that were on the supplier side and out of eTrailer's control, yet etrailer folks kept me up to date and also worked on a customized solution.
My goal was to be able to carry my surfboard on the roof of our 2019 Hyundai Santa Fe to the beach more than 3 hours away. But the particular model we had had no existing racks, no recessed areas, nothing to fix racks to. Not even the dealer had a solution. I was sh*t out of luck.
But etrailer hooked me up. The racks did take me a while to put on, but most of that time was fine tuning to reduce “hum” while driving. I’m very happy with them.
Thanks to etrailer, I have gone surfing and can go surfing whenever I'd like to.
Had two different vehicles to get ready for two different trips and Joshua diligently tracked dow the correct Yakima accessories and backorder challenges. No other provider came close to this level of service. Excellent work! Both trips made better!
I purchased clips that were stated as being compatible with our 2010 Chevrolet Impala. The front clips fit well, however the rear clips do not.
I have a 10th gen Civic sedan and I was dying to get the perfect roof rack set for my car. At the time of my purchase there was not many visuals of what the rack system looked like on this car.
I purchased the:
•Yakima 50in Jetstream crossbars
•Yakima baseline towers
•bc182 & bc183 clips
•Yakima 46in fairing
Overall I love how it looks on my car! During This COVID pandemic I have been camping more, and this is the perfect foundation! First off, the 46in fairing is the perfect fit for the 10th gen civic! Wind noise is low also with the help of the aerodynamic crossbars. My main concern was the fuel efficiency. On long road trips I still average 38-40 mpg with the rack on. My daily commutes I average 34 mpg without Econ on.
Love my Yakima roof rack!! It exceeds my expectations.great product. Also thank etrailer for the tec support! great staff always there to help thanks again!!
Hyundai Sonata - glass pano roof. These items have been on for about 1-year. So happy with the set up. I’ve take a road bike and a mountain bike on 500+ mile trips. The mounts do an excellent job.
I ordered the Yakima "aero" bars , baseline towers, and BaseClip kits for my 2019 Honda Civic 5 door. While expensive the quality is excellent and it was a pleasure to assemble such a high quality and precision engineered product. It fits perfectly on my new car and the "aero" bars are quiet even at freeway speeds. Highly recommended.
Overall these are a great product and much needed. I had a Tiguan with the side rails but needed cross rails for my gear. When I got my Jetta I wanted to keep my Yakima cross rails so I needed the Towers. They work great and fit my car well. I took them off recently after having them on for a year for re-fitment.
The Yakima products are doing great. Just got home yesterday from a 18 day trip using them in Michigan's upper peninsula. Love them. Great products. Thanks again.
Works perfectly on my 2023 Chevy Silverado. The rubber pads are soft enough to prevent scratches, yet firm enough to support the force of being cranked down on the roof. They fit perfectly in the ridge near the edges of the rough.
The installation was super easy, and despite a long time stuck in shipping the delivery itself was extremely fast, and the package arrived in spotless condition. The manuals were very easy to follow, and the end result is absolutely amazing. They provided a nice, flush finish and hold the racks down tight.
The installation was super easy, and despite a long time stuck in shipping the delivery itself was extremely fast, and the package arrived in spotless condition. The manuals were very easy to follow, and the end result is absolutely amazing. They provided a nice, flush finish and hold the racks down tight.
These are great, and it is so nice to get a custom base clips that match the angles and contour of the sides of your roof. Makes it look very clean. These are made very well and for sure these will last a long time like my other Yakima products.
Exactly what I need, and good Track information. Thank you!
Arrived as part of a set of components for a roof rack and kayak carrier. I liked that etrailer had a guide to get the right components to fit my car's make and model year. This baseclip set arrived quickly, but the set for the rear of the car that arrived with them were obviously returns that had not been inspected. That set was missing parts, requiring follow-up calls to arrange for a new replacement for the incomplete set, and about a week's delay in getting the rack up on the car.
Works just like the old towers except they pivot to give a snugger fit on the truck, which makes this tower fit easier and less likely to come loose or break like the other towers. Also it is nice to have a rack on the front of the cab for long items, like full size canoe, that would be too long and need the extra length to fit. Without the extra tower the canoe has to shift back and hang off the back too much and securing the front of the canoe is more challanging.
I though I would love the core bar set up on my truck but I have really grown to love them! Weather it’s bikes, kayaks or a ladder it works great! And even better it looks great! Quieter than Thule square bars and Yakima round bars by far. I would not only buy again but one of the bars was damaged in shipment and etrailer took care of it by sending a new one to replace it right away. Will be buying from them again! Good customer service!!!!
Customer service was excellent, they called me to tell me one item was backordered and how long it would be. Package was shipped with enough packing material. Install was pretty easy, some of the Yakima measurements in the manual are a couple inches off but no big deal. This will be used to carry a box for when the family takes trips. Can pile all the luggage up top and have more room in the car. I would recommend the Yakima corebar roof rack and etrailer! Their price was lower than 2 other sites I checked.
Love my roof rakes just put them back on for this seasons kayaking very easy application was able to apply them myself
Clips are perfect and the etrailer.com experience was great. Ordered on a weekend and had the clips as promised by the following Wednesday.
The clips are fine . I will review etrailer. I needed just clips I asked them which ones they told me. Great place.
Do you have a question about this Roof Rack?
Info for this part was:
At etrailer.com we provide the best information available about the products we sell. We take the quality of our information seriously so that you can get the right part the first time. Let us know if anything is missing or if you have any questions.


Thank you! Your comment has been submitted successfully. You should be able to view your question/comment here within a few days.
Error submitting comment. Please try again momentarily.