
Custom Fit Roof Rack Kit With DK378 | RB1250S | RRRLKHD
(61 reviews)
Price: $514.91
In Stock
Custom Fit Roof Rack Kit With DK378 | RB1250S | RRRLKHD
Item # RR95EP
Our Price: $514.91
Will this fit?
To see if this custom-fit item will work for you please tell us what vehicle you'll use it with.
In Stock


- All Info
- Reviews (61)
- Q & A (0)
- Videos (2)
- Photos
Rhino Rack Roof Rack - RR95EP
- Square Bars
- Crossbars
- 50 Inch Bar Space
- Rhino Rack
- Silver
- Overhang
- 2 Bars
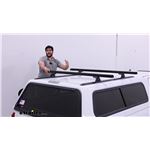
These heavy-duty, aluminum crossbars work with Rhino-Rack legs to create a sturdy roof rack. The square bars include built-in C-channels for mounting Rhino-Rack heavy-duty, contractor-grade accessories.
Features:
Rhino-Rack HD Crossbars - Silver - Qty 2:- Heavy-Duty square crossbars let you build a roof rack system from scratch
- Built-in C-channel on top of each bar is designed for mounting Rhino-Rack Heavy-Duty accessories and carriers
- Rubber strip in the channel helps to cushion load and provide slip resistance
- Built-in channel on bottom of each bar for mounting to Rhino-Rack Heavy-Duty roof rack legs
- Lightweight, extruded, structural-grade aluminum construction for strength and durability
- Silver color
DK Fit Kit for Rhino-Rack 2500 Legs - Heavy Duty:
- Padded, metal clamps provide secure grip on your door jambs
- Bolt onto leg assemblies and tighten for secure fit
- Protect door jambs from scratches and abrasions
- Powder coated for durability and rust resistance
- Molded-rubber pads are custom designed to fit the contours of your roof
- Clip onto the bottoms of your roof rack legs
- Protect your roof from scratches and abrasions
Rhino-Rack 2500 Legs - Heavy Duty - Qty 4:
- Legs let you mount Rhino-Rack Heavy-Duty crossbars to your vehicle's naked roof or fixed mounting points
- Leg bases pivot to ensure the crossbars are level on your roof
- Locks secure system to your roof
- UV-stabilized, glass-reinforced nylon is durable and weather resistant
- Allen key included to ensure legs are securely mounted to your roof
DK378 Custom DK Fit Kit for Rhino-Rack 2500 Series Roof Rack Legs - Naked Roof
RB1250S Rhino-Rack Heavy-Duty Roof Rack Crossbar - Silver - 50" Long - Qty 1
RLKHD Rhino Rack 2500 Series Leg Kit for HD Cross Bars - Qty 4
Video of Custom Fit Roof Rack Kit With DK378 | RB1250S | RRRLKHD


Videos are provided as a guide only. Refer to manufacturer installation instructions and specs for complete information.


Video Transcript for Rhino-Rack Vortex Aero Crossbars Installation - 2014 Infiniti Q50
Hey everyone, it's Evangeline here at etrailer and today we have the Rhino-Rack roof rack system. We'll take a look at how it fits this 2014 Infiniti Q50. So if you wanna carry around some fun accessories, maybe you wanna carry around some bikes but you don't have a hitch or even larger items like kayaks we can do is put them on your roof. What you first need though is a roof rack system. This is gonna be the Rhino-Rack roof rack system. There are a bunch of different options for your Infinity Q50.
This is what you would go with if you want a slightly faster and easier install and also a more rugged look. This is gonna be your medium price point roof rack as well where you still get quality at not that much of an expense. So let's take a look at some of its pros and cons especially on our little sedan here. So this is going to have the 46 inch long crossbars the 2500 towers, and the custom fit kit for your sedan. Now these are three different parts but we can send them to you as a kit.
If you use our fit guide where you put your year make model here at etrailer we'll have that all included in one kit for you. And later in this video I'll show you how to install it. But first let's talk about the crossbars. For height, you have two measurements for roof clearance. One is gonna be how much space do you have underneath your crossbars, here it's about three inches and that's how much space you have for clamps.
Some accessories have U-bolts that go underneath. You want a lot of clearance, which this offers. The next is how high does this sit above your roof And this is just a little past four inches. So that's where your cargo sits. If you're carrying around skis with extra tall bindings you can make sure there's enough clearance.
If there isn't you get accessories that give you more height. Since we have a sedan, we're not worried about this hitting the roof of our garage or anything and we have plenty clearance underneath so it's gonna be a good fit for most accessories. On top of your crossbars, you have these T track channels. So you do have the vortex strips which you take out in order to access it. You also have to remove the end cap to get into those channels. If you're using T track mounted accessories you'll take these up, take these off and cut them around your accessory, which is the downside. I recommend picking up extras of these before or as you purchase your roof rack so that you're ready to go. This offers you 165 pounds of weight capacity. You do have aluminum bars with struts on the inside so you have really good capacity as well in the center of your crossbars. You're not worried about it blowing in the middle but be mindful that this weight capacity includes the weight of your carrier. So if you're carrying around a heavy kayak also remember the weight of the carrier and make sure that included with a roof rack does not exceed your roof weight capacity. Since you do have a naked roof on your roof meaning there's no rails or fixed points, you'll use hooks to go into your roof. You're limited to a specific crossbar spread. That measurement is from one bar to another, 27 and five eighths of an inch. This is pretty in the middle for most accessories. Good for roof boxes and kayaks and skis and snowboards. For installing your roof rack, it might look a little overwhelming at first but that's what this video is for. I'm gonna guide you through the process. I already installed the rear crossbar. So we are going to install the front crossbar together which is actually where you start because it's easier to go from the front and then install the rear. So we have the crossbars, we have the towers, we have the clamps. Let's put them together. First you're going to push in the wind strips into the T track channel on top of your crossbar. Then you're going to flip the crossbar over so that you have access to the bottom channel and that's where you're going to put your towers. So notice that the towers have this long or large square plate. You're gonna wanna loosen it just enough so it can slide through. Once it's pushed in you're then going to measure where to stop. You get this measurement strip included with your crossbars and you are gonna follow the measurement printed on your instructions. So for the front crossbar it says 187. So usually you just cut there at the 187. In our case here, since we're just doing a demonstration I'm not gonna cut it, but I'll show you how it pushes into your roof rack crossbar. Go to where the cut line is and that's where you line up the end of your tower. So you're gonna tighten down the tower with the included Allen key tool. And this actually has its own torque setting which you'll be using throughout this install. The way that torque setting works is that you push on the end of the lever and the lever bends straight if you have enough torque. If it bends past horizontal, you're over tightening the bolt. Installing the pads is next. And to do that, you first need to figure out which one's the right side and which is the left of the crossbar. An easy way to orient yourself is to have the brand logo facing the front of your vehicle, and then the right is gonna be passenger side. Left is driver's side, so this is gonna be your right side. Flip it over, find the pad for the right side. Look for the numbers printed underneath the pad. So this is 697, which is the right side and that's gonna fit onto our arrow here. So the arrow is gonna be facing out and just push the plate and the pad together. Arrows still facing out or away from the vehicle, you then push the plate onto the tower. Now where do you put your crossbars Well, for here we're gonna measure from between the doors to that seam, and then it has a measurement for your front crossbar of 10 and five eighths of an inch. So we're gonna go over there we're going to take that spot, which is right here and then your kit includes some stickers if you wanna put that on your door and that will save your spot. Now get your crossbar, make sure that the towers are secured and the rubber pads are underneath because you're then going to gently place this on your roof and try to line it up with the marking. The arrow on the tower should line up with the arrow of your measurement and you want to the pad to be as flush with the contours of your vehicle on both sides. Now you're going to attach the hooks. So open up the door, put the hook onto the tower and we're just going to set this into place because you wanna make sure it lines up with the curves of your vehicle. Hold it flush as you then get the bolt and you're gonna thread it into the nut in the back. So this can be a little tricky to get threaded the first time, but hand tighten it down before you go to the other one. Now, before you use your tool, you're going to want to tighten it down evenly on both sides. So go like 50% on this side another 50 on that side, 75 back and forth so you're not pulling the whole system one way to the other. This is helpful if you have a friend with you otherwise you're just walking back and forth. Remember that torque setting we talked about You'll also use that for the towers so you don't overtighten them. So for your front crossbar, it's not as sleek of a fit as for your rear crossbar. So not the best fit I've seen but it's also solid and secure on there. And if you do it right you can slam your door on the hooks, no problem. So make sure all four towers are tightened down and then you're gonna put the door on there and lock it to secure it. Final step is the end caps for your crossbars. So you have your Rhino-Rack security caps which use a special Rhino-Rack tool and that keeps your end cap on the crossbar. If you want to, you can purchase metal lock cores separately. I recommend adding the keys to your key chain or putting them in a safe spot in your vehicle. But other than that, once you just double check that everything is solid and secure you're ready to load up your roof rack and hit the road because you are done with the install. That there was a look at our Rhino-Rack roof rack with the 46 inch long vortex aero crossbars, the towers as well as the custom fit kit for your 2014 Infiniti Q50.
Customer Reviews
Custom Fit Roof Rack Kit With DK378 | RB1250S | RRRLKHD - RR95EP
Average Customer Rating: 4.4 out of 5 stars (61 Customer Reviews)
These heavy-duty, aluminum crossbars work with Rhino-Rack legs to create a sturdy roof rack. The square bars include built-in C-channels for mounting Rhino-Rack heavy-duty, contractor-grade accessories.by: Joe03/18/2018
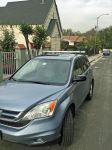
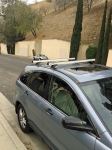
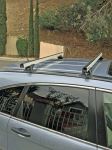
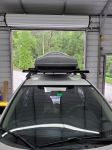
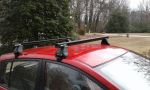
Here are some pics of the Rhino-Rack Heavy-Duty Roof Rack Crossbars - Silver - 50" Long - Qty 2 installed on my 2011 Honda CR-V.
That I recently purchased.


by: Craig10/13/2023
The rack fit well and was easy to install. Seems to be made well. The problem is the amount of road noise. I never even put the basket on. It was so loud, it roared. I repositioned it several times but the noise was way too much and I finally just removed it. I spent a lot of money for the rack and the basket and now they are in storage. I wish it would have worked out better because I thought it looked really good.
by: Bill Boedeker05/05/2015
Ordered a Rhino Rack for my 2014 GMC Sierra 2500HD Denali. Rack arrived in very good shape and all items were there. Installing at this time and see no problems ahead.
by: Michael05/31/2022
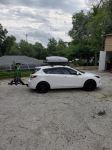
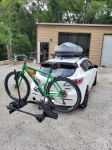
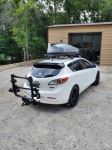
Mazda
Thanks to Etrailer, I am ready to do some serious summer exploring with my 2013 Mazda 3! Rhino Racks, Malone top box, and Kuat bike rack!


by: Eric 06/12/2023
Good quality and locks are included. The plastic lock covers are flimsy but they will keep an honest person honest.
by: ashley10/22/2021
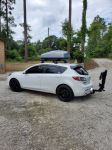
I got the roof rack mounted anyways. Better pics to come when it's all finished!


by: Mike08/01/2017
Great product everything fit perfectly. With the heavy duty bars almost all the hardware for anything you put on the rack is too short


by: Joshua 11/10/2021
Excellent customer service, all current manufacturers for this type of equipment is not available for purchase because Yakima, Thule, even Rhino Rack did mention from customer service representatives from these 3 companies states you are better off purchasing from a distributor such as E-trailer. This company definitely had the transfer equipment from a Yakima support base to a Rhino Rack crossbar system. I needed the additional load weight and Jaime from E-Trailer was extremely patient and helpful…seriously awesome customer service…also my package came 2 days earlier in this truck driver shortage too. Job well done.
by: James01/21/2022
This kit is easy to slap on and sturdy enough to balance my skis and snowboards. I recently used the Rhino Rack on a three hour drive to a ski resort and had no issues.
by: Amanda06/01/2018
2017 Ford F-150
This rack worked out great... I installed in on a 2017 Ford F-150. We drove 6 hrs through wind and rain with a SUP and Tandem Kayak on top. It really took a beating in a storm the whole way. One bracket was a little loose and shifted because of the wind on the Kayak, but it held together. Super happy with Rhino rack!
by: Timothy08/20/2019
2005 Nissan Armada
This loader is amazing...I easily load a 4' x 14' Sunfish sailboat at 120lbs easily without damaging my 2005 Nissan Armada...super sturdy...exactly as advertised. Note:. I order the extra heavy bar and did not need it! Now I take my sailboat with me while I pull my travel trailer. You won't be disappointed. Etrailer ROCKS IN CUSTOMER SERVICE...THEY HUNTED DOWN ALL INFO NEEDED TO MAKE THE PURCHASE...give DENA W a big raise!!!!!!
by: Lou F.11/02/2014
The Rhino rack has been working well. It is a relief to get my ladder out of my car and to be able to use the back seat.
by: Mark08/14/2018
This is my second Rhino-Rack. They go on very easily and hold the bikes/kayaks and even an extension ladder very well....thanks for a great product
by: RO02/05/2017
Nissan Versa
This rack works perfectly on my Nissan Versa for carrying my two Perception Sound 9'6" kayaks. The Rhino-Racks look good to me. The kayaks can rest directly on the rubber pads on the rails, unlike the Yakama racks I had in the past that had bare pipe rails. Also, I expect I can buy parts to adapt this product to a different car without having to buy new towers. I am sorry there are not hooks or loops to attach bungees when carrying lumber. They are noisy in the wind, but less so when carrying the kayaks.


by: Brandon12/15/2017
Two items I received surprised me when I unpacked the box were the rails because they were not black like I saw in the picture, and the rubber insert that I am having a hard time sliding in the rail. Should this rubber insert have come already installed in the rail or is there a top on how to put in with ease?
by: Andrei09/28/2018
2015 Nissan Rogue
This is an excellent product. It was the only product that would fit my truck. I was able to mount it by myself, it took me longer than I thought it would, but it helps if you watch first a video on line about how to put it together. The support staff is excellent if you miss any parts. I highly recommend it for the 2015 Nissan Rogue.
Andrei
by: Rob B06/26/2019
Dodge Ram Pickup
Well engineered rack that fits my Ram 2500 crew cab well. A bit of wind noise at highway speeds. I have the heavy duty cross pieces with a square cross section.
by: Glenn 06/11/2021
Needed the Rhino-Rack parts and they were delivered when promised. Great service.
by: Brian09/25/2018
Once installed they seem sturdy and look good. One of the end caps was damaged in shipping but otherwise everything was good
by: Claire 02/05/2023
Thank you for the very speedy customer service! My roof rack is already here!
by: Bryce03/11/2022
Rock solid with over 120 pounds on them daily, 1 year later.
by: Kenrick08/03/2020
National
I was in a roof rack jam. There was a national shortage of the rack I needed for my car and our summer vacation was a week away. I went to etrailer.com when I couldnt find the roof rack anywhere else on the web. Another website actually suggested that they might have what I needed.
I spoke to Ashley E on the phone to make sure that I was picking the right parts. Ashley was very helpful and knowledgable. She helped me find the right roof rack and made sure that I received it in record time. I am a customer for life!!!
by: Art 08/22/2022
Chevrolet Silverado
Perfect fit for the 2022 Chevy Silverad o.
by: Brittany 10/03/2022
Excellent customer service, very quick delivery!
by: Jordan 10/08/2021
Comes with locks and 2 keys which is nice… some of the parts feel a little plastic-y and cheap (not any parts that have an important function). Thus the 4 instead of 5 star rating.
25
2875
Show More Reviews
See what our Experts say about this Rhino Rack Roof Rack
- How to Determine if Rhino-Rack CXB Leg Kit Fits a 2022 Subaru Forester for HD Bars & Roof Top TentThe Rhino-Rack CXB Leg Kit for Raised, Factory Roof Rack Side Rails # CXB will fit the factory rails on your 2022 Subaru Forester as long as those rails are not more than 1-1/2" tall and not more than 2-1/4" wide. This would allow you to use Rhino Rack HD cross bars like the Rhino-Rack Heavy-Duty Roof Rack Crossbars # RB1250. It is also important to note that since these use the Rhino Rack HD bars, you may have a difficult time finding a rooftop tent that fits. That is because the HD bars...
view full answer... - Will the 65" Rhino-Rack HD Crossbars # RB1650 Fit on My 2010 Mazda 3 Hatchback?I have an answer for you. Unfortunately, the 65 inch Rhino-Rack Heavy-Duty Roof Rack Crossbars # RB1650 are too long for your 2010 Mazda 3 Hatchback with fixed mounting points. With that being said, you can still have shorter Rhino-Rack Heavy-Duty crossbars on your vehicle. Our installation team here at etrailer has tested these shorter bars with your vehicle so that they will fall within the required dimensions of local traffic laws. For this system, you will need the following parts:...
view full answer... - Will the Rhino-Rack RTC-Style Roof Rack Tracks # RTC95JW Fit a 1998 Jeep Wrangler with HardtopThe 37-1/2" long Rhino-Rack RTC-Style Roof Rack Tracks # RTC95JW are a universal fit so as long as your 1998 Jeep Wrangler Sahara has a naked roof that is flat then they will fit. The tracks provide mounting points for the Rhino-Rack # RLTP, # RLTF, and # RLT500 track-mounted legs. These are compatible with the Heavy-Duty Rhino-Rack Bars like the 50" long # RB1250.
view full answer... - Will the Inno Shadow 16 Fit on Rhino-Rack Crossbars on My 2013 Toyota Prius?As far as the fitment of the Inno Shadow 16 Cargo Box # INBRA1210BK being able to clamp around a Rhino-Rack roof rack, it depends on what type of Rhino-Rack crossbars you have on your 2013 Toyota Prius. If you have an aero crossbar system that involves the Rhino-Rack Vortex crossbars like the ROC25 # RR44SR, the Shadow 16 will clamp around those as well. The only caution is that the Shadow 16 will not fit Rhino-Rack Heavy Duty Crossbars like the # RB1250. I am happy to say that all 4...
view full answer...
- How Do Roof Racks Attach to a 2012 Hyundai ElantraRhino-Rack 2500 Series Leg Kit # RRRLKHD is just the legs but for them to actually fit your 2012 Hyundai Elantra you need the proper clamp kit. If you have a 4-door sedan with no rails or crossbars already on the roof you would use clamp kit # DK301 and bars # RB1250. If you have a Touring model with no rails or crossbars you would use clamp kit # DK010 and bars # RB1250. Clamp kits have what is basically a hook that attaches to the roof right above the doors in the door jamb. If you...
view full answer... - Does Rhino-Rack HD Roof Rack for 2020 Toyota Corolla Sedan Have Static Load RatingI checked with Rhino-Rack and they specifically mention they only have dynamic (moving) load ratings, and that is exactly what the 165 lb capacity is with the rack that fits your 2020 Toyota Corolla sedan. Rooftop tents generally only call for a rack to have a certain dynamic capacity so I recommend checking out your tent's manual to find out. As for the roof rack for your 2020 Toyota Corolla, here are the parts you need: - Rhino-Rack Heavy-Duty Roof Rack Crossbars # # RB1250B-2 (Black)...
view full answer...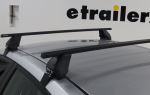
- Can I Use The Batwing Awning # RR33200 With My Factory Crossbars?The Rhino Rack Batwing Awning # RR33200 is a bolt on installation so it won't be able to work with your factory crossbars. You'll need to add another roof rack system with tracks to be able to use the batwing awning. You can use something like these legs # CXB and these bars # RB1250. These have a channel which will work with the hardware on the Batwing. You will need this mounting kit # RR31102. I personally have not used the XTM 270 Batwing Awning before. So I think that the batwing...
view full answer... - Sturdy Roof Rack Recommendation for 2008 Chevy CobaltFor a vehicle like your 2008 Chevy Cobalt I would not want to recommend a track style of rack as the best option. The tracks aren't going to flex enough to fit well and the clamp style racks are much sturdier than one might think so even though that's not the option you listed wanting it would be your overall best option still. Rhino Rack does offer a heavy duty roof rack that fits your vehicle with the # RB1250, # RRRLKHD, and # DK181 if you have a sedan or part # DK182 for a coupe but...
view full answer... - Heavy Duty Roof Rack Recommendation for 2013 Hyundai SonataFor stuff like lumber from a home center type store I would recommend the Rhino Rack HD roof rack part numbers # RB1250, # RRRLKHD, and # DK250 as it is confirmed as a fit and has large square bars that are great for what you are looking for. For load stops you would then want the pat # RRRLH1. Then for cinch straps part # RRRTD35P. This rack has a capacity of 110 lbs but you would also need to check the roof capacity of your vehicle in the owners manual.
view full answer... - Is Rhino-Rack 2500-Series Roof Rack Compatible with Thule Force Cargo Box # TH624The Rhino-Rack 2500-Series roof racks can include either square Euro crossbars, their Vortex Aero bars or their heavy-duty rectangular bars. The Euro square bars and the Vortex Aero bars both are fully compatible with the Thule Force XT Cargo Box # TH6356B. The heavy-duty cross bars # RB1250 are not. The Thule Force XT requires that the spread between the crossbars be at least 23-5/8-inches. As long as the rack has this minimum spread and uses one of the two compatible bar types it will...
view full answer... - Dimensions of Rhino-Rack Heavy-Duty Roof Rack CrossbarsThe Rhino-Rack Heavy-Duty 50-Inch Roof Rack Crossbar # RB1250S has cross-section dimensions of 1-7/8-inches tall and 1-5/8-inches wide, as shown in the photo I prepared for you. We also offer two bars as a set # RB1250. The vehicle known as the Mitsubishi Pajero in other countries is called the Montero in the North American market. If you happen to have a 2006 model year with factory installed roof rails that run front-to-back this crossbar can be installed using leg kit part # CXB.
view full answer...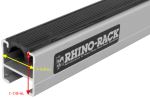
- Parts Needed to Move Rhino-Rack 2500 Series Roof Rack to 2014 Toyota Prius CA vehicle-specific portion of the Rhino-Rack roof racks for your 2014 Toyota Prius C is the Custom DK Clamps and Pad kit # DK351 that you referenced and this kit is used for a number of their 2500-series racks. You may also need a leg kit; which one will depend on the crossbars you have (the 2500 series includes several types). If you have the heavy-duty crossbar # RB1250 you will use leg kit # RRRLKHD; if you have Aero crossbars you'll instead use # RRRLKVA. The link provided will show...
view full answer... - Will the Rhino-Rack HD Crossbars Allow Me to Transport 2 Kayaks on My 2014 Kia Sorrento LX?Yes, the Rhino-Rack Heavy-Duty Roof Rack Crossbars - Black - 50" Long - Qty 2 # RB1250B-2 (black) and # RB1250 (silver) are compatible with the bare roof on your 2014 Kia Sorrento LX without a vista roof. For a complete roof rack system, you will need the following parts: - Rhino-Rack 2500 Series Legs for Heavy-Duty Crossbars - Naked Roofs or Fixed Mounting Points - Qty 4 # RRRLKHD - Custom DK Fit Kit for 4 Rhino-Rack 2500 Series Roof Rack Legs - Naked Roof # DK179 For a J-style carrier...
view full answer... - Crossbar Pads to Carry a Surf Board on Rhino-Rack Heavy Duty CrossbarsYes, we do have foam pads that will fit around your Rhino-Rack Heavy-Duty Roof Rack Crossbars # RB1250 and allow you to carry your surf board. You can use the Rhino-Rack Crossbar Pads w/ Tie-Downs # RRRWP04. These pads will fit your HD crossbars. I have included a picture from the instructions manual that shows this as a fit.
view full answer...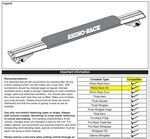
- Weight Capacity Of The Rhino Rack RLTF Roof Rack System.If you used these # RLTF feet with the tracks # RRRTV188 and use the Heavy Duty Crossbars # RB1250 you will have 220 lbs of capacity on your roof. This is a bit more than the average roof rack system so you will be able to really fill up your bar space! You should verify that the vehicle's roof can handl that weight too though.
view full answer... - Roof Rack Recommendation to Carry 2 Kayaks on 2014 Toyota Prius C and 2010 Toyota PriusThere is a Rhino Rack roof rack that will fit both vehicles if you switch out the Custom DK Clamps and Pads. For the 2010 Toyota Prius, you will want the following parts: Crossbars # RB1250 Leg Kit # RRRLKHD Custom DK Clamps and Pads # DK195 For your 2014 Toyota Prius C you will want to add Custom DK Clamps and Pads # DK351. Before you attempt to carry 2 kayaks on the roof of your Prius you will need to consult your owner's manual to determine if you have the carrying capacity for...
view full answer... - What are the Dimensions of the Hi-Lift Jack Mounting Brackets # RJHBI went out to the warehouse and found that the internal dimension of the Hi-Lift Jack Mounting Brackets # RJHB would allow a post that is about 1" thick and about 2-3/4" high. These come with T-bolts that let you mount them on Rhino-Rack Heavy-Duty roof-rack crossbars like part # RB1250.
view full answer...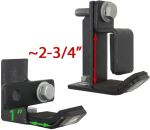
- Leg Spacers for the Rhino-Rack RCH LegsIf you're looking for the leg spacers to mount Heavy-Duty crossbars to your RCH Legs, part # RRRCH6, then the correct part number for those are # RRQMHD05. With these, you'll be able to mount Rhino-Rack HD Bars, part # RB1250. This may seem confusing at first because the fit-guide states that these are not compatible with your 2007 Lexus GX 470. However, in this particular (and very rare) case, the specific vehicle does not matter because these are attaching to the legs. In other words,...
view full answer... - Can I Carry Two Kayaks Side by Side on My Roof Rack?The roof rack you're asking about is a Rhino-Rack System with parts # RB1250, # RRRLKHD, # DK376 which has 50" long crossbars. As for if you can carry two kayaks lying down side by side, it's unlikely, but depends on your kayaks. Kayak widths can range from 22" to 30". If you have saddle-style kayak carriers like the Malone SaddleUp Pro # MPG110MD and your kayaks are less than 24" in width, then you can set them up side by side. If your kayaks are too wide though, you can get two J-style...
view full answer... - Availability of Rhino-Rack Heavy Duty Roof Rack Option for 1997 Nissan Pathfinder w/ Roof TracksWe do indeed have a system that would work on your Pathfinder. In order to use the Rhino Rack Heavy Duty 50 inch long crossbars on your 1997 Pathfinder, you would use the leg system Rhino Rack specifically designed for the recessed roof tracks, part # RLTFMV. The rack has a 220 lb capacity, which could be limited by the roof's actual capacity if it's lower than that of the rack.
view full answer... - 2017 Hyundai Tucson Heavy Duty Roof Rack RecommendationThank you for all of the info! I definitely have a roof rack solution so you can carry some ladders with your 2017 Hyundai Tucson but at this time (February 2022) Rhino-Rack doesn't have a roof rack fitment for your Tucson so we won't be able to install a roof rack using the Rhino-Rack Heavy-Duty Roof Rack Crossbars # RB1250. As an alternative option I recommend going with the Yakima HD Crossbar roof rack system. The crossbars won't increase the weight capacity of the roof rack since your...
view full answer... - Rhino-Rack Heavy Duty Roof Rack for 2018 Volkswagen PassatThe Rhino-Rack # Y01-140B-NT is designed to fit roof mounted tracks such as what would be found on a camper shell, it's not typically used on a vehicle roof. You can install a similar rack using the following parts: • Rhino-Rack Heavy Duty 50 inch crossbars, part # RB1250B-2 for black or # RB1250 for silver • Series 2500 Legs, part # RRRLKHD • Vehicle-Specific fit clips, part # DK323 This rack has a 165 lb capacity and is custom designed to fit your vehicle.
view full answer... - Recommendations for Rhino-Rack HD Roof Rack on a 2013 Volkswagen Jetta SedanI am happy to help you find a roof rack for your 2013 Volkswagen Jetta Sedan. For naked roofs, the roof rack will mount to the door frame of your vehicle using a custom fit hook. The Rhino-Rack HD # RB1650 does not have a confirmed fit custom mount for your Jetta, but the # RB1250 does. You will need the legs # RRRLKHD and custom fit kit # DK055 to complete your roof rack system. Check out the video below for a detailed explanation on how these racks are installed and why the custom...
view full answer... - Does Rhino Rack HD Roof Rack Fit 2011 BMW X3 with Naked Roof and SunroofThe Rhino Rack HD part numbers # RB1250B-2, # RRRLKHD, and # DK295 is a confirmed fit for your 2011 BMW X3 with a naked roof and would not interfere with the sunroof. You aren't going to want to open the sunroof with this rack installed though as it will make quite a bit of noise. If you keep the roof clean as well as the mounting pads of the feet there would not be any long term damage done to the vehicle.
view full answer... - How to Measure for Mounting Shorter-Than-Recommended Rhino-Rack Vortex Bars on a 2016 Honda CR-VWith a 2016 Honda CR-V, the appropriate Rhino-Rack crossbar system for the naked roof is: 54" Heavy-Duty Roof Rack Crossbars, part # RB1375B-2 2500 Series Legs, part # RRRLKHD Custom DK Fit Kit, part # DK284 It looks like you have the right legs and fit kit but have the shorter crossbars. This isn't a tested fit, so there's a chance it will not work. However, if your are trying this, then your solution would be the best route. Take the difference divided by 2 (3" on each side), and subtract...
view full answer... - Will the Heavy Duty Rhino-Rack Roof Rack Fit a 2015 Nissan NV 3500?I have a great alternative for your crossbar setup. Unfortunately, the Rhino-Rack Roof Rack for Thule and Yakima Tracks # Y01-140B-NT is not confirmed to fit your 2015 Nissan NV 3500. However, we do carry a similar heavy duty bar setup by Rhino-Rack that does fit your 2015 Nissan NV 3500. For this setup, I recommend the following parts: - Rhino-Rack Heavy-Duty Roof Rack Crossbars # RB1375B-2 - Rhino-Rack 2500 Series Legs for Heavy-Duty Crossbars # RRRLKHD - Custom DK Fit Kit for 4 Rhino-Rack...
view full answer...
- Weight Capacity and Comparison of Rhino Roof Racks for a 2011 Acura RDXI spoke with my contact for Rhino Rack and he said the weight capacity for all Rhino-Rack roof racks for your 2011 Acura RDX is 110 lbs. I think you were looking at the Rhino-Rack Heavy-Duty roof rack with the Heavy-Duty crossbars, # RB1375, the leg kit, # RRRLKHD, and Custom DK Clamps and Pads, # DK177. The Heavy-Duty crossbars will have a higher weight capacity, but once they are installed on a 2011 Acura RDX, the entire roof rack capacity drops to 110 lbs due to the limitations on the...
view full answer... - 2023 GMC Sierra 1500 Parts for Rhino-Rack HD Roof Rack SystemIn order to install Rhino-Rack HD bars on your 2023 GMC Sierra 1500 you'll need the following parts: - 59" HD Crossbars # RB1500B-2 - 2500 Series Legs for HD Bars # RRRLKHD - DK Fit Kit # DK427 I'm not 100% sure what multi-purpose holders you're referring to but if you send me some photos of the parts you have I'd be more than happy to help you minimize the amount of parts you're needing to purchase so you can have a roof rack on top of your truck!
view full answer... - Can Rhino Rack Square Bars Be Cut Down To Fit A 2014 Scion xB For a 2014 Scion xB we recommend the Rhino-Rack Heavy-Duty Roof Rack Crossbars # RB1375B-2, which are 54" in length. As for cutting down longer Rhino Rack square bars, which I don't recommend, you would need a miter saw with a metal cutting blade and could cut the bars to your specific needs. The end caps would need to be removed first so that you could add them on once you finish cutting. You'll also want to paint any exposed metal after cutting. If you need the mounting hardware for...
view full answer... - Do Parts of Rhino Rack Roof Rack From 2012 Ford Escape Fit 2014 Ford F-150 SuperCrew Cab?I checked with Rhino Rack and the square bar roof racks that fit a 2012 Ford Escape and 2014 Ford F-150 do share the same # RRRLKHD 2500 Series legs which are for HD crossbars, so if that's what you have you would be able to use those legs on your F-150. If you have different legs there is NOT going to be a fit. Apart from that you are correct that you would need new crossbars and a new fit kit. The correct crossbars for the '14 F-150 would be the Rhino-Rack Heavy-Duty Roof Rack Crossbars...
view full answer... - Parts to Install Rhino-Rack HD Roof Rack to 2013 Nissan CubeThe 54" Rhino-Rack HD Bars # RB1375 will fit your 2013 Nissan Cube but you also need the 2500 Series Legs # RRRLKHD and the Fit Kit # DK263. The legs are what hold your crossbars and the fit kit together while the fit kit secures the whole assembly to your vehicle using clamps for the door jambs. If you check out the standard review video you can get an idea of how this will install but it's important to follow the instructions you receive with your parts as well.
view full answer... - Dual Kayak Carrier For 2017 Ram 1500 With Tonneau CoverI would recommend getting the Rhino-Rack Heavy-Duty Roof Rack Crossbars # RB1500, the Rhino-Rack 2500 Series Legs for Heavy-Duty Crossbars # RRRLKHD and the Custom DK Fit Kit for 4 Rhino-Rack 2500 Series Roof Rack Legs # DK043. I've included a video to help you install if you wanted to go that route. Then the most cost effective carrier would be four of the Malone Rack Pads # MPG314, two per crossbar. The foam pads will be less rough on your kayaks whenever you're going down gravel roads....
view full answer... - Kayak Carrier Recommendation for 2009 Ford F-150 With Factory Folding Tonneau CoverA ladder rack is one option for transporting your kayak on your F-150 that has the dealer-installed folding tonneau cover, but note there can sometimes be interference between the common mounting requirements for tonneau covers and ladder racks since both install on the bed rails. I can offer you a simple and very cost-effective option IF your tonneau cover can handle the weight of your kayak. We offer foam block carriers that are very inexpensive, simple to install and that weigh very...
view full answer... - Will the 65" Rhino-Rack HD Crossbars # RB1650 Fit on My 2010 Mazda 3 Hatchback?I have an answer for you. Unfortunately, the 65 inch Rhino-Rack Heavy-Duty Roof Rack Crossbars # RB1650 are too long for your 2010 Mazda 3 Hatchback with fixed mounting points. With that being said, you can still have shorter Rhino-Rack Heavy-Duty crossbars on your vehicle. Our installation team here at etrailer has tested these shorter bars with your vehicle so that they will fall within the required dimensions of local traffic laws. For this system, you will need the following parts:...
view full answer... - Rhino Rack Roof Rack Fit for 2013 Ford EscapeTo install the Rhino Rack Heavy Duty Crossbars on your 2013 Ford Escape you will want to use crossbars # RB1375, leg kit # RRRLKHD, and custom clamps and pads # DK375. If you are interested in the Rhino Rack Aero Crossbars, use # RRVA137B-2, # RRRLKVA, and # DK375. I have attached an installation video of the Rhino Rack aero crossbars on a 2013 Ford Escape for you.
view full answer... - Rhino-Rack Heavy-Duty or Vortex Crossbars for 2019 Ford Transit ConnectThe primary difference between the Rhino-Rack Heavy-Duty Crossbars and the Rhino-Rack Vortex Aero Crossbars has to do with what they are designed to carry and what accessories work well with them. The Heavy-Duty Crossbars feature built-in C-channels that are made specifically for Rhino-Rack Heavy-Duty accessories like the Hi-Lift Jack Mounting Brackets # RJHB. Because the bars are larger than most other systems they will not be compatible with a lot of accessories that aren't specifically...
view full answer...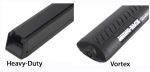
- Parts Needed To Install Rhino-Rack Pioneer Platform On 2022 Chevy Silverado 2500HD Crew CabYou will need to install the Rhino-Rack Heavy-Duty Roof Rack Crossbars # RB1500B-2 to install a Rhino-Rack Pioneer Platform Roof Tray # RR42TB on your 2022 Chevrolet Silverado 2500HD Crew Cab, since they do not offer a Rhino-Rack Backbone system for your truck. The Rhino-Rack 2500 Series Legs # RRRLKHD and Fit Kit # DK427 are needed to attach the Crossbars # RB1500B-2 on your Silverado. You will then be able to attach the Platform # RR42TB with the Pioneer Platform Mounting Kit for...
view full answer... - Roof Rack Recommendation for a 2007 Chevy Avalanche for Transporting LadderFor your 2004 Chevy Avalanche the Rhino Rack roof rack part numbers # RRVA137B-2, # RRRLKVA, and # DK227 has been confirmed as a fit and would work well. Your sunroof wouldn't be an issue either. I would recommend keeping it closed since it will be very loud transporting a ladder up there from the wind noise. However, I have a better solution for you in terms of a roof rack for securing a ladder. Instead I would recommend the Rhino Rack HD bar roof rack part numbers # RB1375, # RRRLKHD,...
view full answer... - Rhino-Rack 2500 Series Roof Rack for 2015 Ford Transit Connect VanOn the Rhino-Rack system made for your 2015 Ford Transit Connect van, parts # RB1375, # RRRLKHD and # DK417, you will be able to place the 2500-series leg assemblies where you need them so long as they can grip properly on the curved edges of your naked roof. This rack system's heavy-duty crossbars feature a built-in C-channel on top of each bar designed for convenient mounting of Rhino-Rack Heavy-Duty accessories and carriers.
view full answer... - Does a Rhino-Rack Roof Rack Using Factory Mounting Points on a 2013 Honda RidgelineRhino-Rack Leg Kit, # RRRLKVA, mounts to the roof of your 2013 Honda Ridgeline using fit kit # DK155 which are clamps so it will not use the factory mounting points. The correct bars for this application are # RRVA150S-2. All of the roof racks install the same way on your Ridgeline.
view full answer... - Will Rhino Rack HD Roof Rack Fit 2012 Honda CR-V with Moon RoofThe Rhino Rack HD Roof Rack part numbers # RB1375, # RRRLKHD, and # DK284 is a confirmed fit for your 2012 Honda CR-V. It will fit your vehicle with the moonroof, but if your moonroof angles up when opening it could potentially interfere with the bars. You should note that crossbars typically add quite a bit of wind noise. You won't end up wanting to have the moonroof open with the bars installed as it will be quite noisy.
view full answer... - Long Crossbar Roof Rack Recommendation for a 2015 Nissan Rogue with Naked RoofWe have a solution for you. Rhino Rack makes a roof rack available for your 2015 Nissan Rogue with a naked roof that will give you 59 inch long bars. For the bars you would want part # RB1500B-2 for bars, leg kit # RRRLKHD, and # DK396 for the clamp kit.
view full answer... - Which Heavy Duty Crossbar Setup Should I Use On My 2015 Ford F-350 Super Duty?I am showing that the correct Rhino-Rack heavy duty crossbar setup for your 2015 Ford F-350 crew cab is Rhino-Rack Heavy-Duty Roof Rack Crossbars - Black - 59" Long # RB1500B-2. You will also need Leg Kit # RRRLKHD and Fit Kit # DK190 to install this onto your roof. This has a 165lb weigh capacity and is 59" long. You can install accessories by clamping onto the crossbars or by using the T-slot track. I have attached an installation video showing this roof rack being installed on a different...
view full answer... - Will Rhino-Rack HD Square Bar Roof Rack System Fit A 2015 Ford F-150 SuperCrew W/ Dual Sunroofs?You are right on. The Rhino-Rack Roof Rack System that uses 59" Rhino-Rack Heavy-Duty Roof Rack Crossbars - Black # RB1500B-2, Rhino-Rack 2500 Series Legs for Heavy-Duty Crossbars # RRRLKHD, and Custom DK Fit Kit # DK427 is confirmed to fit your 2015 Ford F-150 SuperCrew with the Dual Sunroofs and water gutters. Keep in mind that it is not recommended to open your sunroofs with the crossbars installed to avoid any contact between the sunroofs and the crossbars, and you will find that you...
view full answer... - Height Added to Vehicle with Rhino Rack Foot # RRRLKHDWe've had a similar question to this in the past and we've found that the Rhino Rack HD roof racks that use the feet part # RRRLKHD and also part # RB1500B-2, # RRRLKHD add right at 4-1/2 inches of additional height that would mean the feet without the bar would be a little less than 3 inches in overall height.
view full answer... - Roof Rack and Canoe Carrier Recommendation for a 2008 Chevy SilveradoA Rhino Rack Roof Rack that includes the part # RRRLKHD would do an excellent job for carrying a 15 foot canoe on your 2008 Chevy Silverado. The rest of the parts needed to complete the roof rack would be the part # RB1375B-2 and # DK227. This is one of the strongest racks we offer so it would definitely take a lot of abuse. It would be great for carrying your canoe. For securing a canoe upside down on the crossbars I would recommend the Ratchet Grab part # RRRRG. I spoke to my contact...
view full answer... - Roof Rack and 2-Kayak Carrier for 2016 Honda Accord Sport SedanThe Rhino-Rack ROC25 Series Heavy-Duty roof rack for your 2016 Honda Accord Sport Sedan that is made of parts # RB1375, # RRRLKHD and # DK359 is indeed a confirmed fit for your car. But note that this rack's unusual bar profile means reduced compatibility of accessory items like kayak carriers. You will have fewer kayak carrier choices with this rack. Instead I suggest their Vortex Aero rack # RR32SR which features quieter aerodynamic crossbars that will generate much less wind noise than...
view full answer... - Rhino-Rack 2500 Series Legs for Vortex Aero Crossbar Compatibility with Thule AeroBladeAlthough the Rhino-Rack 2500 Series Legs are very similar to the Thule foot packs, the tab that fits into the Thule AeroBlade load bars is slightly too big and the grooves on the 2500 Series Leg do not sit flush with the AeroBlade load bar. I went out and tested them together myself. If you already have the Rhino-Rack 2500 Series Legs # RRRLKVA, then for a complete roof rack on your 2014 Infiniti Q50 you will just need the Vortex Aero Crossbars, part # RRVA118S-2 for Silver or part #...
view full answer... - Fit Kit Needed To Transfer A Rhino-Rack Roof Rack From An Infiniti G37 To A Q50I was able to look up your order and it looks like the Rhino-Rack Crossbars # RRVA118B-2 and feet # RRRLKVA are going to be a fit for your Infiniti Q50, but you'll need to get a new fit kit # DK378. There should be installation instructions to help guide you with placement included with the new fit kit but I've also attached a diagram below. Once installed you should have no issues installing your Rhino-Rack Ski and Snowboard Carrier # RR576.
view full answer...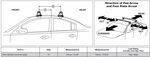
Do you have a question about this Roof Rack?
Info for this part was:

Updated by:
Wilson B

Updated by:
Alex H

Edited by:
Daron K

Written by:
Bethann B
At etrailer.com we provide the best information available about the products we sell. We take the quality of our information seriously so that you can get the right part the first time. Let us know if anything is missing or if you have any questions.
Product Experts Available Now!
Call 1-800-940-8924
Thank you! Your comment has been submitted successfully. You should be able to view your question/comment here within a few days.
Error submitting comment. Please try again momentarily.