
Custom Fit Roof Rack Kit With RB1800B | RRRLTPFD
Item # RR78NP
Our Price: $530.95
Confirmed to Fit
2024 Ram ProMaster 2500
Will this fit?
To see if this custom-fit item will work for you please tell us what vehicle you'll use it with.
In Stock


- All Info
- Reviews (16)
- Q & A (0)
- Videos (3)
- Photos
Rhino Rack Roof Rack - RR78NP
- Square Bars
- Crossbars
- 71 Inch Bar Space
- Rhino Rack
- 2 Bars
- Black
- Overhang
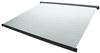
These heavy-duty, aluminum crossbars work with Rhino-Rack legs to create a sturdy roof rack. The square bars include built-in C-channels for mounting Rhino-Rack heavy-duty, contractor-grade accessories.
Features:
Rhino-Rack HD Crossbars - Black - 71" Long - Qty 2:- Heavy-Duty square crossbars let you build a roof rack system from scratch
- Built-in C-channel on top of each bar is designed for mounting Rhino-Rack Heavy-Duty accessories and carriers
- Rubber strip in the channel helps to cushion load and provide slip resistance
- Built-in channel on bottom of each bar for mounting to Rhino-Rack Heavy-Duty roof rack legs
- Lightweight, extruded, structural-grade aluminum construction for strength and durability
- Black color
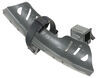
Rhino-Rack RLTP Legs - Fixed Mounting Points - Qty 4:
- RLTP legs create mounting points for Rhino-Rack crossbars
- Legs clamp on with brackets and bolts to your vehicle's factory mounting points
- Ensure that your crossbars are level
- Legs clamp on with brackets and bolts to your vehicle's factory mounting points
- Built-in security hardware deters theft - leg bolts require special tool (included) to loosen
- Constructed of UV-resistant, glass-reinforced nylon
RB1800B Rhino-Rack Heavy Duty Roof Rack Crossbar - Black - 71" Long - Qty 1
RLTPFD Rhino-Rack RLTP Legs for Factory Fixed Mounting Points - Bracket Mount - Qty 2
Replaces Rhino-Rack RRRLCP22


Video of Custom Fit Roof Rack Kit With RB1800B | RRRLTPFD


Videos are provided as a guide only. Refer to manufacturer installation instructions and specs for complete information.


Video Transcript for Rhino Rack Roof Rack Installation - 2019 Ram Promaster 2500
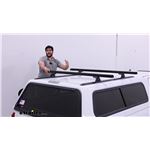
Randy: Hey guys, it's Randy here at etrailer. Today we've got a 2019 Ram Promaster 2500. We're going to be adding a Rhino Rack Roof Rack system to it. Now, the fit kits and everything we're going to talk about today, these are designed to work with the aero bars, which is what we're working on today. I think this is going to be more of your camping, out dooring, boon docking type setup. These will also work with the Rhino Rack 2500 HD bars, or the heavy duty bars.
That's going to be more for your construction, your ladders, your piping, wood, things like that.Now, whether you're using the heavy duty bars, or the aero bars, this is going to do an excellent job of freeing up some space inside the vehicle, or giving you room for those longer, larger items that maybe we can't get inside. Also, if you're into camping out of your van, you know a lot of people will convert these over to use for camping and RV'ing and stuff like that, this is going to give you a lot more storage area. If you've got stuff in there, items in there to make it easy to live, this is going to allow you to get those outdoor accessories wherever you need them.Now the foot packs themselves are very sturdy and resilient. They're reinforced internally, so they're going to give a superior strength. We also won't have to worry about sun fade.
We won't have to worry about cracking. A lot of times when roof racks get installed, they just kind of stay on the vehicle. A lot of people don't like taking them on and off. That's really important so the quality will remain and it'll look good.Now one thing you will want to ensure is when you're using a roof rack system, whether two or three, don't exceed the capacity of the roof of your vehicle. It should be readily available in your owner's manual.
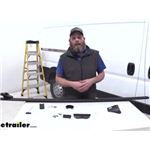
If it's not there, just contact your dealer and figure it out.Now before we get going with our installation process, let's talk about the different components that we have here, and what we're going to need to do the installation. This is our RLTP fit kit, so it's going to have the foot pack. Two come in a box, we've got one for each side. It's going to have the bracketry to allow us to connect to the stud that sticks up on top of our Promaster. We're going to have the hardware, and all the hardware is going to be a safety type, or a security type with that little tab sticking up in the middle.
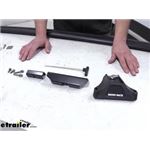
It's going to help to prevent theft, and we've got our tightening tool. Now this kit's going to be specific to the Promaster, and this is designed to work with the 2500 Heavy Duty Roof Rack Crossbar, so if that's what you want to use, you're done.In our case, since we want to go with the aero style crossbar, this is a Rhino Rack, Vortex Aero Crossbar, we're going to need the RLTP adapter kit. That's going to be right here. This is just one side of it, of course there is going to be one for the other side as well, and you're going to need one kit per crossbar, so if you're doing two crossbars, you need two kits, you're going to do three or four, you're going to need three or four. But to get that attached, just going to remove the bolt here that holds our keeper on there, it's pretty straightforward, just turn it to the left, loosen it up. All right. Now we can set this aside.We won't need this unless we're going to be using those heavy-duty crossbars. We're going to take this part of our adapter kit, you can see the part that sticks down there is going to go right through that hole. See how that's going to click together Now we'll take our bolt with the lock washer on it, and we're going to slide our square washer on. That will then just come up through the hole, we'll take this portion . This is going to be our T slot adapter, so this portion will actually slide into our crossbar, then we can get it tightened down. So we flip the crossbar over, you'll see we have the slot here on the underside. Going to take this portion, it's going to slide right in just like that. And now I'm going to take most of the slack out of my bolt here. I still want these to move in and out a little bit, but I don't want them to be super loose, so something like that looks good. We'll take our cap, and at this point we're ready to put that right on the end. Now that cap's going to come with your crossbar and so will the key to lock it. Place that on, and get it locked on.Now that's going to take care of the construction or how we put together a crossbar, now let's go look at our connection point up on the roof. Now, here you can see the connection point for the roof rack systems on your Promaster. This happens to be the rear passenger side corner. We do have four of these, there's going to be one located directly across from this one on the driver's side, and the one forward's going to be just about where your sliding door meets the back of your van right up on the roof line. That's why our two brackets are going to come into play here. We want to take the smaller one, this gets slid right underneath that. We're going to push it in, so that gives us our anchor point there. Now, we're going to take the larger one, and we want these two tabs to then go under that, that we just added. See how that goes.Now, in our kit, we're going to have four of these smaller safety screws, or bolts, whatever you want to call them. Want to be sure you put on a flat washer and a lock washer, and then if we lift up, we'll get our holes aligned here. We're actually going to thread these right down into that smaller bracket that we attached. We want to square this up, meaning we want it to be running inline with the roof line of our van, and then we can use our included tool. I like to snug both of them down, and then we'll tighten them. Now, these don't have to be all that tight. Check your instructions, it's going to give you the torque rating in which you need to use. Of course, you want to be sure your lock washer's sandwiched all the way down, but overall it doesn't take a whole lot of tension.Also, on the bottom of this larger clamp that we have here, it's fully rubber coated, so at the point in which it connects to the van, you can see once it's secure we don't have to worry about it moving around. But we also don't have to worry about it scratching any of our paint. All right, now that's the process that we're going to complete at all the three remaining points, and it's exactly the same. This bracket's going to stay the same, just like the inside bracket and hardware.Now with these in place, it's time to get our crossbar put in position. You'll notice on the bottom of our foot packs here, there's a tab. We've got one located right here, and one located on the other side. Those need to go in the rectangular shaped holes on our clips. We'll get that done over on our driver's side. Slide this in, so it lines up here on our passenger side. And now what I like to do is go side to side. I want to check from this foot pack connection point here, to the end of the bar. I like to make sure it's even on both sides. Now, once we have that equal on both sides, we're going to grab a 10 millimeter socket so we can tighten down that bolt that came with our adapter kit. I'm going to take the slack out of it first. Then I'll make sure I've got it squared up properly, and we'll tighten that down. Just like the base clips, we don't need these to be overly tight, so watch your instructions and don't tighten them up more than what it calls for.Now we want to do that on both sides, and the nice thing to know is that you're only going to have to do that the first time. Each time after that, if you leave your foot pack attached to your crossbar, you won't have to make that adjustment. Then we'll take our longer screws that come with our kit, it's going to go down and through. This one also has a lock washer and flat washer on it, and we want those to thread in, just like these threaded into that lower clip, these are going to thread into the upper clip. We can use the provided tool, and torque those down appropriately. Go over to the other side, put these two screws in there, that's all there is to it. It's going to be ready for use.Now for the removal process, we can leave our base clips attached, we can leave our outer clip attached here. To remove and replace the roof rack system, really we'll just have to take out these two screws on each crossbar that we want to remove, we have to do two here, and then two on that other side.Now that takes care of the installation process. As you can see, it's pretty straight forward.
Customer Reviews
Custom Fit Roof Rack Kit With RB1800B | RRRLTPFD - RR78NP
Average Customer Rating: 4.6 out of 5 stars (16 Customer Reviews)
These heavy-duty, aluminum crossbars work with Rhino-Rack legs to create a sturdy roof rack. The square bars include built-in C-channels for mounting Rhino-Rack heavy-duty, contractor-grade accessories.by: Brian04/23/2024
Dodge Ram Pickup
I got my racks in a timely manner and had them installed on my Van in less than two hours. The instructions were a bit confusing (Didn't really match what was in the box) but I was able to figure out what to do. I have a THOR RIZE G18 camper van that is built on a 2023 Dodge RAM Promaster 1500. The brackets fit the mounting points on the roof. Since it is 9 feet to the roof (You can't walk on this roof) it took a while to move around to the four locations to place the towers. The awning also prevented sliding the bars side to side, so I had to put the towers onto the bar on that side before attaching them to the base. The racks look good and are firmly mounted to the van. Now I have to figure out how to attach my kayaks. (There is an air conditioner in the center and a solar panel also) I plan a two-month trip in June, so I will see how the racks work.


by: Kyle11/10/2022
Nice rack system, strong and durable. Used on a Ford e350 to mount solar panels. Only draw back, one of the L brackets that goes under the rain gutter was not bent square enough and this caused the bracket to slide off when tightened. I had to adjust this with a clamp and hammer, no issues since.


by: Luke 12/05/2023
Super easy system to set up. Only problem was the screws that needed a special allen wrench to screw in and out began to strip. If I take them off, I will most likely need to buy new screws.
by: Luke 12/05/2023
Worked as intended on top of my Ram Promaster and was super easy to set up.
by: Mike10/10/2022
Dodge Ram Pickup
Very sturdy. Used to mount Heavy Duty Rhino-Rack Crossbars to a RAM Promaster High Roof van.


by: Vanperson11/18/2021
Dodge Ram Pickup
Not Heavy Duty. These buckled on my 2020 RAM Promaster. Support said it was my fault (impact) and refused warranty. I only have a pioneer platform and 2 solar panels on the rack, hardly a heavy load.
by: FLiTe09/01/2022
Added to my Ford Transit van to hold solar panels. Fit the factory holes well and we have had no problems. Exactally what we needed. I will be adding two more eventually but now we are having too much fun with the van.
by: Tom Owens07/23/2019
Dodge Ram Pickup
When I bought this for my ram promaster not even the manufacturer could tell me how it rated. I was so new they had no comparisons. I’ve had it on my van for over a year. Traveling around the country through all kinds of weather. Rain, hail, snow, and sun in the desert.
This rack is awesome.!!
by: Sabndy09/16/2020
Security screws and tool are great, but bottom s crews Ca t be tightened without removing aero crossbar. Solved problem by heating and then bending end of tool to 90 degrees.
by: Louis03/27/2020
Dodge Ram Pickup
This was my first purchase with strainer and I just installed the rack so I have no input on durability but the install was super easy, I knew these would fit because the website made it easy to find products compatible with my Ram Promaster 1500, and Kaylyn was proactive and let me know their 71” bars were out of stock but 65” were available. Unbeknownst to her, I’m in a time crunch and her help came in clutch. I would definitely recommend buying from etrailer.
by: Brandon 03/02/2021
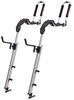
Great product. Added bike mounts and placed on my Diamondback cover. Works great.
by: Jon 07/27/2020
RamProMaster 2500
Awesome product to get a rack on my ProMaster without having to drill any holes. Super easy to set up, highly recommend!


by: Jeremy 06/02/2016
The rack fit perfectly and works great
by: Justin05/08/2024
by: Terry 12/15/2021
All good
by: Kari03/27/2022
Came so fast! Thank you!
by: Paul09/10/2020
by: Kenji07/20/2023
by: Michael 08/28/2022
by: Terry 08/21/2022
by: Samuel 08/29/2022
by: Trevor 11/08/2023
by: Nathan 11/10/2021
25
199
Show More Reviews
See what our Experts say about this Rhino Rack Roof Rack
- How To Use 71" Heavy Duty Rhino-Rack Crossbars on Tonneau Cover TracksIn order to use the 71" Rhino-Rack Heavy-Duty Roof Rack Crossbars part # RB1800B-2 with the channel mounting system on your tonneau cover you'll need the following: Rhino-Rack Quick Mount Legs for Vortex Aero Crossbars part # RRRLT600 Roof Rack Leg Spacer Blocks for Rhino-Rack Heavy-Duty Crossbars part # RRQMHD05 Adapter Kit for Rhino-Rack RTL600 Legs part # RRT-FK1
view full answer... - Roof Rack Recommendation for 2019 Ford Transit T250The roof rack I recommend for your 2019 Ford Transit T250 is the Rhino Rack Heavy Duty rack part numbers # RB1800B-2 and # RRRLTPFC-2 because the crossbars of this rack are the best suited option for carrying ladders. The strip on the top channel has a no-slip rubber surface which helps keep them from moving and because the top channel has load stops made for it for this exact purpose. The bars are shaped more like a ladder rack than a roof rack and combined with a set of Rhino Rack Load...
view full answer...
- Rhino-Rack Heavy Duty Roof Rack for a 2016 Ford Transit T350I am on the Rhino-Rack website and they show 40 bars, the longest of which is 71 inches or 1800mm. To be clear, this is the Rhino-Rack US site which has the parts we can get. If you are on Rhino-Rack of Australia or another country then we cannot get those parts but we are trying to get them added. If you have a 2016 Ford Transit T350 then the recommended Rhino-Rack heavy duty bar length is 71 inches. The recommended leg kit to complete the roof rack is # RRRLTPFC-2. I have included a...
view full answer... - Recommended Roof Rack for 2020 Ram ProMaster 1500 to Use Rhino Rack Batwing AwningI recommend using the Rhino Rack Roof Rack for 2020 Ram ProMaster 1500 that uses parts # RB1800B-2 and # RRRLTPFD, which will give you a nice and durable roof rack for your van. This rack can be used to mount the Rhino Rack Batwing Awning # RR33200 directly to the Vortex Aero crossbars # RB1800B-2 by using the top channels of the bars, so it's a great choice that gives you a high quality rack at a nice price point. We don't have any fans that would mount to your crossbars but as long...
view full answer... - Parts Needed for 71 inch Long Rhino Rack HD Roof Rack for Camper ShellIf you wanted a similar Rhino Rack Camper Shell roof rack to the part # Y01-140B that has 71 inch long crossbars you'd need to piece the kit together with the part # RB1800B-2 for the crossbars, # RTC16 for the tracks on the roof, and then # RRRLT600 for the legs and you'd be set.
view full answer... - How To Use Rhino-Rack Heavy Duty Crossbars On a Pace Edwards Tonneau Cover with Thule/Yakima TracksYes, you can use a Rhino-Rack Roof Rack with the Thule/Yakima tracks on the Pace Edwards Metal Ultragroove Retractable Tonneau Cover. I have listed the parts you need below: Rhino-Rack Quick Mount Legs part # RRRLT600 Adapter Kit for Rhino-Rack RTL600 Legs part # RRT-FK3 (Yakima) part # RRT-FK1 (Thule) Rhino-Rack Heavy-Duty Roof Rack Crossbars part # RB1800B-2 Roof Rack Leg Spacer Blocks for Rhino-Rack Heavy-Duty Crossbars part # RRQMHD05 (2).
view full answer... - Rhino Rack Roof Rack and Pioneer Platform Rack For a 2010 Ford E-350 VanYes, we have the Rhino-Rack Heavy-Duty Roof Rack Crossbars # RB1800B-2 that are held in place with the Rhino-Rack Roof Rack Legs # RL150S10. Or if you are looking for a Pioneer platform the Rhino-Rack Pioneer Platform Rack # RR43QX is the one you need. Both systems attach to the gutter tracks along your 2010 Ford E-350 Van.
view full answer... - Roof Rack Recommendation for a 2015 Ford Transit T150To complete a roof rack on your 2015 Ford Transit T150 you would need the Leg Kit part # RRRLTPFC-2 that you referenced plus the Rhino-Rack Heavy-Duty Roof Rack Crossbars # RB1800B-2. With these two parts you would have a 2 crossbar roof rack for your vehicle.
view full answer... - Roof Rack Recommendation for 2019 Ram ProMaster 3500 for Carrying LaddersFor your 2019 Ram ProMaster 3500 the best roof rack option we have would be the Rhino Rack HD roof rack part numbers # RB1800B-2 and # RRRLTPFD which gives you a set of heavy duty square bars that will work great for carrying ladders or lumber. The bars are shaped more like a ladder rack than a roof rack and combined with a set of Rhino Rack Load Stops part # RRRLH you'd have a great solution for carrying what you mentioned. I attached a picture that shows these load stops and bars used...
view full answer...
- Can I Upgrade To 71" Rhino-Rack Heavy Duty Crossbars Instead Of 59" Crossbars On 2012 Jeep Wrangler?For your 2012 Jeep Wrangler Unlimited with hard top, Rhino-Rack recommends using Rhino-Rack Heavy-Duty Roof Rack Crossbars - Black - 59" # RB1500B-2 along with Legs # RRRLT600, Backbone Mounting System # RRRJKB1, and Leg Spacers # RRQMHD05-2. While Rhino-Rack does not suggest using the 71" Heavy-Duty Crossbars # RB1800B-2 that you were looking at, you can certainly use them as long as they are not longer than the widest point of your vehicle which is usually the mirrors. My research tells...
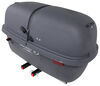
view full answer... - What Roof Boxes Will Fit On The Rhino Rack HD Square CrossbarsYou will have plenty of options for cargo boxes that will fit on the Rhino Rack HD bars # RB1800B-2. As a matter of fact you could fit virtually any roof box that we carry. Most cargo boxes are made with universally designed clamps, so they will fit any crossbar shape. The box does not have to be brand specific to the roof rack. So you could absolutely use a Thule or Yakima roof box. My favorite roof box is the Thule Force # TH6357B. This box (like most others) is compatible with virtually...
view full answer... - Roof Rack for Winnebago Travato Class B Motorhome on 2017 Ram Promaster ChassisThe Thule TracRac TracVan # TH29613XT roof rack is designed to work with 2 pairs of the existing roof rack mounts on a Ram ProMaster. If your Winnebago Travato has those existing connection points on the roof, the TracVan ES roof rack would work perfectly for you. I've linked to a diagram showing what the mounts look like, and where they can be found on the roof. From the online photos I've seen, it appears the exterior of the ProMaster is unchanged from the cargo model, so it's very likely...
view full answer...
- Can 71" Rhino Rack Heavy Duty Crossbars Be Used with Thule or Yakima TracksYes, the Rhino-Rack Heavy-Duty Roof Rack Crossbars are offered in lengths up to 71" using part # RB1800B-2. In order to use these with Yakima or Thule tracks you'll also need the Rhino-Rack Quick Mount Legs part # RRRLT600, Roof Rack Leg Spacer Blocks part # RRQMHD05, and the Adapter Kit for Rhino-Rack RTL600 Legs part # RRT-FK3. In regards to the Rhino-Rack Roof Rack for Thule and Yakima Tracks part # Y01-140B-NT, the max length is 65" so if you need longer you'll need to piece together...
view full answer... - Will Roof Rails Work On a Teardrop Trailer T@BI do have an option for you but roof rails won't work very well on a teardrop trailer, even if you were able to get the rails to conform, it's likely the accessories would bind due to the steep angles. Instead, you will need to use artificial rain gutter mounts which is what most other teardrop trailers use from what I found. I have attached some parts below. Rhino-Rack Artificial Rain Gutters part # 739A Rhino-Rack Roof Rack Legs part # RL280S4-2 Rhino-Rack Heavy-Duty Roof Rack Crossbars...
view full answer... - Does the Weight Capacity for the Rhino-Rack Crossbars Reflect Both Bars or Just One BarThe 176 lbs weight capacity for the Rhino-Rack Heavy Duty Square Bar Roof Rack, part # RB1800B-2, that you referenced reflects both of the crossbars combined.
view full answer... - Rivet Holes on a Rhino-Rack RT-Style Roof Rack Tracks for a 2016 Mercedes-Benz Sprinter 2500The Rhino Rack RT Style Tracks, part # RRRTS546 are pre-lined to the existing holes in the roof of the 2016 Mercedes-Benz Sprinter 2500. However, you will need to drill two holes on the rear of each track to install the included rivets. The complete kit for this is: Rhino Rack Heavy-Duty Roof Rack Crossbars, 71 inches long, Silver, part # RB1800 or Black, part # RB1800B-2 2x Rhino Rack RLTF Legs for Rhino Rack RTC and RT Style Tracks, part # RLTF Rhno Rack RT-Style Roof Rack Tracks,...
view full answer... - Recommendation for Attaching Solar Panels on the Roof of a 2010 Ford E-350 VanFor a roof rack to fit your 2010 Ford E-350 Van, I recommend the Inno Square Crossbars, # INB165, and Inno Feet for Square Crossbars, # INSD. The square load bars measure 65 inches long x 7/8 of an inch tall X 1-1/4 inches wide. The two crossbars have a weight capacity of 220 lbs. The Inno feet # INSD use the rain gutters of your vehicle to attach to the roof. The feet include a special wrench that will allow you to munt the feet to the van. The wrench makes installation quick and easy. For...
view full answer... - Solution for Mounting Tent to Bed Rails on 2018 Ram 1500 with Tonneau CoverAs long as your Access roll-up tonneau cover installs completely inside the bed rails on your 2018 Ram 1500 you can use the Rhino-Rack RT-Style Roof Rack Tracks # RRRTV168. Just note that you may need to cut into the bed liner (if present) where the rivets for the tracks will attach. With the tracks installed you can then use the Rhino-Rack RLTF Legs # RLTF and the Heavy-Duty Roof Rack Crossbars # RB1800B-2 that you mentioned to complete the setup. These crossbars have a combined weight...
view full answer... - Best Roof Rack System for 2001 Ford E350 VanThe gutter mounts we have are actually really sturdy if you get the right ones and install them right. Technically, you should have more weight capacity off the gutter mounts since the weight is distributed vertically through the gutters vs racks bolted onto your fiberglass roof. A good system for your 2001 Ford E350 Van is the Rhino Rack system with Square Crossbars # RB1800B-2 and Gutter Feet # RL150S10. You can switch the square crossbars for aero ones with 71" Vortex Aero Crossbars...
view full answer... - Recommended Rhino-Rack Crossbars That Works With A Retrax Pro Tonneau CoverI did some research and unfortunately Rhino-Rack does not make the HD bars # RB1800B-2 compatible with your RetraxPro tonneau cover. The only kit they make that is desinged to be used with the Retrax Pro and Retrax XR tonneau covers is the Rhino-Rack Vortex Crossbars for Retrax XR and Mountain Top EVO-M Tonneau Covers # RRVA180B-RRRLT600. These crossbars have a maximum weight capacity of 220-lbs. measure 71" long x 3-1/8" wide x 1-3/16" tall, and will mount to the t-tracks on your Retrax...
view full answer... - Front & Back Hitches With Accessories For Ultimate Mercedez-Benz Sprinter Van 3500The Swagman Skaha 2 Plus Bike Rack with Cargo Carrier # S69SR is definitely the move for you, but if you plan on putting it in the front of your 2017 Mercedes-Benz Sprinter 3500, you'll need a front hitch # 306-X7352. For the back if you have a factory step bumper you'll need this hitch # 75601 and if you have a Standard bumper you'll need this one # 75549. In order to use the Yakima EXO Swing Away Enclosed Cargo Carrier # Y62VR you'll need a class III hitch or higher. If you wanted to...
view full answer... - Can Rhino-Rack HD Roof Rack For 2005 Ford Van be LockedTechnically, there is not a way to lock the Rhino-Rack HD crossbars or the rack to your 2005 Ford van. It is usually the feet that get locks, but since the rack installs with gutter mounts, there isn't an available lock for this rack. That said, they do have bolts in the legs that require a special torx key (included with the legs) in order to install, so it would be very difficult to remove the legs despite them not having locks with a key. The parts that fit your van for a complete rack...
view full answer... - Availability of Rhino-Rack Roof Rack System w/ 71" Heavy-Duty Square CrossbarsI can definitely help you with the same type of setup as part # Y01-140B but currently there aren't any kits that use the 71" Rhino-Rack Heavy Duty crossbars. The parts that you will need are the Rhino-Rack 71" Heavy-Duty Roof Rack Crossbars # RB1800B-2, the Quick Mount Legs # RRRLT600, and the RTC-Style Roof Rack Tracks # RTC16.
view full answer... - Rhino Rack RT-Style Roof Rack Track Installation for 2014 Mercedes-Benz Sprinter Cargo VanI spoke with Tony, my contact at Rhino Rack, and he assured me that you will only install the Rhino-Rack RT-Style Roof Track, # RB1800B-2, # RLTF, # RRRTS546, from the outside of your 2012 Mercedes-Benz Sprinter. There is no need to remove your headliner or any of the lights/accessories on the interior. To install the rails, you will need to remove the plugs on your Sprinter's roof with a flat head screwdriver in order to secure the track with the T-bolts provided. You will also need...
view full answer...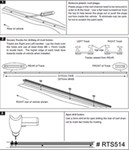
- Recommended Roof Rack for 2020 Ram ProMaster 1500 to Use Rhino Rack Batwing AwningI recommend using the Rhino Rack Roof Rack for 2020 Ram ProMaster 1500 that uses parts # RB1800B-2 and # RRRLTPFD, which will give you a nice and durable roof rack for your van. This rack can be used to mount the Rhino Rack Batwing Awning # RR33200 directly to the Vortex Aero crossbars # RB1800B-2 by using the top channels of the bars, so it's a great choice that gives you a high quality rack at a nice price point. We don't have any fans that would mount to your crossbars but as long...
view full answer... - Roof Rack Recommendation for 2019 Ram ProMaster 3500 for Carrying LaddersFor your 2019 Ram ProMaster 3500 the best roof rack option we have would be the Rhino Rack HD roof rack part numbers # RB1800B-2 and # RRRLTPFD which gives you a set of heavy duty square bars that will work great for carrying ladders or lumber. The bars are shaped more like a ladder rack than a roof rack and combined with a set of Rhino Rack Load Stops part # RRRLH you'd have a great solution for carrying what you mentioned. I attached a picture that shows these load stops and bars used...
view full answer... - Roof Rack That Fits A 2018 Ram ProMaster 1500I took a look at the picture you're referencing and it appears to be similar to the Rhino-Rack RTC-Style Roof Rack Tracks # RTC18 with the RLTP Legs # RRRLTPFD. I do have have a solution, however the roof rack mentioned above with the feet will not fit your ProMaster. If you're still wanting a roof rack, the Rhino Rack Vortex Aero Crossbars # RRVA180B-2, with the legs # RRRLTPFD, and the leg adapters # RRVA-FK1-2 is confirmed to fit your vehicle, and has a maximum weight capacity of 165-lbs.
view full answer...
- Roof Rack for 2014 Ram ProMaster 3500 Conversion VanWe do offer specialized roof racks made for tops of vans like your Promaster 3500 and for use on camper shells. We also offer a wide range of paddle board carriers that either mount onto the roof rack or that can be used directly on the roof surface, like foam block carrier # MPG152 from Malone. We even have the awesome vacuum-cup-mount SeaSucker paddle board carrier # 298-BX1806 that gives you the flexibility to position the carrier on almost part of the roof surface. For a rack for the...
view full answer... - Roof Rack and Cargo Carrier for 2017 Winnebago Travato on Ram ProMaster 3500 ChassisDoes your 2017 Winnebago Travato on a Ram ProMaster 3500 chassis already have a roof rack? If not Rhino Rack has an option that is a fit for this chassis which consists of Crossbars # RRVA180B-2, RLTP Legs for Factory Fixed Mounting Points # RRRLTPFD and RLTP Leg Adapters # RRVA-FK1-2. If the solar panel on your Winnie is in the middle of the rig and can potentially interfere with installing this roof rack another option to consider is the SeaSucker Monkey Bars Roof Rack # 298-SX6000B...
view full answer... - Mounting Awning To A Rhino Rack Roof Rack On My 2015 Ram ProMaster 2500For the roof rack, you'll need to get these bars # RRVA180B-2, with the RLTP Legs # RRRLTPFD and these adapters # RRVA-FK1-2. I've included a video for you to watch to see how it installs! If you want to use the roof rack for your awning you will need to go with a wrap around awning like the Yakima SlimShady # Y96VR. This will just clamp around the bars with little effort. All you need is your hands to clamp it down to the crossbars. If you really want to get the Thule Hideaway # TH490011...
view full answer... - Heavy Duty Roof Rack that Fits 2021 Ram ProMaster 2500We have a similar heavy duty roof rack that fits your 2021 Ram ProMaster 2500 but the Thule you mentioned only fits Sprinter vans. So instead you could use the Rhino Rack Heavy Duty roof rack part numbers # RB1800 and # RRRLTPFD.
view full answer... - Recommended Cargo Box for Roof Rack with 42 Inch Crossbar SpreadI have a solution for you, but you're not going to be able to use the # TH27PQ to accomplish this. You'll need to find a cargo box that can be used on roof rack systems with a 42" crossbar spread and the only option we have for that is the Yakima SkyBox 21 # Y07337 -which has a maximum allowable crossbar spread of 42" and will mount to round, square, aero, elliptical, and most factory crossbars (maximum dimensions of 3-1/2" x 1-11/16"). The Yakima SkyBox does come equipped with locks for...
view full answer... - 2020 Ram ProMaster 2500 Roof Rack to Fit With Thule Hullavator ProTo add a roof rack to your 2020 Ram ProMaster 2500 you need a Rhino-Rack system as Thule has yet to come out with a roof rack for any ProMaster models. Your Thule ProBars will only fit Thule feet so we need to start over with a complete roof rack: 71" Vortex Aero Crossbars - # RRVA180B-2 RLTP Legs - # RRRLTPFD RLTP Adapters - # RRVA-FK1-2 Your crossbars will have a good amount of overhang and you'll be able to offset them a little more to help with clearance for the Thule Hullavator Pro...
view full answer... - Roof Rack that Fits 2019 Ram ProMaster 2500We have roof racks for your 2019 Ram ProMaster 2500 with the Rhino Rack # RRVA180B-2, # RRRLTPFD, # RRVA-FK1-2 which you could use to mount an awning as long as it was designed to attach to crossbars.
view full answer... - Roof Tent Options For 2017 ProMaster 2500 CamperVanThe best roof tent for your 2017 Ram ProMaster 2500 is the Yakima SkyRise HD Tent for Roof Rack Crossbars - 2 Person # Y07436. To mount this you will need a roof rack; I recommend going with Rhino-Rack Vortex Aero Crossbars - Aluminum - Silver - 71" Long # RRVA180S-2. You will also need Rhino-Rack RLTP Legs # RRRLTPFD and RLTP Leg Adapters # RRVA-FK1-2 to install the crossbars. This has a weight capacity of 165lbs, which is the highest weight capacity of any roof rack for your vehicle....
view full answer... - Recommended Roof Rack for 2020 Ram ProMaster 1500 to Use Rhino Rack Batwing AwningI recommend using the Rhino Rack Roof Rack for 2020 Ram ProMaster 1500 that uses parts # RB1800B-2 and # RRRLTPFD, which will give you a nice and durable roof rack for your van. This rack can be used to mount the Rhino Rack Batwing Awning # RR33200 directly to the Vortex Aero crossbars # RB1800B-2 by using the top channels of the bars, so it's a great choice that gives you a high quality rack at a nice price point. We don't have any fans that would mount to your crossbars but as long...
view full answer... - Roof Rack Recommendation for 2019 Ram ProMaster 3500 for Carrying LaddersFor your 2019 Ram ProMaster 3500 the best roof rack option we have would be the Rhino Rack HD roof rack part numbers # RB1800B-2 and # RRRLTPFD which gives you a set of heavy duty square bars that will work great for carrying ladders or lumber. The bars are shaped more like a ladder rack than a roof rack and combined with a set of Rhino Rack Load Stops part # RRRLH you'd have a great solution for carrying what you mentioned. I attached a picture that shows these load stops and bars used...
view full answer... - Roof Rack That Fits A 2018 Ram ProMaster 1500I took a look at the picture you're referencing and it appears to be similar to the Rhino-Rack RTC-Style Roof Rack Tracks # RTC18 with the RLTP Legs # RRRLTPFD. I do have have a solution, however the roof rack mentioned above with the feet will not fit your ProMaster. If you're still wanting a roof rack, the Rhino Rack Vortex Aero Crossbars # RRVA180B-2, with the legs # RRRLTPFD, and the leg adapters # RRVA-FK1-2 is confirmed to fit your vehicle, and has a maximum weight capacity of 165-lbs.
view full answer... - Roof Rack for 2014 Ram ProMaster 3500 Conversion VanWe do offer specialized roof racks made for tops of vans like your Promaster 3500 and for use on camper shells. We also offer a wide range of paddle board carriers that either mount onto the roof rack or that can be used directly on the roof surface, like foam block carrier # MPG152 from Malone. We even have the awesome vacuum-cup-mount SeaSucker paddle board carrier # 298-BX1806 that gives you the flexibility to position the carrier on almost part of the roof surface. For a rack for the...
view full answer... - Roof Rack and Cargo Carrier for 2017 Winnebago Travato on Ram ProMaster 3500 ChassisDoes your 2017 Winnebago Travato on a Ram ProMaster 3500 chassis already have a roof rack? If not Rhino Rack has an option that is a fit for this chassis which consists of Crossbars # RRVA180B-2, RLTP Legs for Factory Fixed Mounting Points # RRRLTPFD and RLTP Leg Adapters # RRVA-FK1-2. If the solar panel on your Winnie is in the middle of the rig and can potentially interfere with installing this roof rack another option to consider is the SeaSucker Monkey Bars Roof Rack # 298-SX6000B...
view full answer... - Mounting Awning To A Rhino Rack Roof Rack On My 2015 Ram ProMaster 2500For the roof rack, you'll need to get these bars # RRVA180B-2, with the RLTP Legs # RRRLTPFD and these adapters # RRVA-FK1-2. I've included a video for you to watch to see how it installs! If you want to use the roof rack for your awning you will need to go with a wrap around awning like the Yakima SlimShady # Y96VR. This will just clamp around the bars with little effort. All you need is your hands to clamp it down to the crossbars. If you really want to get the Thule Hideaway # TH490011...
view full answer... - Heavy Duty Roof Rack that Fits 2021 Ram ProMaster 2500We have a similar heavy duty roof rack that fits your 2021 Ram ProMaster 2500 but the Thule you mentioned only fits Sprinter vans. So instead you could use the Rhino Rack Heavy Duty roof rack part numbers # RB1800 and # RRRLTPFD.
view full answer... - Recommended Cargo Box for Roof Rack with 42 Inch Crossbar SpreadI have a solution for you, but you're not going to be able to use the # TH27PQ to accomplish this. You'll need to find a cargo box that can be used on roof rack systems with a 42" crossbar spread and the only option we have for that is the Yakima SkyBox 21 # Y07337 -which has a maximum allowable crossbar spread of 42" and will mount to round, square, aero, elliptical, and most factory crossbars (maximum dimensions of 3-1/2" x 1-11/16"). The Yakima SkyBox does come equipped with locks for...
view full answer... - 2020 Ram ProMaster 2500 Roof Rack to Fit With Thule Hullavator ProTo add a roof rack to your 2020 Ram ProMaster 2500 you need a Rhino-Rack system as Thule has yet to come out with a roof rack for any ProMaster models. Your Thule ProBars will only fit Thule feet so we need to start over with a complete roof rack: 71" Vortex Aero Crossbars - # RRVA180B-2 RLTP Legs - # RRRLTPFD RLTP Adapters - # RRVA-FK1-2 Your crossbars will have a good amount of overhang and you'll be able to offset them a little more to help with clearance for the Thule Hullavator Pro...
view full answer... - Roof Rack that Fits 2019 Ram ProMaster 2500We have roof racks for your 2019 Ram ProMaster 2500 with the Rhino Rack # RRVA180B-2, # RRRLTPFD, # RRVA-FK1-2 which you could use to mount an awning as long as it was designed to attach to crossbars.
view full answer... - Roof Tent Options For 2017 ProMaster 2500 CamperVanThe best roof tent for your 2017 Ram ProMaster 2500 is the Yakima SkyRise HD Tent for Roof Rack Crossbars - 2 Person # Y07436. To mount this you will need a roof rack; I recommend going with Rhino-Rack Vortex Aero Crossbars - Aluminum - Silver - 71" Long # RRVA180S-2. You will also need Rhino-Rack RLTP Legs # RRRLTPFD and RLTP Leg Adapters # RRVA-FK1-2 to install the crossbars. This has a weight capacity of 165lbs, which is the highest weight capacity of any roof rack for your vehicle....
view full answer...
Do you have a question about this Roof Rack?
Info for this part was:

Edited by:
Daron K

Updated by:
Alex H

Written by:
Bethann B
At etrailer.com we provide the best information available about the products we sell. We take the quality of our information seriously so that you can get the right part the first time. Let us know if anything is missing or if you have any questions.
Product Experts Available Now!
Call 1-800-940-8924
Thank you! Your comment has been submitted successfully. You should be able to view your question/comment here within a few days.
Error submitting comment. Please try again momentarily.