
To see if this custom-fit item will work for you please tell us what vehicle you'll use it with.
Extremely quiet, aerodynamic crossbars attach to Yakima towers to create a stylish roof rack for your vehicle. Rubber strips in T-slots push down to load carriers or accessories - no need to trim. Full-length aluminum bars maximize carrying capacity.
Features:
Yakima 60" JetStream MD - Silver:Videos are provided as a guide only. Refer to manufacturer installation instructions and specs for complete information.
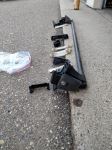
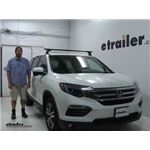
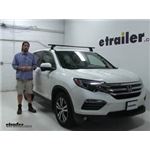
Speaker 1: Today in our 2016 Honda Pilot, we're going to be test fitting the Yakima Round Bar Roof Rack System consisting of part numbers Y00409, these are the round crossbars on the top here, and these are 58 inches long.We'll also be using part number Y03536, and this is the Round Bar Adapter Kit for the Yakima towers.We'll also be using part number Y00146. These are the Baseline Towers designed for naked roofs.Finally, to attach it to the vehicle, we're using the Base Clip Fit Kit part number Y06152.This is going to be the same for the rear bars as well. These are great sturdy cross bars for your roof, and car carry a wide variety of accessories such as bike racks, cargo carriers, excuse me, cargo baskets, and cargo boxes.While, they are exceptionally sturdy, they do cause noise while you drive. Now, you can purchase fairings that you can find on etrailer.com to help cut down that wind noise and drag, or you can upgrade to the Yakima core bars that also utilize this tower system.Moving onto the towers themselves, at the end caps here, we do have these plastic portions that can be removed and replaced with the Yakima SKS Lock Core System, so you can secure it to your vehicle and make it key to like with the accessories that you're hauling.Removing our end cap here you can see how everything attaches to the vehicle itself. We have the clamp that attaches to the door frame, as well as the pad underneath. So, your vehicle isn't going to get damaged or scratched once this is installed, because the clamp is also padded once it's being installed.So, let's go ahead and show you how the rear bar gets put into place.
We already have it partially assembled on our lovely table over here, With all the parts that you need right in front of it. So, our first step is, we're going to take our adapter kit for the round bar and attach it to our tower.This is a very easy process. You simply take the plastic portion here, push it in on the top, you're going to hear a little bit of a click. We'll take our round bar adapter, attach it to the screw in the center. We'll pull out this tab here, so we can get to the screw, flip it upside down.
We're just going to loosely tighten it so we can get it in place on our bar.Move over to our bar, slide this into place. To help out with this, we're going to flip it on its side here like so. Now we'll take our measuring tape here and measure out the distance between the two towers. You'll find this in your instructions.Move this out a little bit. Now normally what you would do, is you would find the center of the bar and measure out to both sides.
We already know where we had to be at so, kind of cheated a little bit. There we go. Now we'll tighten it down. I'd like to point out something here in a second. That's the tightening tool that comes with the kit.
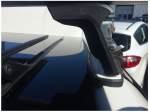
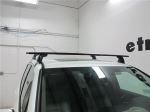
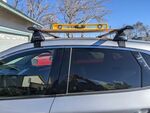
It does give those audible clicks so you know when everything is torqued to its specifications without overtightening it.Now, one thing I'd like to point out, looking at the underside of our tower here, you're going to see three notches on each side here. One, two three. One, two, three. Knowing which side is the front is very important because that determines the pitch and the tow that you set. The pitch is on this side and we have it set to B, which is the middle notch. The first notch, A, B, C, and so on.On the other side the tow is set to two. One, two, three. We tighten it down with this screw here, which has already been done. Just be sure to take a look at this in your instructions when you're tightening everything down.Next, we'll take our pad here, pointing out that the arrow's going to be facing away from the vehicle, we'll snap that into place on the bottom, and now we're ready to set this on the room of our vehicle.Set it down gently, as to not damage our vehicle while we're doing this. Now, at this point, we're going to measure from center to center of the bars on both side to keep it even, and then we'll make sure that's it's even side to side too.Alright, we're going to want to make a couple adjustments here. Double check the measurements since I kind of had to move it a little. Alright. Looks like we're even on both sides too. Now we can open up our rear doors and start installing our clamps. This isn't necessarily the steps that they have you do in the instructions, but, I find that it make it a little bit easier on us while we're installing this, so we don't have the clamps accidentally making contact while we're setting them into place.So, our first step is we're going to loosen up the bolt here. You can see how this raises up like so. We're going to take our included clamp. We're actually going to loosen this up a little bit, going to push that in, and then, we're going to tighten that bolt that we just loosened up. You see how it's now going against the vehicle. We'll repeat this process on the other side as well.There's some other items you can put on this roof rack system. It can be anything from your ski and snowboard carriers to your kayak carriers as well. A wide variety of objects. Once we have this loosely installed, we'll get it snug up against the door frame on both sides. We'll go back and forth until it's completely tight, and then you hear those clicks from the tool. See how it's tightening down around there There we go. Close that up.Now we can put on our end caps on both the bars and our towers. I'd like to give you a couple final measurements here to give you an idea of how high it sits off the roof once it's installed. From the center of the roof to the bottom of the bar's going to be about two and five eighths of an inch, and from the center to the top is going to be about three and five eighths inches as well. So, that's more than enough space for your accessories that wrap around your bars, so it's not going to make contact with your roof and scuff it up at all.Also, you can still utilize your sunroof once these are installed as well. These bars do have a carrying capacity of 220 pounds once installed, but you should always check your vehicle's manual to make sure your roof can take those weights and go by their recommendations.There you have it, for the Yakima Round Bar Roof Rack System on our 2016 Honda Pilot.
Average Customer Rating: 4.8 out of 5 stars (111 Customer Reviews)
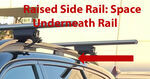
Extremely quiet, aerodynamic crossbars attach to Yakima towers to create a stylish roof rack for your vehicle. Rubber strips in T-slots push down to load carriers or accessories - no need to trim. Full-length aluminum bars maximize carrying capacity.Excellent solution for my 2023 Chevy Silverado. In the past, I have had rails installed on the roof of my pickup trucks, but I find the BaseLine towers to be a better solution, since they don't permanently change the truck. Plus, they are much more solid than SkyLine system on the rails.
Really easy to install & work as specified. So happy with the customer support/service at etrailer.
Strong, Solid Bars, Super Light, and really easy to install!
Follow the instructions, and you can't go wrong on the self installation

Love my Yakima roof rack!! It exceeds my expectations.great product. Also thank etrailer for the tec support! great staff always there to help thanks again!!
Ackage came 2 days early the install was somewhat easy (did it by myself)
Did not get to mount anything to it but seems really sturdy. One thing I can say is mark out your mounting points with provided stickers then put up and make adjustments to the roof rack.
Well packaged and on time
So far so good. Purchased these towers to use on a 2022 GMC Canyon with HD bars that I already had, primarily to carry my canoe. Yakima's fitting instructions worked perfectly and the whole system seems really solid.
Your notice of schemes was a lot better than the yakima site provided. They did not suggest the scheme you did.
But when the products arrived, the instructions were by yakima. Generally worked as instructed except the tower to tower transverse mounting dimensions needed to be tweaked for a perfect fit.
Great product fast shipping
Great! Easy to install!
Solid build quality and easy installation on my '21 Mazda CX-5.
Work exactly as they should and hold everything securely to my vehicle without interfering with the car’s normal operation. etrailer had best prices based on my research. These bars are much quieter than traditional round bars and worth the added expense.
Easy to install thanks to the etrailer video. I have used the rack system on many long distance trips including driving from South Carolina to Yellowstone.
Nicole was beyond helpful!!!
Easy to install and sturdy. I carry a 9' pontoon boat on my camper shell using this rack at freeway speeds with no problems.
Happy with the purchase. Crossbars shipped and received quickly.
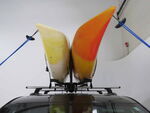
Yakima is always great, the bars are just right for my kayaks and look great too.
Roof rack parts were ordered correctly and shipped quickly.
The roof rack is great. Solid.
Hi, the company, good profesinal service. The product, all I pay was there. Very easy to install. Thanks Bless
Great fit, feels really sturdy, excellent directions
Protected the paint and held on tight.
Great product, well built and easy to i nstall.
Great product... love that fact that I can take the bars on and off without having to disassemble the system. Very convenient when not its not being used.


Do you have a question about this Roof Rack?
Info for this part was:
At etrailer.com we provide the best information available about the products we sell. We take the quality of our information seriously so that you can get the right part the first time. Let us know if anything is missing or if you have any questions.


Thank you! Your comment has been submitted successfully. You should be able to view your question/comment here within a few days.
Error submitting comment. Please try again momentarily.