
Summer Starts Here - Save up to 70%
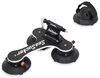
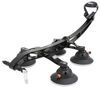
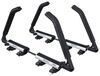
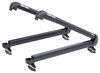
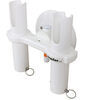
Carry 2 bikes on your vehicle's roof without having to purchase a separate roof rack and bike rack. Installs and removes in seconds with vacuum cups that won't scratch or dent your car. HUSKE plugs accommodate bikes with different size axles.
Features:
Specs:
Videos are provided as a guide only. Refer to manufacturer installation instructions and specs for complete information.
Hi everyone, it's Evangeline here at etrailer and today we'll be taking a look at the SeaSucker Mini Bomber vacuum cup mounted bike rack. This can carry up to two bikes and it's really easy to set up on your roof. We'll talk about the different features, different specs as well as how to install it and where to install it right here at etrailer.com. So if you don't have a hitch receiver or a roof rack, you can also use a vacuum cup mounted bike rack in order to carry around your bikes. This can also be used for if you're using a rental car and you just need something that you can store inside your suitcase, pop onto the car and then you're ready to go. So here we have it on a smaller sedan but for different situations, you can mount this differently too and we'll talk about that later in this video.
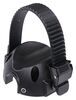
This has a weight rating of 45 pounds per bike. Now with your heavier bikes remember that the heavier the bike, the more you're also gonna have to lift up onto your roof. This is a fork mounted bike rack with most of the popular adapter plugs included with a kit. Now with fork mounted racks, you are gonna have to figure out where you're gonna put your front tires inside your vehicle for your trip. When carrying this around for storage, it arrives in a box which can also be converted into a storage case.
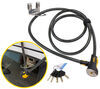
Once you install your fork mounts, you then cut out part of the box for it to fit inside this case. This is gonna weigh about 12 pounds give or take the adapters you use and the size is gonna be 31" long by 9" tall. The rack is gonna be very durable, designed to hold up to the elements as well as water or dirt and grime you may have from your bikes. But if you are leaving it on your car, it does not have locks included. So some options for you, SeaSucker has a trunk or a window cable lock.
The window cable lock goes on your glass and then gives you a spot to run a cable through. On that note, I personally prefer using something like the Thule locking straps when I use SeaSucker products. I wrap the straps around the bike and part of the rack and then I put the rest inside my door and close the door on the rest of the straps. That might be less intrusive of a locking option. You can also just take off the rack when you arrive at your destination and put it in your trunk.
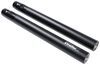
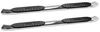
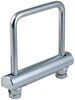
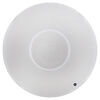
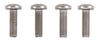
So you've seen how it looks. But let's take it outside onto the test course. Before driving away, always check the vacuum cup indicators at the back to make sure they're secured. Double check your bikes and make sure that your Thru-axles or your quick release skewers are tightened down. After that, let's hit the road. So we're going through our slalom where we make our quick turns and our U-turns. And this will see how much the bikes sway around side to side. And this is where having them mounted securely is very important. We have our alternating speed bumps, we have that diagonal action and this moves them up and down. We also have our normal speed bumps so that's the up and down movement. So make sure you have the correct surface for your Mini Bomber bike rack and set it up ahead of time. If you want it on your roof, a good spot is gonna be as close to your front windshield if not on it because this is gonna be the most stable part of your roof. If you wanna put it towards the middle just check if it flexes or not. And if you do have a hatchback you can also put it very clear off of the hatch. Just measure for where the vacuum cup should go. Always make sure that the surface is clean from dirt, dust, and debris. So here we have our fork mount and it's gonna be universal but does need to be installed into your carrier first. Notice how we have three holes on the end and that way you can pick and choose which angle works best for your bikes. So we're gonna go for the center one. We have a bolt that pops right through and then at the bottom you secure it with a flat washer as well as a nut. This includes an Allen key as well as a box wrench to tighten this down but I recommend using your own 7/16" ratcheting wrench or a longer Allen key to make this a lot easier to install. With everything tightened down or in the position you want it to be, set it onto your roof. Some people like it off centered making it easier to load one bike up. Some people like it centered for ease on both sides. Most car roofs have a slight curve so there is a little bit of flexibility on the body. Start by the center pumps and then move out towards the edges. You'll see that the carrier will flex a little bit to accommodate those curves. De-press the plunger until you no longer see any of the orange indicator. Now when you do secure the outer edges, sometimes the middle ones tend to come back up so just secure them again. So you have different Thru-axle plug adapters and you get two sets of them as well as two sets of quick release skewers. So for example, we have a 110 boost Thru-axle so we're just gonna put those plugs right in. You're gonna have to push them until they're fully seated and now they can work for your bike. When setting up your quick release skewers, you do have to do a little of extra work ahead of time. I recommend putting your rack on the floor with the vacuum cups underneath before setting the tension on your bike. Take the front wheel off and fit the forks onto that skewer. And now you can set that tension, tighten or loosen as needed. When setting up the rear wheel cradle, what I like to do is just measure for my wheel base and then that helps me figure out where to put that cradle. So in our case here, we have a 48" wheel base so this is a good estimate of where it needs to go. You don't have to get it right on the dot because there is a little bit of adjustment. When setting it up, make sure that the plunger is facing the rear of your vehicle and also it makes it easier when the straps are fully open. Get your bike carefully onto your roof. We're gonna put this into our quick release skewer, pop that through. Since it's all set up, we just need to tighten down. So I'm using the crank arm strap to secure our pedals because we don't have that much clearance. And if pedals come down, they'll hit the roof. We also have a strap here in the back to secure our rear wheel. If you are mounting this vertically on the back of your car, you do not need this strap. For your Thru-axle bikes, you are gonna have to hold your bike up as you insert the rear axle and wrench it down. So your fork mounts are set up, your rear straps are set up too, your bikes are secure. That's it, you're ready to hit the road. And also, depending on how many bikes you need to carry, SeaSucker has some different options for you. If you wanna carry around a single bike you may wanna look at the SeaSucker Talon MAX or if you wanna carry around three bikes, that is the SeaSucker Bomber bike rack. This right here was a look at the SeaSucker Mini Bomber MAX two bike vacuum cup mounted rack here at etrailer.com. My name is Evangeline and I hope you enjoyed the journey.
Info for this part was:
At etrailer.com we provide the best information available about the products we sell. We take the quality of our information seriously so that you can get the right part the first time. Let us know if anything is missing or if you have any questions.


Thank you! Your comment has been submitted successfully. You should be able to view your question/comment here within a few days.
Error submitting comment. Please try again momentarily.