
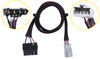
T-One Vehicle Wiring Harness for Factory Tow Package - 4-Pole Flat Trailer Connector
(298 reviews)
Price: $90.82
In Stock
T-One Vehicle Wiring Harness for Factory Tow Package - 4-Pole Flat Trailer Connector
Item # 118558
Retail:$130.38
Our Price: $90.82
You Save: 30%
Will this fit?
To see if this custom-fit item will work for you please tell us what vehicle you'll use it with.
In Stock
Thank you! Your comment has been submitted successfully. You should be able to view your question/comment here within a few days.
Error submitting comment. Please try again momentarily.


- All Info
- Reviews (298)
- Q & A (0)
- Photos
Tekonsha Custom Fit Vehicle Wiring - 118558
- Custom Fit
- Trailer Hitch Wiring
- 4 Flat
- Powered Converter
- Tekonsha
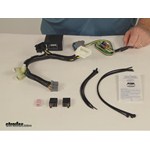
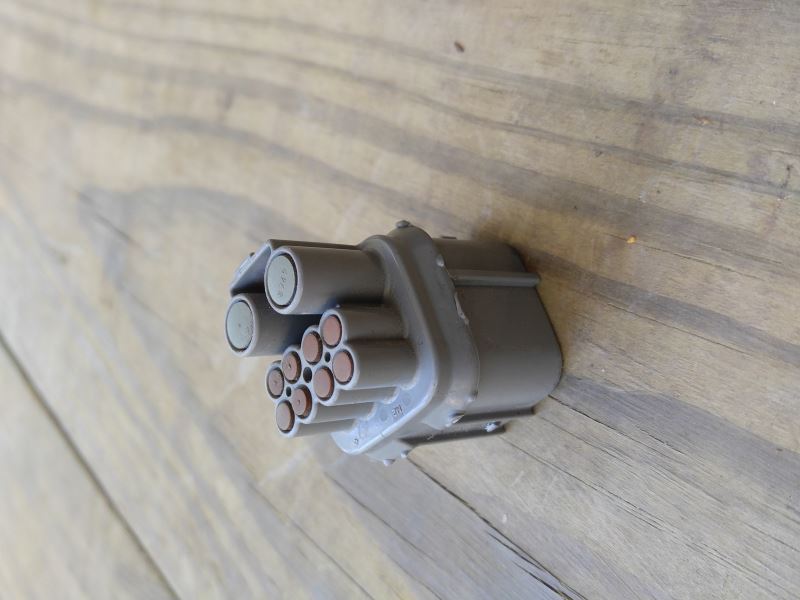
Quickly and easily install a 4-way, RV-style trailer connector on your vehicle with this custom harness. T-One connector plugs into OEM tow package wiring harness - no cutting, splicing or tapping required.
Features:
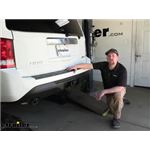
- Provides a 4-way flat trailer connector at the back of your Honda Pilot to power your trailer's signal lights
- Designed for use with a factory tow package
- Compatible with 5-pole, 6-pole, and 7-pole adapters (sold separately)
- Connects quickly and easily - no cutting or splicing of wires
- Tow harness with 4-way connector plugs into connection point behind rear bumper
- Converter connects in rear cargo area
- Powered module connects directly to battery to avoid overloading vehicle's electrical system
- Comes with dust cap for 4-way flat connector
Specs:
- Maximum amperage:
- Stop/turn light: 4.2 amps per circuit
- Tail lights: 7.5 amps per circuit
- 1-Year limited warranty
Installation
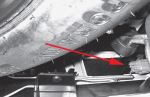
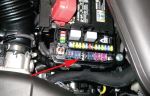
This custom-fit T-One connector plugs into your vehicle's factory tow package wiring harness. The connection point for the 4-way harness is located behind the rear bumper. The converter plugs into the factory wiring harness in your cargo area, on the driver's side. The included relays then plug into the converter harness. Once you've plugged in the connector, insert the included fuse into your fuse panel as indicated in the instructions.

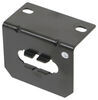
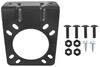
Once installation is complete, the 4-way connector will be stowed beneath your vehicle, near the trailer hitch. A mounting bracket (sold separately) is recommended to keep the connector secure.
It is recommended that you use a small amount of grease on all electrical connections - the plugs on your automobile and the 4-way connector itself - to help prevent corrosion.
ModuLite Powered Tail Light Converter
A ModuLite power module is built into this T-One connector. Because most trailers run on a 2-wire system - wherein the brake and turn signals are carried on 1 wire - the separate brake and turn signals from your vehicle's 3-wire system need to be combined so they are compatible with the wiring system of your trailer. This power module functions as a tail light converter to combine the brake and turn signal functions of your automobile so that they run on one wire to properly activate your trailer's tail lights. Note: This will not affect how the tail lights on your vehicle operate.
With a ModuLite, your trailer's lights will be powered without overloading your vehicle's electrical system. Because the module draws power directly from your car's battery and bypasses the electrical routes that are used by a basic wiring harness, there is virtually no draw on your tail light circuits.
118558 Tow Ready T-One Vehicle Wiring Harness
Installation Details
This Product Fits The Following Vehicles
- 2012 - 2015 Honda Pilot
California residents: click here


Customer Satisfaction Score:
96% were satisfied with this product
4% of customers were not satisfied
- Wrong item was ordered
- Did not arrive in time
- Alternate product found
Customer Reviews
T-One Vehicle Wiring Harness for Factory Tow Package - 4-Pole Flat Trailer Connector - 118558
Average Customer Rating: 4.8 out of 5 stars (298 Customer Reviews)
Quickly and easily install a 4-way, RV-style trailer connector on your vehicle with this custom harness. T-One connector plugs into OEM tow package wiring harness - no cutting, splicing or tapping required.by: James 04/21/2023
Correct fit easy install instructions working like a champ .
by: Kent 02/04/2024
2013 Honda Pilot
Quality parts , Good instruction video for help in the installation
Installation went smoothly
Only difficult part was the dummy cap on the wiring plug at the rear bumper, kinda difficult to remove
As for the parts and instructions, flawless
Thank you for providing the parts that I needed
by: J07/11/2022
This product worked perfectly for my 2013 Honda Pilot. The directions were crystal clear and the installation was straightforward (easy). The process may have taken 30 minutest to complete, but I was not rushing.

J

7/12/2023
After a year, this product has been solid and held up to multiple trips. Thank you!!
by: Stan R04/09/2021
I am extremely satisfied with product. Took me less than 30 minutes to install. I will admit I watched some [online] videos about installing this product before, therefore I already knew what I was doing. Hardest part was to remove safety cap underneath the rear bumper to connect wiring together, however it’s a Honda difficulty, not etrailer one.
Thank you very much. Tested, it’s working excellent.


by: Lee08/28/2022
Super easy installation! Just watch the video. Can’t wait to tow our boat!


by: Andy J.08/31/2017
2014 Honda Pilot
This wiring harness was the perfect fit for my 2014 Honda Pilot. The tail lights on my trailers work perfectly. Best price and best service! Thanks!


by: James 08/11/2023
Worked perfectly. Your installation videos are a game changer!
by: John 03/25/2023
This wiring harness was very easy to install. Took me approx 20 minutes. The price was a bit higher that some of the other wiring harnesses but ease of installation is well worth the extra money spent.
by: Hector R08/29/2019
Amazing. Everything fits perfect. No cutting no hassle. This was a missing piece to my 2014 pliot ex-l. I thought the pilot came ready to just hook up a trailer and go. But come to find this is what was missing. I got on the phone with etrailer on a Sunday afternoon. Lady was really nice and answered my questions. The only thing I would like for there tp be free shipping with no price minimum.


by: Roger 09/17/2023
2014 Honda Pilot
Easy install, great video to walk you through the steps!
by: Robert 04/10/2023
My wiring harness works exactly as is should. A very nice product, indeed.
by: David05/16/2023
Works like it's supposed to, which is the best part. No surprises. Instructions were easy to follow and installation encountered no major hiccups.
by: Ed C.04/20/2019
The install was delayed, stalled, waylayed and stopped because of the EVIL connector cap ( see picture ) that would not come off.

by: Arnold R08/09/2014
Fantastic product. It is litterally plug and play. I don't know the technical names for the pieces included, but I will try to explain a couple of important parts to the install. *1. For the the install of the single colored pinkish fuse. There are TWO fuse boxes located under the hood. You are looking for the one located right behind the radiator at around the mid point. It is smaller than the obvious looking fuse box located to legt, above the wheel well. That had me stumped for about 5 minutes. **2. Large black cable with the white plug end on one side and black plug end on the other is next. The kit comes with two loose black fuses. those plug into the the BLACK end to the cable mentioned above. There is a image of the auxilary panel you need to remove that comes with the package. Located behind the rear passenger, driver side. Once you removethe panel you will see the matching white end plug. about a good 8" straight back. I used a flash light, the inside of the panel is pretty dark. I didn't tie it down my hands were to big to get in there and do all of that. FYI,Does not rattle or make any noise. ***3. Now the tricky part. There is a gray cap (matches the the gray pug located on the final cable) that needs to be removed from underneath the rear bumper, driver side. Remember, you are laying down and looking up. There is a small lever located on the gray plug. I belive it is located on the back side of the gray plug. You need to hold the small lever down and slide forward at the same time. After you plug in the last cable. You can try to zip tie the cable on the bumper. But I was not able to locate any secure spots. I just snaked it around, and tucked it in behind the hitch. Hope this helps, oh and I am no english major. So sorry if my grammar offends anybody hahaha.

Dave W.
4/26/2015
I too love this aftermarket plugplay system. Installation took all of 30 minutes only because I am old and it takes time to get up and down from the ground! You will need a flashlight, straight bladed screwdriver and nothing more! The only other items needed are WD40 or PB Blaster to used to lubricate the cover on the grey plug behind the rear bumper. This will make it much easier to remove and a couple of small dabs of dielectric grease for the plugs!

Eric F.
8/4/2015
Thanks Arnold for posting this...i didn`t see the second fuse box either ...your posting saved me a bunch of time
by: Oscar C.03/22/2014
2012 Honda Pilot
The wiring harness number 118558 for my 2012 Honda Pilot went together pretty much as advertised with two exceptions. When the access panel is removed, there is a bracket that the black box should slide onto. I had to file the bracket so the black box would fit. Not a big problem. The real big problem came when trying to remove the dummy plug under the car. After much wasted time and energy, I finally pried the clip loose from the frame and took it apart. I then removed the dummy pug quite easily, inserted the 4 plug harness fitting and reinserted the clip back into the frame. This step should be included in the instructions as the dummy plug CANNOT be removed without that clip being taken apart. Also, the mounting brackets # 18144 and # 18140 are not needed. There is a molded 4 plug bracket as part of my plastic bumper.
David M.
5/11/2014
Hi Oscar C - can you upload a pic of this mounting location? Would love to see your installation. Thanks
by: Bill Z12/31/2013
2013 Honda Pilot
The wiring harness (Item: 118558) was very easy to install in my 2013 Honda Pilot. I also purchased the 4-pole flat mounting bracket to make my installation simple and neat. Instructions included in the kit clearly identifies each item in the kit, and which connectors to connect to the factory pre-wired connectors.
David M.
5/11/2014
Hi Bill - Where did you mount the bracket? Can you share pix? Thanks.
by: Carlton 05/19/2023
2013 Honda Pilot
Package included everything required for installation. Instructions were clear.
by: Victor l.08/14/2013
2012 Honda Pilot
Product is excellent, directions are very weak! The web site picture of kit shows the black box plugged into the grey plug on harness but it is not delivered that way. Directions state to plug black box into access opening in rear driver side access. if I had not gone to the web site and saw the picture there, I would have been lost, you have to plug black box into grey plug on harness and plug the white end of harness into access plug. There are no directions on where to plug in relays I had to find that myself. I did post a video on YouTube under etrailer 2012 honda pilot wire harness.
Jay
7/3/2014
Great video Victor, Thanks! Etrailer should comp you!
by: Paul C.10/17/2017
2015 Honda Pilot
I was certainly pleased with the staff and their expertise on answering questions on the product and the efficiency of the delivery shipment. The product was easy to install and managed to eliminate the problem I had with my new vehicle with LED lights and connecting to my trailer which had the old lights. The result is the product is working great and I have confidence in etrailer products and staff. Thank you.

Paul C.
10/17/2018
One year after installation and all is well.
by: Steve07/04/2018
2013 Honda Pilot
Super simple to hook up hardest part was getting the grey cover off other than that 10 minute install half the price of purchasing in town too great product

Steve Q.
7/4/2019
Perfect
by: Adrian03/12/2014
Honda Pilot
The most time consuming issue was removing the cap from the HONDA PILOT harness connector. The e-trailer wiring harness installed just as advertised. Highly recommend.

Adrian
3/13/2015
Works great, use it all the time.
by: John04/05/2013
2012 Honda Pilot
Ordered the harness on Friday night, got it on Thursday, and had it installed and functional within 30 minutes after I opened the box. All the parts fit correctly and the control box even had the right tabs to mount where the factory unit mounts behind the panel. VERY pleased in all regards,
John
10/7/2014
It has continued to work correctly - I could not be happier with my purchase.
by: Toby D07/07/2014
2014 Honda Pilot
Got this for my 2014 Honda Pilot. Worked great. Entire install probably took 20 minutes.
The longest part was getting the factory cap off of the grey connector under the bumper. Took a while to realize there were two clips that needed to be pressed. One on the bottom and one on the top.
Other than that this was a great product at a good price, and worked like a charm!

Toby D.
7/9/2015
Thank you for the follow up Rachael. Everything is working fine with the harness. No complaints.
by: James02/11/2013
Product appears to be of good quality and I'm sure will work well, if I get them installed correctly. Installation instructions are absolutely terrible. Instructions for mounting the harness say to "locate" items, but doesn't say what to do after you have located the part. Instructions for connecting the flat plug are better. Picture with fuse installation instructions does not accurately depict my fuse box. Parts are included which are not identified and I don't know if I am supposed to install them or not. Etrailer staff was friendly and I know they can do better.
Sarah L.
2/14/2013
If you are referring to the two additional black relays, these are installed in the empty black plug on the harness section that is attached to the black converter box. There are slots for both relays on this plug.The box-style fuse included with the kit goes in your secondary under-hood fuse box in the slot labeled Trailer Main. Check your owners manual or the underside of the lid of the fuse box for a labeled diagram of the slot functions. Apart from that, it looks like all other mentions of locating connectors are just followed by plugging in the matching connector for the harness. Let me know if you have any other issues along the way.
by: Stan W.08/07/2013
2013 Honda Pilot
The installation of the wire harness could have only been easier if I had little boy hands! The space Honda leaves for harness is kind of tight. It took me longer to collect a few tools and something to lay on than it did to actually install the harness.
Stan W.
2/20/2015
Still working perfectly. Thanks
25
298
Show More Reviews
See what our Experts say about this Tekonsha Custom Fit Vehicle Wiring
- Availability of Trailer Wiring Connector for 2015 Honda PilotThere is indeed a trailer wiring harness for the 2015 Honda Pilot. Curt manufacturing has determined that their # C56170 carries over from the 2014 model year and will fit the 2015 Pilot. I've linked you to the installation instructions.
view full answer... - Solution for Needing Replacement Converter for Tekonsha Wiring that Fits 2013 Honda PilotTekonsha does not offer replacement modules for their trailer wiring like the # 118558 that fits your 2013 Honda Pilot so the best option would be to replace the entire kit.
view full answer... - Troubleshooting 2015 Honda Pilot that Won't Start After Trailer Wiring InstallIf your 2015 Honda Pilot is cranking but won't fire up after you installed the Tow Ready Wiring Harness part # 118558 most likely the problem is fuse or relay related. Since the harness requires the installation of a few relays I would double check that you have relays installed in the right spots of your relay/fuse box. It sounds like maybe the fuel pump relay isn't installed in the vehicle and that is preventing the vehicle from starting or it is also possible that the relay has gone...
view full answer... - Trailer Running Lights Not Functioning After Installation of T-One Harness Part # 118558It is possible that the two supplied black relays, which plug into the smaller black connector block about midway along the main wiring harness, may not be fully inserted into the connector block. This condition could cause the symptoms you're experiencing with your running lights. First, double-check that the relays are correctly inserted into the harness. If this does not remedy the problem then you can next follow the troubleshooting steps outlined below. If you have the relays plugged...
view full answer...
- Will the T-One Vehicle Wiring Harness # 118558 fit a 2013 Honda PilotThe Tow Ready Custom Fit Vehicle Wiring # 118558 that you referenced is confirmed to fit the 2013 Honda Pilots without the tow package. We have not had the chance to install this product on a vehicle yet so we do not have an install video, but I did attach installation instructions for this product for you to check out.
view full answer... - Recommended Trailer Wiring Harness for 2013 Honda Pilot without Tow PackageIf your 2013 Honda Pilot does not have the tow package, I recommend the Tekonsha T-One Vehicle Wiring Harness # 118558. This harness is confirmed to fit your vehicle and will easily install by connecting to built-in ports in the cargo area, on the driver's side. This will provide a 4-Way connector at the rear of your Pilot to power a trailer's signal lights. I have attached the complete installation instructions that you can also look through.
view full answer... - What Plug-In Wiring Harness do I Need to Use the Tekonsha Primus IQ # TK90160 on My 2015 Honda PilotSince you input your vehicle into our fit guide, I believe you are referring to your 2015 Honda Pilot's factory plug. When looking at the available instructions for the compatible wiring harness # 118558, the plug location on your vehicle is in a compartment that is accessed by opening the rear door on the driver's side. It is inside the panel that is labeled "AUX FUSE." I went ahead and included photos and instructions about how to gain access to your plug.
view full answer...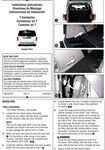
- Availability Of Replacement Parts For Tekonsha T-One Vehicle Wiring Harness 118558I have a replacement option for you, but after speaking to my contact at Tekonsha I confirmed unfortunately you can not buy any of the parts of the Tekonsha T-One Vehicle Wiring Harness for Factory Tow Package # 118558 for your 2013 Honda Pilot separately. Instead the only option to replace the wiring parts you are missing, is to purchase a new complete harness using # 118558.
view full answer... - Trailer Wiring Harness for a 2014 Honda Pilot without Factory Tow PackageFor your 2014 Honda Pilot you can use trailer wiring harness # 118558 to add a 4-Way flat trailer connector to the back of the vehicle. I have linked a video review of this harness for you.
view full answer... - Recommended Trailer Wiring Harness For 2012 Honda PilotThe trailer wiring harness I recommend for your 2012 Pilot is the T-One Harness, part # 118558. This harness gets very good reviews from our customers. There are three areas you need to access on your Pilot to install the harness. One is located behind the 'aux fuse' door in the cargo area of the vehicle on the driver side. The other area is by the spare tire under the vehicle. The third area is in the fuse panel in the engine compartment. I have attached the detailed installation instructions...
view full answer...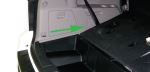
- Are all Components of Tow Ready Wiring # 118558 Required to Install a 4-Way on a 2014 Honda PilotYou would need all the components of the Tow Ready Custom Fit Vehicle Wiring # 118558. The only time you would only need just the 4-way harness would be if you already had a 7-way and were going to just a 4-way. In that situation the rest of the harness would already be installed.
view full answer...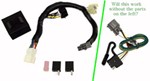
- Installation of Tow Ready Wiring Harness 118558 on a 2012 Honda PilotThe black fuse-like connectors you mentioned are relays, and they are going to be installed in the extra black plug you see on the section of the # 118558 wiring harness that connects to the black converter box. This plug has slots for both of the relays. Once the included box-style fuse is installed in the secondary underhood fuse box, the two relays are in place, and you have installed both sections of the harness, no other connections are required. I am including a link to the installation...
view full answer... - Fuse Location For Tekonsha Wiring Harness on 2015 Honda PilotThe instructions for the T-One Vehicle Wiring Harness for Factory Tow Package - 4-Pole Flat Trailer Connector # 118558 are Tekonsha's as opposed to ours, but yeah, they are not very specific. The two relays plug into the black connector block that is coming out of the wiring loom. The fuse goes in fuse box number 2, which is pretty centrally located in the engine compartment, but slightly off to the driver's side. The fuse will be placed in fuse location number 3 in that fuse box; you...
view full answer... - Solution for Difficult to Remove Factory Trailer Wiring Connector of 2014 Honda PilotFactory connectors can be a real joy to release. Even when you fully depress the release lever they can feel like they are still latched. What I would recommend you try is depress the release lever and then use a wider slot screwdriver inserted between the two pieces to twist/pry the pieces apart. You'll want to move the screwdriver frequently to try pry from several spots.
view full answer...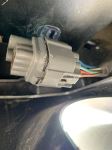
- Trailer Wiring Recommendation for 2013 Honda PilotWe have the best luck with the Tekonsha brand trailer wiring harnesses so the part # 118558 which is a confirmed fit for your 2013 Honda Pilot would be your best option.
view full answer... - What Size Fuse Comes with the Tow Ready Custom Fit Vehicle Wiring # 118558The fuse that installs in the engine compartment that comes with the trailer wiring harness part # 118558 that you referenced is a 30 amp fuse. I attached a review video for this wiring harness for you to check out as well.
view full answer... - Adding a 4-Way Trailer Wiring Harness to a 2012 Honda PilotYes, you can have the dealership run the VIN of your 2012 Honda Pilot through their computer system and it should show how your vehicle is equipped. But you can use the 4-Way trailer wiring harness, # 118558, whether it has the factory tow package or not.
view full answer... - Wiring Harness For 2013 Honda Pilot Without Factory Tow PackageThe T-One Vehicle Wiring Harness, part # 118558 is a confirmed fit for your 2013 Honda Pilot without the factory towing package. The connector block is included in the kit but we do not offer it as an individual item.
view full answer... - No Power on Trailer Wiring Harness Install in a 2013 Honda PilotIt is possible that there is a fuse that is normally present on the 2013 Honda Pilot that is blown or missing. It would be in the same location as where the relays install for kit # 118558. The testing procedure starts with testing the input wires coming from the vehicle and going into the converter box. If there is no power going into the converter then it is likely a missing fuse or relay. If there is power going into the box then you would check the wires coming out that go to the 4-Way....
view full answer... - Recommended 4-Way Wiring Harness For 2013 Honda PilotThe Tekonsha, part # 118558, is the correct wiring harness and is a confirmed fit for your 2013 Honda Pilot. It allows you to quickly and easily install a 4-way trailer connector on your vehicle with this custom harness. T-connector plugs directly into OEM tow package wiring harness with no cutting or splicing required.
view full answer... - How to Disconnect Dummy Plug on Gray OEM Trailer Connector on 2012 Honda PilotDisconnecting that gray dummy cover on your 2012 Honda Pilot so you can install a wiring kit like the T-One # 118558 can be a bit frustrating, but what we've done in the past has actually been to pop the connector off of the frame, disconnected that plug, made our new connection, and then put the connector back in place. By pulling the OEM connector down it makes it easier to remove that dummy plug. Id you check out the linked installation video at the 5:57 minute mark you can see us...
view full answer... - Where are the Trailer Wiring Connection Locations for a 2012 Honda PilotThere are actually a few connection points required for trailer wiring harness # 118558. There is one behind the bumper in the location you have described, but the other connections are inside the cargo area of the vehicle. I have included a link to the installation instructions for you to view.
view full answer... - Recommended Wiring Harness for 2012 Honda PilotTo install a 4-Pole Flat Trailer connector on your 2012 Honda Pilot to connect with your trailer and power its rear signal lights, I recommend the T-One Vehicle Wiring Harness for Factory Tow Package # 118558. This harness is confirmed to fit your vehicle with the factory tow package. The T-One Connector will plug directly into the OEM harness on your vehicle and will provide a vehicle side 4-way to connect with the 4-way on your trailer. I have attached the installation details for you...
view full answer... - Trailer Wiring Kit for 2013 Honda PilotThe Rola light kit plugs into an existing 4-way trailer connector on the back of a vehicle. You don't add a converter to it because it installs right onto the carrier. If you're looking for a 4-way trailer wiring harness that fits your 2013 Honda Pilot use part # 118558. It has the highest amp output of the harnesses that fit and it installs by plugging into a connector behind your Pilot's rear bumper. Included with the harness is a powered converter which plugs in to a connector in...
view full answer...
Do you have a question about this Custom Fit Vehicle Wiring?
Info for this part was:

Expert Research:
Mike L

Expert Research:
Sarah L

Expert Research:
Michael H

Expert Research:
Jameson C

Expert Research:
John H

Expert Research:
Adam R

Expert Research:
Rachael H

Expert Research:
Jeffrey L

Video by:
Joshua S

Video Edited:
Jacob T

Updated by:
Laura H

Updated by:
Wilson B

Updated by:
Alexander C

Updated by:
Hannah L

Updated by:
Isabelle B

Test Fit:
Ryan G
At etrailer.com we provide the best information available about the products we sell. We take the quality of our information seriously so that you can get the right part the first time. Let us know if anything is missing or if you have any questions.
Product Experts Available Now!
Call 1-800-940-8924
James
4/22/2024
Followed the directions and it is doing great