
To see if this custom-fit item will work for you please tell us what vehicle you'll use it with.
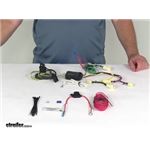
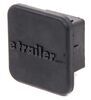
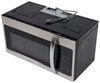
Quickly and easily install a 4-way trailer connector on your vehicle with this custom harness. T-connector plugs directly into existing wiring. Powered converter reduces strain on wiring system.
Features:
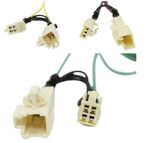
This custom-fit T-connector plugs into your vehicle's wiring harness, which is located behind the driver's-side and passenger's-side tail lights. You will have to remove the floor covering, interior paneling, and tail light assemblies to access this harness. Once you've plugged in the connector, run the red hot lead up to your car battery. Connect the included fuse holder, and then connect the fuse holder to the positive terminal on your battery.
Once installation is complete, the 4-way connector will be stowed beneath your vehicle, near the trailer hitch. A mounting bracket (sold separately) is recommended to keep the connector secure.
It is recommended that you use a small amount of grease on all electrical connections - the plugs on your automobile and the 4-pole connector itself - to help prevent corrosion.
A tail light converter is built into this T-connector. This converter is a battery-powered unit that bypasses the electrical routes that are used by a basic wiring harness. As a result, there is virtually no draw on your tail light circuits.
Because most trailers run on a two-wire system - wherein the brake and turn signals are carried on one wire - the separate brake and turn signals from your vehicle's three-wire system need to be combined so they are compatible with the wiring system of the trailer. This converter combines the brake and turn signal functions of your automobile so that they run on one wire to properly activate your trailer's tail lights. Note: This will not affect how the tail lights on your vehicle operate.

California residents: click here
Videos are provided as a guide only. Refer to manufacturer installation instructions and specs for complete information.
Ryan: Hey everybody, Ryan here at Etrailer. Today on our 2017 Toyota Sienna, we're going to be taking a look at and showing you how to install the Hopkins Four-Pole Trailer Wiring Harness. So this is going to provide your trailer with the necessary lighting functions to be safe and legal. And since many Sienna owners use their vans to do a little bit of everything, this is going to get you covered. What sets us apart is that it's going to be pre-wrapped all the way down to our four-way flat connector. So that's a nice touch.
It's something that will keep us a little more protected, that way we shouldn't have to worry about our wires getting damaged. So it's going to have a really thick, nice rubber dust cap, and it's going to be really easy to grab and pull that off.That'll help keep the terminals protected. And what's nice is they actually include a little bit of dielectric grease. So you don't have to worry about getting that separately. That way, from time to time, you can coat your terminals with it and really help prevent any of that corrosion.
Now what's nice about this wiring as well as the fact that it has a module box. So that module box is going to protect your Toyota's factory wiring. If a short or an electrical issue we're to occur on the trailer side. And that really would put my mind at ease, especially with today's newer cars, because we all know how advanced the electrical systems can be.So what's nice about this too, is that this is going to live inside of your Sienna, out of the elements and out of sight. So when you're not using it, you wind it up, keep it in your storage compartment out of the way, whenever you are ready to use it, we'll just grab it and drape it over the threshold.
Now, anywhere on the threshold is fine, where there's weatherstripping with one exception, you want to stay away from this latch area. If it gets caught in there it could potentially get damaged. So we eyeball the length that we need, the four-way connector's really long. So that's nice to have that extra wire there, if you need it.So we'll drape it over and just close our hatch on it. Bend it to try to get it to stay where we want it.
And once we get our hatch closed, we're ready to hook up to our trailer.But other than that, a good wiring harness that should really work out well for you. Now, as far as the installation goes, it's really not complicated, but it is a little bit time consuming. Speaking of which let's go ahead and put it on together now.First thing we need to do is get our tail lights removed. So we'll go ahead and open up our hatch. And that'll allow us to come to the inside portion of our tail light and remove a couple of bolts. So we're going to have two 10 millimeters, go ahead and pull those out. Then we can grab our light and carefully work it side to side just a little bit to loosen it up. And you're going to want to pull back towards you at the same time. So if you're having a little trouble getting the taillight out, one thing you can do is come on the side and just with the palm of your hand, just push back on it.And that's sometimes will help release the clips back here that's holding it in place. And if the tail lights really fighting you, like it is in our case, what you can do is get a plastic trim panel tool or something like that. And just put it behind the taillight lens, put a little bit of pressure on it to release that clip there. Once we get the tail light out, we can then disconnect the electrical. We're going to have two tabs here. You pushed down on the center and pull back. We're able to release them. We can set our taillight to the side. The other taillight is set up the same way. So we're just going to repeat that process over there.Now we can remove this threshold here. So this is going to be held in place by three fasteners, one here, here, and here. These are all going to be removed the same way. So what you do is flip this cargo hook up and this little piece of plastic here in the center, you can take a flat head screwdriver, pop that free. Underneath it we're going to have a 10 millimeter bolt. We'll run that out. And try to work everything out. You may need to grab your flat head again and pry underneath there to pop it out. Once you have it out we'll repeat that process for the other two and we can just set these aside for now. Then we can grab our threshold at the bottom and pull it towards the front and up at the same time, it'll release some clips.That's what the clips will look like. Once we have it out of the way, we'll set it to the side. To give us a little more room to work, if you move over here to the side panel, we're going to free it up a little bit. So grab the bottom and work up and it'll release a couple of clips and give us enough room to get our wiring back in there. Pretty much the same thing on the passenger side, we're going to have this little cover here. We'll remove this. And again, just pull up in that Panel to free up some space.We can then grab our harness. And we're going to take the T-connector ends that have the red and brown wire, as well as the yellow wires, and we're going to go behind the panel and out through the hole in the taillight pocket there. Just going to just feed them up.So our T-connectors are going to get plugged into the factory taillight, wiring. All the connectors are different, so you can't plug it in wrong more or less, so this end is going to plug right into that factory connector. And this end is going to go to that one.Once we have those plugged in, we can grab our taillight and plug these in to the corresponding connectors here on the back of our taillight. Once we have it all connected. We can reinstall our taillight the opposite way that we removed it.Now we can grab our green wire with the T-connector and bring it over to the passenger side. And we're going to do the same thing. We're going to route this up and to the taillight pocket.Once we have our connectors pulled out, we're only going to plug into one of the factory connectors and that'll be this one here. T-connector into one end. Then we can grab our tail light and plug the other side into it. And don't forget to take your factory wire and plug that in as well. We can just re-install our taillight, just like we did the other side.So at this point I went ahead and secured our module box and I just used a zip tie to secure it to some of this factory wiring here. That way we don't have to worry about it bouncing around. Now we can grab the white wire with the pre-attached ring terminal. This is going to need to get grounded to the body of our vehicle. I'm going to do it right here, where it is nice and thick metal. So I'm going to take the self tapping screw to get it secured.Now, underneath of our van, we are going to need to remove this plastic panel. That way we can get access to the backside and we can run some of our wiring. So to get our panel off, we're going to have several pushpin style fasteners with a white head on them, just like this. And to get those out, you just grab a flat head screwdriver, going to pry underneath the head and then get underneath the base of the fastener and work it completely out.And then along the bottom edge of our rear bumper, we're going to have a total of five, 10 millimeter screws that we also need to pull.And finally, we're going to have four of these type of fasteners. So you can grab a big Phillips or Flathead and unscrew them. Now, sometimes these don't want to bite the threads. And so what you'll need to do is pull down on that panel while you're turning and that can usually get them to pop free. Now, keep in mind when you're doing these, these are the last things that's holding our underbody panel up. And even though it's plastic and lightweight, you still don't want it to fall down and hit you. So keep that in mind. You want to keep a hand on it to support.Once we have it release, can we move it and send it to the side. Now that we have that panel out of the way, over here on the driver's side, we're going to have a rubber grommet and we're just going to drill a small hole through it. That way we can run our power wire up inside it.If it comes out, no big deal. We'll simply just push right back into place. Once we have that hole made, we can grab our big bundle of red power wire. Take one end of it. You can just feed a few inches up inside, that way we can grab that end and get it hooked up.So back inside, here's where our red wire came up through that grommet and we're going to be hooking it to the red wire that's coming out of our module box with this pre-attached butt connector. So we'll take the end of our wire. We're going to strip back some of the installation.I like to give these wires a twist to ensure a good connection. We're going to place that end into our butt connector. Then we can come in and crimp it down. So I went ahead and just used some electrical tape here where our butt connector was connecting the power wire. And then I just cleaned up all of our wiring and taped all the extra up and pushed it into this pocket. That way it's out of the way and safe. And then I also cleaned up our green wire that runs over to the passenger side. And so what I did is just use some clear packing tape to just tape it to the very bottom of our threshold area here, all the way across. That way it'll be stuck to the body nice and secure behind our plastic threshold once we put it back on.Now we can start to put our trunk area back together here. I do want to point out your Four-Pole wiring. You do want to leave it out of this opening here, because this will live inside of our van. That being said, you just line everything back up. This simply just more or less pushes back into place. As far as the weatherstripping goes, you want to make sure that the weatherstripping is sitting on top of the panel, just like this. That way we don't have to worry about any leaks or anything like that. Thresholding, on the same way that we removed it, we'll line it back up, push it down into place and re-install our cargo anchors.Then once we have this panel pushed back in place, we can re-install our little door here. Now back underneath of our van, where our wire comes out of that grommet, here to the under side, what I'm going to do is just take some silicone and just seal everything up. That way we don't have to worry about it being open. With that being said, we can run our power wire to the front of our van. So I'll go ahead and do that now and show you the path that I took to get there. So what I did right away, this little hole here, I zip tied our wire to it. And along the way I used those included zip ties to keep it secure. You want to be sure to avoid any hot or moving parts while you're doing this. But I just ran it up along this edge here, where it comes out here. Around this factory wire, up and over, right through here. And so it comes out around the outside of our fuel tank.I just ran it behind the support straps, secured it with some zip ties and just started to wrap around the front of the fuel tank and continue towards the front of our van. So it goes underneath this panel. It can be a little tricky to see, but it is quite easy to just push your wire through it. And it comes out right there. From there, it continues up into the engine compartment and what I did, you just take a pull wire, so you can use a coat hanger or a piece of tubing, whatever you might have, open up the engine compartment, drop that pull wire down to the bottom side. Then you can take the end of your power wire to it, go back up, pull on that wire and it'll pull the power wire right up to you.So here in the engine bay, this is where our power wire came up from underneath. And I just routed it around like this. So what we're going to do is grab our included fuse holder. We want to make sure that the fuse is not installed, and we're going to plug the end of our power wire into the pre-attached butt connector here. So strip back the insulation, push it in and crimp it down. So this butt connector is actually a heat shrink butt connector. So what we're going to do is grab a heat source and heat up the ends to seal them up.So now, once the ends ar shrunk, that's what they're going to look like. Now we can hook this up to the positive battery terminal. So if you lift up our cover, we're going to have a 12 millimeter nut here. So we'll get that removed. Take our ring terminal, slide that over the stud. And re-install the nut.Once we get the nut all snugged down, we can come back to our fuse holder, take our fuse and put that into position. So I went ahead and used some zip ties to clean up our wiring. And this is how it turned out. And at this point we can close the hood and test our wiring to make sure that it's functioning properly. So I went ahead and plugged it into a little tester. If you don't have one of these, you can always just hook up to your trailer. We're going to try our left turn, our right turn, our brake lights and our running lights. And finally, we can take our rubber dust cap, put that on the end of our four-way. And it actually does come with some dielectric grease. So now it'd be a good time to just to smear a little bit on the terminals to help keep them protected.And finally, we can move back underneath and reinstall our panel the opposite way that we removed it. And that'll finish up our look at and our installation of the Hopkins Four-Pole Trailer Wiring Harness on our 2017 Toyota Sienna.
Average Customer Rating: 4.7 out of 5 stars (19 Customer Reviews)
Quickly and easily install a 4-way trailer connector on your vehicle with this custom harness. T-connector plugs directly into existing wiring. Powered converter reduces strain on wiring system.Other than a minor snafu with the delivery, everything was great. It took about 1 1/2 hours to install the hitch. I didn't have to move the vehicle fascia like the directions said, I just had to maneuver it around a bit. We pulled the golf cart trailer with it this weekend and had no problems.
Excellent service excellent website great communication between the company and me very fast service arrived on time package perfectly!!!! Five star review for me....
The Package said a pro can install this in an hour, I am no pro but this only took me about 45 minutes to install from start to finish. Great fit and very sturdy build quality! It said to lower the exhaust to get the part in. I was able to slide it in without lowering the exhaust and complete the install by myself, well I had the assistance of my 3 year old.
10/10 would buy again.
I really enjoy dealing with etrailer, I feel like it is a small company next door and that I am a valued customer. Great service, prices and friendly staff. My first go to place for my hitch, rack and trailer needs. I just received a new receiver for my son's van and the Hopkins wiring harness, so now comes the opportunity for the two of us to install it together. Father and son time. Thank you all at etrailer.
I have a small trailer and an old car that I need to toe and I wanted a hitch that would be mostly hidden and this one fit exactly how I wanted it to. It was easy to install. Ordering was easy and delivery was quick. The on line help and advise, spot on. My wiring questions were answered, thank you Jason S, and the install videos helpful as well. (Watched them more than once). You guys ( Jason, George and John) made this easy. Thank you.
Worked well. Surprisingly this thing took longer to install than the actual hitch.
The 2 items I ordered arrived in 6 days (to Canada). Both were exactly as ordered. Thanks to installation videos on etrailer, installation was a easy. Great detail in the installation videos. The main reason I purchased this hitch was because only the receiver shows behind the vehicle (cross bar is hidden). I would highly recommend both of these products.
All items arrived on time and I was able to assemble everything easily
fantastic
Easy installation.
Competitive price. On time shipping. Product was exactly as described. Perfect fit.

Worked great , a must for a new vehicle.
Do you have a question about this Custom Fit Vehicle Wiring?
Info for this part was:
At etrailer.com we provide the best information available about the products we sell. We take the quality of our information seriously so that you can get the right part the first time. Let us know if anything is missing or if you have any questions.


Thank you! Your comment has been submitted successfully. You should be able to view your question/comment here within a few days.
Error submitting comment. Please try again momentarily.