
Summer Starts Here - Save up to 70%
To see if this custom-fit item will work for you please tell us what vehicle you'll use it with.
Give your vehicle's cloth seats an upgrade with these seat covers that look and feel like factory leather. The perforated leather covers with memory foam centers keep you cool and comfortable as you drive. Simple, slip-on installation.
Features:
Upgrade your vehicle's cloth seats with these luxurious leather seat covers that look and feel just like factory original equipment. The custom-fit covers protect your seats from wear and tear, and they install easily over your existing seat material.
Each set includes covers for your vehicle's front and rear seats, as well as covers for your headrests, armrests, and center consoles (where applicable). The covers accommodate all of your vehicle's seat belts and controls without impeding access, so you won't lose functionality. Every seat adjuster, every console function, and every cup holder has been accounted for.
The covers are constructed of perforated leather. This ventilated, breathable material doesn't conduct body heat so you'll stay cool on long road trips. The perforations prevent moisture build-up between the covers and seats so mold and mildew won't develop. Each cover has anti-bacterial and anti-odor coatings to help preserve their new and clean scent, and they are flame resistant.
The breathable leather also makes this the ideal seat cover to use with a Clazzio seat heater (SH-1 - sold separately).
All Clazzio covers are custom cut and hand sewn by professional machinists to ensure that they fit your vehicle's seats without flaw. The thread used for stitching the seams won't loosen, fray, or tear over time. It is, however, specially designed to break away in the event that the seat airbags deploy. And you can replace an individual cover so one set of Clazzio seat covers will last for the lifetime of your vehicle.
Each cover has a 1/2" memory foam pad in the center. This memory foam layer softens in reaction to your body heat to perfectly fit the contour of your hips and legs. This gives you an additional level of comfort that you didn't have with your original seats.
Both the driver's- and passenger's-side front seat covers have a rear map pocket for convenient storage.
Clazzio covers install over your seats with no need to remove any factory material. Simply slip the covers over the seats. Once the cover seams are properly aligned, tuck all excess material into your seats' plastic trim so they look tight and wrinkle-free. Then secure the covers with the built-in straps, hook-and-loop fasteners, and S-hooks. Detailed instructions with color pictures are included with each seat cover to ensure easy installation.
Videos are provided as a guide only. Refer to manufacturer installation instructions and specs for complete information.
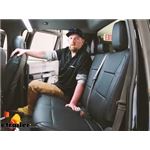
Hey everyone. Shane here with etrailer.com Today I have a 2021 Ford F-250 Super Duty. I'm gonna walk you how to install the Clazzio Custom Leather Seat Covers. When you think about leather, you always get it in your mind that it's really expensive to take your car, if you want leather seats and get leather seats put on by a specialty shop, or you go to buy a new car and they wanna charge you thousands of dollars extra to get leather seats in it. Well, we don't have to spend that extra thousands of dollars either take our car to a shop, to get them done, or to buy a car from the dealership that has 'em. Clazzio's makes leather seat covers that when they're installed, as you can see here they look exactly like they came in the vehicle.
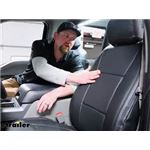
They're gonna have half inch memory foam in the center. So you've got plenty of cushion. They're perforated, so they're breathable, they don't hold moisture. We come right down here and we look at our stitching. I'm gonna show you what it looks like and how well these are gonna hold up.
Our stitching, it's double stitched. So when you compare this to some of the other seat covers out there, you may buy at an auto parts store or something like that. They're gonna be single stitch, but when you put those on, they tend to move around after a while. You always got to readjust and readjust. These, as I mentioned are custom fit, so when you put them on, they're tight, they fit really tight and they look exactly like leather seats that you bought when you bought the vehicle.
The double stitching is gonna hold everything together, really tight. So you know, that normal wear and tear of getting in and out of the vehicle all the time You won't have to worry about the stitching coming apart, being double stitched, it's gonna hold up really well. Not only they're gonna be available in black, but also gray, light gray, and beige. Not only for the crew cab, but also for the super cab and the regular cab. You just wanna make sure you check our fit guide and make sure you check for the correct way that your seats are set up.
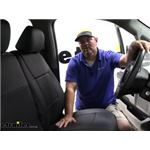
Now for your crew cab, your super cab, you can get them as a kit for the front end rear seat or just for the front seats. Couple other nice features that I wanna point out that these seat covers is, it's not only gonna come with the covers, it's gonna come with a matching head rest cover. Depending on your setup, this truck or vehicle, center seat cover, center or backrest cover, head rest cover, and also the armrest cover. So everything you get is gonna match. This particular set is also gonna come with a back seat set. Now, here in the back, we're gonna take a look at the backside of our front seats first. Each one is gonna have a map pocket and you'll notice, this band that runs right here. It kinda goes in at an angle so that when you open it, put something in or take something out and you let it go, it's gonna stay tight up against the seat. And you can see, these look like factory installed leathers seats and not leather seat covers. They fit that good, and they look that good. Couple of nice features, other nice features that I want to point out is, being custom fit, all of your latches, where the backrest latched to the back wall, child safety rings here. As far as the cleaning process, just a damp wet rag can probably wipe most of it off, leather seats are usually pretty easy to clean. I will say, with having leather, you have to maintain them. So that means putting something to keep the leather soft. If you don't, what ends up happening is they will dry, and this is with any leather seats, not just the cover, they'll dry and then they start getting really stiff and they'll start cracking. So don't let that happen with these, treat them just like you would any other leather seat. Cleaning process, again, very simple. Now we've gone over some of the features, let's walk you through how to get them installed. Starting your installation, can start on the driver's side or passenger side, it really doesn't matter. We're gonna come down here to the back seat right at the bottom, there's a flap. If you feel underneath, there's two straps, and that's hooked up here underneath the seat, we need to unhook those and let this flap loose. This one is hooked around this plug here. So I'm gonna have to take the plug, the little connector that's holding it up and in place. We'll have to pull that out to get that one off. Otherwise, it be should be, now look at this one, it's just wrapped, so it's just kind hooked around a little plastic piece. Like that. So our first one, this one over here, it was just hooked around a plastic, little tab. Right over here on this outside, it's actually hooked around this wiring. And in order to get it off, we're gonna have to take the little tab and pull it out. Just like that. And we can get that off and then put our wiring back in place. Now you're gonna get a little sheet and your kit is gonna look like this. What this does is it tells you what number goes to what seat. From this, you're gonna pick the cover and there's a tag on it, it's gonna have them number. You're just gonna match those with the seat you're installing it on. This is gonna be our lower portion or the actual seat part. You're gonna undo the straps. And we're gonna take this, we're gonna started here in the front and we're just gonna push it around our seat just like this. This flap here we're gonna take it and we're gonna shove it between the two sheets. You wanna make sure the buckles come out when you send it to it. You're gonna have a little strap for your seat belt. Run that around there like that. On the outside edge, you're gonna have a little kind of a foam bead. This plastic trim, we're gonna take this and we're gonna tuck it in back behind it. The kit is gonna come with a little tool like this, if you need it. You may need it in some spots on this 'cause it can get a little tight. You wanna try and get that bead all the way down on there. What I found was right at this corner, it gets hard to try and get this that foam bead in there. So if you pull the whole seat cover forward, get the back section of that bead in there, tuck it in as much as you can and then you can slide the whole thing back and you can see how it turns out there. So now, it's just about tightening it up, making sure everything's pushed to the back, as much as possible. You got your flap through there. We have our straps, here need to run them underneath we're gonna make sure we're going over any of the wiring. Anything that may be moving, we don't want to hit it. I'd say, try and stay as close to the bottom of the seat as possible and run it in, strap it up, and then we'll cinch those down and then we can move on to our next cover. Now I'm doing this seat in the strap back behind this or back to the back of the seat. Again, staying away from pinching any wires or anything like that if you have to go in between to do it. The passenger side really isn't that bad. I think the, because the seat over here is not powered, but on the driver's side, it's a little bit different. It's a powered seat, so you have quite a few more wires and brackets to go through. Now we've got our straps in, we'll go ahead and hook them up to the buckles and tighten them down. We'll take that strap get it fed through the buckle. Let me just cinch it out. Once you get everything hooked up, come back up and check out the seat. Make sure you don't have any wrinkles, you don't have any, no like, corners pinched up. If you do, all you gotta do is just grab it and work it. Work it down where it's tight, put it down your corners. Go back down, cinch up the straps one more time. And that seems pretty much done. Or that section is pretty much done. Once you get the seat part done, we can move to the back rest and the headrest. We need to remove our headrest. To remove them, if you haven't done it yet, push both of these at the same time. We'll set this aside and we'll get that covered here in a few minutes. Grab the cover for this and start installing that one. Again, find the tag for that seat, which is gonna be the back rest. Each side is gonna have a zipper. We're gonna unzip it, we're gonna spread it apart, we're gonna lay it right over the top just like that. Now, your instructions are gonna tell you to get this down tight, get it zipped and everything. And then come back up and do this. I say, do these firsts. Gives you a little bit more room to move the cover around, to get it around these because they are a little bit bigger. And all you're gonna do, you gotta get that piece settle there. Just like that. We'll do the same thing here. There you go. Once we get that, we can work from the top down. We have our two side of flaps where your zippers connect. And you get those leather around to the back as much as possible. Three flaps at the bottom, we need to tuck them in between the two sheets. And if you lean the seat, that backrest completely forward, puts a little bit bigger gap in there to get those flaps pulled through. As I said before, these aren't, you know, they are not just an easy put on, but if you want a good quality seat cover without paying thousands of dollars it's actually the way to go. Maybe a little bit trying to put on, but once you get them on, you're basically gonna have leather seats, nobody that looks inside your vehicles is gonna know any difference. Once you get your flaps through and we need to start pulling our sides around you get them zipped together. We're just gonna work those around. That'll be easier to zip from the back seat. And honestly, if you have a second person that can help kind of squish the seat if you're doing it, probably get it done in half the time. The original flap that was hanging down here, you can pretty much do what you want with it. I just folded it up, kind of keep it out of the way. We're gonna come back up here once we got them zipped. We're gonna check out the seat and we're gonna go from the top down just kind of work everything down, try and get any wrinkles you may have in there out. And then we'll come down and we'll finish strapping up. And then using the hook-and-loop fastener to get it completely strapped down. You're gonna have a hook-and-loop strip here. And the flats that we sent through, they're gonna have hook-and-loop. I myself, like to start with the center one. You're just gonna pull it, stretch it up like this, and pull this down tight. And then I can just repeat that for this. You can always come back, make any adjustments once you have them hooked up. You have two rubber bands here and a bag of little clips. These rubber bands are what hold this tight underneath the seat. So it pulls them back down, your flaps that went through the seat or what pulls the front down. I'm gonna take the clip and all you need to do is slide it on to the band. Now we need to go underneath and try to find somewhere to hook it. I don't like to hook it to any factory wiring or anything like that, that may be for heated seats or electric seats. A lot of times, there's a little plastic fasteners down there that your wiring maybe hooked into with a little fastener that have holes in them. Sometimes you can take these clips and you can hook that into one of those holes and that will hold that in there. There's not really a specific place that you have to hook these. These are just to make sure that that back rest stays secure. I actually found here on the passenger side, there's a metal piece of trim here. It's got two holes in it. Perfect place to hook those. Now, you'll notice this right here. Looks like it's kind of a crease. With these being in a box packed together, you may have that once these heat up enough, that will eventually go away. So once you get your covers in place, you find any spots, as I mentioned earlier, along the seems, stuff like that, that maybe you curled over or something like that, just kind of work them out, you know. Kind of push them until you get it to where you like it. So the headrest, in my opinion, is probably the hardest part about putting these on. Because you got to get this little cover over top of this, and these are usually pretty stiff. So sometimes what you do is you're gonna get one corner kind of started and you can see there's not a whole lot of give there 'cause we want them tight. You kind of hold it like this and have to kind of squeeze the padding together. Kinda like that. And then just kind of work it from there. Once you get it all the way down, you're gonna have a little plastic trim piece here, kinda U-shaped. You're gonna take this end, we're folded like this, and we're gonna slide this edge right inside of there. You can kinda get one in sort of in there, or at least started and kind of work down to the other end. Something like that. Once you get it like that, you'll take this and just kinda work those where that flap is down underneath. Once you get your headrest cover in place, go ahead and reinstall your headrest and you have to see it's pretty much done. You're just gonna repeat the process on the other side of the vehicle. Now we're gonna move to the backseat. This is a 60-40 split bench. They're gonna install exactly the same. The bench side is actually, it's just gonna be longer. So, we're gonna do is we're gonna do the seat first, just like we did on the front. We have the zipper and the hook-and-loop. We're gonna raise up the back just a little. This hook-and-loop here, when you're putting this on, can be kind of a pain. So I like to fold it, kind of fold it up like that. Start on the inside and then pull over the zipper side, go ahead and work everything towards the bottom or towards the back like that. Now you'll notice this hole right here, there's Ford seats with a handle on the bottom. This is a 2021, so it actually doesn't have the release handle there to raise the seat. It's actually a strap over here on the side. So now we're gonna stretch it around, try and get the zipper done. One thing I do wanna point out is this strap to raise the seat up is actually gonna be covered where it zips. However, you reach down right here, the little release lever. It's right there, you pull it forward and that will allow you to raise your seat. Gonna take this flap, again, we're gonna feed this between the two seats. Your child safety seat hooks through the proper holes there. Take your flap, just like we did on the front. We're gonna pull it tight up and we're gonna have the two pieces together. Take your zipper, suck it right up underneath here like this. Check your hooks again, so you don't take a chance of tearing the leather cover. Once you have that on, we're gonna move to your back rest. To release our back rest and pull it forward, on our passenger side, there's a strap that hangs out here on the side. If it is not hanging out there, which it was not here a second ago, you're gonna have to fold up the seat part up and this will separate kind of from the window. Over here on this side, you take a flathead screwdriver, a long one, kinda pull this back. That strap is connected to this lever and that's what releases it. On your driver's side backseat it unhooks a little bit different. Once you raise this up and it pulls that seat forward, there's a bracket back there. You're gonna reach back and you'll see a little pin hanging out here and you're just gonna slide that pin up and it will release the back seat on the 60 side of the bench. Okay. So now that we've got it forward, gonna take our back part, take the hook-and-loop, kinda hold this side up all around then we're gonna slide it right over the top. As you're pulling this down, watch out for this, so you don't accidentally tear the cover. All you're doing is you're just working it down, so you get it tight at the top I'll be honest with you, this single seat on this side is a little bit more difficult than the double side over there to put on. We're gonna do the same thing here. This flap, we're gonna feed it in between. And we're gonna do it just like we did the front seat. Pull it up. Then we could just keep working our way over until we get it fastened all the way across. Then we'll come up here at the top, and we're gonna do this the same way we did the front seats. And you can do them as soon as you put the cover on, if you want, it's really up to you. And of course the strap for your release. There's a little slot over here in the cover. Don't forget to pull that through. Once you have that done, we can move to the headrest. Again, just match up the one that goes with that headrest. It's gonna install the same way as it does the front one. So as I mentioned, putting them on is gonna be the same. The only difference between the back headrest and the front one is these are gonna have hook-and-loop fasteners rather than having that plastic piece where you have to feed the two pieces together. Other than that, just squeeze in the padding to get the head rest on there and making sure that it's straight. Get it on. Go ahead and install your headrest. We'll move on to the next seat. Now we're gonna do our center seat and arm rest on the front. Zipper, there's gonna be a hole in it for this latch right here. You're gonna make sure that it's facing down. Zipper is gonna go towards the passenger side. Either gonna install this like your seats, we're just gonna slide it over the top, get everything lined up. Make sure you can move your latch, get the zipper down. Take the flap, we're gonna feed it through and get it right out here. And then, fasten the two together. Next we'll move to the back rest. We're gonna have a small zipper here, that's for your seat belt side. Undo all the hook-and-loop strips there. Basically, you want it to start over the top like this. Now, in some cases, your center console, you all have a storage compartment here and this will be a lid. The bottom part is gonna install exactly the same way. The top, you're gonna have an extra piece that if you had a lid, this would slide over top of the lid and these straps will be underneath. Now we're gonna have hook-and-loop fastener in both sides. Do you remember when we unstrapped it This back flap, there's a fastener right here. We're gonna take this, try to get it back in that plastic trim. I'm gonna feed those two together like that. We're gonna do same thing on this side, we're gonna raise our lid and you're gonna have another bead here, kinda like your seats. Have another bead here. We're just gonna tuck it up inside of here. Sometimes they'll go in between these two pieces. In our case here, they're not actually gonna, it's not actually gonna come through here. 'Cause it's a full plastic piece. So just get it under the best you can. And we'll come up here to our hook-and-loop fasteners straps here. Take those and put it together like that. And we need to come back, put our cover on our armrest. Again, holes for all the components here on the bottom. You need to make sure that's facing down. This flap right here, gonna take your little plastic way that comes with you or comes with your kit. And you're gonna tuck it, start working it in, run underneath the plastic right here. Once you get one little section put in the rest of it should be all just work your way from one side to the other, just kind of getting it all put in there. Once you get the back rest and the arm rest done. Repeat the same process for putting on your headrest cover as you did the rest of them. Once you get everything installed, you're ready to go. That's gonna do it for look at and installation on the Clazzio Leather Seat Covers on a 2021 Ford F-250 Super Duty..
Average Customer Rating: 4.5 out of 5 stars (2 Customer Reviews)
Give your vehicle's cloth seats an upgrade with these seat covers that look and feel like factory leather. The perforated leather covers with memory foam centers keep you cool and comfortable as you drive. Simple, slip-on installation.I am pleased with the product overall. The seat covers really do look very close to factory leather seats. They took me about 4.5 hours to install all the covers on my f250 supercab. It’s an xlt with cloth seats and these leather covers look great. The instructions that come with the seat covers are not very good. I would recommend an installation video. Also the two back seat bottom covers must have shrunk a bit because I could not get the Velcro to meet. I bought some 2” wide Velcro and connected the ends. I am waiting for a response from etrailer. The only piece that doesn’t really look that good is the cover that goes around the front center console section. The cover that fits the lid looks great but the cover that fits the front part does not fit very well. With the center console in the up position, that part can not be seen. They are comfortable and look great overall.

Now a year since install..all fitting(s) pieces remain snug and secure. Very comfortable, and easy to clean. As of this review, NO suggestion of wear, tear, or loose corners. All in all, VERY pleased.
Info for this part was:
At etrailer.com we provide the best information available about the products we sell. We take the quality of our information seriously so that you can get the right part the first time. Let us know if anything is missing or if you have any questions.


Thank you! Your comment has been submitted successfully. You should be able to view your question/comment here within a few days.
Error submitting comment. Please try again momentarily.