
Summer Starts Here - Save up to 70%
To see if this custom-fit item will work for you please tell us what vehicle you'll use it with.


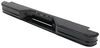
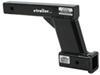
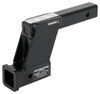
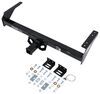
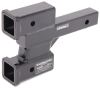
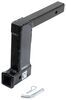
Designed for use with motor-home-mounted tow bars, the direct-connect brackets are virtually invisible, easy to mount and remove, and they eliminate the need for a quick-disconnect crossbar on your tow bar. Installs on your vehicle's frame.
Features:
Note: Roadmaster direct-connect base plates will only work with Roadmaster tow bars that slide into a trailer hitch, such as the Nighthawk, Sterling, Blackhawk, Blackhawk 2, Falcon, or Falcon 2. These base plates will not work with tow bars that require a hitch ball.
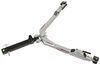
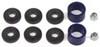
The drawbars, or front arms, on this base plate kit are supremely easy to mount and remove. Just insert them into the brackets and twist to lock them in place. To remove each arm, simply tug the built-in pull pin to disengage the lock, twist the arm back and pull it out of the bracket. Once the drawbars have been removed, the remaining brackets are virtually invisible. On most automobiles, the brackets are mounted within the grille, where they remain not only unseen, but protected from scrapes and scuffs as well.

Videos are provided as a guide only. Refer to manufacturer installation instructions and specs for complete information.
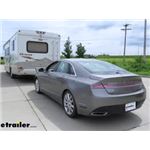
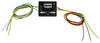
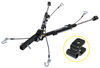
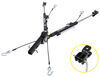
Hi there, Lincoln owners. Today on your 2016 Lincoln MKZ, we're going to be installing Roadmaster's Direct-Connect Base Plate Kit.This is one of the major components needed to flat tow your MKZ behind your motorhome. In addition to your baseplate, you're also going to need your diode wiring, your supplemental braking system, your safety cables, and your tow bar to connect them together.This is what our base plate is going to look like when it's installed. The majority of the base plate is going to be completely hidden behind your front fascia, and it's going to be a Direct-Connect face plate, so your tow bars are going to connect directly to the arms here. What's nice about this compared to your crossbar connection, the crossbar connection is going to require a little bit more assembly with the crossbar attaching to the base plate after it's installed, and then if you want to remove it, there's a little bit more involved removing the crossbar.With the Direct-Connect style, if you want to get rid of these two to give you a little bit more stock appearance, you simply pull the pin, give it a twist, and they pop right out. To put them back in, you just push them in, twist them until they lock in place.
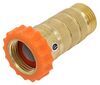
It's custom fit for your Lincoln MKZ, and it features a 6,000 pound towing capacity, which is well over the weight of your MKZ, so you don't have any worries that your base plate is going to be an issue. Next to each arm where your base plate will connect, you'll find your tow hook here, so you can connect your safety cables to it. And just to the right of that on your passenger side, you have your wiring connection mount right there, so you can mount your six-pole connector braking system and diode wiring.What I really like about this base plate is how hidden it is, being able to remove the Direct-Connect arms gives it a very stock clean look. It's hidden behind your bumper right here on the front, so none of your friends are even going to know that this has been modified to flat tow. You can take it on vacation with you.
You can take it to work, and it's going to look professional all the time.With your MKZ now able to flat tow behind your motorhome, you no longer need to bring a tow dolly along and have the extra large components hanging out at your campsite, everybody else seeing that you've got all that stuff laying around. Your campsite is going to be nice and clean looking with this. And if you need to run out and grab some more supplies, you can quickly hop into your MKZ and do it and not have to tote your motorhome along, which is much more of a hassle to find a parking spot and just to drive around in general.We'll begin our installation by removing the cover above our radiator. There's going to be eight plastic pushpins we're going to want to remove. We'll use a flat-bladed screwdriver or a trim panel tool to pop out the center, and then the entire thing will pop up after that.
We'll do that for all the remaining fasteners. We can then pull our panel off and set it aside. We'll now remove all the Torx bolts across the front of your fascia. You're going to have a total of five on each side. We're going to use a T25 Torx socket to remove them.We're now on our driver side wheel well.
We're going to remove the bolts that you see with a small hex head on them. We're going to use a 7mm socket. To get easier access to them, I recommend that you turn your steering wheel in, so that way you can get your tools in there. When you do the other side, you'll want to turn your wheel the other direction. There'll be a total of four on each side.Now, underneath the vehicle we're going to be removing all of the bolts that hold on our front splash shield and the undershield for our engine. Across the front, you're going to have several bolts we're going to remove with a 7mm socket. You'll have four on each side you're going to be removing, and then at the back of our shield, you're going to have three more bolts you're going to need to remove on each side.Across the middle of our shield, we're going to have four bolts we're going to remove with a 10mm socket. Now we can take our undershield down and set it aside. Then we'll remove our undershield. There's seven bolts on each side we're going to need to remove with a 10mm socket. Once you've removed all the bolts, you can set your shield aside. On each side, after removing your covers, if you look up the fender well, you'll two bolts that we're going to need to remove using an 8mm socket. These bolts are attaching your fascia, and we'll need to take them out so we can remove it.Now, on your passenger side, you're not going to be able to go up from the bottom due to the washer bottle that's there. So you're going to have to peel the fender liner back. You're going to feel up and your bolts are going to be located here. So you just got to feel them because you're not going to be able to see them, and you're going to use your 8mm socket to get in there and get them out. A smaller ratchet with an extension is typically your best option here.We're back at our headlights. We're going to need to remove two bolts that hold our headlight assemblies in as they're going to come out with our fascia when we take it off. We're going to remove the Torx bolt located here and the one located here. We'll use a T25 for the smaller one towards the center and a T30 for the one towards the rear of the vehicle. We're going to do that on each side.We're now ready to remove our fascia starting on one side. You'll want to pull it down. As you can see, there's some alignment pins there. You want to pull it down to get those free and then we can pull out away from the vehicle. Once you've got one side loose, you want to check for any electrical connectors and unplug those. So we're going to unplug our headlight assembly there. We're just going to see if there's anything else here. There's another one over here, and while it's still attached, you just kind of want to let this side hang out here and then go release the other side, unplugging electrical connectors on that side, and then we'll take the whole thing off.We've got both sides released and electrical connectors disconnected on both sides. We're now going to slowly pull away and we want to check towards the center as there may be more electrical connectors, depending on the options that you have on your MKZ. After we double check for all of our electrical connectors, we'll grab an extra set of hands that's going to help us set our fascia aside where it won't get damaged.With our bumper set aside, we can now access our lower radiator support. We're going to be removing this. When you do this, you want to be careful to lower it down slowly and gently as our radiator is just going to be hanging at that point. We're going to use a 13mm socket to remove the bolts. There are going to be two on each side.Next, we'll drill out holes in our bumper beam here. You want to go 2" back. Refer to your instructions. It'll give you a nice template there and the picture, show you where to drill it. So we've gone back and we're in the center of the beam. We've made our mark, and we're now going to drill it out. I'm going to start by making a pilot hole with a 1/4" drill bit, and then we're going to step it up to a 1/2". We're going to repeat that same process on the other side.You can kind of see here on the inside of our bumper beam there's a hole, and this is going to be directly across from the hole that we just drilled. So we're going to take our 1/2" drill bit, we're going to go through the hole we just drilled, and we're going to enlarge this hole on the inside of the frame as well. We'll do that on the other side as well. Below our bumper beam you'll find your frame sticking out here. There's a hole in the top and bottom of the frame. We're going to use the same 1/2" drill bit to enlarge those holes as well. For our all of your hardware, we're going to be using Red Loctite on the threads of all the bolts. If you need some Red Loctite, you can pick some up here at etrailer.com.We'll now take our brackets. You want to make sure you get the correct side. We've got our passenger side here. We're going to place it on our passenger side, lining up the holes in the bracket with the holes that we had drilled in our bumper beam and frame. We'll then take the longest bolt that comes in the kit, place a large plate washer on it. We're going to go through the hole in our bumper beam, come out the other side and go through the hole in our bracket.On the other side, we'll be placing a lock washer, followed by a nut. We'll take the medium-size bolts that come in the kit, place a flat washer on it. We're going to slide it up through the bottom of our bracket and then through the hole in the frame that we had enlarged. On top, we're going to follow that up with a flat washer, lock washer, and nut. We'll then repeat this on the other side.Now that each bracket is holding itself in place, we can get our rear hardware installed. If you look straight down the bracket, you'll see a hole in the back. That's going to line up with the hole in the frame that's preexisting. We're going to slide a medium-size bolt through there until it comes through the other side. On the other side, we're going to place a flat washer, followed by a lock washer, and then a nut. We'll do this to the other side too.Now, on each side we want to trim the louvers off here. We're just going to trim the sides off. So we're just going to cut straight down. We're using some tin snips to do this, and then we simply just want to cut it up, trim all that off. We're going to do the same thing on the other side. You may have a module here that you will need to cut around. You don't want to cut into that or cause any damage to it.We'll now take our cross brace. We want to position it between our two brackets that we just installed, lining up the holes on the side of our cross brace with the holes in our bracket. We'll then take our shortest bolts that come in the kit. We want to go through the outside towards the inside through our bracket and then our cross brace, and on the inside we're going to place a lock washer followed by a lock nut. We'll repeat the same process for the three remaining holes. We can now go back and tighten up all of our hardware using a 3/4" socket and wrench. An extension may be required to tighten down your back bolts. Then you can go back and torque all of your hardware to the specifications found in your instructions.We'll now need to trim our fascia in order for it to reinstall and fit around our bracket. Gone ahead and marked out here where we'll be cutting for the openings that we'll need for our bracket to poke through to be able to connect to our tow bar. We'll also need to trim these off along our absorption pad here. You can find a template for these in your instructions. We're going to be using a cutoff wheel to cut these out. We'll repeat the same thing on the other side. You can see a small portion here that I wasn't able to get with the cutoff wheel. It's okay to use a pair of snips or a razor knife to clean up the small bits that you may not be able to get.We'll now also cut off the strips here that we won't be needing. Now that we've got everything trimmed out, we need to relocate the wiring that runs along the bottom here. We want it to be above our base plate, so we're going to use our trim panel tool to pop out all the connectors where it's holding it on. You'll have four bolts that hold this piece on here. We're going to remove those using a 5.5 mm socket. I'm going to start by just removing the bottom ones nearest our wiring as you probably don't have to take the top ones out. That pops out enough to give us the opportunity to poke our wiring up behind it. That's all we're trying to do is get our wiring up out of the way. Once you've relocated your wiring, you can reinstall the bolts that you removed.Now that our fascia is all trimmed out, you can set it up, make sure that everything pokes through the way it's supposed to. If you need to, you can trim it out just a little bit more, and then to reinstall it, follow in the reverse in how we removed it. Now, if you're doing an entire flat-tow setup like we are, I recommend that you hold off on reinstalling your fascia until you've installed the rest of your components. It'll make it much easier to install your wiring and braking system if you leave your fascia off. That completes our installation of Roadmaster's Direct-Connect Base Plate Kit on your 2016 Lincoln MKZ.
Average Customer Rating: 4.8 out of 5 stars (2051 Customer Reviews)
Designed for use with motor-home-mounted tow bars, the direct-connect brackets are virtually invisible, easy to mount and remove, and they eliminate the need for a quick-disconnect crossbar on your tow bar. Installs on your vehicle's frame.
Etrailer did a beautiful job installation job on my car.
I bought and self installed this on my 2021 GMC Sierra Duramax 1 year ago. Install took about 5 hours and wasn't difficult...I could problty install it in 2-3 hours after leaening the tricks. Weve towed the truck all over the USA since then (over 10,0000 miles) and it works great! I've used other brands and highly recommend Roadmaster tow systems over the competition.
I reported that one of the removable tow arms was missing to etrailer within hours of receiving the baseplate. This was due to the shipping box being damaged during transit and likely just fell out. After four business days with no communication from etrailer I contacted Roadmaster. A couple of emails and they shipped the part. Very disappointed having to do etrailer's legwork. For this I will give etrailer one star.
The baseplate RM 524473-5 for a 2023 Ford Escape fit as expected sorta. Had to apply a 3 pound hammer as the mounting brackets were tweaked a little likely from welding and pulling a little out of square. I felt the instructions had a lot of reading between the lines, a couple of times I just about picked up the phone and called them to see if my interpretation was correct. But I just consulted with my analytical 15 year old grandson and we figured it out. (His 18 year old brother served to knock me to the floor and pull me back up again, faster than calling a crane service.)
My big complaint was that they could have provided actual measurements where to drill the Tupperware where the arms go through, there is a couple of reverence points that could be used. There was a few minor things that didn't/did need to be done but likely could easily be because of running production changes. (And better packing of 45 pounds of steel by RM)
The tow bars hook up easily to my dinghy car, a 2020 Ford Escape Hybrid. I like that the arms dis-attach easily and can be stored elsewhere. The tow arms attach quickly and easily to the baseplate arms. I do like this system. The installers put it in, so I cannot comment on how easy that was. I know the installers contacted etrailer for their questions, so I was glad to hear that.
The Roadmaster direct connect base was a perfect fit for my 2013 focus S to flat tow. We had it installed in about 3 hrs following the complete direction and pictures. I highly recommend using etrailer.
Good product. If you are reasonably handy and have some tools, you can install this yourself in a few hours. I'm a mechanic, it took me a little over 2 hours to install on my own toad. The fit is good, there are 4 holes you have to drill, otherwise it is plug and play. When you insert and twist lock the tow bar mounts into their sockets they feel a little sloppy but they are secure, and i never noticed any rattle when towing. Overall i give it a 4 out of 5 for easy install and clean look after install. Pic included of installed base plate.
Installed on my 2020 Jeep Cherokee for flat towing behind our motorhome . I wanted a tow bar connection that integrated with the front end of the Jeep and the removable arms did the trick . I had one issue with the driver side receiver bracket not lining up with the upper mount bolt hole on the Jeep, image 0547. Had to make a slight adjustment to the receiver bracket so the holes would line up, image 0551 and image 0559. The rest of the install went smoothly
I also installed the Demco braking Stay n Play Duo system , image 0565 which went in without any issues, image 6028. 7 thousand miles of towing later, couldn't be happier with the products
This is a rock solid baseplate. Installed on a 2023 Equinox LT (AWD). I followed etrailer's videos for installation and they are spot on. We connect with a Roadmaster Nighthawk tow bar, charge line kit, smart diode lighting kit, and a Demco Stay-in-Play supplimental braking system. It is fairly well hidden when not in-use. This setup is great!
I installed them on my new RAM 1500. Works great, very heavy duty. I also modified and attached a push bumper and used the Roadmaster base plates.
Exactly what I needed. Written jbstructuons were spot on and video was very helpful.
Installed on my 2020 jeep jl sport s with factory plastic bumper and plastic rock guard. Shane’s video was very helpful but I did not like how the metal plate behind the rock guard was cut away and how the rock guard had two big cut outs so I did some modifications. I cut two slots in the metal bracket and added angle brackets for extra support. As a result i did not use the supplied brackets for the rock guard. I created a template for the rock guard which resulted in two small cut outs. A lot of extra time but i am retired so time is relative. I think it looks great.
Installing on 2020 Jeep Trailhawk :
Pic #0557 : Roadmaster Base Plate Kit , Demco Supplemental Braking System , Diode Wiring Kit , Demco Battery Charge Wire Kit
Pic # 0548 ,0551 , 0559 Had to adjust the bracket plate to line up with the upper bolt holes
Pic #6028 finished install , mounted the operating unit to the top fuse box cover using automotive Velcro . Air cylinder , controller and LED light installed . Aside from the base plate bracket not lining up with the upper bolt holes I would give it 4 stars . My son in law is a master at solving mechanical issues .
I was very pleased with the way you handled my order. I called and was greeted pleasantly and knowledgeable about what I needed and in just a few minutes my order was placed. It arrived just as they said it would in a timely matter.
I would recommend e-trailer to anyone!
Easy install. Looks great. Apparently they have made some changes so that the video is not accurate. Install instructions though were spot on. A template for cutting the grill would be an added plus.
I bought this base plate kit for my 2022 Jeep Rubicon Gladiator so I could flat tow behind my class a motor home with a Roadmaster Falcon all terrain non binding tow bar. The instructions were easy to follow and went smoothly except drilling the holes. That was my fault because I was using a dull drill bit. See attached photo
The base plate arrived on time, with excellent instructions. I went slowly because my truck is only days old and still had it done in an evening.
This kit worked out great for my 2022 Chevy Equinox. I like how it has separate side plates, which make it easier to attach the main bar. The points where it attaches to the frame seem plenty secure. It is important to watch the videos provided by etrailer as Ryan is very thorough and has good tips for installing. I would also recommend installing additional wiring while having the front end off. Overall, I was able to complete in my driveway. The hardest part was sorting out the wiring for whatever braking and tail lights you decide on. William S helped me pick all the necessary components needed for flat towing behind my Jayco RV. I am looking forward to a summer of camping and having more freedom to explore the area, now having a car.
The bracket kit fit my 2023 Subaru Crosstrek perfectly. The instructions are excellent and the video is really useful too. I’m really pleased with this RoadMaster bracket kit and the support from eTrailer.
Item works good. We pulled our ‘21 Canyon behind our RV on several trips and had no issues other than you need to put in a diode to the rear lights to keep them from back feeding.
Easiest I drive done. Works perfectly. I had some concerns if it would work on my Shelby F-150. etrailer put me in touch with Roadmaster directly who had never done one either. Said if it didn’t work I could return it. It fit with minor adjustments. Have towed a few thousand miles already. Couldn’t be happier
Great Company Product arrived on time and the tracking information was above and beyond what I expected Product is exactly as described and of excellent quality
Would highly recommend etrailer and Roadmaster
Everything went pretty good except for the reinstall of the PAD. Had to mount it on an angle because wire to short. Love it versus the crossbar I had on Santa Fe 5 speed. Also had to wire 12v outlet and emergency brake switch wiring into drivers side which was fairly easy. And 12v charging circuit for battery. My grandson Seth made it look easy.
Well made, easy to install (provided you use one of etrailer's videos to install it!), non obtrusive. Fits well on my Jeep Wrangler. Just an overall great product!
Just took the maiden voyage with the new Motorhome and the new Tow Car or ( Toad ). After getting everything set up and installed on the coach and the dingy towing was a breeze. Hardly even noticed that i was towing a car behind me. Bought all RoadMaster equipment and purchased everything from etrailer, baseplate and towbar with the invisibrake system and all the necessary cables. Etrailer was Awesome they made sure that I had everything needed and that everything fit my vehicle.
Have enjoyed the Roadmaster base plate on my Mercedes Benz Sprinter Van. The only complaint I had was what was required to install it. I have installed several in different vehicles and this one was the most difficult. Some are easier than others, but once installed, it performs as expected.
Info for this part was:
At etrailer.com we provide the best information available about the products we sell. We take the quality of our information seriously so that you can get the right part the first time. Let us know if anything is missing or if you have any questions.


Thank you! Your comment has been submitted successfully. You should be able to view your question/comment here within a few days.
Error submitting comment. Please try again momentarily.