
Summer Starts Here - Save up to 70%
To see if this custom-fit item will work for you please tell us what vehicle you'll use it with.
Thank you! Your comment has been submitted successfully. You should be able to view your question/comment here within a few days.
Error submitting comment. Please try again momentarily.
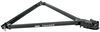
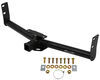
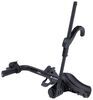
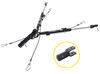
Custom designed to fit your vehicle so it can be safely towed behind your RV, this base plate has easily removable arms that offer a seamless look when you're not flat towing. Base plate bolts directly to your chassis, so no welding is required.
Features:
Specs:
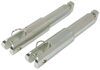
This base plate's hidden design creates a clean and seamless look. The bracket arms are easily removable, creating a slick appearance when you're not flat towing. Because the arms can be removed, you also won't have to worry about banging your leg into any protruding arms when you walk by.
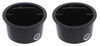
Attaching and removing the bracket arms is a breeze. To attach the arms to the base plate, simply insert them into the receivers and rotate them until they lock into place. Once you're finished towing and want to remove the arms, pull the pin to disengage the lock, rotate the arms, and remove them from the receivers. Finally, plug up the now empty receivers with the included receiver covers to help keep dirt and debris out of the base plate and provide a finished look.
Flat towing your vehicle is much more convenient than using a trailer or a tow dolly. These other options take up much more storage space, leaving you less room both at home and at the campsite. In addition, securing your vehicle to a trailer or tow dolly can be a hassle and more time consuming than hooking up with a tow bar.
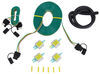
There are 5 basic components needed when flat towing a vehicle: a tow bar, a base plate kit, a safety cable set, tow bar wiring, and a supplemental braking system.
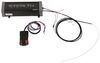
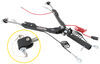
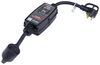
The tow bar links your towed car to your motorhome. It attaches to the custom-fit base plates that install on the frame of your towed car. Safety cables ensure that your towed car does not separate from your motorhome in the event that your tow bar becomes detached. Tow bar wiring allows your towed vehicle's signal lights to sync up with your motorhome's tail lights, which is required by law in most states. Finally, the supplemental braking system - also required in most states - brakes your towed car when the brakes in your motorhome are activated, preventing wear on the motorhome and decreasing braking distance for your entire setup.

Videos are provided as a guide only. Refer to manufacturer installation instructions and specs for complete information.
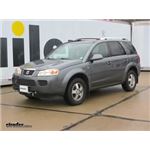
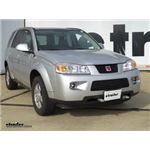
Today on our 2007 Saturn Vue, we're going to take a look at and show you how to install the Blue Ox Base Plate with Removable Arms. Part number is BX3335. Our connection points that this provides are going to give us the perfect solution for being able to haul our car behind our coach and get to our campsite or our destination safely. With a quick pull of the pin and turn, we're going to be able to get those removed. It's going to be pretty inconspicuous at that point. Those we'll be able to place in, that's going to keep out any of that dirt or debris and prevent it from getting inside.
When we're ready to tow, just place that in, rotate it, it's back locked into position. The base plate offers sturdy steel construction and a black powder coat finish. It's custom fit so once you have the fascia off, it's going to go into position, have to drill a few holes and get it installed but it's going to be a fairly straight forward process. You'll see the safety chain connection points or sockets are located right in the cut out that already exists in the bumper, so there's not going to be any modification of the front of that to worry about. Also the wiring prongs that stick out are in a great location to allow us to get our wiring mounted someplace nice and securely here. Now in each wheel well, this is the passenger side, in the front wheel well, we've got one, two, three, four, and five push pin fasteners here. We want to get those removed and then we can set those aside as well.
Pull out the center portion of it. I'm just using a screwdriver here. Once you've got that center section out a little bit, the rest of it will come with it. With those removed, we'll be able to pull our fender liner back and right at this seam, right here is going to be the head of a bolt. You'll need a 10 mm socket and we want to get that removed on both sides. The easiest way to get to this bolt is going to be to turn your tire out of the way.
That way we'll have a little bit of room to get in here and get our wrench in place. On the underside of our car we've got three more push pin fasteners to remove. You'll come down from the license plate, kind of see this panel that runs across, right behind there you'll see these brackets. One, two, and three of them. The push pin fastener right in the end is what we're going to remove.
If they separate it's not a big deal. These will just push back down inside there, just like that. Now with the help of an extra set of hands we'll start to pull the fascia off the vehicle. Right on this outside edge where the fender meets, there are going to be three little clips there. We need to get those separated and you don't want to break them so we'll just kind of pull out slightly on the bottom part of the fascia and we'll push in on those with our screwdriver to try to get them to separate. Now check on the backside for any electrical connectors like your fog lights or anything else that might be up here. As long as you don't have any, let's get this set aside somewhere safe. Now we need to remove this styrofoam bumper core here. Again these are just push pin fasteners. They're quite a bit larger than the ones we've had, but same principle. Pull the middle out then the outside. Pull that off and set it aside. It's time for us to make a cut down here. This is going to allow room for the bracket to come over. We want to cut right underneath our bumper there and then on the backside we want to come right down the edge of the frame down here. There's a little bump there, we're going to stay just to the right side of that bump as we come down through. We're going to be eliminating this area. We're going to do the same thing on the passenger's side, of course it's going to be reversed. All right, now we're going to get that cut out. You can use a reciprocating saw, kind of like a Sawzall, use a cut off wheel, whatever you've got handy. It's a good idea once you have these cut out, just to touch them up with a little bit of, either black spray paint, or some undercoating. You might even use pink spray paint I guess. It's just something to keep the rust from building up or that bare metal from getting exposed to the elements. With the help of an extra set of hands, we're going to lift this up into position. The brackets that go upward here, it's going to be a little bit thicker closer to the front of the vehicle. We want that to slide in this slot that's right here between this hump and the back of the bumper. That's going to slide right up in that area. We want to get that lifted up as high as we can. To do that we're going to use a couple of jack stands here to apply some pressure. If you're on the ground, this would be maybe where like a floor jack or something would come in handy. Once we have our base plate as high up as what it's going to go and as far forward, we're ready to drill out our holes. We're going to hold it in position with a few clamps, however, you're probably going to have to knock on the bottom of it with a dead blow hammer because it kind of spreads around that frame rail just a little bit. Then we're going to take our 13/32 drill bit and I'm going to clear out the hole first. It's going to have some powder coating in it. Then I'm going to mark the frame. That's going to give me a little mark there, so I know where the center of that hole is. Once we have that in each spot, we'll drill it out with a smaller bit as a pilot hole and then work our way up. Once our pilot holes are drilled we're just going to follow those up with that 13/32 again and get all six holes drilled out appropriately. Now we've got our nut plates. These are going to be placed behind each of the holes that we've drilled. We're going to use our provided hardware with a lock washer there. Those are going to go through the holes and they get threaded into our nut plates. We have red Loctite on them to keep them from backing out in the future. There's a square hole right on the bottom of the frame, plates going to fit up and in, kind of see it right here. You just want to use that wire to get it lined up behind your hole. Once that's lined up, we'll just place our bolt in and get it threaded into the plate. Now just loosely until you see, you move that wire it will move your nut, you'll know it's attached. We just need to do that for the two remaining on this side, and the three on that side. Now that we've got them started, it's time to snug them down. Then we'll torque them to the specifications, which are listed in the instructions. Now it's time for us to get these removed or out of the way. You'll have options. You can cut them off if you want, just kind of poke them in there, or if you'll take a . If you have a pair of pliers you should be able to flex them back and forth and then they kind of just pop off. You may find it more beneficial to get them removed rather than just cut them. That will prevent them rattling around in the future and maybe aggravating you. We're ready to connect our permanent safety cables. Basically these are going to go up and around the frame. That's what we attached the side plates to and they'll be connecting to this hole that we've got here. The passenger side's definitely the one to spend the most attention to, you've got your belt right here and also a couple of lines that run up here. We don't want to bother those. We don't want any to go around those. The driver side it's a little bit more open, so it'll be a little easier to route these over there. There we go just straight up and around. They've provided us with a quick link, we'll just drop through. We just want to close that up. You don't really need to tighten it down too much. You could just use a 15 mm and put a little torque on it. You'll notice there's still kind of some slack in our cable here. I like to bring it down and around and then use a few zip ties here. That's going to take all that out. We want have to worry about this moving around too much. While the fascia's still off the vehicle, this is going to be the ideal time to install things like your breakaway switch or wiring. That way you can get it zip tied up nice and neatly. You're not going to have to worry about it contacting anything it shouldn't. Now that we've got anything ran wiring wise that we needed to, we're going to come up with our foam pad here and we need to mark the area, kind of on each side there, that's going to allow us to cut this out a little bit, so it will fit down over those brackets. Now we've kind of squared our marks up here. We're going to start by going up about 1/4" up into the backside of it. Once we have both of them cut, we'll test fit it, and if we need to we can always take out a little bit more. Looks like our holes have lined up there so we'll just replace the push pin fasteners we removed earlier and that will have it secured. We're ready to start sliding our fascia back on. Just want to kind of gently get our clips to all line back up. Of course, you want to look down here and kind of guide it around the base plate. Now we'll align those three clips we had earlier in the right spot. Push that to get it clicked in. Just work our way around, getting all of our holes to line up. Once these on the top line up, just put one of our screws in there on each side. It's going to help hold that position. That will give us time to go around and get all of our other fasteners in place. Once we've got those in place we'll take care of the 10 mm bolts that are in the fender area. Now's the time when we'll go through and replace all of our push pin fasteners. Remember we've had five in each wheel well and then we'll have three underneath right there in the middle. That's going to complete our installation of the Blue Ox Base Plate with Removable Arms. Part number is BX3335 on our 2007 Saturn Vue.
Average Customer Rating: 4.8 out of 5 stars (3019 Customer Reviews)
Custom designed to fit your vehicle so it can be safely towed behind your RV, this base plate has easily removable arms that offer a seamless look when you're not flat towing. Base plate bolts directly to your chassis, so no welding is required.
Easy to install and use.
I just followed the instructions through your video as my first time got it done in 5 hours...
Really helpful and knowledgeable, thanks
Very good product
The size of the box terrified me but I had to do this one myself.
This project is not for the faint of heart. When you think about what could go wrong you could wet yourself. I went with my gut and just opened the box. Hmmm, packaged very well with everything you need for the install. No going to the hardware store for this or that. Sat there with a cold sarsaparilla and read the very detailed instructions, went back to the etrailer web site and checked out some vids and pics. Hmm, it didn’t seem that daunting of a job. On my 04 Lexus GX470 most of the holes were drilled. Before I knew it 5 hours had past and I owned a toad! I took it to my local Rv service center for an inspection and it was deemed safe to use.
This thing is awesome, tracs straight as an arrow.
Now, I have to figure out this diode lighting kit. Camping is fun! Yah!!! :) Noah and etrailer made this a tolerable project. I urge everyone to take advantage of the resources that are on this sight. I always learn something when I’m there. See y’all on the trail….Rod
Well, I'm glad I'm good with tools, grinders, drills, and such. It was not just bolt-on dal. The car grill was able to be used any longer as it was too tight of a fit. Some of the lower fascia had to be trimmed and also removed OEM nuts from the front, the angle wouldn't allow the stock nuts to work. But in the end, I got to work out. So prepare to spend around 4-6 hours playing with it to get it to work. I am positive it's going to work as intended.
everything bolted up easy, i simply drilled hole’s into were needed and supplied my own bolts straight through for easy installation.
I am really happy, not only with the product but the customer care I received. Very quick and helpful!!
I would make one suggestion. Take the headlights out when doing this on a Chevy Cobalt. It will make it much easier to get to the 3 bolt holding the fender to the fascia.
This kit fit well, had decent instructions, and performed perfectly every time once installed. If doing the install yourself, you'll need some metal fabrication tools to notch the D-ring plates behind the bumper but it's not complicated, just a little time consuming depending on the tools you're using. The look is also a little weird on the front of a new Bronco since you're losing the burly bumper D-rings, but it's a well engineered setup overall. I only used the tow bar setup a couple times before the vehicle was lost in a wildfire so I can't comment on the longevity, but I have no doubt it would still be working fine today.
I will start with the people that work here at etrailer are great to deal with and very helpful! These baseplates for my 2023 bronco have been great. i bought and installed myself. install pretty straight forward. and these work great for flat towing my bronco behind my motorhome.
eTrailer was very helpful in choosing the correct hitch for our rv and car. They also provided a special brake application in the car that makes it super easy for toad braking.
I am 72, and I hook up this toad and pull it with confidence. The instructions to hook up the toad was presented with ease. They knew exactly what they were doing, and we didn't rush through the demonstration. I would recommend eTrailer to anyone.
Installed successfully on my 2024 Trax LT. However, with respect to the following installation steps, I made some changes:
All - Don't use a reciprocating saw! An oscillating tool and saw attachment works best, allowing more precise cuts.
Step #8 - After consultation with BlueOx Tech Support, I elected to re-install the plastic shroud. Wasn't difficult and I felt better about maintaining the integrity of the original equipment.
Step #28 - I moved the temperature sensor to a forward facing position in the grill section directly above the baseplate.
Baseplate installation went pretty smooth with no surprises. I chose to separate the lower grill piece while I had the bumper cover off. This allowed me to install the bumper cover over the baseplate and then accurately determine where to make my cuts in the grill for the baseplate protrusions. The Blue Ox base plate is well made and fit perfectly.
Etrailer offered competitive pricing for the base plate and the package was shipped promptly and arrived very quickly...much faster than I had anticipated.
The packaging was excellent and included all documentation. Installation was very straightforward and the unit was a perfect fit with minimal modifications to the car itself. Only a few small pieces of plastic had to be trimmed for a perfect fit.
We did have some trouble with 2 of the nuts-with-wires attached in that the bolts did NOT want to thread in to them. For some reason, they just did not want to 'start' easily and this made the blind installation of the nuts on the bolts extremely time-consuming. The nuts/bolts did not cross-thread and there were no other issues once we were able to use a tool to jam the blind nut and stop it from moving so that the bolt could be tightened and torqued. 4 of the 6 went in smoothly and with zero issues, so do I not believe that it was 'installer error' (!).
In the end, a perfect installation and the base plate is nearly invisible. I would definitely purchase from eTrailer again and can easily recommend their products based on this experience.
Pretty easy to do my self but the instructions could have been a bit larger with more pictures. I think the hardest part was drilling the holes to attach the two brackets as there was only one hole on each frame. Getting the square nuts with wire attached were difficult to get both aligned because the wire on the first one got in the way each time
My only negative comment is that this base plate sets the tow bar connections 23" above the ground making it somewhat of a pain to fine towbar and hitch connections. It mounts relatively easy.
Everything as advertised. Followed the videos and instructions for installing the base plates and tow bar and all were good. Did a test pull today and it towed great, straight as a dye. I only have 2 suggestions. There was no mention in the video of the space plate, which was included. Figured it out. Second suggestion, Install a 2" ball on your work bench and adjust the receiver to it. The instructions tell you what socket to adjust it with but that could have been done on the bench before shipping. Great product, so excited. We are off on a few hundred mile trip with the Fit behind the motorhome Wednesday. So excited. No more tow dolly.
It turned out fine but my opinion is that you should have some average or above mechanical skills to install this yourself. As you can see, the base plate protrusions are hardly noticeable at a distance with the tow pins removed. One thing worth mentioning is I had to mount it more rearward on the frame because the front valance would not mount back on correctly. Overall, good base plate.
Bought it at etrailer as I have with other trailer hitch related parts. Installed it myself, and it was a real job. I figure about 10 hours to get it right so I didn't have to worry if my 'toad' would pass my motorhome as I tooled down the road. Fit was perfect for my 2008 Honda CRV, but make sure you keep that oil cooler line up as high as possible or you will be redoing the fit to get the front cowling back on the car. Bought an angle grinder with cutoff wheels and that made the frame notching a lot easier. Note that if the removeable attachment pins are a tight fit into the base plate, they will loosen up with a good silicone lubricant and the wear of towing. I have towed with confidence for a year without a hitch (pun intended).
The Bx2692 is the better tow bar solution because it is higher up to hopefully keep your tow bar flat. I modified a Base bumper to install this because it is only available for the "Modular" and "Capable" bumpers. The base bumper option from bluox is for lower tow hook delete option. Took about 3hrs with the help of a grinder jigsaw and multi tool.
The item I received must have been a returned item. The box label was proof it was shipped to someone else before. Reason I'm not happy is because the bag of screws was open and most of it slipped out of the holes of the damaged box that was opened before and re-taped. The end of the crossbar was bent and not much packing inside. I needed this for our trip, so I didn't return it and had to fix and find screws to make it all work.
This baseplate fit perfectly and was a pretty easy instal after removing the bumper wrap on my wrx. Car pulls steady and straight!!
etrailers customer service is excellent. The item was back ordered, the customer service folks kept me informed on the projected delivery the entire time. And the Blue Ox part are really high quality. Only one minor issue, the bolts, nuts and washers bag was opened and the box had a large crack. Lost a few small pieces, not a big deal I have plenty of spares in the shop. Thanks etrailer
We had this base plate kit professionally installed on my wife's 2017 GMC Acadia and we've used it as our tow vehicle with no problems. It's easy to connect to the Blue Ox system we bought from etrailer and it's worked out great!
This Base plate was fairly simple to install in about 1/2 a day. I also installed brake kit and wiring so actually spent most of the day. This baseplate combined with the etrailer tow bar have been great. already pulled over 5000 miles with no issues at all. I love this setup and will never go back to tow dolly
Do you have a question about this Base Plate?
Info for this part was:
At etrailer.com we provide the best information available about the products we sell. We take the quality of our information seriously so that you can get the right part the first time. Let us know if anything is missing or if you have any questions.


Carleton
6/18/2023
Perfect. Was easily installed