
Hellwig Rear Anti-Sway Bar - 1-3/4" Diameter
Item # HE93RR
Retail:$1,721.76
Our Price: $1,205.29
You Save: $516.47
Confirmed to Fit
2019 Ford F-53
Ford - 20,500 GVWR
Ford - 22,000 GVWR
Will this fit?
To see if this custom-fit item will work for you please tell us what vehicle you'll use it with.


- All Info
- Reviews (36)
- Q & A (0)
- Videos (4)
- Photos
2019 Ford F-53 - Hellwig Rear Anti-Sway Bar - 1-3/4" Diameter
- Anti-Sway Bar
- Rear
- Hellwig
- Steel w Polyurethane Bushing
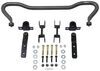
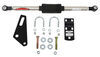
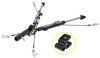
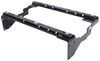
Minimize sway and driver fatigue by improving the stability and driveability of your motorhome. Solid, 1-3/4" chromoly bar mounts to the rear axle and to the frame to balance weight transfer and reduce body roll. Includes mounting hardware.
Features:
- Minimizes side-to-side movement to improve overall stability of your vehicle
- Lets you execute turns and quick maneuvers with confidence
- Allows for a level ride, even on irregular surfaces
- Reduces driver fatigue - minimizes effort required to keep your vehicle in line
- Diminishes effects of crosswinds, passing motorists, and shifting cargo
- Designed to fit your vehicle and work in conjunction with its suspension system
- Attaches to rear axle and to chassis - uses weight of axle to brace frame as it shifts in turns
- Avoids interference with most popular aftermarket add-ons and accessories
- Made with polyurethane bushings instead of the standard rubber variety for a longer-lasting system
- Durable and resistant to damage caused by oil, gasoline, and ozone
- Less wear means less give in the system and better support
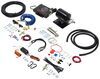
- Includes zinc-plated mounting hardware, easy-to-follow instructions, and bushing lubricant
- Constructed of thick 4140 chromoly steel for superior strength
- Sway bar finished in corrosion-resistant, silver vein hammer tone powder coat
- Mounting brackets finished in corrosion-resistant, black powder coat
- Made in the USA
Specs:
- Bar diameter: 1-3/4"
- Limited lifetime warranty
7216 Hellwig Rear Anti-Sway Bar - 1-3/4" Diameter
Installation Details
California residents: click here


Video of Hellwig Rear Anti-Sway Bar - 1-3/4" Diameter


Videos are provided as a guide only. Refer to manufacturer installation instructions and specs for complete information.


Video Transcript for Hellwig Rear Anti-Sway Bar Installation - 2018 Ford F-53
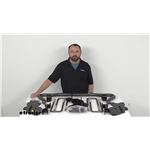
Hello neighbors, it's Brad here at etrailer, and today we're taking a look and installing the Hellwig Rear Sway Bar on a 2018 Ford F-53 Motorhome Chassis. This is what your sway bar is gonna look like when it's installed, and what's really nice is it uses a lot of the factory mounting points that are already there, and that does include changing out the U-bolts for new ones, and this plate will just slide over where those existing ones were, you get new hardware to bolt this up, we also, off of that new bracket, have our brackets with our polyurethane bushings, and that's something throughout this whole sway bar, you have polyurethane in all of the bushings, which make it a much smoother operation, they don't break down long-term, and they hold up really, really well to weather or any chemicals that you might see out on the road. Going along with that factory mounting, we do have a bracket up here that's gonna go to a cross member that's on your frame already, and it's gonna utilize three of those bolts, or at least those bolt holes to get this attached. So it's solidly mounted to your frame as well as your U-bolts, and just kind of follows along with your rear axle, so that way, when one side has a little bit of weight onto it, it's gonna fight against it. Now something you may notice is, this is on the rear of the axle from the factory, these actually have one in the front, so this is just gonna help out that front one do a little bit more of that sway control. And this being an inch and 3/4 inch thick, means that it has quite a bit of tension to be able to really fight against the sway, even with a vehicle this heavy.
Now something to keep in mind too, is there are a few different Hellwig's rear sway bar kits available for the F-53 chassis that we have it on today, and it comes down to your gross vehicle weight rating, so you're gonna want to check your RV, specifically, to make sure that you're getting the proper one. The one that we have here is for 20,500 up to 22,000. All of the hardware included in the kit, which is really everything, you're gonna be not using any of the factory hardware, which is nice, because it's all zinc-coated, it's all designed for being underneath your vehicle, and being able to hold up long-term to any of those, you know, road grime or just breaking down normally that you would see. And going along with that, Hellwig does have a special hammertone finish on the sway bar, which, not only does it hold up to scratches long-term, a little bit better than just a solid surface, but also it creates little pockets, so when you put grease for your urethane bushings, it's gonna kind of keep that trapped in there, where some of the other ones out there are just flat surface, and when that's crimped around and moved out, it actually pushes that grease, whereas this is nice and trapped in there, and once that grease is in, creates a nice smooth surface, but it's gonna hold that there as a reservoir. So as I mentioned, this is a pretty fixed sway bar, especially compared to the factory one that we have.
It's made out of 4140 chromoly steel, so it's heavy, but you really do need that to fight against the sway that you see in an RV like this. So if you're getting gusts as you have a semi pass you, or just winds, or just making a turn and feeling like it's really top-heavy, a rear sway bar is a great way to really mitigate some of that, and cut down on it. Sometimes you can look at other suspension enhancements that also work with that rear sway bar and like a SumoSpring, or a Timbren, something along those lines. Those will also help with sway, but this one really fights against that side-to-side movement, you're really not gonna notice a big difference on up-and-down bumps, but when you make that turn, it's just gonna have a little bit more of a sporty feel to it in a good way. It's gonna feel planted, you're gonna feel more confident when you make any turn, and it's definitely a component that you're gonna be happy once you have it installed.
The good thing with this one too, is it plays ball with all aftermarket components, it doesn't get in the way, having it kind of set in the back here, it's really not gonna interfere with anything that you may already have. If you are doing SumoSprings in conjunction with this, I'd highly recommend doing the sway bar first, the things that I've learned from doing previous ones, but other than that, this is definitely an upgrade. It is kind of tricky to do yourself if you don't have the right tools, or the place to do it, you can always use the etrailer dealer network to find someone close to you to get this installed if this isn't something that you really want to tackle because there's gonna be some high torque settings, some large bolts, and doing this underneath the RV can get a little bit tricky, but it is totally worth it, because once you take this out and drive, you're gonna be really happy with results. Now with that being said, overall, if you look at it step-by-step, the installation's not that bad to do. It really does come down to, you know, making sure that you have the tools necessary to knock those nuts loose on your U-bolts, but I'm gonna walk you through all the steps, in that way, you can determine whether or not this is something that you're gonna want to tackle, or maybe have someone else do.
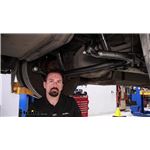
So let's take a look at that. Now to begin our installation, this is gonna be an additional sway bar, we're not replacing the old one, and our new one is gonna be bolting up to where our factory U-bolts are, and we're gonna be replacing those, so we need to make sure that we have the suspension compressed, so basically, it sitting on the ground is gonna be key, we have ours up on a lift, which obviously makes it a little bit easier, but the wheels are still compressed. So if you're doing this on flat ground, you may struggle a little bit with getting tools inside of here as we're gonna be using a large impact to get these bolts off. Also, just make sure, as you're underneath the vehicle, you're taking all the proper safety precautions. We have an inch and 1/8 socket, we're gonna take off these nuts, we're only gonna do one side at at a time. You wanna make sure you don't take them all off, and a lot of times, these can get build up with corrosion, so I suggest maybe ahead of doing your installation, hitting that with some penetrating oil, hopefully that'll kind of help loosen 'em up, these can get a little bit tricky over time. So we'll go ahead, we'll get ours taken off, (power tool buzzing) Now when removing the last one, you do wanna be careful because this plate is gonna want to drop out, it's fairly heavy, so just kind of be aware of that. You might want to back this off, till you have a few threads left, and then just hand-take that off. (power tool buzzing) We will drop this out, and we'll keep this handy, 'cause we're gonna be putting it right back up. And then we can take our factory U-bolts out, and these are pretty tall here, your best bet is to kind of lift them up over the leaf spring, and then once you kind of get them off to the side, you can take these out. Now on the front side, you do wanna be careful, there are some brake lines there, so just be gentle when taking your old ones out and also putting your new ones in. Now your top plate is gonna be resting on the leaf springs, and this just sits in the dowel that's up there. Make sure that your U-bolts are gonna be resting in those same grooves where your old ones were, that's very crucial. So we'll get these in place. (U-bolts clattering) And as I mentioned before, here's those brake lines, and they are gonna sit in between the lines and our axles, so just make sure you have those properly in place, that way, it's not gonna damage these lines. Now this portion is gonna get a little heavy for a little bit. We're gonna have our bottom plate go around, obviously, our axle and our U-bolts, and make sure you have that in the proper orientation, it kind of ramps up towards the front, so that'll go in place, and then we're getting our lower bracket mounted up as well, that's also gonna slide, make sure you have it in this proper orientation. You can see the gusset, that should be facing towards the ground, and these tabs should face towards the inside, so they are side-specific, and you're gonna want your hardware ready to go, that way, you can kind of at least get one started, it'll hold it up there, and we'll be using the new hardware included in the kit. So that's gonna be a flat washer, and then our large U-bolt nuts here. So I'll get everything raised up and get one started. (metal plates clattering) And then as I mentioned, it's pretty heavy here to hold up, so I think if we just get one threaded on here by hand, that'll at least hold it up. We'll just go ahead and get the other one started. And once you have all your hardware in place, I recommend just kinda lifting up on the assembly here, just to find the loose spots, and then hand-tighten these down. That's gonna make sure that it's a little bit even here, and that's what we're gonna do with our torque wrench. There's a specific pattern, and we're gonna work our way up from each torque setting, making sure that they're all properly, you know, and evenly tightened down. So go ahead, grab your torque wrench, and this is slightly smaller than the factory bolts that came off the U-bolts. So I'll grab that socket, and show you exactly what you need. Now when torquing this down, we're not gonna get full torque on one of them, we're gonna just kind of evenly go in a pattern, and I'm gonna be using a 1 1/16 socket to accomplish that, we have the 3/4 inch U-bolts, so that's gonna be a torque setting that's gonna be capable with a 1/2 inch torque wrench, if you have the larger ones, you will need a larger torque wrench to accomplish that. But I'm gonna go in a cross pattern, so we'll start in here, we'll go across, then to the side, and then we'll cross back, and we're gonna be using that same pattern each time we torque it down, and what we're looking for, is making sure that that U-bolt sits nice and properly. 'cause if we start tightening it too much on one, it's gonna want to lift the other side of it up, and if that's the case, you're gonna want to even that back out. So I'll go ahead, I'm gonna start getting these snug down, with our first torque setting. (torque wrench clicking) (torque wrench beeping) Now we'll just ramp up our torque wrench in those incremental steps in the instruction manual, until we get them all fully torqued down properly. (torque wrench beeping) Okay, now that we have these all properly torqued down, we can go ahead and start on the other side by doing the exact same process. And with both of our lower brackets in place, we're gonna be putting our side brackets in, and you can see that these are gonna be side-specific, so this is going to go towards the front, so make sure that this taller part is towards the rear, and we're gonna be using, where we have our cross members that mount up to our shocks, we're gonna be using the factory bolts here. So since we're in that triangle shape, we're gonna leave the up, forwardmost bolts on both sides in place, and we're gonna be removing these. Now they have handle nuts in 'em, so really, you just need to get those bolts loosened up. And these are gonna be on the backside. They may spin a little bit, but you're gonna want to retain these. The tricky part is, is once you get them loosened up, you're really not gonna be able to pull them out on the bottom here because your leaf spring's in the way, and that means you can't get your new ones or your brackets bolted up. So what I recommend doing is we're gonna take these, get them all loose with the handle nuts taken off, leave them in place, so it kind of holds that cross member. And then we're gonna unspring the suspension, that's gonna allow that leaf spring to drop a little bit, and then we can get our bracket all bolted back up. But to remove our bolts, those three, we're gonna use a 13/16, so I'm gonna use a ratcheting wrench here. It may be pretty tight to get these to kind of budge, so there's a few different methods you can use. One of the ones that I've seem to have luck with, is holding your ratchet in place and you can take a hammer, and just kind of knock that to impact it to get it to be loose, you can also use another wrench if you have the leverage here, if you're doing this on the ground, maybe not, but taking this wrench, and just kind of doubling it up for leverage. So we'll go ahead, we're gonna get these all taken off. (wrench clicking) Now you may be in luck if you're able to get this out, and get your bolt out, then you're looking pretty good. But if it's tight, again, you may have to either use your jacks or raise up on the rear to get this suspension unsprung, that way, you can get these out of the way. I'm gonna get my top one out, and then we can get our bracket put up. I was able to get our bracket just kind of loosely in place, and feed two of those bolts in. I can't get the other one, but we are gonna be raising and unspringing our suspension here. So what I'm gonna do, is we are not gonna be using those handle nuts, we're gonna be using the new nuts that are included. So I'm gonna at least get these started here. And these are slightly larger diameter on the head of the bolts, as well as the nuts as from the factory ones. These are gonna be a 15/16, so you're gonna want to grab a ratcheting wrench or a box-end wrench to be able to hold that as we torque these down. Now I've used the rear hydraulic jacks to raise it up to be unsprung, and you can see, this makes it a nice straight shot to these bolts. So if you're struggling to get them out, or put the new ones in, this is the workaround for that. So I'll get my last one here, I'm gonna hand-thread this in, and we're gonna tighten and torque these down, but I'm gonna go ahead while we have the suspension unsprung and get that other side bracket put in place. And when tightening these down, there's a little bit of play here, so I try to press this up against the frame as I was tightening them. And as far as using the torque wrench to get them torque down properly, I always try to use the socket on the nut side, that's kind of the best way to do it with the torque wrench, so having the 15/16 wrench on the outside, you're gonna probably want some extensions here to get that all snug down. And I just use an impact while holding this up just to kind of get this in place. (power tool buzzing) And if you get those bottom ones kind of holding that up, (power tool buzzing) it's gonna make it a lot easier to hold it up, as you get these tightened down before torquing them. Now we're gonna get our end link attached to our frame bracket, we're gonna be using this bolt, this flat washer, and then a nylon lock nut. Also included in the kit is gonna be a little packet of grease. This is urethane around this bushing here, so I went ahead and just kind of coated those outside edges, it's just gonna cut down on noise long-term. We'll then take our bolt, pass it through our frame mount, and then on the backside, we're gonna just put our flat washer and our nylon lock nut, and we're just gonna hand-tighten this in place, we don't need to tighten this down quite yet. You can go ahead and do the same exact thing on the other side. Now we're gonna grab our sway bar, and we're gonna use the same hardware that we attach our end links to. We also have our bushings here, so again, I'm just gonna put some of that grease around the edge. To get your sway bar in place, you're gonna have the same hardware that we put our end links in place with, and it's gonna be the same orientation, so you might want an extra set of hands, the sway bar is rather heavy. So to get this in place, once you get one, it's not bad. And what you're gonna be looking for, I'll get these started here, is the orientation of the sway bar. As you kind of pull this up to those brackets that we mounted on our U-bolts, you should see a slight curve down in this center section, so just make sure that's in the proper orientation. Now we're gonna grab our urethane bushings, and this strap that's gonna go over it. And this is gonna bolt up right in this portion here, but we wanna make sure that this is pretty well-aligned with the sway bar. We can always move it, it's not a big deal, but we're gonna be greasing it up, and so our sway bar is still gonna, it has the potential to move a little bit side-to-side until everything's bolted down. So just kind of eyeballing it here, we know it's gonna go kind of in this spot. I'll go ahead, I'll take off our shackle there, we're gonna grease this up pretty heavy, the hammertone finish on this is actually kind of a cool design because you see these little pockets, that's actually gonna trap some of the grease where some of your other sway bars out there are just flat, and it pushes that grease out once this is kind of compressed, so this is nice, it's gonna keep it lubricated a lot longer than some of the other urethane bushings out there. And this is mostly just to kind of cut down on noise, and you're gonna have smooth action, and just overall, make it a much nicer operation of your sway bar. So we'll grease that up. I'm also gonna put some in the bushing, and I might recommend some nitrile gloves here. I'm just kind of using my hand, but this is pretty nasty stuff here. I'll get that on here, just kind of move that around so it's nice and evenly coated. We'll grab these bolts with a flat washer, we're gonna drop these down, and once we get our shackle here in place, we're gonna be using another flat washer, and then the smaller lock nuts that we have. So we'll just kind of raise this up, and if you need to, you can just kind of hand-tighten a nut on there for now, just to make it a little bit easier, if you can get your flat washer on, by all means, but this is kind of a tricky job for one person. So I'm just gonna put this on just to kind of hold that up, and then I can get my flat washer and nut in on the other side. Now if you're following along in the instructions, they're not very clear on hardware, and the pictures really don't do a whole lot of help, and there's no exploded view. So kind of going about this just with what I've done from other sway bars, and the issue I'm having, is this flat washer kind of will line up here on the back, I'm not gonna have any luck there, but this shackle here has a little bit of a gap between that and the top edge of the urethane. So what I'm gonna do, just to kind of close that gap up, is put the flat washer in between, and then draw this up, and I think that's gonna be the best method. We're gonna leave this just hand-tightened on for now, we'll go ahead and get the other side put up. Now once we have this all loosely attached with all the proper hardware, we're just gonna go back and make sure that we torque down all of our end link bracket as well as our brackets on the sway bar. The torque settings are gonna be found in the instruction manual, so we'll make sure we get them all torqued down properly. Other than that, all that's left to do is go take it out, enjoy the new handling on your RV. And that was a look and installation of the Hellwig Rear Sway Bar on a 2018 Ford F-53 Motorhome Chassis.
Customer Reviews
Hellwig Rear Anti-Sway Bar - 1-3/4" Diameter - HE93RR
Average Customer Rating: 4.8 out of 5 stars (36 Customer Reviews)
Minimize sway and driver fatigue by improving the stability and driveability of your motorhome. Solid, 1-3/4" chromoly bar mounts to the rear axle and to the frame to balance weight transfer and reduce body roll. Includes mounting hardware.by: Jeff05/10/2024
Rear Sway bar by Helwig: Great, HOWEVER the flange is too rounded on the brackets provided and you cannot get a washer to fit when tightening-also cannot get a socket on to tighten, thus you cannot get a torque wrench on. Front Sway bar by Roadmaster: Great. BUT the provided new bushing that fits in the factory bracket is too thick and needs to be trimmed to fit right. BOTH of these issues SHOULD NOT have to be tolerated by a buyer of what is supposed to be an expensive quality product!!! The staff is superb but they asked me for a PRODUCT review and both brands are not impressive on the hardware.
by: Fred 04/30/2024
Really takes that rock-n-roll motion to a minimum, especially when driving out a driveway. Much beefier than the stock E450 sway bar - very pleased with this product.
by: Fred 04/30/2024
Really takes that rock-n-roll motion to a minimum, especially when driving out a driveway. Much beefier than the stock E450 sway bar - very pleased with this product.
by: Brad 03/19/2024
Sway bars are considerably larger than factory. They were easy to install and helped to control side to side sway. These bars were installed along with a rear sway bar. I would recommend these sway bars
by: Ronald 06/23/2024
Almost twice the size of my original. It was an easy perfect fit. Used the stock mounting locations as original.
by: Travis 06/13/2024
Fast shipper, quality products and installation videos too
by: Phillip 04/25/2024
Great experience. The orginal sway bar was disconntinued however Tiffani stayed on top of my order at all times with a direct replacement for my truck.
Thank you,
by: Brad 03/19/2024
Installed this sway bar along with a front sway bar. This bar is quite larger than the factory one and helped control side to side sway. I would recommend this sway bar cause it make driving our RV so much more enjoyable.
by: Luke04/17/2024
Easy installation and noticably better handling. Hope it will help when I have the drop in camper in the bed. (Already had rear Hellwig bar)
by: Scott 04/23/2024
Thank You etrailer for your prompt shipping and Expert advice and videos!!
by: Philip03/08/2024
Excellent website and easy ordering! The parts were delivered in just a couple of days; really fast process! Thanks for everything and if I need anything else, Etrailer will be the first place I look:)
by: Norman 05/04/2024
We’re in total awe that delivery occurred today. An installer has it and it will go on our truck tomorrow.
by: Michael03/31/2024
Good product no torque values on bolts in direction!

by: Tom 12/14/2023
Massive improvement over the stock sway bars!
by: Tom 12/14/2023
Massive improvement over the stock sway bars!
by: Teri 08/31/2023
As usual, etrailer was so helpful and knew exactly what part we needed for our rig. They were sent out the day they were ordered and we had them installed and are 100% pleased with the product. Our motorhome definitely feels more stable and tight with these stabilizers on them.
by: Teri08/31/2023
We ordered the hellwig front and rear stabilizers and had them installed and are 100% pleased with the stability of the rig. I did not even feel a semi passing me after we picked it up from the shop to take it back to the storage unit unlike before.
by: Lonny 03/01/2024
Great product that works to perfection on my 2020 Ford Expedition. I wanted less sway when on a less than great highway. And that’s what we have achieved.
by: Dominic 04/21/2024
Excellent , easy to install
by: William 12/16/2023
Perfect fit and felt a huge difference on the first drive. Install was straight forward with no issues. Highly recommend for all F150 owners!
by: Melton D R02/28/2024
Very good boxing
Very knowledgeable people
by: Kevin 11/14/2023
by: John 06/17/2024
by: Jeanne 03/30/2024
25
32
Show More Reviews
See what our Experts say about this Hellwig Anti-Sway Bars
Info for this part was:

Edited by:
Lindsey S

Video Edited:
Jonathan Y

Video Edited:
John S

Installed by:
Andy C

Test Fit:
Bradley B

Written by:
Sabrina W

Video by:
Ethan H
At etrailer.com we provide the best information available about the products we sell. We take the quality of our information seriously so that you can get the right part the first time. Let us know if anything is missing or if you have any questions.
Product Experts Available Now!
Call 1-800-940-8924
Thank you! Your comment has been submitted successfully. You should be able to view your question/comment here within a few days.
Error submitting comment. Please try again momentarily.