
To see if this custom-fit item will work for you please tell us what vehicle you'll use it with.
Thank you! Your comment has been submitted successfully. You should be able to view your question/comment here within a few days.
Error submitting comment. Please try again momentarily.


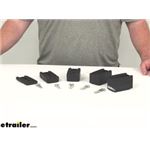
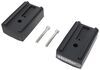
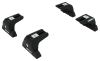
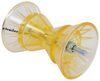
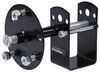
These 5-mm thick Quick Mount spacers bolt to the tops of 2 legs to level a crossbar on your vehicle's roof. Sold as a pair of 2.
Features:
To attach the Quick Mount spacer between your roof rack leg and crossbar, you will use the nut, flat washer, and spring washer originally included with the leg hardware. You will replace the leg's original socket head cap screw with the new screw included with the spacer kit.

Videos are provided as a guide only. Refer to manufacturer installation instructions and specs for complete information.
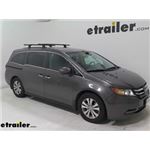
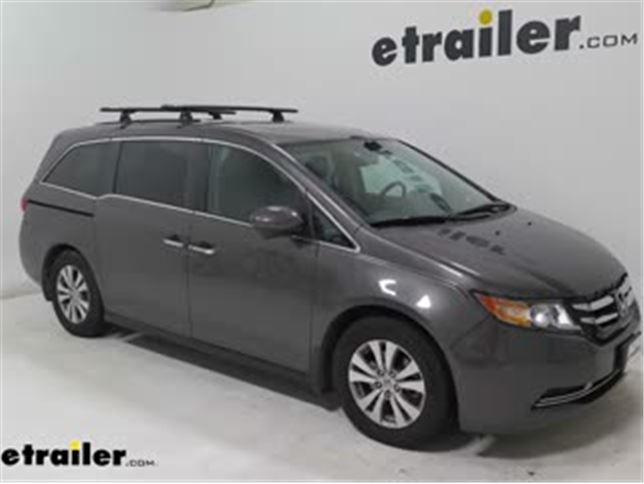
Today in our 2014 Honda Odyssey, we're going to be taking a look at and showing you how to install the Rhino-Rack Vortex Aero roof rack system for naked roofs. You can also purchase this kit with silver crossbars. This roof rack system allows you to carry, a wide variety of accessories or equipment on top of the roof of your vehicle to conserve space on the inside. The aerodynamic shape of the crossbar, along with the rubber strip that fills the T-track, help cut down on wind noise and drag. To access the T-track, just take your included key, and unlock your end cap, and then you can pull it off. And right here, you have access to this channel.
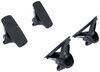
You would just take this trip out, cut it to length of the accessory you want to use and then you're good to go.We have this leg kit, which connects our crossbars, to the tracks right here. A great feature about this is that you can take the roof rack off while leaving this part of the leg on. So, it's very easy to put on and take off. These can also slide within the tracks to accommodate whatever accessory you might be using that day. While this track system is very convenient, keep in mind, you will have to drill into your roof to get this system in place.The locking mechanism is a great feature, so no one can remove your roof rack without this key.
You just insert it, and then unlock the end cap and pop it off. Now we have access to the locks to get this our crossbars off our roof. All you have to do is push in on these tabs and then push them back slightly. It pops right off. When we pull these tabs back out, you can see the locks come out and they insert in the side of that leg.So when we're push it back in, we'll set it in place, and we'll pull out on tabs.
They lock in a place and it's not going anywhere. The roof rack sits about four and three quarters off the top of your roof to the top of your crossbar. The weight capacity for this system is 165 pounds. But you want to make sure that you double check with your owner's manual, to make sure your roof can handle that weight.Now that we've gone over some of those features, let's show you guys how this installs. The first thing we got to do is install our Railtrack system.
Now we already have the driver's side installed. Let's show you how to install the passenger side.The first thing you want to do is cover your entire area of where you're going to work with tape, either masking tape or even painters tape will do the job. Now, we're going to set our bar in place and make our markings, for where we need to drill. We're going to start to make sure that our bars are square, by measuring from the edge, or the inside edge, of our other bar, the same distance on both sides. Once you have that distance, go ahead and grab your pencil. And I'm going to mark a little L-shape right here, to mark where the bar is supposed to be sitting.Now with an extra set of hands he's going to hold down our track, so we can measure on this side. Again you want to make sure you did the same measurement for both sides.Once you have it set, we'll go ahead and make our markings. It's always a good idea to double check your measurements. So we'll make sure, that we have measurement on the front and then we'll measure on the back to make sure it's the same. While still having our extra set of hands holding down the bar, we're going to Mark out holes for where we need to drill. You can take a pencil or pen, and just Mark a little circle on the inside. And then we'll do that on all of the holes in our track. Now we can begin to drill, the instructions said to use a five millimeter drill bit. However, since we don't have any metrics system drive bit, it's equivalent to a 1364 spit, now we're only going to go down about five to seven millimeters, which is equivalent to a quarter of an inch. So, we have our tape and we marked it. So we know to stop at that point. Now we'll line it up with our first hole, and then we'll begin to drill.Now, just move on to the next home and continue all the way down. It showed a vacuum of your mess when you're done.Now we can go ahead and remove all the tape. Now because we've drilled into the top of our vehicle. We have some exposed metal in those holes. So we're going to take some cold galvanized paint that you can pick up at your local hardware store. And we're going to fill the insides, to help prevent rust and corrosion. You can grab a small paint brush, or a cotton swab, really anything that can get on the inside of that hole. It doesn't take much, just kind of dab it in there, spinning a little bit. And that's good, then give it about 15 minutes to dry. Now that we've let the paint dry, we're going to take these double-sided adhesive tabs, that have a little hole in the middle, and place them over each drilled out hole.Let's just go ahead and try to line it up as best you can, and then stick it on. You want to leave this padding on the other side, to make sure that no dirt or debris gets on the adhesive until you're ready to place your rail. Now we're ready to put our rail in place. First, we need to remove this protective film. That's on the tracks, and you'll want to do that. Also, for the double sided adhesive tabs.Before we put our rail in place, we want to make sure, that we get our end caps, in the correct spot. Now we'll go ahead and line up the first couple of holes, and press down so that adhesive begins to work. And then we'll grab our rivets and begin riveting. We're getting a rivet in place. Now I have kind of put a little force to get it in there. And because we have this little space right here, there is a little spacer provided such a rivet, can get in there and do the job. Now the instruction is suggest using a Pneumatic Riveter. However, if you have a good hand Riveter, it'll get the job done so long as it gets the rivets in place. It's replaced of it on.It takes just a little bit of force, and you might have to pump it a couple of times, for that rivet to get put in place. Once you've got that, you can move on and continue for all of the holes. So, this pin right here should be completely broken off and it should be sitting flush inside our tracks. As you can see, our track is not completely flushed with our roof yet. However, as you move down, it's going to slowly be pushed down. You want to make sure that you push it down and take your spacer with you and use it for every rivet. Now we're going to set our feet in place.We already have three of them in place. I'll show you how to get this one. We have it partially set up right now, but that little plate on the end. So how are we going to do that, is going to take our little inmate screw. We're going to take a lock washer, place it on, and then a flat washer, next we'll come through the top and place it in. So, it posts down on the bottom.From there, we'll grab this little plate, and then, slightly threaded on. Once you have it partially threaded on, we're going to take the two plates and slide them, into our track. And then once you have it in the track, and you have all of your feet in the place they need to be, you can take your included tool and tighten down the bolts. When your rack's not in use, you have these covers to place on your feet, so that you don't have to remove them from the tracks. We've already installed the front bar. Let's go ahead and install the rear one. It Installs very similarly with one small difference. The only difference being for the rear bar, you're going to have to place this spacer right here, on top, of your leg. All you have to do is take this little piece out, and we'll go and show you how to do that. First, We'll go ahead and unlock our end cap. Pop that off. Now, if we flip this over, we see this little bolt on the inside. We'll take our included Allen key and go ahead and loosen that up.And when I flip it over, you see that, that piece is going to come loose. We want them to take it all the way out. Once we have it all the way out, we'll take our spacer and place it on. Now there is going to be a very small amount of space to get that piece back on, but it still will fit. So we're just going to place it on, and then on the other side, we're going to turn the key, to start threading it. Once we have it threaded on, we can place it on our crossbar. Now we'll take this little piece right here and insert it into that track. Like I said, it will be a little tight, so you just got to kind of wiggle it on there.Once you have both of them installed, you can place it on your roof. Now, before you put it on your roof, you're going to want to pull in on these red locking tabs. You can see those locks kind of slide in. That's going to allow you to put them inside the feet, and do this for both sides. We'll go ahead, and place it, into our feet. Where is going to be loosely installed for now. We need to measure our crossbar spread. So we're going to measure from the center of bar, to the center of the other bar. The manufacturer suggest anywhere between 25 and 30 inches. Once you have that measurement, go ahead and make sure the other side is the same. Once you have your spread figured out, just go ahead and lift up on your crossbar. We're going to come in and tighten down our legs.There's two bolts to tighten down. Once you have them both tightened, you can repeat this for the other side. Once you have your feet tightened down. Now we're going to determine our crossbar overhang. You just want to make sure it's even on both sides. Now we can tighten them down, using the included Allen key. Now as you can see, we have this gap right here, which airflow can get into and cause some wind noise, you do get these strips provided that you can cut to length to fill those spaces. We're going to leave these out so our customer can determine if they like the spread.Now we can put our crossbar back on top, except this time we're going to pull out on these tabs, so that they lock into place, that we can put our end caps in place, on our crossbar and lock it with the included key. And then, we'll go to our leg, and put this end cap on, and lock it up. Once you have everything tightened down and locked down, you ready to hit the road and there you have it for the Rhino-Rack Vortex Aero roof rack system for naked roofs on our 2014 Honda Odyssey.
Average Customer Rating: 4.8 out of 5 stars (9 Customer Reviews)
These 5-mm thick Quick Mount spacers bolt to the tops of 2 legs to level a crossbar on your vehicle's roof. Sold as a pair of 2.As far as the product goes I do not see the need for it unless you have clearance issues. These were automatically added to my order as I purchased the Rhino Rack quick mount legs and vortex crossbars. When I went to assemble the kit (on a 2004 Chevy Trailblazer) I found that these spacers were not required. After reading the instructions for the spacers, it looks as if these are designed to elevate the crossbars up off the legs to gain more clearance from the bars to the roof.
I honestly do not know why they were included with my order but I paid for them so I'll keep them in case I need them when I switch the system to a different vehicle.

Perfect fit, fast delivery
Backbone installed- waiting for feet to attach crossbars
Product is great but the strainer customer service I received from Melissa T was above and beyond fantastic
Exactly what I was looking for with a really fast turn around.
Do you have a question about this Accessories and Part?
Info for this part was:
At etrailer.com we provide the best information available about the products we sell. We take the quality of our information seriously so that you can get the right part the first time. Let us know if anything is missing or if you have any questions.


Jeff S.
8/3/2018
I like the products pretty much considering it was the only option available for my vehicle. The roof racks do cause a bit more wind noise than I had hoped but Im used to it now and just turn the radio up a bit more. I did go back and read my reviews again and they are still accurate a year later.