
Floë Integrated Drain Down System - 12V DC
(2 reviews)
Price: $278.60
In Stock
Floë Integrated Drain Down System - 12V DC
Item # LC88FR
Retail:$459.99
Our Price: $278.60
You Save: $181.39
In Stock
Thank you! Your comment has been submitted successfully. You should be able to view your question/comment here within a few days.
Error submitting comment. Please try again momentarily.


- All Info
- Reviews (2)
- Q & A (0)
- Videos (6)
- Photos
Lippert Accessories and Parts - LC88FR
- RV Fresh Water
- Drain System
- Lippert
Floë drain down system lets you quickly and effortlessly flush out your RV's water system. The compact unit is easy to install and operate. Compressed air pushes through freshwater lines as outlets are opened. Connects to 12V DC outlet.
Features:
- Water drain down system lets you quickly and effortlessly flush out your water system in your RV, boat, or any mobile vehicle
- Compressed air is used to push water through water lines
- Clears lines of stale, stagnant water - helps prevent frost damage in winter months
- Simple operation lets you drain your water system in minutes
- Disconnect city water, drain all freshwater outlets, and then close valves
- Turn on Floë and let unit pressurize to 15 psi
- Release one water outlet until line is drained
- Drain hot and cold lines separately
- Allow Floë to repressurize, and then repeat for each water outlet
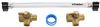
- Easy installation - hooks up to your RV's cold main water line using included T-connector
- Meets NSF International safe drinking water standards
- Electrical rating: 12V DC
- Maximum pressure: 15 psi
- 1-Year warranty
809127 Lippert Components (LCI) Flow Integrated Drain Down System 12 Volt DC
Installation Details


Video of Floë Integrated Drain Down System - 12V DC


Videos are provided as a guide only. Refer to manufacturer installation instructions and specs for complete information.


Video Transcript for Floë Integrated Drain Down System Installation - 2020 Highland Ridge Open Range Fifth Wheel
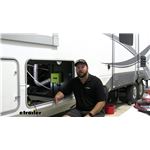
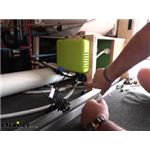
Hey, guys, it's Jake here with etrailer. Today we have a 2020 Highland Ridge Open Range fifth wheel trailer, and we're gonna be taking a look at and I'm gonna show you how to install the Floe integrated water drainage system. Adding a drainage system like this to your RV is kind of unique in the market as of right now. This is a system that is designed to be permanently mounted inside your RV. You tie it in with your water lines so that you can winterize your camper or just use it like the owner of this one's gonna use it for, it's just to clear out stagnant water from campground to campground. They use it quite a bit, but they wanna be able to blow out the lines before they have to run a bunch of water through so that they don't have the stagnant water sitting in the lines and then they can get that new water flowing through the system.
The other thing that this is designed for is for winterizing. So winterizing, you've probably seen a couple different methods. The main two methods are running antifreeze through your system, using the water pump on your RV. The other one is blowing the lines out with an air truck. And in order to do that, you have to have access to a compressor.
If you're on the road or you're full-time, chances are you don't wanna haul a compressor with you all the time. So you've gotta run by a gas station or a tire shop to borrow their compressor to be able to pump air through the lines on the city water inlet. That's fine and dandy. I've tried both of those methods. I really like or I prefer the antifreeze method, but the other one does require having a a compressor with you.
This system, this essentially is just a small air compressor that will blow out your lines just by you opening up the valves. Now, what you wanna do to operate it is you turn the Floe system on. You might hear it run for just a second, but your line should be full of water, so it shouldn't take long for it to pressurize the line at all. But what we'll do is we'll turn this on, and you'll see the water start to come out, and then you'll hear the compressor come on, which it just did. So you wanna run it until you have nothing but air coming out, which you can see there.
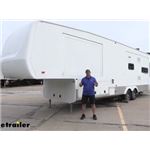
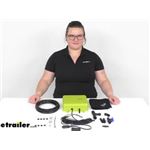
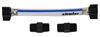
Shut it off, wait for it to pressurize the line again, which it just went off, and do both sides. (compressor whirring) You hear the compressor come back on. It's much faster than having somebody outside. The problem with these RVs is they're. It's a good thing to have. Their sidewalls are becoming too thick so it's hard to talk back and forth through the sidewalls. I know you can use your cell phones, but that process of blowing out your lines requires two people. I'm doing this whole thing by myself. The one thing I will add is you notice how noisy it is. We'll go out and do a quick sound clip out there to show you what it sounds like right next to it. But you definitely wouldn't wanna use this system if somebody's sleeping or at the campground 'cause it's pretty loud, but the convenience of it is gonna outweigh the noise by far. Now we're gonna give you a sound clip from outside. Again, we have our baggage door off for easy access here. But even with it closed, I can't imagine it's gonna hide much of the sound 'cause it's inside the camper. (compressor whirring) As you can hear, outside, it's pretty noisy. So that's something you definitely wanna consider when getting this system because it might wake some people up if you're doing it at home. If you're doing it at home, you can easily get everything winterized have no water in your lines. I think it's a great system. It's just the one downfall is it is a little noisy. Now, although this system does do wonders for getting all the water outta your lines, you will still have to go through the normal procedures of winterizing the three tanks. So you have to empty all three of them. You might want to throw a little bit of winterizer in the bottom of each of those tanks because you never get 'em completely cleaned out. That's why I always keep at least one gallon on hand just to put a little bit down the toilet and then down the sink to be able to get it into the gray tank. But you definitely wanna drain your fresh water tank. You wanna drain your water heater, and then you want to open up your low point drains with this system on, and it'll blow those out too. Now one last thing, When you're not using the system to winterize your camper and you're camping all year long, you want to turn this off and use the system as it is. You wanna make sure your switch is turned off. When you go to winterize, that's when you want to open it up. You shouldn't have any issues with it, but you don't want any water tracing back up this line if you've got a high pressure water line and getting into your compressor. So you shut it off when you're not using it, and then open it up in line when you are. Now, as far as the insulation goes, it's not a difficult installation at all. The one thing I will say is that you need to find a place that is as close to the water system as possible, but also still convenient for you to reach. It seems like the closer we got to our water system, the more inconvenient it was for us to install it. I was in this baggage door for about an hour and a half getting this system installed. I was okay with that because I know that, once I was done, this was the best place that I could find to put it so that they could still reach it from outside, but then have it close to the water system too. So you'll have to find a good place on your camper that it's not gonna get damaged and that you you can easily install it. With that being said, let's go ahead To start our installation, what I like to do is I like to really set everything out on the table so that you know you've got all the necessary parts that you need. And just to go over 'em real quick, we're gonna have the operating unit itself, which is your Floe. You'll have a new shutoff valve for the Floe system when you're not using it. The T fitting to tie the flow into your existing water line, the fittings to plug into the water lines, one Floe fitting, some decorative caps for your screws, rubber washers that are isolators so that your Floe system doesn't vibrate against the wood. A couple of hose clamps. Your wiring that you'll eventually have to wire into a 12-volt outlet. That's the one thing that doesn't come with this kit that you will have to pick up separately. And then we also have the rest of our hose that we need to be able to run through. But what we're gonna start with is mounting up our units so that we can run everything else 'cause we are gonna have to cut all this to length. So we wanna make sure we got this in the permanent spot, so that we know how long to cut all this stuff. And when you're putting your hardware in place, it's important to put these little plastic rings on it. They're essentially designed so that you can put the little decorative caps on top of these after you're done. I just wanted to say that before if you are following along with this and doing it at the same time I am. So we'll take our unit. This can get tricky, but we're gonna take our unit and I wanna mount it high enough to where the owner of this RV can easily get to it. And what we'll have to do is we'll take a little rubber ring, slide it behind here. Make sure you line it up. This wouldn't be a bad thing to have somebody else helping you with. Here we go. And you don't wanna run those screws down too far 'cause you can strip out this wood. So we'll go ahead and get the rest of our screws in place and start running our hoses, and we'll take our little decorative caps and pop those on. Now we need to get a couple of our fittings installed. This, you can kinda get creative with it. We could take this 90-degree and go straight inside our wall 'cause our water system's right behind it. But it does include this shutoff valve that we're gonna have to be able to get to pretty easily, 'cause when you're running your system, you don't want this open. So we're gonna put this directly onto the end here. And it's just like an airline. You wanna push it on till it pops like that, give it a little tug so you know those teeth are biting into it. And then we took a little small piece. It doesn't even have to be this long, but I'm leaving a little bit extra till it pops in like that. I'll leave a little extra so that he has some room to be able to cut it later on if you needs to. So we need to line up a spot here to be able to fit a small piece of airline through this wall. This is where we're gonna be putting our 90 on, and our 90 needs to go through the wall right about here. So we'll grab a drill, pop a little hole in the wall, and then we'll be able to connect some more airline here, run it through, and it'll be a nice clean install. (drill whirring) And we'll take our airline from behind our wall, run it out, And we can take our 90, put it on the pump first. And I forgot to mention earlier, when you're cutting these lines, you wanna use a razor or something really sharp, and make sure that you're airline is cut straight 'cause that's how these fittings work, is that they rest down in the basin of this and they need to be flat. So I'll take this and push this in. Here we go. Got the top end and that worked out perfect there. So now everything else we'll do. Other than running this electrical in here, we're gonna grab ourselves a grommet. We've got some lying around the shop here, but you wanna pick up a grommet, automotive grommets work great. We're gonna drill a hole through here, and then put our electrical through there also. We just want this to be as clean as possible because, when you're putting stuff in and outta this baggage bay, you don't wanna have to worry about hitting this. Now, the next connection we have to make is going to be to our water line itself. That is gonna be this connection. And again, you want the long side to go to your fresh water tank or in the direction of your fresh water tank, and then the shorter side is going to be back to your system or to your water pump is what it'll be. 'cause you're gonna wanna push the water through the system this way, and then it should clear the lines that way too, but that's the way the instructions say. That's how we're gonna do it. Everything is gonna be behind here, behind our wall. You can see here we've got a couple different hoses, many different hoses actually. Basically, what we need to do is we need to figure out which hose is coming from our fresh water tank. We identified that this blue hose is the one that's coming from our fresh water because it's gonna be the only only one that makes sense. You can see here I'm wiggling this hose that's coming from our water pump. And you'll notice, on the water pump, there's a filter. The filter will always be before the pump. And so this is telling us that this hose back here, I'm trying to show you guys clearly, this hose right here is what is going to feed our entire system. So if you have city water, our city water connection is actually right here behind this valve. You can see it on the other side. Basically, this right here is gonna be the start to our entire water system. So this is the hose that we're going to need to cut into to splice that T fitting in. So we'll take a set of airline tube cutters, and we'll get back in here, and we're gonna try to cut this as straight as possible. That's good. We saw a little water come out of there. It's no big deal. We've got a drip pan down here for a reason. We'll take that. Then we we'll have our two barbed fittings that we'll need to slide one in each end. This is gonna be tricky. I can tell you right off the bat because it's behind this wall. You can slide it in at an angle. Make sure our hose clamps still slide over it with ease. They do, so we don't have to worry about putting those on right now, but we'll slide this up. Try to push it up into place. We'll do that same thing for our other end. Now you might have enough room or enough enough flexibility in your hose in there. You might be able to pull it out. We ended up just unthreading this one from the full system. So we could make this connection, put our hose clamp on. And it does help if you've got. we just had some water in here, so it helps if you have some in there to be able to push this fitting into place. We just kinda wanna get it to where it's flush all the way around, and then slide on your hose clamp, and tighten it down with the screwdriver. And we can take our T fitting, we'll take the longer side and run it towards our tank, which is going to be this lower hose. We'll take that and. It's kinda hard to see with my hands in the way, but we'll clip that into place and it'll bite down onto the plastic. And when you're cutting this hose, you can actually cut a little bit out of it. You don't have to leave the full thing in like I did, but we'll take that hose from the top, and we'll make sure that clicks in all the way. Click that in all the way. Give it a couple tugs up and down. Make sure that it fits correctly. And then all we have to do is put our airline in there. So that's where the rest of this airline comes into play. I definitely recommend giving yourself a nice, gentle angle to be able to connect this. So we'll do an estimate here. Should be good enough there. And now we can take our airline cutters again, cut a nice straight line there. If you don't have some airline cutters, they're definitely something useful around the house or anything automotive. Or you can just take a razor blade and maybe like a block of wood and just use a knife and cut it straight down. We'll take this and plug it into the fitting. The next thing we need to do is get our wiring run. We're gonna start by running a hole through our wall here so we can get our wire on the other side. And then we will take a grommet, run the wire through the grommet, get it all nice and neat here on the front side. And then on the backside, we're not gonna use the extension. They do have an extension that comes with the kit. It basically will plug in and it'll give you a length of wire to be able to go reach a 12-volt outlet. Well, our RV does not have any 12 volt outlets, round outlets on it, so we're gonna have to install one. And what we're gonna do is we'll just install it back here, and then this length on the inside here will allow us to connect to that 12-volt outlet. Now what we're gonna do is I had the. I wired up the 12-volt plug, and the plug that comes with our operating unit, I'm just gonna plug it into it. We're gonna route this back behind the wall so they don't ever have to deal with it again. There's an on-off switch on top of the unit itself. So we're gonna plug this in and then just tape it all. And if they ever need to disconnect it, they can disconnect it with this plug from behind that wall, but they shouldn't have to worry about that because the unit itself has an on/off switch. So we plugged it in. This is just to keep it from coming unplugged because we all know RVs, they shake and there's all kinds of moving parts when you're headed down the highway that cause things to come unplugged. So we don't want that happening, and there's no reason why this shouldn't be able to stay plugged in. Now the way that we connected our wires, we went ahead and ran 'em. It's really tight back here as you saw earlier, but this is a wire coming from our operating unit, connected it to the extension, which is a big spool of wire you see spooled up up here. You will have to use that extension whether you need the length or not because it has an inline fuse in it. And then we ran it over here, connected it to our wire that has our 12-volt plug on it which we showed you earlier that we wrapped up. This connects everything together. Now, all we have to do is go outside by our battery, put our 15-amp fuse in our fuse holder that is holding back power from our 12-volt source. So we'll go ahead and do that and then we can test out the unit. Now, with our fuse in place, we'll go ahead and flip the on switch. Our line we tested out earlier, our lines are probably pressurized just from that little bit of being on. So we'll go ahead and open up one of our valves inside and see if the water comes out of it. Now all we have to do to test it out is you want to make sure that all your valves, if you have a bay like we have, your wet bay, you wanna make sure it's open as if you're currently camping. So that's why the best way to do this is to do it after the end of your season, so then all we have to do is open up our valve, and you'll hear. So some will come out because it's pressurized, and you'll hear that compressor come on and off to pump all this water out. (compressor whirring) (water spattering) (compressor whirring) And once you get all the water out, you'll hear the air start to purge like that. The compressor will keep going until it builds the pressure in the lines that it wants. And then you'll go to the next valve, (water spattering) and repeat this process for your entire camper. Any water outlet that you have, you wanna do that to. We're gonna go through and test it to make sure everything's working in here. So you can hear it went off again. It's a pretty cool system once you get it working. But yeah, you just want to go around to the rest of your system and make sure that you get all the water out. Once you know everything's working properly, that's gonna do it for the installation. All in all, I really like the system. I personally own a fifth wheel camper and I know that it's a pain to have to winterize your camper every year, and this is gonna make it so easy. With a flip of a switch, you can go to each of your outlets, turn 'em all on, get all the water out of it, turn the system back off, and then drain your tanks, and then you're done. It just took a two to three-person job if you have extra help. Took a two to three-person job down to one-person, so you can winterize your camper by yourself. The other thing that's nice about it is you can winterize your camper anywhere you want. You don't have to buy antifreeze anymore or worry about the smell of antifreeze in your lines, and you don't have to have a compressor on hand in order to blow your lines out. The other thing with the system is it's safe. So you're not gonna damage any of your water lines. And to me, that is worth gold. Having this system installed to be able to winterize your camper so it's safe for the next season is all that I really care about. Well guys, hopefully, this video helped you to decide whether or not the Floe integrated draining system is right for you in your 2020 Highland Ridge Open Range.
Customer Satisfaction Score:
92% were satisfied with this product
8% of customers were not satisfied
Customer Reviews
Floë Integrated Drain Down System - 12V DC - LC88FR
Average Customer Rating: 5.0 out of 5 stars (2 Customer Reviews)
Floë drain down system lets you quickly and effortlessly flush out your RV's water system. The compact unit is easy to install and operate. Compressed air pushes through freshwater lines as outlets are opened. Connects to 12V DC outlet.by: Frank 04/30/2021
Nice system, works well. Thanks Bob and your crew for the install. See video of install.
by: Erich Jost04/15/2022
Great to deal with etrailer, quick order processing, shipping and quality products. Courteous, helpful representatives.
2
2
See what our Experts say about this Lippert Accessories and Parts
- Where To Install The Output Line For The Lippert Floë Freshwater Drain System The Floë Integrated Drain Down System # LC88FR is going to be installed in the line that runs between the the fresh water tank and filter/water pump. Basically this means before the water pump and filter, which will keep the water and air pressure from the Floë all going in one direction. If you place it after the pump or filter then it would force air the backwards through these components, damaging them. 15 psi is relatively low compared the 40-50psi water pressure normally on your...
view full answer...
Info for this part was:

Edited by:
Lindsey S

Video Edited:
Jacob T

Video Edited:
Chris R

Video Edited:
John S

Installed by:
Kathleen M

Test Fit:
Shane H

Test Fit:
Jacob H

Video by:
Jonathan Y

Video by:
Thomas T

Written by:
Kristina F

Updated by:
Halie H

Updated by:
Carrie F
At etrailer.com we provide the best information available about the products we sell. We take the quality of our information seriously so that you can get the right part the first time. Let us know if anything is missing or if you have any questions.
Frank
5/3/2022
Still works great. Winterized the camper with no problems. Easy to use.