


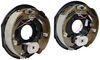
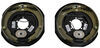
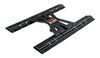
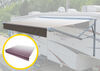
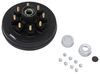
Passenger's-side electric brake measures 12" x 2". Rated for 4,000-lb to 7,000-lb axles. Mounting flange has 5-bolt pattern. Fits 14-1/2", 15", 16", and 16-1/2" wheels.
Features:
Specs:
With repeated use of this brake assembly, the brake shoes may move out of alignment, causing less efficient braking performance. To keep the brake shoes aligned and the brake assembly performing correctly, you should perform routine maintenance.
This brake assembly should be adjusted after installation and then as needed for the life of the brake. To adjust the brake, use a brake adjustment screw tool (sold separately) to turn the adjustment gear on the inside of the assembly. Continue to turn the gear until the drum surrounding the brake catches on the brake pads enough so that the hub can no longer be turned easily by hand. Then reverse the gear by about 10 clicks. A properly adjusted brake should drag slightly on the brake drum.
Videos are provided as a guide only. Refer to manufacturer installation instructions and specs for complete information.
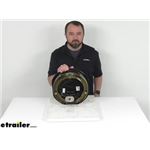
Hi, everybody. Andy here with etrailer.com. And today, we're gonna take a look at this Lippert 12-inch, right hand electric trailer brake assembly. This manual adjusting passenger side electric trailer brake assembly measures 12 inches in diameter and measuring the brake pads themselves two inches wide. And this is rated for a 4,000 pound to 7,000 pound trailer axle. And this will work with your 14.5 inch 15 inch, 16 inch, and 16.5 inch wheel sizes.
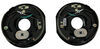
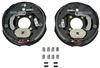
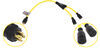
And as you can see here, it does have our five bolt mounting flange bolt pattern. And this is going to work with most standard hub and drum assemblies including Dexter, Lippert, and AL-KO. And electric brakes are easier to install and offer more user control than hydraulic brakes. They require only an electric brake controller which just holds separately, so no actuators or hydraulic lines are necessary. And if you notice here in the back, we have two black wires that need to be connected.
One is gonna go to your brake feed and the other is gonna go to your ground and they're both black. So you can use either wire for either function. So this is a manual adjust brake. And so periodic manual adjustment is required with the fine tooth brake adjustment gear that's going to allow for a more precise setting. And looking, again, in the rear of this, we do have an included adjuster plug that's going to cover the access hole to keep dirt and grime out of the assembly and off the shoes.
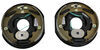
So to adjust the brake, you're going to use a brake adjustment screw tool which is sold separately and you're going going to use that tool to turn the adjustment gear on the inside of the assembly. And you do want to continue to turn the gear until the drum surrounding the brake catches on the brake pads enough so that the hub can no longer be turned easily by hand, and then reverse the gear about 10 clicks. A properly adjusted brake should drag slightly on the brake drum. So again, this is a right-hand side, which is the passenger side brake assembly. And the way that you can tell, of course, is by the sticker on the newer ones here.
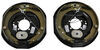
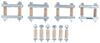
So we have a sticker here and then a sticker right here. But if you don't happen to have a sticker, the way that you can tell is by looking at the length of the pads on the shoe. So the longer pad right here is the, this is our longer pad and of course this is our shorter pad. And the shorter pad is our primary shoe. So the primary shoe, this shorter pad will always face the front of the trailer. So that's telling you that it is going to go this way, which is going to be our passenger side brake assembly, the right-hand side. So if you are in need of the left hand, or the driver side assembly as well, I am including our item number to that left-hand assembly on your screen and you can just take that item number and put it in the search field of our website and it will take you to that left hand electric trailer brake assembly. I do wanna point out that the mounting bolts and hardware are sold separately, so if you do not already have the compatible mounting hardware, you would have to pick that up as a separate item. Well, that's gonna conclude our look today. I do hope that it was helpful for you. Again, my name is Andy. Thank you for joining me.
Info for this part was:
At etrailer.com we provide the best information available about the products we sell. We take the quality of our information seriously so that you can get the right part the first time. Let us know if anything is missing or if you have any questions.


Thank you! Your comment has been submitted successfully. You should be able to view your question/comment here within a few days.
Error submitting comment. Please try again momentarily.