

How to Add a 7-Way Round Pin Trailer Connector to a 2011 Chevy Silverado with 7-Way Blade Connector
Question:
I need to mount and wire the PK11720 Pollak 7-Pole, Round Pin Trailer Wiring Socket to a 2011 Chevrolet 2500 HD flatbed. I would like to connect it directly to the factory 7 way connector under the truck. It currently has a 4 pin flat connector which will never be used. Can you tell me all of the required brackets, hardware, boots, adapters, and instructions needed to make it go smoothly? I tried looking, but either could not find everything or could not confirm compatability. Thanks,
asked by: David W
Expert Reply:
Your 2011 Chevy Silverado has what is called a multitow trailer connector with a 4-Way flat and 7-Way blade style trailer connector. In order to convert the 7-Way portion to a 7-Way Round pin, all you will need is an adapter. We have one that would be perfect for you. Take a look at the Hopkins Adapter 7 Way Blade to 7 Way Round Pin, # 47595. All you will need to do is plug in the 7-Way blade end into your truck 7-Way. Then plug the trailer into the 7-Way round receptacle. This would be the ideal method since it does not permanently change the wiring on the vehicle.
If you would rather replace the 7-Way blade style connector, you will need to separate the connector from the wiring harness in the back. Once you have done that, you can leave the factory plug in its place because the 7-Way will not fit in the same location.
The wiring harness that plugs into the back has a plug on it. In order to access the wires, you will have to cut the plug off. But before you do that you will need to note which wires are associated with which pins on the plug. Or you will need to use a circuit tester, like # PTW2993 if needed, to test the wires at the plug while someone runs through the various functions in the truck.
To hardwire the wires to the 7-Way round you will need the Pollak Heavy-Duty, 7-Pole, Round Pin Trailer Wiring Socket, # PK11720, and boot # PK11761. The first step is to find a place to mount the mounting bracket, # PK11771. You can use self tapping screws to hold it to a place of your choosing. Then, you will need to secure the 7-Way round to the bracket (hardware to included). Next, slide the narrow end of the boot down the wiring harness a bit. Then, you can start to connect the wires as follows:
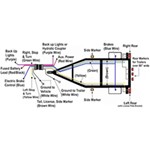
Original 7-Way configuration (if looking at the back of the plugs where the wires connect)
11 oclock position = 12 volt power; connects to the 10 oclock position on 7-Way round
9 oclock position = Right turn/stop; connects to the 4 oclock position on 7-Way round
7 oclock position = Brake controller output; connects to the Center pin on 7-Way round
5 oclock position = Ground; connects to the 12 oclock position on 7-Way round
3 oclock position = Left turn/stop; connects to the 8 oclock position on 7-Way round
1 oclock position = Running lights; connects to the 2 oclock position on 7-Way round
Center = Reverse lights; connects to the 6 oclock position on 7-Way round
After making all of the connections you would then slide the boot up to cover the connections to complete installation. I have included a link to our wiring FAQ that should help you.


Products Referenced in This Question

Pollak Bracket for Single-Pole Trailer Wiring Socket

- Accessories and Parts
- Trailer Wiring
- Mounting Hardware
- Brackets
- 1 Round
- Pollak
more information >

Product Page this Question was Asked From
Pollak Heavy-Duty, 7-Pole, Round Pin Trailer Wiring Socket - Vehicle End

- Trailer Wiring
- Trailer Connectors
- Vehicle End Connector
- Plug Only
- 7 Round - Round
- Pollak
more information >
Featured Help Information
Miscellaneous Media


Continue Researching
- Q&A: Semi Trailer Light Function Locations on Heavy Duty 7-Way Pin Connection
- Article: Trailer Wiring Diagrams
- Q&A: Replacing A 125255UC Double Lip Grease Seal
- Article: Trailer Maintenance Schedule
- Q&A: Converting a Semi 7-Way Trailer Connector to an RV 7-Way Trailer Connector
- Article: Brake Controller Installation: Starting from Scratch
- Q&A: How to Make an Adapter to Go from Semi Truck 7-Way Round to RV Style 7-Way Blade on Trailer
- Q&A: What Are The Hole Dimensions On The Buyers Products 50 Ton Air Compensated Pintle Hook
- Q&A: Which Trailer Brake Magnets Do I Need to Use
- Q&A: Identifying Dexter Axle Over 10,000 lbs
- Article: Breakaway Kit Installation for Single and Dual Brake Axle Trailers
- Article: Testing Trailer Brake Magnets for Proper Function
- Article: Gooseneck to 5th Wheel Adapters
- Article: Big Truck Big RV