Installing a Brake Controller from Scratch on a 1994 Winnebago
Question:
I have a 1994 winnebago, class A, 34 ft. motor home and I am going to pull a enclosed trailer 14x7 tandam axel unit with the motorhome. 7000 lbs gross weight.I would like to know what wiring set-up and controller I would need to use to hook up to this unit. The Drawtite unit looks to be the one,but I dont know about the wireing hook-up. I will also have to change the plug to a 6 prong standard plug because I currently have a 4 prong round plug. Could you let me know what I need? Thanks
asked by: George P
Expert Reply:
You will be able to use any brake controller because they are not vehicle specific, but I recommend using a proportional controller instead of a time delay controller like the one you have referenced. The benefit of a proportional controller is that they engage the trailer brakes in proportion to how much the towing vehicle is braking, rather than a pre-determined setting for all braking situations like a time delay controller would.
I recommend the Tekonsha Prodigy P2 Brake Controller - Proportional, # 90885. It is the newest version of the popular and highly rated Prodigy series of brake controllers. It is easy to use and easy to install. I have included a link to the installation details below.
Next, you will need a 4 to 6 Way Installation Kit, # ETBC6. To install this kit, you will first need to wire your existing 4 Round connector to the 4-Flat of the ETBC6. There are two ways to do this. You could clip the end off of the 4-Round on your RV and determine the functions using a circuit tester like # ALL640595 and then clip off the end of the 4-Way on the ETBC6 and hardwire them in the following manner. Right turn and brake, connect to the green wire on ETBC6. Left turn and brake, attach to yellow wire on ETBC6. Running lights, attach to brown wire on ETBC6. Remaining wires are grounds, attach then together.
The other way is to use the Adapter 4 Round to 4 Flat, # 47465, plug one end into your existing 4-Round and the other end into the 4-Flat of the ETBC6. This will save you a lot of time. You will just have to use a circuit tester to determine the functions of your 4-Round and then make sure the adapter end that plugs into the 4-Round is pinned the same way. If not, you can easily re-pin the adapter. Yellow is left turn and brake, green is right turn and brake, brown is running lights, white is ground.
After you have connected your 4-Way to the ETBC6 using one of the methods above, you will need to hardwire the remaining 3 wires on the ETBC6. Ground the white wire to the RV frame. Next, using the included duplex cable, attach the red wire on the ETBC6 to the black wire in the duplex cable. Attach the white wire in the duplex cable to the blue wire on the ETBC6.
Next, route the duplex cable under the RV, avoiding areas that might pinch or burn the cable. Since your RV is 34 feet long, you will need additional duplex wiring. It is sold in 1 foot increments, # 10-2-1. You will probably need at least another 15 feet as some extra will be required for future installation steps. Route the duplex cable up through the engine compartment, near the battery.
Under the hood, separate the two wires in the duplex cable. Attach the black wire first to a 40 amp circuit breaker and then to the positive battery terminal. Now, route the white wire through the fire wall, into the cab of the RV where you mounted the brake controller.
In the cab, attach the white wire you just routed to the blue wire on the brake controller. Next, take a length of wire left over from the duplex cable (you will just need one of the wires in the cable) and attach it to the white wire on the brake controller. Route it through the fire wall and attach it to the negative battery terminal.
Back in the cab, attach a length of wire to the brake controller black wire and route it through the fire wall and attach it first to a 20 or 30 amp circuit breaker (see brake controller instructions for which one to use) and then to the positive battery terminal.
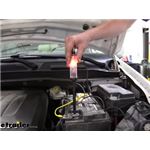
Back in the cab, there is just one connection remaining. On the brake light switch above the brake pedal, using a circuit tester like # PTW2993, find the wire that carries a signal ONLY when the brake pedal is pressed. Attach the brake controller red wire to this wire and installation will be complete. I have included an FAQ article below on installing a brake controller from scratch that should help a lot. I have also included a video below that shows the installation of an ETBC7 kit. The ETBC7 kit installs the same as ETBC6 with the exception of an extra wire for reverse lights on the ETBC7.


Products Referenced in This Question
Deka Jacketed 2 Wire, 10 Gauge, Brake Wire - per Foot

- Wiring
- Wire
- Jacketed Wire
- 2 Wire
- 10 Gauge
- Deka
more information >

- Trailer Wiring
- Wiring Adapters
- Single-Function Adapter
- 4 Round
- Plug and Lead
- 4 Flat
- Hopkins
more information >
Tekonsha Prodigy P2 Trailer Brake Controller - 1 to 4 Axles - Proportional

- Trailer Brake Controller
- Proportional Controller
- Electric
- Electric over Hydraulic
- Automatic Leveling
- Under-Dash Box
- Dash Mount
- Up to 4 Axles
- LED Display
- Up to 360 Degrees
- Tekonsha
more information >
Universal Installation Kit for Trailer Brake Controller - 6-Way and 4-Way Flat - 10 Gauge Wires

- Accessories and Parts
- Trailer Brake Controller
- Installation Kits
- etrailer
more information >
Universal Installation Kit for Trailer Brake Controller - 7-Way RV and 4-Way Flat - 10 Gauge Wires

- Accessories and Parts
- Trailer Brake Controller
- Installation Kits
- etrailer
more information >