

What is Needed to Install a Brake Controller and 6-Way Trailer Connector on a 2008 Honda Pilot
Question:
I have few more questions: 1. Can I get Tekonsha P-3 instead of P-2? 2. My trailer has 6-pin poles and I got #118336. Now, I am using the cable/adapter 6 to 4 pin (comes with trailer) to connect to my TV. The item # ETBC6 has 6 pins. What connector do I need to connect from trailer to ETBC6? 3. The most important question: how to wire them? I know you guys have video instruction but can you walk me through with my Honda Pilot?
asked by: RN
Expert Reply:
Since your trailer has a 6-Way connector installed you most likely have one of 3 wiring situations on your trailer. The first, and most likely, is that your trailer has electric brakes and a power wire to maintain a battery for auxiliary functions. The second is that you have the same power wire and backup lights at the rear of the trailer. The third, and least likely but possible, is that your trailer has hydraulic surge brakes and a coupler with electric backup lockout.
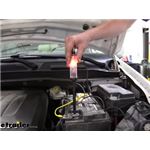
If your trailer has electric brakes then you will need to install the Brake Controller 6 and 4 Way Installation Kit, item # ETBC6, and a brake controller like the Prodigy P2, item # 90885, on your 2008 Honda Pilot, along with the # 118336 4-Way harness that you mentioned.
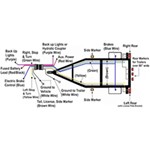
We have installation instructions (see link) that detail the complete installation of the 6-Way and 7-Way brake controller installation kits and we have a wiring page (see link) that shows how the wires are attached to the 6-Way connector. You will also need to make sure that the 6-Way connector on your trailer is wired to match the wiring on the vehicle side connector.
If you do not have brakes on your trailer you will need to pull one of the hubs off the trailer and record the inner and outer bearing numbers, and the grease seal number. You will also need the trailer wheel bolt pattern and wheel size. We have a instruction page for measuring trailer wheels and bolt patterns for you to review. With this information I can recommend a hub and drum and a brake assembly that will work with your trailer wheel, bolt pattern, and spindle.
Let me know what configuration you have and I will be glad to make a more specific recommendation.


Products Referenced in This Question
Deka Jacketed 2 Wire, 10 Gauge, Brake Wire - per Foot

- Wiring
- Wire
- Jacketed Wire
- 2 Wire
- 10 Gauge
- Deka
more information >
T-One Vehicle Wiring Harness with 4-Pole Flat Trailer Connector

- Custom Fit Vehicle Wiring
- Trailer Hitch Wiring
- Converter
- Custom Fit
- 4 Flat
- Tekonsha
more information >
Adapter 4 Pole to 6 Pole and 4 Pole Trailer Wiring Adapter

- Trailer Wiring
- Wiring Adapters
- Multi-Function Adapter
- 4 Flat
- Plug and Lead
- 6 Round
- 4 Flat
- Hopkins
more information >
Tekonsha Prodigy P3 Trailer Brake Controller - 1 to 4 Axles - Proportional

- Trailer Brake Controller
- Proportional Controller
- Electric
- Electric over Hydraulic
- Automatic Leveling
- Under-Dash Box
- Dash Mount
- Up to 4 Axles
- LCD Display
- Up to 360 Degrees
- Tekonsha
more information >
Tekonsha Prodigy P2 Trailer Brake Controller - 1 to 4 Axles - Proportional

- Trailer Brake Controller
- Proportional Controller
- Electric
- Electric over Hydraulic
- Automatic Leveling
- Under-Dash Box
- Dash Mount
- Up to 4 Axles
- LED Display
- Up to 360 Degrees
- Tekonsha
more information >
Pollak Circuit Breaker - Cycling/Automatic Reset - 20 Amp - Straight Mount Bracket

- Accessories and Parts
- Wiring
- Circuit Breaker
- 20 Amp
- Pollak
more information >
Pollak Circuit Breaker - Cycling/Automatic Reset - 40 Amp - Straight Mount Bracket

- Accessories and Parts
- Wiring
- Circuit Breaker
- 40 Amp
- Pollak
more information >

Product Page this Question was Asked From
Universal Installation Kit for Trailer Brake Controller - 6-Way and 4-Way Flat - 10 Gauge Wires

- Accessories and Parts
- Trailer Brake Controller
- Installation Kits
- etrailer
more information >
Featured Help Information
Instructions
Miscellaneous Media


Continue Researching
- Article: Brake Controller 7- and 4-Way Installation Kit (ETBC7)
- Article: Brake Controller Installation: Starting from Scratch
- Article: Trailer Wiring Diagrams
- Q&A: Where Do the Wires on the Universal Install Kit for Trailer Brake Controllers Get Installed?
- Article: Wiring Trailer Lights with a 7-Way Plug (It's Easier Than You Think)
- Q&A: What is the Difference Between a 4-Way and 7-Way Trailer Connector
- Article: Wiring Trailer Lights with a 6-Way Plug (It's Easier Than You Think)
- Q&A: Installing Transmission Cooler on 2012 Honda CR-V
- Article: How to Choose the Right Trailer Hitch Class
- Q&A: Comparing Stealth Hitch and EcoHitch Stealth for 2023 Tesla Model 3
- Q&A: Adding a 7-Way and Brake Controller to a 2007 Volvo XC90 with 4-Way Connector
- Q&A: Should I Get a Proportional or Time-Delayed Brake Controller
- Q&A: Brake Controller and Wiring Recommendation for a 2008 Ford Explorer Towing Trailer with 6-Way
- Article: Towing a Trailer? Let's Talk About Brake Controllers
Tuyen N.
7/9/2010
I have few more questions: 1. Can I get Tekonsha P-3 instead of P-2? 2. My trailer has 6-pin poles and I got #118336. Now, I am using the cable/adapter 6 to 4 pin (comes with trailer) to connect to my TV. The item # ETBC6 has 6 pins. What connector do I need to connect from trailer to ETBC6? 3. The most important question: how to wire them? I know you guys have video instruction but can you walk me through with my Honda Pilot?