
Demco Classic Base Plate Kit - Fixed Arms
(207 reviews)
Price: $434.39
Demco Classic Base Plate Kit - Fixed Arms
Item # DM9518266
Retail:$588.00
Our Price: $434.39
You Save: $153.61
Will this fit?
To see if this custom-fit item will work for you please tell us what vehicle you'll use it with.


Need help with installation?
Locate installers near me- All Info
- Reviews (207)
- Q & A (0)
- Videos (1)
- Photos
Demco Base Plates - DM9518266
- Fixed Drawbars
- Demco
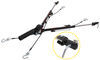
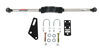
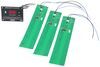
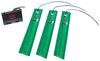
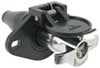
This custom-fit base plate kit lets you hook up your tow bar to your vehicle. No external crossbar means that only the base plate tabs are visible. Simple bolt-on installation with included hardware.
Features:
- Custom-fit base plates provide attachment points for your tow bar
- Hidden reinforcement means that less of the bracket shows
- No crossbar support beam or large, protruding brackets
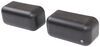
- Tab covers provide a clean look for your car
- Sturdy, dependable design
- Spreads towing force evenly to minimize weight placed on suspension
- Constructed of durable steel
- Simple installation - no welding required
- Bolts securely to your vehicle's chassis
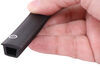
- Electrical bracket lets you easily mount a round electrical connector plug
- Instructions and necessary hardware included
- Compatible with all Demco tow bars
- Adaptable for use with tow bars from other manufacturers (adapters sold separately)
- Made in the USA
Specs:
- Distance between brackets: 27-7/16"
- Bracket height: 15"
- 1-Year limited warranty
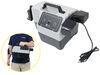
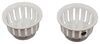
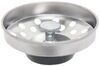
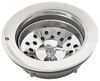
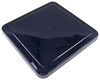
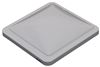
Tab Covers

When you're not towing, the included tab covers provide a clean look for your car by covering the protruding brackets. They also keep dirt and debris out of the base plate tabs, and even act as a shin guard to help cusion the blow if you walk into the base plate tabs. These high-density polyethylene covers easily snap into place over each pull point when your tow bar is not attached.
Tow Bar Adapters
If you have a tow bar from a different manufacturer, an adapter may be available. Demco makes adapters for use with other manufacturer's tow bars so that you don't have to go through the added hassle and expense of replacing your tow bar when outfitting your new towed car with base plates.

| Type of Tow Bar | Use Adapter |
|---|---|
| Roadmaster Eagle and Eagle 8000 | DM9523014 |
| Reese Tow Champ and Valley Industries | DM9523015 |
| Roadmaster Falcon 5250 | DM9523023 |
| Roadmaster Tracker, Falcon 2, Falcon All-Terrain, Blackhawk, Blackhawk All-Terrain, and Sterling tow bars with serial numbers up to 14,500 | DM9523036 |
| Roadmaster Nighthawk All-Terrain, Sterling All-Terrain, and Sterling tow bars with serial numbers 14,501 and above | DM9523062 |
9518266 Demco RV Classic Baseplates
Installation Details
This Product Fits The Following Vehicles
- 2010 - 2011 Cadillac SRX excluding Turbocharged
- 2010 - 2011 Cadillac SRX Turbocharged
- 2012 - 2016 Cadillac SRX with Adaptive Cruise Control
- 2012 - 2016 Cadillac SRX without Adaptive Cruise Control


Video of Demco Classic Base Plate Kit - Fixed Arms


Videos are provided as a guide only. Refer to manufacturer installation instructions and specs for complete information.

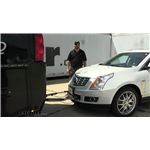
Video Transcript for Demco Classic Base Plate Kit Installation - 2013 Cadillac SRX
Hey guys, it's Jake here with etrailer. Today we have a 2013 Cadillac SRX and we're gonna be taking a look at and I'm gonna show you how to install the Demco base plate. Your base plate is going to be one of the main five components that you're going to need in order to flat tow your vehicle. So first off, obviously you'll have your base plate and you'll have your tow bar, your safety change, your diode wiring, and then a braking system. Now what this base plate's gonna allow you to do is it will allow you to flat tow your vehicle behind your motor home. The Demco base plates will fit directly into the Demco tow bars.
So if you have a Demco tow bar or you're looking for one, it'll also fit directly into the etrailer tow bars as long as you have the Demco ends on them. If you already have a tow bar you can pick up just an adapter to go in the end in order to fit into the Demco base plate. What I really like about this base plate is it's gonna come with pretty much everything you need, other than the wiring, obviously your tow bar and then your braking system. It'll have your safety chain loop tabs. I like 'em, 'cause they're very discreet, they're hidden in with the design of the base plate itself, you'll get a bracket to mount your sixfold to.
And we discovered that when installing this, the other side of the wiring bracket is great to be able to mount your breakaway switch too. Demco's base plate is going to have their really rugged textured black powder coat finish to be able to help with the rust and corrosion over the years. Now, if you see any rust and corrosion happen over time it's most likely going to happen on the inside of these two prongs where this is moving up and down or around where this safety chain is connected. You can't really get away from that. That's gonna happen on any base plate because you have metal on metal contact, paint really doesn't stand a chance.
All you have to do is give it a quick shot of spray paint and you're good to go for the next season. Now as far as the installation goes, this installation is not too bad, given that you do have to take the front face off. You will have to drill 14 holes in your frame of your vehicle. It's not too difficult. I would definitely say you could do this in maybe a weekend, give yourself two days and you should be able to do it no problem.
When it comes to trimming the front fascia you kind of have to get creative. The best way to do it, as you'll see later on in the video, you hold your fascia back up and kinda look at what needs to be trimmed. There will be instructions to show you what to trim. We don't really like to use those because it's a very generalized way of trimming. So what we do is we hold the fascia up and we see what's actually contacting the base plate and trim those portions out. But with that being said, let's go ahead and pull the car inside and show you how we did it. To begin our installation we're gonna have some push pin fasteners on top here that we're gonna need to remove 'cause we need to remove this black panel. We'll have six total, two on the top portion here and then 1, 2, 3 and 4. We'll use a trim panel removal tool. This one is specific for push pin fasteners. You can also use a flathead screwdriver. You just wanna pop these out, set 'em to the side, 'cause we will be putting them back. Now in order to get this removed, well what else we need to do is we need to take these, there's little tabs here, just slide it this way and then this little rubber strip will come right off. There you go. We'll just work our way around, and then this black plastic piece will just pop right off. Now with that rubber strip removed, you should be able to just pop this right off and set it to the side for reinstallation later on. Now with our cover out of the way, you'll expose seven 10 millimeter head bolts that are holding in the top of our grill here. We'll take 10 millimeter socket and get those removed. Inside our wheel wells we're gonna have four Phillips head screws that we're gonna need to remove. Your first one is gonna be right here. Then going down, you'll have another one, another one, and then this one down here. You will have two more further in, but we will not have to remove those to get this off. Start with this one here and we're using this angled drill bit holder. You can use a a ratchet with a drill bit in the end of it, however you see best to get these out. Now if you're doing this from the ground, what you can do is you can turn the wheel in on whichever side you're removing these screws on temporarily and then turn the wheel out the other way on the other side to get to those screws. That way you can still use a normal screwdriver. Now in behind our wheel well after we get these screws removed, you will pull the wheel well liner back and right here you'll have a seven millimeter head screw that you'll have to remove just like that. Now underneath our bumper we're gonna have 12 seven millimeter bolts. We're gonna have to remove you. Just want to be sure that you're not removing the air dam here. The bolts will be up in between each of these little cutouts and we'll start removing them. And what we'd like to do here, our next step is gonna be removing this fascia. What we like to do is take some blue painters tape and paint or tape the the joint here to be sure that when we go to pull the fascia off, what can happen is if you go to pull this off the fascia kind of wobbles wherever it wants to go and there's metal clips behind it that could scratch this paint. So we just put painter's tape on here to help it from getting scratched. Now we're ready to remove our fascia. What you wanna do is you want to get an extra set of hands to help you take the fascia off, because it's larger and awkward. So what you do is you just peel it off from the edges and then we'll have to watch because we have some fog lights in here we'll have to watch, be careful and look for any wires that are connected. And it looks like we've got the wiring harness on Brad's side over there and a sensor on this side. So we have one large connector over here that we're gonna disconnect, and then we'll also have these two wiper connections here. And basically all we did was we disconnected 'em and then stuck a bolt that we had lying around to plug it off, 'cause otherwise it'll want to keep draining. Set those off to the side and then we can set our fascia in a safe place. Now we're gonna have these two 10 millimeter bolts that we'll need to remove. And then with these tabs what we're gonna need to do is take these tabs and bend them at a 90 degree angle straight out this way. Take this, take a pair of pliers, being careful not to bend the bracket. We'll take these here, bend this tab down. Now to make room for our base plate, we need to trim the air dam and we just need to make essentially cut from here, go up, and then cut all of this off. This needs to come off but we wanna leave this portion that's up here and continues down. We wanna leave all that there. We're just using a multi-tool. You can use a pair of snips to be able to do this. Whatever you have, a razor blade might work too 'cause it is just rubber. And we're gonna repeat that same process on the other side. The next step in our process is gonna be lifting our base plate up into place. What we need to do is it's gonna have to rest right here on the side of our frame rail. So let's to pop this push pin fastener out and let this plug allow us to get it outta the way. Now we can lift our base plate up into place. You want to have yourself a couple of clamps ready to clamp this to the side of the frame. What you need is this racket needs to be below the base plate because eventually it will be attached to the bottom of it. Now we've got ours temporarily clamped to the pinch welds on our frame. What you want to do is you want the space from this cross tube to the bottom of this bumper to be 5/8 of an inch. So we've got this side lined up. What we'll need to do is loosen up our clamp here and lift it up just a little bit to get it closer to that 5/8 of an inch. There we go. Now clamp it back down. Now that we've got our base plate clamped up in place what we're gonna do is we need to draw out three holes here. We've got 1, 2, 1 of 'em is behind this, and then our third one's down here. We have to drill out these holes, slide our bolts through, get that bolted down first and then we can come back and drill out these four holes and throw in the self-tappers. Now in order to mark our center holes for this we're gonna use our final size, which is 13/32 drill bit. We'll use this our final size to mark the center. So you just drill a little bit and then you can see in the center of that hole is a little divot. We'll go back with a smaller pilot hole and work our way up to get to this final size. And with two of our holes drilled out we can take some clear coat. We're going to just line the bare metal that we just exposed by drilling that hole. Go ahead and put a little bit on the base plate too. This will just help to prevent rust and corrosion later on. And then what we need to do is once we get the hardware in these two holes, we'll tighten 'em down, and then take this clamp off and then reveal our third hole so that we can put the drill hole there too. We'll take one of our bolts that comes in our kit, a flat washer. You wanna put some blue loctite on all this hardware. Slide that in, followed by another flat washer on the backside, a lock washer, and a nut. I'll go ahead and tighten these down. We're not gonna really crank down on it because we will have to come back and torque 'em. We'll just give 'em a quick. Now with those two in place it's gonna hold our base plate still so we can pop our clamp off to see that third hole. We'll repeat that same process for this hole. Now we can take a 5/16 drill bit and drill out these four holes in our frame. Now we'll take the self-tappers that come in our kit and when you run these in you wanna run 'em in a little bit. You wanna really watch your socket, run it in a little bit, pack it out, run it in, pack it out, and then drive it home. Now once you get it to go all the way through like that, we'll take some blue loctite, some on the threads, and then put it back in. I will do that same process to the remaining three. Now we'll repeat that same process on the driver's side of the vehicle and then we'll come back, and we need to torque down all the hardware to the specifications and the instructions. The next thing we had to do is we took some of the shorter bolts that came in our kit and this is what bending those brackets at a 90 degree we're for. What's nice is Demco, on their base plate, they give you a place to bolt this to, so that this cooler can operate as it's supposed to. Now this time you would reinstall the fascia on the front of your car. We are going to be installing some more flat tow components, so if you have some more this is a great time to do it. We have several different things that we need to install such as diode wiring, your braking system, stuff like that. That is a lot easier to get installed when running all the wiring and stuff without the front fascia in place. It helps you to just organize the wires a lot better get 'em outta the way and then after we get all that done, we can come back, put the front fascia back on and cut out what we need to, 'cause we will have to do a little bit of trimming to get the front of our base plate to be able to fit through the front grill. Well guys, hopefully this video helped you decide whether or not the Demco base plate is right for you and your 2013 Cadillac SRX.
Customer Reviews
Demco Classic Base Plate Kit - Fixed Arms - DM9518266
Average Customer Rating: 4.8 out of 5 stars (207 Customer Reviews)
This custom-fit base plate kit lets you hook up your tow bar to your vehicle. No external crossbar means that only the base plate tabs are visible. Simple bolt-on installation with included hardware.by: Frank 07/01/2021
I installed it my self. took about two hours, easy to use for me.
by: David06/03/2021
As advertised
by: Randy05/14/2024
The base plates fit nicely but the covers are a poor fit. It would make sense to me that the covers covered the whole base plate.
Thanks, Randy


by: Smitty12/19/2020
Received on time and installed as directed. I'm 78 and only had one problem, that of having to bend down a tab on the vehicle frame. Had to go buy a punch. However, the left base plate front holes for the tow bar attaching pin was not in alignment. The pin would not go through. Contacted etrailer and received a replacement in no time. Removed the bad one and reinstalled the new one. Then took the vehicle to my hitch guy for brake wiring. He double checked my work and said everything was in great order and a good fit. With the virus lockdown, I have not towed other than home from getting the brakes set up. But that worked ok.


by: Virgil 12/20/2022
Etrailer has proven to be the best place to purchase all my towing needs! They sent my first order very quickly. I decided to do a second order for another vehicle and again perfect service and top quality parts! The communication is A++++ and I highly recommend Etrailer.
by: Ace03/27/2024
Received shipment fast. I ordered the wrong adapters and call customer service right after delivery. Got excellent service from Brittany ordered the right adapter, got a return label while on the phone to my email. Installed the demco base plates with a few problems. Fit was tight but nothing a small mallet couldn't handle. They do mention in instructions that you may need to elongate one of the holes. Mine was for a 2016 GMC 2500. Definitely need to make hole bigger on the truck frame. I would do it before inserting the baseplate. Otherwise great product good tight fit.
by: Doug 04/18/2024
It took closer to 5 hours by myself!! Actually fairly simple install. If I had another one to do now it would probably take 3 hours. Some of the bolts were a pain with my large hands. It only pokes out a little. Very happy with this hitch!!
by: Michael W01/27/2023
Very high quality.
Very quick delivery.
Very good customer service.
I will order from etrailer again, I'm sure
by: Howard 12/27/2023
easy to install on the truck frame and the removable arms help hide the base plate.
by: Scott 09/02/2022
Towed our jeep 3,000 miles and this baseplate fit and worked very well.
by: Jim 03/18/2024
Super Service and parts fit perfectly.
Very good quality.
by: Marcus08/28/2019
Great service - ordered Sunday night, delivered Wednesday lunch time, installed Wednesday afternoon. Excellent information, instructions - took about 4 hours, had to file 2 bolt holes a slight bit, but the fit was very good.
I am very happy with the baseplate and would recommend it to anyone.
Before and after pictures attached.


by: TL07/02/2022
Demco is a great product. This is the third baseplate we have purchased for different vehicles. All have fit perfectly. It took me 1.5 hours to install this one on our Fiat 500.
by: Vincent 07/18/2023
These base plates are AWESOME! They were very easy to install on my 2013 Ram 2500. I just removed the shackles that were there, and the base plates aligned to the existing holes perfectly. Connecting to the tow bar behind my RV was a simple and easy task. Make sure you use the Loc-tite that comes with the base plates on the new bolts. This will ensure you have a good strong tight bond. The plastic covers that come with the base plates are a good fit too. The only come off if you pull them off, plus they protect your knees if you happen to bump into the base plates by accident. This is an awesome product, I highly recommend.
by: John 04/26/2024
Good service and bang on timely delivery, thanks
by: Kyle 05/15/2024
Very happy with this. It shipped fast a lso.
by: Reto05/19/2019
After reviewing the top name brands for tow bars I was really exited first with Roadmaster's pin style base plate connectors, but when I realized that it would require cutting and possibly drilling I took a second look and decided to install the Demco base plates and get the tow bar from them as well.
These plates can be installed in a mere 2 hours if you have all the tools ready to go. I have the fortunate luck that my truck is equipped with the air suspension and so lifting it to the highest setting and driving up on 12in ramps gave me ample amount of room to work under the front bumper area.
The installation is seriously easy and requires no special tools, other than a set of metric sockets and a torque wrench. The factory tow hooks are removed and these base plates fit in the exact same space without any cutting, not even the plastic cover behind the pumper needed to be removed (though for some odd reason the instructions did and I followed them on the driver side but when I realized that I could install the plate without this step, I omitted it on the passenger side). Despite my initial worry of wanting a nearly invisible look, these bars are remarkably clean looking.


by: Don, Ellendale ND07/26/2023
Received my H3 Hummer baseplates and towing lights diode kit. Haven't installed yet but when it's done I hope to submit pics.
Dealing with etrailer has always been nothing short of outstanding. Always rapid delivery of great parts and excellent prices. Thanks once again etrailer.
by: Stephen10/05/2021
Fast delivery and great price. Replaced an old Roadmaster baseplate (which was a shin-getter) for my Saturn Vue, with a Demco baseplate. Fits perfect! New baseplate is barely exposed to my shins. Directions were very clear, and I installed it in about 2 hours. It even came with the thread lock required. etrailer communicated every step of my shipment, even following up after delivery.


by: John 04/04/2024
it bolted right on . works great
by: Doug03/26/2024
I can only comment on how fast the shipping to Canada!! It was awesome!!! Tks
by: Kevin 07/12/2023
I installed this base plate on my 2006 z71 crew cab 1500. It works perfectly to flat tow our truck anywhere we want to go.
by: Doug11/03/2022
One year follow up....
The Demco unit is a solid base plate overall. Basemount mounting holes are slightly off compared to the frame which made installation slightly difficult, however, not too difficult to rectify. Unit works well with just over 3000 miles in the past year.


by: Dale02/13/2022
I am very pleased with this base plate , it installed with very little effort . The only issue I had was that it was delivered to the wrong address . The shipping label was for another address and with much effort we found it .
But with that I will still purchase from etrailer in the future .
25
207
Show More Reviews
See what our Experts say about this Demco Base Plates
- Will Demco Base Plates Fit 2012 Cadillac SRX With or Without Adaptive Cruise ControlThere is actually nothing different, as the Demco Classic Base Plate Kit # DM9518266 is a fit for your 2012 Cadillac SRX either with or without adaptive cruise control, so this is the exact base plate you'll need to flat tow your SRX. There are a number of parts you'll need for this, and I'll recommend the best options for you: - Base Plate Kit: Demco Classic Base Plate Kit # DM9518266 - Tow Bar: Demco Commander II Non-Binding Tow Bar # DM9511012 - Wiring Kit: Roadmaster Diode 7-Wire to...
view full answer... - Does Demco Base Plate Kit for 2015 Cadillac SRX Require Drilling to InstallYes there is drilling required to install the Demco base plate kit part # DM9518266 that is a confirmed fit for your 2015 Cadillac SRX. There's a total of 7 small holes that need to be drilled where you will use the base plate kit as a template. This is true for all of the base plates that fit your vehicle.
view full answer... - Do Fuses Have To Be Pulled When Flat-Towing 2010 Cadillac SRX Behind MotorhomePer the dinghy towing instructions in the owner's manual for your 2010 SRX, three fuses need to removed and then re-installed in a later step. The fuses are BCM 1, BCM 2, and BCM 3. This information can be found starting on page 9-106. There are other restrictions in the manual based on the transmission and engine size. I recommend checking the manual or with your dealership to make sure you have your SRX prepped for towing. There are five items you need when flat-towing a vehicle. You...
view full answer... - How To Confirm Fit of Demco Classic Base Plate Kit for 2016 Cadillac SRXThe Demco Classic Base Plate Kit part # DM9518266 is a custom fit for a 2016 Cadillac SRX so you should not have any concerns with trying to verify measurements beforehand. I wish I could provide you with a detailed dimensional drawing but as this is proprietary information Demco would not release it. They did however tell me that the overall width of the base plate from end to end is 46.8" if that helps.
view full answer... - Recommended Adapter To Adapt Blue Ox Tow Bar To Demco Classic Base Plate KitYes, the Demco Classic Base Plate Kit part # DM9518266 will require an adapter to use the Blue Ox tow bar. The Adapter for Blue Ox Tow Bars to Demco Classic Base Plates part # DM9523034 is what you need to adapt the tow bar. This adapter only works with Blue Ox Aladdin, Aventa II, Aventa LX or Alexus tow bars. Please let me know if you have another Blue Ox tow bar and I can look into that further for you. However, you may consider replacing the tow bar all together especially since the...
view full answer...
Do you have a question about this Base Plate?
Info for this part was:

Edited by:
Lindsey S

Expert Research:
Jameson C

Updated by:
Wilson B

Updated by:
Noah M

Updated by:
Manda E

Video Edited:
Jonathan Y

Written by:
Kristina F

Test Fit:
Jacob H

Video by:
Thomas T
At etrailer.com we provide the best information available about the products we sell. We take the quality of our information seriously so that you can get the right part the first time. Let us know if anything is missing or if you have any questions.
Thank you! Your comment has been submitted successfully. You should be able to view your question/comment here within a few days.
Error submitting comment. Please try again momentarily.