
Part Numbers: SS98GV,31432
Thank you! Your comment has been submitted successfully. You should be able to view your question/comment here within a few days.
Error submitting comment. Please try again momentarily.
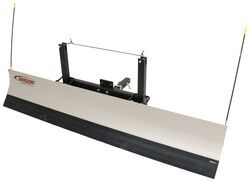
82 x 14 Residential plow with thick rubber cutting edge self-adjusts up and down to smoothly clear a path on any terrain. Aluminum blade stays in straight-ahead position, and makes plowing your driveway as easy as pulling forward or backing out.
Features:
Specs:
Snowplow Installation
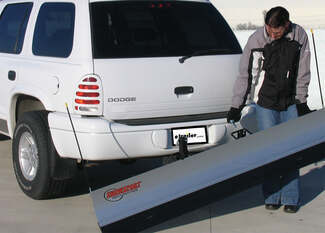
Front or rear mount? Versatility is the SnowSport LT's middle name.
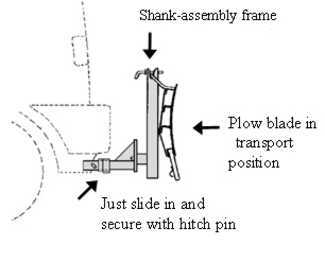
Installation is quick and simple - just slide the included shank assembly into your 2" hitch receiver and secure with pin.
Once the plow frame is connected, attach the blade by lifting one end at a time onto the frame's holders. The lightweight aluminum blade construction makes lifting or adjusting an easy, one-person job. Secure the blade in either the transport or plowing position with the plow's snap pins. The low-profile design won't block your headlights, and the transport position is secure enough for highway travel.
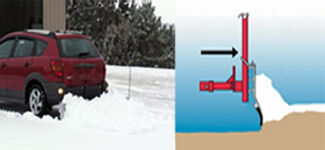
If using with a rear-mount receiver, simply lower the blade to plow position and back up as usual. For a front-mounted plow blade, just drive forward with the blade in the plow position. The unique design takes the hassle out of plowing: This device has no hydraulics or complicated wiring. The push frame on the shank assembly allows the blade to move along the grade of the terrain for easier, more efficient plowing. The heavy-duty rubber cutting edge is effective yet turf friendly, collecting snow and squeegeeing slush without digging into the ground.
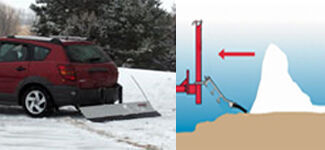
When you are ready to reverse your driving direction, the blade lies back, skimming over the surface of the ground until you change direction again to plow.
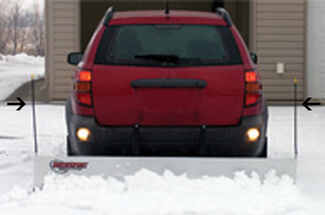
Handy blade markers extend vertically from the ends of the plow to help you see where you are plowing.
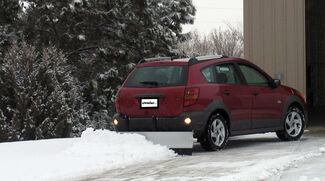
With the SnowSport LT, plowing snow is as easy as backing out of your driveway. Once you are finished plowing, simply lift the blade, refasten it in the transport position and head off for work or errands.
California residents: click here
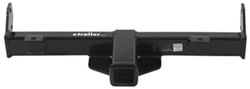
Easily attach a variety of accessories to the front of your Jeep Wrangler with this fully welded, corrosion-resistant trailer hitch receiver. Perfect for winches, spare tire carriers and more.
Features:
Specs:
At etrailer.com we're committed to the products we sell, and to our customers. Our experienced and knowledgeable staff are available via both phone and email to address your questions and concerns for the lifetime of your hitch. The technicians at etrailer perform hitch installations on a daily basis, making them a valuable resource for do-it-yourselfers. The one-on-one, personal service you'll receive comes straight from an expert in the towing and automotive field. We've installed it, we've wired it and we've towed with it, so whatever your question, we can answer it.
Videos are provided as a guide only. Refer to manufacturer installation instructions and specs for complete information.
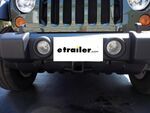
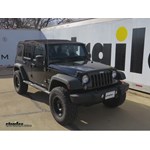
Today on our 2015 Jeep Wrangler Unlimited we'll be reviewing and installing the Curt Front-Mounted Two-Inch Receiver Tube Hitch, part number 31432. Now here's what our hitch will look like once it's installed. The hitch is completely made of steel and is a fully welded construction. You've got a nice strong square cross tube with a nice black powder-coated finish. This is a 2-inch by 2-inch receiver tube and it's go the pre-drilled hole for a 5/8 pin or locking pin. This hitch is capable of up to 9,000 pounds of line pull and 350 pounds of vertical load. The gross trailer weight is 3500 pounds and it comes with a limited lifetime warranty. Next we'll go ahead and give you a couple measurements to assist your selecting accessories for your new hitch.
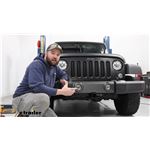
From the center of the hitch pin hole to the outermost edge of the bumper is 4 inches. From the top of the receiver tube opening to the ground is 24 inches. This will help you with accessories such as a ball mount, cargo carrier or a winch. Now I'll go ahead and show you how to install the hitch. To being our install we first need to remove the front fascia. To remove the front fascia there are a total of six push pin fasteners. We have four here among the front and two in the back underneath.
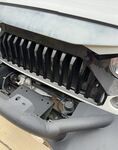
We're going to remove those two first. Now to remove these fasteners we can use a flat blade screwdriver or a trim panel tool prying the center of the fastener out and then removing it completely. Keep in mind these fasteners all operate the same as they're identical. The way we remove the two underneath will be the same way we removed the ones across the front. Once we have all the fasteners removed we can go ahead and pull the fascia down. We need to remove the attachment that holds the wiring harness to the passenger side frame. Again we can use our flat blade screwdriver or trim panel tool and just pop the push pin fastener out, moving it out of the way at this time.
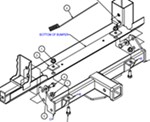
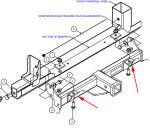
On the inside of the frame here on the passenger side, we have two pre-drilled holes. Top one is a round and the bottom one is a little bit of an oval hole. This will be the passenger side frame rail attachment points. Our center or bumper attachment points are also pre-drilled holes. They're the larger holes you'll find here in the bottom of the bumper structure. Here on the driver's side we have two identical or similar attachment points with the exception of there is a secondary piece of metal on the inside that covers up a portion of the lower attachment point. If your application is covered like this one it won't allow the half inch bolt to pass through it.
You'll need to use a file or drill bit to open up the hole. Once we have it filed or drilled out take my bolt just double check that it will go through nice and easy. The hardware we're going to use to attachment the hitch here to the bumper structure will be half inch by one and a quarter inch long bolt that will go through a spacer block that sits on top of the frame structure and gets secured with a half inch flange nut. I'm going to go ahead and take my spacer block and put them in position. Note here on top of the frame structure there can be manufacturer wiring so be careful not to pinch or smash it when securing your hardware. We're now ready to go ahead and put our hitch in place. It's a good idea to get an extra set of hands to help you hold the hitch while you install your fasteners. As we install our fasteners we're just going to do them finger tight so we can move the hitch around to get all our attachment points lined up. For the frame attachment point on the bottom we're going to use a half inch carriage bolt and block that will come up through the bottom of the frame and get secured on the inside with a half inch flange nut. To get our hardware in place we'll use the half inch bolt leader supplied with the install kit. We'll start by getting our bolt leader going through the attachment point into the frame and then out the side of the frame towards the bottom. Then once we have the bolt leader fed out of the frame we can slide on the block and thread on the carriage bolt. We'll then feed them into the frame separately pulling them up into place and out through the hitch attachment point. Once we have the carriage bolt pulled up through the attachment point we can remove the pull wire. Once we have the pull wire out of the way we'll install our flange nut and again we're just going to go finger tight. For our top attachment point we're going to use the half inch bolt by one inch long along with our half inch conical tooth washer. The teeth of the washer will face the hitch. Going through the hitch into the frame. Then on the inside of the frame we're going to feed a handle nut into place to thread onto our bolt. Note we can bend the handle nut as necessary so we can get it onto the head of the bolt. Now with our passenger side done we can move over to the driver's side and repeat the same process. Now with all of our hardware in place we can go ahead and tighten it down. After we tighten it down we can go ahead and torque to specification as indicated in the instructions. Now with all of our hardware tightened down and torqued to specifications we'll adjust our handle nuts. The handle nut can be bent over or possibly just left because it will be covered up by the front fascia. Or you can cut it off. We're going to use a pair of tin snips and cut it off so that it's up inside the bumper channel. Now on our front fascia we have two options: one we can not reinstall it or two we can cut it out. To cut it out we'll have to cut around our hitch attachment points, the receiver tube, and guss it. To cut it out, what I'm going to do is hold it up in place, lining up the attachment points for our push pin fasteners and then use a paint marker to mark out the sections that need to be trimmed. Noting that the two center attachment points are not even from the center of the hitch. You'll notice that the passenger side is further out towards the tire and the driver's side is more centered under the inside of the fog light. I've got the sides marked out, I'll go ahead and mark my depth. We're just going to start by cutting off the flat flange here for our two center structure attachment points. Then for the hitch we'll need to cut it a little deeper. To cut out this hard plastic we're going to use rotary tool. Now with everything reinstalled and secured we're ready to hit the road. That will do it for our review and install of the Curt Front-Mounted Two Inch Receiver Tube Hitch, part number 31432 on our 2015 Jeep Wrangler Unlimited. .
Average Customer Rating: 4.8 out of 5 stars (42 Customer Reviews)
82 x 14 Residential plow with thick rubber cutting edge self-adjusts up and down to smoothly clear a path on any terrain. Aluminum blade stays in straight-ahead position, and makes plowing your driveway as easy as pulling forward or backing out. Easily attach a variety of accessories to the front of your vehicle with this fully welded, corrosion-resistant trailer hitch receiver. Perfect for winches, spare tire carriers and more.What can I say that you haven't already heard? etrailer.com made this such a painless and straight forward process for selecting the front hitch for my 2015 Jeep Rubicon Unlimited that I can't believe I didn't do it sooner.
The Curt front hitch for my jeep arrived quickly and in great shape, very well packed. On unpacking I found my hardware and instruction firmly secured to it so it didn't get mixed up with my rear hitch, good forward thinking.
The hitch is robustly built and you can see the care that goes into the quality, all the welds are neat and tidy and the finish is excellent. The hardware is all coated for long lasting performance and the fish wire is beyond handy.
For the installation of the front hitch the instructions are a little lacking. This is not to say bad or confusing, just lacking a little more how to. The etrailer video on installing it made the process go smooth and easy. On my Rubicon model you do have to fight with the sway bar motor on the passenger side and the vacuum unit on the driver side, it is a pain but if you take the top frame trim off it is much easier to work. The bolt hole on the drivers side, pass a drill through it to make sure the ft is right because its very tight to work in that area and close won't work. Other than that, it installs exactly like the video. The only thing that would complete the package would be a template for clipping the front plastic shield, the Curt instructions include a sketch that gives you an idea but a simple temporary adhesive template would make it super simple to drill the corners out and then connect the dots with a tool of choice. But hey, that's just me.
The hitch tucks up real nice and doesn't kill approach angle or ground clearance which is great for my application as its for carrying a winch when I need it. I would recommend etrailer.com without hesitation and strongly urge the Curt line of products based on what I've seen so far.

As always, good quality and price. Service is Good and shipping is fast.
It was a great price to solve my problem of how to take my bike camping when I’m pulling my teardrop trailer.
Installation wasn’t that difficult with the exception of the top bolt on the drivers side. The brake booster pump was in the way. Keep trying and you’ll get it in eventually. It took me about an hour to install.
Fit like a glove and installation was quick and smooth. Delivery was well within reason considering item not in stock. Extremely pleased with etrailer.com and staff kept me informed on shipping.
Fast shipping! Fits 2013 jk perfectly. As the video states you need to enlarge the hole on the left side. Bought this for the snowbear 84” plow setup.
Perfect fit .fast shipping
Great product. Fits nice, looks great.

Chris M.
2/25/2015
Thanks much for the pix. You should sell them to Curt and provide them a template for valance trim!!!!

Angryredbird
3/10/2015
Bill are these images?.. Or have the images been assign to your post?.. reason Im asking is that it appears that you did a great job cutting away the lower air dam for the hitch receiver.. very professional. Do you have a template for this alteration?

The Curt Front Mount Trailer Hitch 31432 for the Jeep Wrangler is well designed and built. It has excellent fit so no shims or spacers are needed. Your videos and customer comments were very helpful. The problem that others encountered with short bolts seems to be fixed now. Instead of 2 short and 2 long hex head bolts shown in one of the photos, they now provide four "2.25 inch" bolts which are really about 2.125" which makes the lower driver side bolt marginal. Good practice calls for at least 1 thread to extend beyond the nut, but the lower bolt feels (I can't see it) to be approxemately flush which should be good enough.
The hitch was exactly as advertised. Installation instructions were complete.

Mark G.

11/15/2021
One year later and its still working great!
I was a little surprised with the snow plow. I thought it was going to be hydraulic/electric. It does okay, going on flat and slight declines. Inclines not so good. I also. Bought a rear trailer hitch. Very pleased with it.
Front reciever 2007 Rubicon The front hitch reciever is for 2007 and on Jeep wrangler but I have a Rubicon. ALMOST the same but there is the small problem of the swaybar disconect. Probably a 10 minute job on a wrangler but on the Rubicon it took an hour squeezing my hands arount the swaybar disconect. Fits and looks great, I highly recomend this item.
Craig
10/6/2013
on a rubicon remove the sway bar and disconnect as a unit , takes maybe 10 min so you can acess the hitch location.
We bought this hitch to use a floating snow plow on the front. It's works just like it should.we took our bumper off to put a new aftermarket bumper on which made installation easier. With an aftermarket bumper we did have to trim a part in the middle of the bumper for the hitch to fit but if you have a stock bumper it will fit perfect.
Found a front receiver hitch for my 2011 Jeep Wrangler at a reasonable price. Arrived quickly, had the local garage install for me. We tow a 1960 Nomad trailer with this vehicle and plan to add a bike rack to the front.
I have a '13 Wrangler Unlimited. The hitch is solid and the holes in it do line up with the holes in the front bumper. Maybe it's just me, but 45 minutes is an extremely optimistic prediction of how long the installation takes. I ended up having to drill one hole in the bumper support (as suggested) figure out ways to actually get the nuts and washers in such tight quarters. I'm glad it's installed now and looks great. I think a detailed video or an alternate method of attachment would be helpful, for my model at least.
Excellent merchandise as always. Great company to deal with and fast shipping. I would highly recommend etrailer.com to my friends!

Ray R.
9/11/2019
for maneuvering trailers in to tight places!
I do a lot of online ordering and these people are the best delivered way before I expected and consistently checked to make sure everything was great.... I cannot wait to get my hitch on the front of my Jeep so that I can plow snow this winter I'm so excited with this company
Jeep wrangler install fairly easy. Need longer arms on handle nuts. Very hard to torque inside frame nuts.

Joseph O.
11/18/2020
Works great with front hitch plow. Light winter last year though so only used it a couple times.
Great service, easy to follow instructions for installation. It was a nice front hitch option on Jeep Wrangler to place fishing basket and still have option to use back hitch.
The hitch fit perfect... All the hardware was supplied... However, on the drivers side of my 2012 JK, there is an extra bracket mounted on the frame which causes 2 of the bolts to fall short by a little over a quarter inch... This may only apply to 2012... A quick trip to the hardware store remedied the problem... The order arrived ahead of time and was well packed... Very happy with etrailer and would definately recommend their company...
The product and workman ship were excellent, the look and fit up close to the bumper were great.
The ease of the install was terrible, took way more than 45 min.
Need to figure a better way of simplifying installation, and better instructions on cutting front air dam.
I bought the jeep reciever cover and really finished off the appearance.
Looks and works great. Very easy to install with great instructions. 2nd hitch I have purchased from etrailer. Great prices and fast shipping. Recommend highly!
Thanks for keeping me posted on the progress of my shipment.
I got it Friday and it was installed by Saturday at 9:00am.
I used it Sunday to park my tent trailer in my garage, it was so easy with the front hitch.
Good QualityI'd echo the other reviewer's comments about installation on a Rubicon model. Getting to the mounting bolts with sway bar disconnect was painful. If you plan to reinstall the bumper valence you need to trim it. The instructions only provide the vaguest locations of where to trim. Curt should have provided some life size templates.
The hitch itself seems well made and of good quality. But if you have a Rubicon and plan on replacing the valence it will be 3x-4x longer to install than the 45 minutes noted in the installation instructions.
I use this hitch with my snow plow on the Jeep and it stays solid. The installation was super easy with the included kit.
Worked with out a hitch (pun intended.. for 1 year without issue) used it to mount aluminum plow to front for plowing drive way and works great.
I bought one for a full size Silverado and it too worked for three years no issues or loosening. I added the copper never-seize to nuts and bolts when installing. Good brand
Ask the Experts about this Snow Plow
Do you have a question about this Snow Plow?
Info for these parts were:
At etrailer.com we provide the best information available about the products we sell. We take the quality of our information seriously so that you can get the right part the first time. Let us know if anything is missing or if you have any questions.
Jeep Wrangler Unlimited Accessories


Timothy
6/18/2024
product is working very well,