
To see if this custom-fit item will work for you please tell us what vehicle you'll use it with.
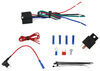
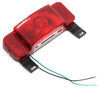
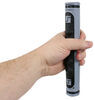
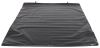
Designed to look like the factory lights on 2015-2019 Chevy and GM trucks, these roof lights make your vehicle more visible to traffic and give it a big rig look. Amber lenses cover the bright, long-lasting amber LEDs. Wiring and hardware included.
Features:
Specs:
Installation
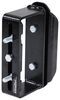
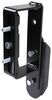
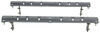
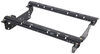
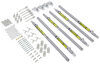
These truck cab lights come with everything you need for an easy installation. The illustrated instructions include a handy template that you can use to drill holes for mounting the lights. And the wiring diagram walks you through every step to make sure everything operates as it should. The light bases conform to both flat and curved surfaces for a tight fit.

California residents: click here
Videos are provided as a guide only. Refer to manufacturer installation instructions and specs for complete information.
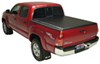
Hello neighbors, it's Brad here at etrailer. And today we're taking a look at the Pacer Performance Hi-Five Cab Lights for a 2022 Chevy 3500. Many larger factory trucks come standard with cab lights, and generally that's required on trucks that are 80 inches wide, and that's to let people on the road know that a wide vehicle is coming through. Well, this one is not 80 inches wide, but could be towing a pretty wide load, and also it's just a larger vehicle. And let's be real, cab lights are a very nice aesthetic touch to a truck. It does give it that nice kind of beefier big rig look to it.
And these ones in particular, the smoke option gives it a little more stealthy look. Now this is available also in amber lenses as well. They all have the LED amber lights, but you can kind of go for a little more stock look if that's what you want, but the smoke I think is pretty sharp looking. Now being LED, they're gonna be pretty efficient, and also they have a lot longer lifespan than your normal incandescent bulbs. So you're not have to worry about fiddling around with bulbs burning out.
Now if this style of lights looks familiar, that's because it's modeled after the 2015 to 2019 GM and Chevy trucks that are generally on their 2500 HDs or their 3500 HDs. So it is nice in the fact that it does have that OEM look, but it's really great because that smoke kind of sets it apart from some of those factory ones. Now it is also shaped to contour to the shape of your roof. So while it is somewhat of a universal fit, it is brand specific, and that reason being, it is gonna contour to your roof line. Now it does have a nice foam pad underneath that is gonna seal up with the bracket mounted underneath it when you tighten it up, so that way you're not gonna have any water leaking through the holes that are drilled.
Now as far as installation goes, you are gonna be drilling through the roof of your truck. And so it's gonna really come down to making sure that you measure it out perfectly before making those drill marks. And in the instructions, there's a kind of basic template that you can use, but really it's gonna come down to getting sure right where you wanna be, and double, triple checking before you drill those holes. The rest of the kit is pretty straightforward as the wiring is included, as well as the ways to make the connections by snapping them together with a wire crimp. I've actually opted to put a little bit different setup than what comes in the kit, as this one does have an on and off switch, which is great, you can turn it on whenever you want or turn it off.
We've actually opted to tie into our fuse panel of the running lights. That way when you turn your running lights on, they're gonna come on at the same time. We've also put a relay in place to make sure that if these ever fail, it's not going to knock out your clearance lights. It's totally up to you on the installation, but I'm gonna walk you through how to get these mounted up and get them wired. So, let's take a look at that. The first step of installation is gonna be determining where we're actually gonna mount it up. Now, generally you kind of follow having this centered up and these kind of a little bit offset back. And what I've done is use tape just to kind of give us a nice layer to work with, and also make marks where our mounting bolts are gonna go through. So what I've done is kind of mock these up in a fashion that I think will work. Because of that antenna, we're gonna have to go on the outside of that. So I've just kind of mirrored that image on the other side. So first things first, find your center, and you're gonna want to denote where that center mark is for our center light. From there, we can start getting our measurements. Now I've gone ahead and I've gotten our measurements set up where our mark's gonna be drilled, so I'll go ahead and walk you through those. That way if you're happy with the way that they look installed, you can actually use those same measurements. So starting on our passenger side, I'm gonna give you the measurements of our drill marks where our studs are actually gonna go through. So I started here at the line, and coming down right at our windshield here, right at the crack, it's gonna be six and a half. Now it is contoured, so going from the center mark, I'm gonna go on the inside portion here of the tape measure. So six and a half, and our back hole is going to be seven and a half. So we have our distance. Now as far as our width goes, you can see from the center line to the outside of our rain gutter is exactly four inches. And that continues on on the one above. So I've gone ahead and mirrored those same measurements on the driver's side, so make sure that that is good. Now the center one, first off, find your center mark obviously. But I actually took the center light and I put a little bit of tape underneath on the screws or on the bolts just to make sure it's not scratching our paint. But I've made little marks, and where I've determined those to go is actually 19 inches from that mark to the inside edge of the rain gutter here. Now I'll go on the other side and double check to make sure that we have that same measurement. But let's get our distance. And we're looking right at seven inches from the in between the windshield and the roof line to our mounting hole there. So let's check the other side. We have our six and a half, our seven and a half, our four inches. And in fact, this one I see is a little bit out so I'm gonna just move that mark just a hair over to the center. But let's go ahead and get our center mark here, or our center light mark I should say. And it's gonna be tricky here with the antenna, so you're gonna want to kind of eyeball it here because this rain guard does start to curve out, that can actually alter where that measurement point is. So just kind of put that right above it, and we should see 19 inches. So now that we have our measurements made, we need to make sure that there's no interference underneath, underneath our roof liner, and that way we're not just drilling holes and hitting something that might be important because we do have our antenna here, we also have this center kind of, you have your lights there as well as sometimes the sunglass holder, basically that upper center console, we wanna make sure we're not hitting that. So what we're gonna do is we're gonna pull a little bit of this roof liner down, that way we can make sure that it's actually clear and it's gonna help us run our wires a little bit later. So, let's hop in the vehicle and start pulling the interior apart. So upon first glance, there's gonna be a few things that we're gonna need to tackle. So we do have this little center console area. We also have our visors, as well as these handles on the A pillar. Now we are gonna be running power eventually to the fuse in the engine bay, so having this A pillar panel kind of off is going to help us run that wire down. So I'm gonna start here. Now I'm using a very small flathead screwdriver. A plastic trim removal tool works also very well here. It's gonna keep it from marring up, but some of ours might be a little bit too thick, so a small little flathead should be able to pop this panel open. Just gonna take your time with this. There's no real major big gaps to be able to kind of get into it, so it can be a little bit tricky. I'm gonna kind of just work my way around the edge and see if we can't, there we go. Right at that corner I was able to get underneath there, and then it kind of pops up pretty easy. Go ahead and do the same on this side. Here we are. And make sure you hold on to all your interior panel pieces as we remove them, as well as the hardware, 'cause we'll need that for reinstallation. So, you can see our bolts here. We'll go ahead and get our ratchet, and we'll get these taken off. So these are gonna be a 10 millimeter, and go ahead and get these off. Now we're gonna go ahead and repeat the same process on the passenger side. Now we're gonna take our window shade here, and you're gonna see, it's gonna be kind of hard to see, there's a little split, and that's gonna allow us to actually get this off. So I was able to use just my fingernails here and work this out this way. And there's that split, you can kind of just take that off, and that's gonna reveal we have some Torx bits here. Looks to be, I would say a T15, let's check. T15 is gonna be the ticket, so there's three of those there. We'll go ahead and get those removed. With those three out, we should see these little white clips here, and those are kind of holding this in, so you might need to take my flathead here and try to pry those back. There we go. So working from the outside, pushing that tab in, it's just a little light clip there. Back to Michael to get this side now that that one's popped. So you can see here, these are our clips that just kind of snap in. So if you pry those back, it's gonna take it off the teeth there. Now we have this out, we can set this aside, somewhere where it's not gonna get dirty or scuffed up. So to get this center portion opened up, you see there's an L or a J shape depending on how you're looking at it, but we'll go ahead and pry this up a little bit. There we go, once we get one edge, you can kind of work your way up. Go ahead and do the same on the other side. And you can see that's gonna reveal some Torx bits. It looks like it is a T15 yet again, so we'll be able to get those loosened up with our same driver. And those are actually a little bit smaller than a T15, so let's go ahead, I'll figure out the size for you. So now you're gonna want a T10 Torx bit driver here, and we're gonna go ahead, we're gonna take these two out. Let's see if we have any movement here. That might still be attached, but we do have two more that are actually tucked up in here. So let's go ahead and get those loose. So now that we have our screws taken out, you're gonna see this little slot, the rectangle, that's gonna allow us to get our flathead in there, and we should be able to just get that popped. There's also one on the other side, so go ahead and do that as well. Just be careful here. So we do have the switch here, which makes me think we might be getting caught on that, so let's take a look and see what we got going on. You might have to slide it down. So kind of working at this, I tried here pulling on this actual whole housing here. It does seem like that's where we're gonna be able to pop this down, but again, I'm gonna kind of move slow, make sure that we're not pulling anything down that could cause damage. Main thing is, this switch seems like it's holding up the party here as it's catching so. Now prying here, it does seem a little scary, but there's gonna be clips right here on this as well. And so once those pop down, you're gonna see, we have our center portion taken out. Now, since we're gonna be just dropping this a little bit to gain access, you can kind of leave this hanging down. We're not gonna be removing the entire headliner, so this should be fine. These wires seem like they are protected enough to be able to support that. So great thing here is, we are gonna be able to see kind of where our drill marks are gonna be, but we're gonna continue on, and we're gonna be taking off this clip here from our actual mirror, or I'm sorry, our sunshade. Now on the backside, there's gonna be a small little slot, and that's where our flathead is gonna go. And just simply pop that open. And that little piece comes out, so make sure you hold onto that. Now it does look like we have another Torx bit there, and this one looks to be a T15. And you can see this clip actually wants to hang there, but that's gained us the movement that we need to be able to see under there and route our wires. So we're looking pretty good here. Now as far as our A pillar plastic, we may need to take a little bit of this trim, the rubber gasket here, and just kind of peel this back. And that's gonna kind of gain us a little more to be able to pry this out using our handle here. There's gonna be clips on these as well up here, so you may have to put some pressure. Now if you have a panel removal tool, sometimes these help get in there and you can kind of pop those clips open. But with a little bit of even pressure, we should be able to get this to open up. The clips actually are pretty far over this way, so using a trim panel tool or a flathead, kind of get underneath there, and we're just gonna kind of pry this until we hear that pop. Now, as far as installation of this, being a new vehicle, there's not a whole lot out there. So looking at some other resources, it seems like this is a common issue with this being a little bit tricky, so just take your time, make sure you're not breaking any of the plastic. But we'll get this separated, it's just a little bit more patience. There we go. So as you can tell, it took a little bit of force, by getting my hand on that top side there, those clips just go into this metal with these metal teeth. So yeah, it takes a little bit of force here, and you can see mine kinda pried it back a little bit more than I wanted, but this metal clip should go further in when we go to re-install and it should clip in back in place no problem. So, let's take a look here, we'll peel this back. And as you can tell, we have access to our roof. So make sure you have it done all across on the driver and passenger side, and then we can start making our drills. Now you're gonna wanna go ahead and make sure you have extra tape around the whole edge because as we drill, you don't want your drill bit to walk around and cause any damage to your paint. Now, to give you a little easier way to get that drill bit started, we're gonna take a punch, and right where our holes are marked, we're gonna go ahead and just put a little dimple there. Go ahead and do that on the other. Now go ahead and drill your pilot hole. Now make sure when it does actually go through, that you're stopping the drill. That way it's not gonna catch your headliner. You might also wanna make sure you have something there to keep your headliner down, that way it doesn't catch as it goes through. Now you're gonna wanna grab your light as well as this backing plate. The backing plate actually has three holes, and that's gonna be for that wire to pass through. So orientate your light in the position that it should be facing forward, and you're gonna see that this bracket, it has it slightly offset where those wires will pass through, so just kind of line it up, figure out which way is the proper orientation, and you can see that it is closer to that front hole. So what I'm gonna do is take our bracket here, I'm gonna line it up with the holes that we just made, and then I'm gonna drill just a small pilot hole through the wiring. That way we have it lined up perfectly when we enlarge the holes. So now we have our three holes, drill them to go back and enlarge where the studs are gonna go through. We're also gonna want to enlarge that wire hole just a little bit to allow those wires to be able to pass through. Now we're just gonna test fit to make sure that it does drop into place. And that's pretty good, I have my wires up, so we'll be able to pull this tape up and then feed our wires and then our studs through. Now if there's any shavings here, you're gonna wanna make sure that you vacuum or blow them off. Don't try to brush them off with your hands. That way you, A, don't get any metal splinters, but also you don't scratch your clear coat. We'll feed our wires through. Now if you do have sharp edges where you drilled through for the wires, you might wanna take a little punch and kind of just work that around just to kind of smooth those edges out, or if you have a very small file that you can get in there, that might be worth doing. Line your studs up, and that should drop in place. Now once you have that in place, you can go ahead and take off the plastic, and then you're gonna wanna grab that same plate that we used to make the markings, and this is going to go underneath. Now before we do that, we're gonna want to attach a ring terminal to the ground. The reason being we're gonna use the stud to actually attach it before this goes on, that way there's metal and metal contact for that ground. You can actually attach all of them together and have one common ground, but I think having one on each and knowing that it's gonna be nice and sandwiched in there, and hopefully our ground shouldn't come apart, and that's gonna be a nice, secure connection. So I'll go ahead and grab my ring terminal, and I'll show you how I do that. So now we're going to take our wires here and we're gonna pass them through the bracket. Now with our wires pulled through, we can feed this bracket up, and put it on the studs. Now there is a weld here, and I think that bracket is actually gonna sit in there pretty decent, as long as I feed this front edge in first, and it's gonna be hard to see right away, but I'll show you how it kind of sandwiches in there. All right, so now we have our bracket on. And go ahead, we'll be grabbing our flat washer and the supplied nut that's in the kit. We'll go ahead and hand tighten this on just kind of get that in place. I'm gonna do the other one as well. And this is gonna be a five-sixteenths, so if you have a ratcheting five-sixteenths wrench, that's probably gonna be your best option for getting these tightened down. So there you can see that part of the bracket kind of feeds underneath this welded portion. So, it actually kind of works out well. You do have to kind of feed that in through the front, but it fits in perfectly. So, now that we have those hand tightened on, I'll go ahead and tighten these down with my rachet wrench. Now you are gonna wanna tighten these down to where it's pretty snug because that's gonna compress the foam that's actually underneath the light, and give you a better watertight seal long-term. But you also don't wanna go too tight to where you're actually going to damage the light. So just go ahead and you'll feel it snug up and then give it a few, maybe a quarter turn or a half turn just to kind of make sure that this is in place. There we go. Now I'm gonna double check my front one, just to make sure that they're evenly tightened. With that tightened down, we're gonna go ahead and repeat the process on the other side. So now we're gonna do the same process on our center light. Now the wires are offset to the driver's side. So on our passenger side, we're just gonna simply make our indention, and we can go ahead and make that pilot hole. So now we're gonna grab our plastic washer that goes on the backside of the center light, and you're gonna see it does have that wiring hole going through it. Both of them do, but you're only gonna use it, or at least that hole on one side. Given it is on the driver's side, I'm gonna line this up with the hole that we just piloted, and I'm gonna go ahead and make our hole for the wires to pass through. Once you have your holes drilled, just gonna give that a quick test fit there. And that looks good. So we'll go ahead and we're gonna get some of these metal shavings off, we'll peel our tape off, and then we're gonna feed our wires through. And then we're gonna start making some connections. Feed our wires through. And then our mounting studs there. Get that sitting nice and flush. Now I see that my studs are actually catching a little bit on that side, so I'm gonna go back with the drill bit. I'm just gonna water that out a little bit so it drops in flush. So now we're gonna take our plastic washers here and feed our wires through first. And then we can just run this up to that mounting stud. Now do be careful because since we drilled through, there might be some metal flashing, or some burrs hanging off. So just be careful that you're not cutting your fingers on that, you know, that sitting there. So I'm gonna go back with my washer and my nut just like before, and get that hand tightened on. So now you can go back with your ratchet wrench or socket and just tighten those down. So now we're gonna take the black wire of our white, and we're gonna be actually putting a ring terminal on here, and that's gonna ground it. And I'm gonna show you this one here, just 'cause it's gonna be a little bit easier to see, but what we're gonna be doing is taking a ring terminal, which does not come in the kit. If you need to pick one up, we have these here at etrailer and your local hardware store will generally have them as well. And this is gonna make sure it's a nice, secure connection on this metal. Now the clips that come in there in the kit will say that you can attach them on, have a single ground, and you can absolutely do that as well, but to not have to extend any more wires than we have to, this is gonna make a little bit easier. Now with ring terminals, there is gonna be a flat side that's gonna sit flush against the metal. It looks like we have plenty of space here just kind of where all of our mounts are gonna be, so I think if I just kind of put it, you know, right about here, that should be fine. It's nice and hollow on the other side so it's not gonna cause any issues with anything. And we're gonna simply attach this with a self-tapping screw, drill this into our metal here. Just make sure it's tight enough to where it's not gonna move. And we're gonna go ahead and do the same thing on the other two black wires. Now in the kit, they have stamped together connectors for our wires. I'm gonna go ahead and use butt connectors as I think they're a better connection overall. So what I've done is I've taken some of the extra wire length, which as you can see, will easily reach our middle one, so I went ahead and clipped that, and then I've just attached that with a butt connector here. So I'm gonna route this to our next power wire, and we're gonna jump into that as well using a larger butt connector, a larger gauge because we have the two wires. And then from there, we're gonna run another jumper with the extra wire, just with that butt connector to the next one. And from there, all of our power wires will be attached and then we can route it to the engine bay to actually get it power. So with our wire, we've ran that over here and I've just attached it to our red power wire from the middle light. And you're gonna wanna leave a little bit extra slack here because this wire on the light doesn't have a whole lot of movement. You're gonna wanna be able to still move this in a fashion to where it's gonna be out of the way when we put this back up. Now there's plenty of space up there so I don't worry too much, but it's better to leave yourself a little bit of room before making connections. So, we have our wires twisted up there. Let me go ahead, I'll put a butt connector on here. So now we're gonna take the rest of that wire supplied in the kit, and we're gonna just make sure we have enough to run to our outer light. Go ahead and make a cut. And then we're gonna tie it in to this butt connector. Now, if you'd like to, you can do a little bit of extra protection here, and that's just gonna be wrapping this with an electrical tape, just to kind of keep it all protected and from pulling apart. And that way over time, it's just not gonna kind of work itself loose. It's up to you, you don't have to do this step, but it gives me a little more peace of mind knowing that it's not gonna just pull apart. So now just take your wire here and you're gonna route it over to where our last light is. We're gonna go ahead and make the same connection with that butt connector. Now, we're gonna be taking the rest of this red wire and we're gonna be routing it down at the A pillar here. Now, once that's routed, this is when you can kind of decide how you want to get your lights to power up. So I have this wire, and I'm just gonna kind of run it down pretty easily down our A pillar as there's plenty of spots to kind of just run along with the factory wires. And if you need to, you can throw a little zip tie on there just to keep it secure if you'd like, but once you have this run down, you're either gonna be tying into your switch and regardless, you're gonna be tying into your power. So you're pretty much at a good point. If you want to, you can go ahead and get your interior put back together. Now the relay will only use the running light circuit as a switch. It then sends power from the battery or the accessory circuit that you choose to send the power from. That way the only amperage of the taillight circuit is for switching the relay. Now this way, if for some reason, if you lose accessory power, you're only gonna you lose the cab lights because you're not drawing power from the actual running light circuit. You are only gonna trigger it in the relay. Now the other option is to use a fuse tap directly to the running light fuse. The downside is if both the fuses blow, you not only lose the cab lights, but you also lose the running lights on the vehicle until the fuses have been replaced. So this could be dangerous situation if it occurred while driving. I do think that might be a rare occasion, but again, this way we know for sure it's only going to be essentially for the lights itself, and it's gonna keep it separate. Now there is the switch in the kit, and that's gonna work perfectly fine, but you are gonna have to manually switch that on and off. So if you want this tied into the actual running lights, so when you're running lights are on, the cab lights will be on, you can use a fuse tap, but that fuse tap has a fuse, and you're actually gonna have another inline fuse for that. So if the fuses failed for whatever reason, you're actually gonna lose your clearance lights or your factory running lights as well. So if it's, you know, you're driving at night and those fuse just happen to blow, that could be a dangerous situation. So the relay acts as basically its own fail safety to keep these lights working or triggered on when those running lights are turned on. But if there was to be a problem, the lights may not work, but you'll still have your factory clearance lights, and that's gonna keep you safe. So our relay is gonna live in the engine bay, and that's gonna get us closer to not only our fuse panel, but also our battery. And in order to get this ran up to it, this is gonna be a little bit too short because we're gonna be running it through a grommet through the firewall. So where this spade connector is that normally goes into that switch, I'm gonna go ahead and I'm gonna cut that off. So we'll be extending this wire. I have some spare wire here that we just kind of had on hand. That's gonna be long enough to for sure get us into the engine bay. If you are going the relay route, they do give you an extra included, you know, little length of wire here that should also work just fine. But I'm gonna go ahead and use ours just because we do have plenty of it here. If you do need extra wire, we actually have that here at etrailer, you can pick some of that up. But we'll go ahead and we're gonna make this connection here with the wire on our, from our lights. So we'll go ahead and just splice this. And then we're gonna put our butt connector on here. So with that connection made, my next step is gonna be finding a grommet in the firewall. Generally there's gonna be one that's kind of tucked kind of on the firewall by the pedal assembly. So I'm gonna look under there, find our best route, and then we're gonna fish this through to the engine bay and make our connection on the relay. So to get our wire through the engine bay, the grommets on this truck are not exactly super easy to find, nor is there a really large one, but I did find one and that's gonna be our hood latch release. So you actually have the cable passing through it, and there's a grommet that's a little larger than a quarter size and I was able to pry that up. And I'm using just old airline tube that we have, it's slightly flexible, but I can push that through the grommet. And then what I'll do is on the opposite end, actually tape that wire in. So we're just using this as a pull wire to get our wire passed through the engine bay. So if you have a skewer, or a hanger, a metal hanger, even maybe a long screwdriver, you can simply tape that end onto it, peel back that grommet, and push it through. Now when it comes through on the engine bay, it is a little bit tricky, but I'll show you where it comes out at. So following this little line here, you're gonna see the grommet's gonna be kind of tucked up a little bit, but you're gonna see a rubber plug with a hard wire. And if you follow this back, you're gonna see it does go to the hood latch, so that's how you know it is the correct one. And you can see, I just pass my airline through it and then just kind of fed a bunch through. That way there's excess on the other side, that way I know where to pull from. So here, it's kind of hard to see, but we have in between our two reservoir tanks, you can see straight down there, this is kind of where it pokes out through. And it was kind of tricky to see, but once I fed enough, I could see that this was kind of looping around. And so now that I have a grasp on it, I can simply pull this through to get our wire. Now, make sure whatever you're using to pass it through, whether it be that skewer, or a hanger, or a screwdriver, tape the end of that wire, that way when you're pulling through, it doesn't actually get caught and get stuck down there. So once you have that taped up, simply pull this through and get all your slack pulled out. Don't pull too hard, but now you'll have your wire closer to where you need it. So now that I've pulled this wire through, I'm just gonna kind of get that slack out gently. And remember, we do have a butt connector there, so if it gets a little tension, check the other side to make sure you're not pulling on that. You don't want that wire to separate. And once you have enough wire pulled through, we can probably just tuck this underneath this bracket of the reservoir and around here, and that's gonna put us right where we need to be, the fuse panel, the battery, and it's gonna keep it over here where we can mount our relay. So it's gonna keep it looking nice and clean, and you're not gonna have a bunch of wires all over the place. So I'm gonna make sure that I have all my slack pulled through, and then we'll start making our connection. Now since we're gonna be tying into the fuse panel, we have to find that the fuse that this is gonna work well with, and that's gonna be obviously our running lights that we wanna come in on at the same time. So looking at our panel, I've actually found, number 42 is gonna be our park light right. So there's also a left, but as long as you're tying into one of them, that should work no problem. Our 42 fuse is right here, this 10 amp, and I've gone ahead and tested it. And the way to, you're gonna wanna double check as well. You're gonna have a test light, put that on your negative, and you're gonna test to make sure that you don't have any power while the lights are off. And then turning the light on, this should kick on. So you should know that that is the proper fuse that we're gonna be pulling, and we're gonna put our fuse jumper into there. Now that we kind of have a little bit of a plan here, I'm gonna go ahead and grab our relay. Now I'm gonna walk you through the wire coloring that we're using here. And that way you can kind of double check yours if you are doing a relay to know that you have the proper one. So here we have five different wires. So let's run through these. First we have our red wire. This is gonna be our power wire. Now this is going to get a ring terminal and go to the actual battery post to get that 12 volt supply. Our blue wire, we're not actually gonna be using. So I've just gone ahead, wrapped that over and taped it up. Our green wire, I've gone ahead and attached our fuse jumper here. Now this is gonna go where that fuse is on 42, plug into here, we're then gonna put that fuse that we pulled to put this into place in here on the bottom. And then also included in the kit is gonna be this 10 amp fuse. So those will both sit there, and that way it's protected. Moving along, we have, this is gonna be our black wire. This is gonna actually go to the wire that we extended, so this is gonna run to our lights. And then finally we have a ground. So this can go to the negative on the battery, or you can find a spot to self-tap this ground on. I've gone ahead and put that ring terminal on. So I'm gonna go ahead and I'm gonna start making these connections. And then once we have it all laid out, I'll show you kind of how it looks. Now for the butt connectors that I'm using under the engine bay, I'm actually gonna be using heat shrink ones. And that's simply gonna just give a little added protection because the engine bay is prone to, you know, being wet or seeing moisture. These actually kind of cinch up once you heat them down, and that's gonna keep that connection protected. And also it just gives it a little extra hold overall. So, with these crimped down, we'll go ahead and get our heat gun on there. Now if you need heat shrink butt connectors, we have these here at etrailer. They are really nice for a lot of different projects, especially on any electrical that again might be prone to seeing any wet conditions. So going ahead and I've cut off the extra wiring that we had as our pull through wire. And that's just gonna take some of that slack out so we don't have to loop it around in the engine bay. And so we'll be attaching that to the black wire on our relay. So now on our red wire, this is gonna be our power wire that's going to the battery. We're gonna attach a ring terminal. Now we're gonna go ahead and I'm gonna mount it to this post on the positive of our battery. And it does look like it's gonna be a little tricky for that wire to run out and have this still clipped down. I'm gonna try to run it here and see if it's still has room to do that. But for now, let's take this 10 millimeter off and get our ring terminal on. So now we're gonna pull that 42 fuse that we tested earlier. Now we're gonna want to actually get a micro fuse tap, as the one that comes in the kit is not gonna fit in the slot here. The way this works is it just plugs in where that fuse was. And we're gonna put the fuse that we pull in this bottom portion. And then the top one, we're gonna put a five amp fuse, and that way it's going to have that protection. And then this is gonna butt connect to our green wire. So I'm gonna go ahead, get our butt connector on here. And then we'll attach it to our fuse tap. Now we're gonna hold tight, and putting our fuses in and plugging this in until we're completely hooked up to power. So we're gonna move along here so we can set this one aside. So now all that we really have left here is gonna be our negative and our power. So, let's go ahead, we'll get our negative put on the negative terminal, and then we can get our power put on. So now we can take our power and place this on, our power or our positive terminal post here with that on there and tighten that down. So now we can grab our fuse tap. We're gonna go ahead and put our 10 amp fuse that came with it, or the one that we actually pulled here, we're gonna put that on the bottom. And then we're gonna put our five amp up top. And then from there we can actually get this plugged in to our fuse slot. So now all of our wires are accounted for. It's a little bit of a mess here, so I'm gonna kind of tie these up, see where our slack is, and then we're gonna actually mount the relay. Probably gonna just do a self-tapper right here to kind of get it out of the way, but for now I'm gonna tie these up, get a little bit of wire loom on there to clean it up, and then we'll get that mounted. So with a little bit of wire loom here, I just kind of tucked it up, make it look nice and clean, and all of our wires are out of the way. So now I need to mount up my actual relay here. And this seems like a good spot as there's nothing behind it here that it should make contact with. So I'm just gonna go ahead and use a self-tapping screw and get that installed. Now with all of our electrical connections hooked up, we have all of our interior panels put back in, we're ready to test this out and see how it looks. So now to see what it actually looks like all powered up. And as you can see, it's got a nice clean appearance, but it also makes the truck have a little tougher look as well. That nice smoke looks great and subtle when the lights are off, but also it looks even better when the lights are on. And that was look and installation of the Pacer Performance Hi-Five Cab Lights on a 2022 Chevy 3500..
Average Customer Rating: 4.2 out of 5 stars (6 Customer Reviews)
Designed to look like the factory lights on 2015-2019 Chevy and GM trucks, these roof lights make your vehicle more visible to traffic and give it a big rig look. Amber lenses cover the bright, long-lasting amber LEDs. Wiring and hardware included.Installation is easy as long as you take your time. The quality and appearance is good also.

Out of the box and after the install, I was somewhat happy with the product, but after just a couple months the amber cover over the center section blew off in a touch less carwash. I was able to find it and after contacting etrailer about a replacement, I was told I was out of warranty. Now I’m stuck with them and had to use silicone to hold it back together. Would not recommend this product. Wish etrailer would have had better customer service in this matter.
I received3 my replacement order after the USPS destroyed my initial order in transit. The folks at etrailer swiftly and efficiently shipped me out a new order after updating them.
Package came when they said. The Box was so smashed that I took photos of the package before I opened it. I thought there would be parts missing and lights would be smashed. All the parts where there and in ok condition. They need to send these out in a another box so they arrive in better condition.
NOT AS BRIGHT AS EXPECTED.
Do you have a question about this Vehicle Light?
Info for this part was:
At etrailer.com we provide the best information available about the products we sell. We take the quality of our information seriously so that you can get the right part the first time. Let us know if anything is missing or if you have any questions.


Thank you! Your comment has been submitted successfully. You should be able to view your question/comment here within a few days.
Error submitting comment. Please try again momentarily.