
Thank you! Your comment has been submitted successfully. You should be able to view your question/comment here within a few days.
Error submitting comment. Please try again momentarily.


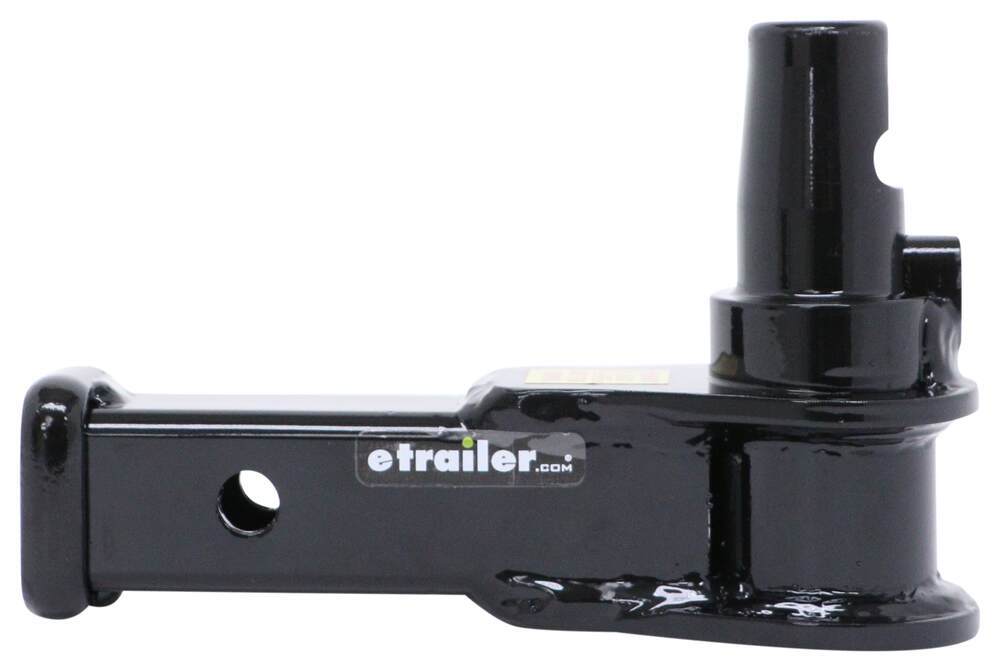


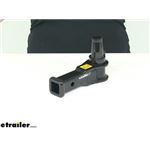
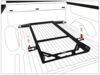
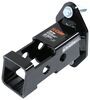
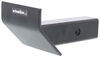
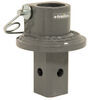
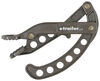
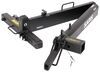
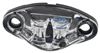
Easily mount your bike rack or cargo carrier for a trip to the trail with this removable, 1-1/4" receiver attachment for your Stealth Hitches rack receiver. Sturdy attachment inserts and secures in your rack receiver's center block.
Features:
Specs:
Note: This attachment is for hitch-mounted accessories only and cannot be used for towing.
Videos are provided as a guide only. Refer to manufacturer installation instructions and specs for complete information.
Hey everybody, Ryan here at etrailer. Today on our 2021 Tesla Model 3, we're gonna be taking a look at and showing you how to install the Stealth Hidden Trailer Hitch Receiver. When it comes to these Teslas, they look awesome. Really streamlined cars, very sporty, and really have some good lines to them. So, whenever you're not wanting to use a hitch or use an accessory, the last thing you want on the back of it is a big, giant hitch. And that where this setup really shine.
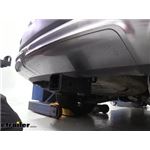
So, when you're not using it, the receiver tube actually comes off and it'll be completely hidden. You'll have no idea that you even have a hitch on the back of the Tesla. So, the way this works is pretty easy. The most challenging part is this things ride pretty low to the ground, but the small sacrifice to climb under here and take this apart is well worth it, in my opinion. So, to get the receiver tube out, you're gonna have this cover, we pop that off.
They're gonna have a locking mechanism, so we'll unlock that. On this side, there's gonna be a handle. And when we turn this handle, it's gonna release the receiver tube. So keep a hand under this, it's heavy, when you do this. That way, it doesn't drop on top of you.
You're just gonna rotate that, the receiver tube's gonna pop out. And then what you can do, just to keep this area protected up there, they actually give you a plug there. So you just pop that in and keep everything covered up. Whenever the receiver tube opening is removed, you can see it looks 100% factory. You can't see that the hitch is there at all.
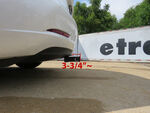
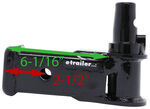
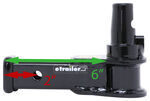
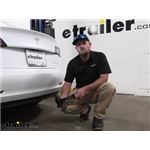
And it has that really good appearance that we're all looking for with our Tesla. Whenever you are ready to use the hitch, it's gonna be just as easy to put in as it was to take out. You're simply just gonna reverse our steps and you're good to go. Now, I'm not gonna lie, if you just have the hitch back here and you're not using an accessory, I'm pointing out the obvious, it does come way far out. It looks a little out of place on a Tesla, but honestly not that big of a deal, 'cause if you plan on using it, who cares, right If you are not going to use it, drop it out. And you'll never notice it's there. But honestly, they actually thought things through, by making it come out so far. That's gonna give us some really awesome clearance. So when you're using a bike rack, particularly, you're not gonna have to worry about hitting your bumper or anything like that, 'cause a lot of those types of accessories will fold upright to stored position. And by the hitch coming out so far, you're gonna be able to fold it up and not have to worry at all about it touching the back of your Tesla. The receiver tube opening is going to be a 2-inch by 2-inch. So that is a really common size and a ton of different accessories will work with this us up here. With that said, though, some people don't have 2-inch by 2-inch accessories. Some people already have 1-1/4" accessories that they really like, and they really don't wanna get rid of them and buy a different accessory, just so can work with this hitch. And that's actually the situation that our customers in today, not a big deal though, because there is an 1-1/4" by 1-1/4" receiver too available. This works the same. It just replaces the 2-inch by 2-inch one, and that's what he picked up. So that way, he can drop this 2-inch one out, put this one in, and use his favorite accessories still. So you definitely get a couple of options. And if that's your case, go ahead and check this one out. And kinda talking about options. One thing Stealth does really well is kind of finding packages, if you will, that will kinda meet the needs for everyone and their particular situation. So for example, the exact setup we have here today, this is gonna allow you to use just accessories. Hitch-mounted accessories, you can't tow with this set up. With that said, if you wanna tow and use accessories, there's a kit available for that as well. So it's a hitch, the receiver tube, they give you a ball mount, some wiring, and things like that. So it's a great all around kit. You can tow and use your accessories. If you're unsure, if you're gonna tow in the future, but you know right now, you wanna use accessories, there's also a kit that more or less like an upgrade type kit. That give you the components that'll work in conjunction with this hitch that will allow you to tow. So like I said, if you we're unsure, if you're gonna tow in the future, there's a possibility there, you can pick up this now. And if that's the case, if you do need to tow, you can always pick up the upgrade kit, set it up on here, and you'll be good to pull a trailer behind your Tesla. So the receiver tube is gonna have a reinforced collar there at the end for a little bit of extra strength. And it's going to use the standard 5/8 pin and clip. Now keep in mind, it doesn't come with a pin and clip, but if you need one, you can grab it here at etrailer. So now let's talk a little bit about the weight capacity of this hitch here. It's just gonna have any 350 pound gross tongue weight rating. And that's gonna be the amount of weight that is pushing down on the hitch. So pretty high number, actually. You should be able to use those one to four bike racks. And of course, that's gonna depend on how heavy the rack is itself as well as how heavy your bikes are. Now, I'm gonna give you a couple of measurements and you can use these to help figure out which hitch mounted accessories will work best. From the ground to the top inside edge of the receiver tube opening, it's gonna be about 9-1/2 inches. So if you can choose an accessory, try to get one with a rise in the shank. It'll just give you a little bit more ground clearance. From the center of the hitch pin hole to the edge of our rear bumper, that's gonna be about an 1-1/2". And when I say that, the hitch pin hole is actually going to come out past our bumper, that distance. And you can use that measurement to figure out exactly if any of those folding type accessories you might have can be stored in that upright position without contacting the bumper. If you're in the market for a new bike rack, couple of them came to my mind right away. And that is the Thule Helium Series Bike Racks. So there's a platform style rack as well as a hanging style rack. And I feel like those would be an awesome fit for the Tesla because they're made from aluminum. They're super lightweight. And they just have kinda that modern futuristic look to them, almost. It kinda just vibes with the look of the Tesla. And I feel like a lot of people would be real happy with it. With that side too, we've had quite a bit of experience with all different types of racks. We put them on all different types of cars here at etrailer. And those two kinda just stuck out to me right away, as soon as I thought about it. So that's something you're thinking about, probably definitely worth at least giving them a look and checking them out. So at the end of the day, a hitch you really can't go wrong with. Not only is it going to look great when you're not using it, it's virtually invisible, but it's super easy to pop in and use your accessories. So definitely get the job done. Now as far as the installation goes, really not bad at all, believe it or not. I know as soon as I started with it, and said, okay, I'm working on this Tesla today. I was a little reluctant, it's a Tesla, just kind of the nature of the car. You might think it may be complicated, but I was actually pleasantly surprised. It really was not too bad. Handful of fasteners, the bumper comes off. Everything's pretty easy to get to. So believe it or not, you might be surprised on just how easy it is to actually work on. Speaking of which, let's go ahead and put it on together now. To begin our installation, we're gonna be here at the back of our Tesla. And first thing we need to do is remove our tail lights. So go ahead and open up your deck lid there. And if we come into the corner, we can peel back the paneling to get to some fasteners. Well you can just grab this carpeting here. Just kinda peel that back. And we're gonna have two eight millimeter nuts, we need to pull off. So we'll grab our socket, get them removed. And we can go ahead and unplug our light. So there's gonna be a red keeper tab. You can kinda pull out on that and squeeze down on the connector and then we'll unplug it. If we get to the top of our tail light, we're gonna have this knob. And if you can't get it broke free by hand, take a paper towel or a rag, pair of channel locks here and very carefully just break it free. That way, you don't damage it. And then we can remove our tail light. So careful pulling side to side like this. You don't wanna get too carried away. We're gonna try to pull straight back. On the light, there's some tabs in there that it's like alignment tabs, and that's kinda what's hanging us up. You can get a plastic trim tool like this, kinda work it behind there to help to free those alignment pins. So once we have it released, we can go ahead and set our tail light off to the side. Those are the alignment pins I mentioned. And we'll set this off to the side and repeat this exact same process on the other side of our vehicle. And a matter of fact, anything we do from this point on, to one side, we're also gonna repeat to the other 'cause they'll be set up the same way. With the tail light out of the way, that's gonna expose the fastener here and we need to pull it out and we'll use a 10 millimeter socket. Now let's move to our rear wheel wells. And along this edge here, we're gonna have two push pin type fasteners. And they're gonna be just like this one. So I have one in the corner and the same style one, a little bit further back. It's a little tricky to see, but it is there. What you're gonna do is take a pick or a trim tool or a flat-head screwdriver, pry underneath the head of the fastener, and pull it completely out. There's a third push pin fastener here in our wheel well. So when you're taking these two out, go ahead and make sure to get that one out as well. And if we follow the edge of our wheel well up here, where the fascia meets the quarter panel, we're gonna have a Torx bit fastener. So I'll use a T25 to get this removed. Underneath our vehicle, we're gonna have this big gravel guard and we need to get that out of the way or loosen it up. Each side there's gonna be a tab like that, that you can pop open the screwdriver. And we're gonna remove the 10 millimeter underneath it. Then we're gonna have several more fasteners that we're gonna pull out. So it looks like we're gonna have two. Like we have a couple more on this edge. So it turns out that we actually don't need to physically remove this gravel guard. So, not a big deal, one less stuff, we don't have to worry about doing. But with that said, all these bolts are loose and out of it. With that said, we can lower the car back down and get to working on getting the fascia removed. Now with an extra set of hands, we can get our fascia removed. I did put some painter's tape along the seams here. That way, we don't have to worry about scratching up our paint. And what you're gonna do, kind of broke this loose and it come apart real easy, but you're just gonna grab the corner and pull outward on it. You may need a trim tool like this to kinda push down on those keepers there to get it to release. We're just gonna work our way around and lift to here. So when the corner is really tight, just be careful, pry up on these. So we have the other side, about the same, and continue to work our way towards the middle here and be careful when it comes free. You don't pull it off all the way just yet. We wanna make sure we looked out and make sure we don't have any wiring attached. Looks like we have one connector here. We'll pull back on that tab, push down on the middle of it to disconnect it. And so the fascia should come out along with that big panel underneath. Let's get this removed and set it off to the side, somewhere safe. Now we can do with the fascia out of the way, we have this plastic piece here, and we need to get that out of the way. That way, we can expose some fasteners holding on our bumper beam. So there's gonna be several 10 millimeter head bolt and along the hole there. And we're not gonna unhook it or anything like that. We just need to be able to have this little bit extra space. That way, we can get to this hardware in this area. Now we're gonna remove our bumper beam. Now over here on the passenger side, we're gonna have two 15 millimeter nuts. Same deal on the driver's side, there's just gonna be three. So one more in the middle. Now we'll grab our socket and pull those out. So I went ahead and I already got the nuts off the other side. And what we're able to do, slide our beam off and set it to the side. Now we can do is remove this support plate. So this is why we needed to loosen this up. So we get to this nut here. These are all 15 millimeter head nut as well. This last nut out of the way, and then we can set these plates off to the side. This point, what we need to do is make sure we don't have any like sealer or anything in this area. Ours is perfectly clean. So chances are pretty good, yours is too. If you do have some sealer built up here, make sure to scrape it off. And then over the studs, you're gonna take these plastic type washers. Go ahead and just slide those over. Now we can grab our hitch and get it into position. So this is simply just going to slide over these studs, like so. And then on the outside stud or studs, if you have two, you're gonna take the factory nut and get that started, each side of the hitch. And then we'll come back, tighten it down. And then we can switch over to a torque wrench and tighten that nut down to the amount specified in the instructions. If you don't have a torque wrench, you can pick one up here at etrailer, or a lot of times, you go to your local auto parts stores, they'll have one available to rent. Now we can get our bumper beam and we're going to fasten it to these included brackets. And so the brackets, you'll see, there's a nut on one side of it and make sure that nut is gonna face up. All right, and the thick part of the bumper beam, that's also gonna be the top side. So the holes in the bracket are gonna line up with the holes in the bumper beam. You're gonna take these bolts, put on a flat washer, drop them through the bracket, like so. Flip it over and we're gonna put on one of these nylon washers, plastic type ones. I have to hold everything. It's a little tricky to keep it all together, but we'll line that up in the bumper beam. Then we're gonna take a flange nut, hold that in there, and get it started. I really haven't found a great way to do this. You need a little bit of luck on your side to keep everything together here, but we'll just get these threaded. And we're gonna tighten them hand tight, do the same deal with this one here. Now we can take our assembled beam. And you can see those brackets are gonna line up with studs. So go ahead and put those on. And then we're just gonna take the factory nuts and we'll just get these on hand tight. Now we can do is make sure that those brackets are kinda pushed as far out to the outside as possible. So in our case, it looks like the bottom one's moving just a little bit. We're gonna hold them there and then tighten down these two nuts. From here, you wanna make sure that your bumper beam is centered and once you have it centered in your vehicle, we'll come back and tighten up the remaining bolt. Once everything's tight, we'll come back and torque the hardware down that we haven't done yet. But these ones that they wanna spend on you, what you can do is take a 17 millimeter box wrench and come in from the back and hold the head of the bolt there. That'll prevent it from spinning so you can actually get it torqued down. It is pretty tight. So you might have to kinda find that sweet spot to get in there. But it's definitely doable. Now we can take a receiver and put this in place. So you want the handle, this portion to be on the passenger side of our vehicle. And those holes in there are gonna line up with the holes in our hitch. I do wanna mention, if you have the towing hitch, there's some safety chain loops that go on with this at this point as well. So some I wanted to point out. But you're gonna take the bolts and get them lined up here. Push them through. And on the other side, your bolts come out, you're gonna take the included lock nuts. Get both of these started, and then we can tighten and torque them. So I'm using a 15/16 socket and box wrench to snug this up. Once those are tight, make sure to come back and torque them down. So I went ahead and done was bolted this plastic bracketry back on up the opposite way that we removed it. And with that in place, now we can work on getting her fascia back installed. Now if you come here to our fascia, some models may have this, some won't. And our case, our fascia does. But we have this little trap door here. And before we put it back on, we're gonna remove it. That way, the hitch will clear. It'll probably just go back together easier. So there's this two quarter turn type fasteners, take a flat-head, pop that out. If yours does not have this, there is some trimming instructions or trimming diagram rather in the instructions, and you can follow that and they'll have you cut an opening out. That way, you can get to your hitch and everything else. Now with an extra set of hands, we'll take our fascia and get it re-installed. Don't forget to plug in any electrical connectors that may have disconnected. When you're putting this back on, just take your time. Make sure you go around all the corners and look and make sure everything's lined up. You don't wanna force this in and break anything. And that'll finish up our look at and our installation of the Stealth Hidden Trailer Hitch Receiver on our 2021 Tesla Model 3..
Average Customer Rating: 4.8 out of 5 stars (14 Customer Reviews)
Easily mount your bike rack or cargo carrier for a trip to the trail with this removable, 1-1/4" receiver attachment for your Stealth Hitches rack receiver. Sturdy attachment inserts and secures in your rack receiver's center block.
Love the quality of this hitch and the ease of using the attachments for various racks. Installed the hitch receiver myself and it took less time than I thought it would. After a year of use, it still gets high marks from me.
A great receiver but it's been stuck in my hitch. I've tried the recommended manual force to get it out and I'll take it to a shop and suggest rubber hammers next.

Andrew

6/2/2023
Update I did get it out, and have since been using a 2inch hitch so can’t report if the sticking is still recurring
Works great. Delivery was extremely quick. etrailer always has best parts and are very informative.
great product. I only you had the option to get the 1-1/4 in. during the rack receiver order so you don't need to order it separately if all you need is 1-1/4 in.
Great product and great service.
This company not only has a great product but a fantastic customer service department. We received a wrong item and within s couple of hours, we had a response and a replacement on its way!!!
Same high quality as the 2” receiver in a smaller, lighter, easier to handle size that works perfectly with my bike rack.
etrailer had it in stock and delivered it promptly.
Very good service and fast... very good vidéo for installation instructions on the web site.
Thank you.
Purchase was easy, quick and reliable
Thank you for your help - great product and even better service. I was pleasantly supprised on how quick I received my order - have a great summer and stay safe. Michael
Do you have a question about this Trailer Hitch?
Info for this part was:
At etrailer.com we provide the best information available about the products we sell. We take the quality of our information seriously so that you can get the right part the first time. Let us know if anything is missing or if you have any questions.


Jenny N.
6/10/2022
You mentioned that it has been stuck in your hitch. I reached out to the manufacturer and I have a question to ask. Was the attachment left in the hitch for a long period of time? If it is left in the hitch, then there is a possibility that rust has formed and expanded causing it to be stuck. The recommendation is to spray penetrating oil up into where the attachment connects to the block in the hitch. Then take a rubber mallet and tap it from side to side as well as up and down. Repeat this process a coupler of times. After this, find something that can catch the attachment or have another person to help. Take a flat screw driver and while turning the lever, wedge the screw driver in between the rack receiver and block to work it loose.