
Summer Starts Here - Save up to 70%
To see if this custom-fit item will work for you please tell us what vehicle you'll use it with.
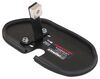
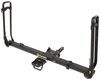
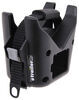
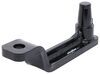
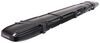
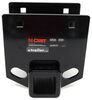
This fully welded, corrosion-resistant vehicle trailer hitch receiver is perfect for your light-duty towing needs. Draw-Tite's Tested Tough guarantee ensures that this hitch exceeds industry standards. Drawbar sold separately.
Features:
Specs:
Draw-Tite's Tested Tough program provides testing standards far superior to those outlined by the Society of Automotive Engineers (SAE), the go-to source for engineering professionals.
Each Draw-Tite trailer hitch receiver undergoes extensive fatigue testing and static testing with the ball mount that is either supplied or recommended for use with that particular hitch, thus ensuring results that are applicable to real life use. Fatigue testing is also conducted on hitches rated for use with weight-distribution systems.
In addition, Draw-Tite performs static testing on a simulated automobile, as opposed to the rigid fixture used for SAE testing, resulting in a more true-to-life scenario.
At etrailer.com we're committed to the products we sell, and to our customers. Our experienced and knowledgeable staff are available via both phone and email to address your questions and concerns for the lifetime of your hitch. The technicians at etrailer perform hitch installations on a daily basis, making them a valuable resource for do-it-yourselfers. The one-on-one, personal service you'll receive comes straight from an expert in the towing and automotive field. We've installed it, we've wired it and we've towed with it, so whatever your question, we can answer it.

Videos are provided as a guide only. Refer to manufacturer installation instructions and specs for complete information.
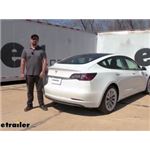
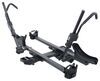
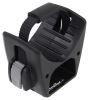
Hello neighbors, it's Brad here at etrailer, and today we're taking a look at installing the Draw Tite Class One trailer hitch receiver on a 2023 Tesla Model 3. Now being that it's a Class One trailer hitch receiver means that you are gonna be an inch and quarter receiver opening and that's gonna be a little bit trickier to find ball mounts and cargo carriers, as well as bike racks. But there's still plenty of options available. Now all of those accessories are gonna stay in place with a half inch pin and clip. And this is not included with the hitch, but a lot of your accessories will come with one. Now, if you wanna pick up a locking pin and clip, that's a good option.
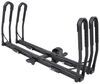
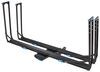
That way you can leave your accessories loaded in, locked in place and no one's gonna be able to walk away with it. Now you will have your receiver tube opening hanging out here and there is a panel that normally you can hide some of the other hitches that are available, and those are gonna be hidden hitches which include the Eco Hitch as well as a Stealth Hitch. Now they are a little bit more of a premium hitch, but it's really nice because there's gonna be a receiver that you can remove and that way when you're not using it, you're not gonna be able to see this at all. Now those are also gonna be a two inch receiver tube opening, which is really gonna open it up, as to what accessories you can pick. Now being that it's a class one, you don't have exactly the highest towing capacity numbers, but if you do plan on pulling a small trailer you do have safety chain loops here that'll allow for a standard S style, or even a larger clevis style.
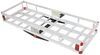
Now speaking of those capacities, this one's rated at a gross trailer weight rating of 2000 pounds which is gonna be the weight of the trailer, plus the accessories loaded onto it. And your tongue weight's gonna come in at 200 pounds and that's gonna be that downward pressure that's put on the inside of the receiver tube opening. So if you're thinking about getting a cargo carrier bike rack, keep that in mind. You don't want to go over that 200 pounds. Now something to consider too when choosing accessories is making sure that you find something that can be in a stowed position if it folds up.
So a lot of your cargo carriers and bike racks will fold up, and you wanna make sure you don't hit your fascia. So measuring from the center of the hitch pin hole, to the furthest point of the fascia coming in about two and a half inches. So I don't worry too much that it's gonna make any contact with that fascia, but as far as ground clearance goes, this one's pretty low here at nine and a half inches. So you might wanna look for a cargo care bike rack that kind of upswings a little bit just to kind of give you a little bit more clearance. And also keep in mind, when you're going on an incline with those loaded up, those are gonna tilt towards the ground.
So just keep that in mind while driving with accessories on here. Now as far as installation goes, this one isn't too terribly bad. It may look like a lot because you have to pull off your rear fascia to be able to pull your impact bar, and that's where that hitch is gonna replace that. So if you follow along with the steps I'm gonna show you step by step how to get yours installed. So let's take a look at that. Now our hitch is going to live where our bumper beam is located, so this rear facial is gonna be coming off, and the first step to get this off is going to be taking our taillights out and there's gonna be these knobs up top. We're gonna go ahead and get those off. So just turn these counterclockwise. You should be able to kind of do this with your hands here. If it is a little bit tight, you could probably put a pair of channel locks, maybe wrap 'em in tape so it doesn't mar up this plastic. But we'll go ahead get these unscrewed and there's gonna be one on the other side as well. Now there's also gonna be some nuts holding in the taillights that we need to gain access to, and they're gonna be kind of tucked behind this interior panel. So two ways to do this. You can either kind of use a trim panel tool or even a flathead to kind of just pry this back. Other option, you can actually take your weather stripping here and peel it, but there is some adhesive there, so just kind of be careful with that. The main thing that we're trying to do is get to these bolts. There's one here, there's also one that's kind of tucked back. Now the tricky part with these is once they come off, you're gonna wanna make sure that you don't drop 'em. They're very tiny and obviously you wanna make sure that you have all the hardware to put it back in. So just be careful. If you need to have a magnetic tip, that could help. But before we take those off, I'm gonna go ahead and unplug our taillight. So there's this red clip you're just gonna wanna pull that back and that's just a locking tab. And sometimes if they're tricky, you can take a small flathead and just kind of pry that back lightly, and then push it in your tab and you should be able to get these to separate here. And now with an eight millimeter socket we'll go ahead and get these two nuts removed. And what I'll do is I'm gonna just kind of loosen them both up. So you have this one here and one up top. And that way they're not completely coming off the stud, and dropping down so that way we can just now do this by hand and have a good grip on these. Now at this point we're just gonna go ahead, kind of pull back here, and we should be able to get this to separate. There we go. Now there are some rubber plugs that these tabs kind of go into. So if you need to kind of just work this side to side. that's gonna help loosen it. And if you need to pry, use a plastic trim tool just kind of work your way and pry here. Just make sure you're not on the edge of the light you don't want to crack it, but as you kind of wiggle that, that should pop loose. So we'll go ahead and set this aside and then repeat on the other side of the vehicle. Now with our taillights out, you're gonna see that there's gonna be a 10 millimeter screw that we're gonna be removing on both sides. So go ahead get those taken out. And we're gonna head over to our wheel well and where our rear fascia meets the rear quarter panel, you're gonna reach up there and facing vertical is gonna be a T 25 screw. We're gonna go ahead and get that removed. This is pretty small, so hold on to this. We're then gonna kind of just follow this down, and where it kind of flattens out here, there's gonna be a plastic push pin and then as you kind of work your way back, there's gonna be one here, as well as one kind of tucked behind the wheel. Now to get these popped off is pretty easy. You can use a flathead screwdriver to pry them. I'm gonna be using a trim panel tool and there's a slot on there where you should be able to pop open that center portion and that should allow us to get the rest of it to come out. So just kind of work on that center part there. And if you could get the whole thing in one go, that's awesome. If it pops out separately, no worries, you can get that separate piece later and just make sure that you keep these together. So go ahead and get those removed, and then just repeat the same process on the other side. Now the instructions, they're gonna say that there's either eight screws or nine, depending on the model. I found that ours actually looks like it had six of them, but either way it's going to get this lower appearance portion taken off from the body. And this is gonna come off with the fascia in one go. So we'll come here first to these plastic panels. We'll see there's a slot here for flathead screwdriver, just kind of pry that open. That's gonna give us access to a 10 millimeter bolt and the rest of the hardware is also gonna be a 10 millimeter. So we'll grab our socket, we'll get these loosened up and then you're gonna wanna work your way a little bit wider, you'll have these and then the two up here. So go ahead, get those taken out. Now, once we have this hardware removed, this is gonna kind of allow us to pry this back and there's some plastic clips here that kind of slide into it. So if you can slide this, this panel's tabs kind of over it, it's gonna make it a little bit easier. But that's gonna give us access. There's gonna be a 10 millimeter dead center there, so we're gonna want to go ahead and get that removed. And we're getting ready to take the fascia off. So I recommend having a spot to place it while you're doing your install. That way it doesn't get scratched. And also you might want to grab an extra set of hands as it can get pretty bulky, and you're gonna be separating an electrical clip while holding up the fascia. So having that extra person really helps. And I'm just gonna put some painters tape along the edge of our fascia and rear quarter panel, and this is gonna help just kind of prevent any scratching on the paint or clear coat from happening, as it can rub against each other, not only on removal but also reinstallation. So go ahead and cover both edges, and you're gonna want to do that on both sides of the vehicle. Now to remove our rear fascia, we're gonna start by pulling on this edge. Now where we'll remove that T 25 there is a metal retainer clip, so you're gonna want to be kind of careful with that. Not to scratch but you just gotta pull pressure behind it. And with that metal clip, mine actually kind of slid out. So make sure you grab that clip and put that back in place once you have the fascia off. But you're just gonna kind of work your way towards the middle of the vehicle, just taking your time on these clips. Now once you have these clips off, you're gonna work your way towards the middle, and sometimes you do have to kind of lift up on the bottom to kind of allow this to separate. Now, some of them will have clips, electrical, here that you're gonna have to separate. Ours does not. So we'll go ahead and set this aside. Now we are gonna be taking off our impact bar, but we have this sensor bar that's kind of attached here that we need to get out of the way. And to make it a little bit easier, we have our plug here. I'm gonna just pop this out just using a trim panel tool. And then we have just a series of 10 millimeter bolts that are holding this in place. So we'll go ahead and get these removed. And with that hardware removed, there are some little clips here that just kind of pop into this metal. Go ahead. You're gonna release those on both sides. And with that sensor taken off, that's gonna allow us to kind of just set this in the trunk here. That should give us enough room to where we can gain access to our impact bar. So now we need to remove our impact bar, and there's bolts here, we're not gonna worry about that. You're gonna have these ears. So go make sure you're going to the plate that's actually attached to the vehicle, and we're gonna find that we have three nuts it looks like. Now some vehicles will change between years. On our 2023 here though, this is what we have. So you may have eight, but either way, just make sure you have all that hardware taken off. Now, support your bumper beam. It is hanging on the studs but you don't want that to drop. And we'll go ahead to get this removed. Now keep those nuts handy, as we're gonna be using them to put our hitch back up, but the impact bar is not gonna go back on the vehicle. So you can do it whatever you want with this, but we will not be putting it back on. So now go ahead and have the nuts that you took off handy, because we're gonna put this in place, and I'm just gonna hand tighten one of 'em on each side and that way we have this supporting itself. It's gonna make it easier to get the rest of the hardware on. Now before I snug 'em down, you do have a little bit of side to side because they're slotted. So just make sure that this is aligned nice and center. You can kind of use this corrugation here just to make sure that we have it properly aligned. And then I'm gonna go ahead and snug these down. I'm gonna be coming back with a torque wrench so you don't have to get crazy here. Just make sure that it's pressed against the vehicle. Now we'll come back with our torque wrench and using the torque settings found in the instruction manual, we'll go through, make sure these are all torqued down properly. Now if you need a torque wrench, we have these available here at etrailer. You can generally go to an auto parts store and rent one for free, but this is gonna make sure that they're gonna be tight enough to stay in place, but also not too tight causing any stress on those studs. Now we can get our sensor bar put back in place. We're gonna take our access panel out of the way, before putting our fascia back up. That way we have clearance for our hitch. And you just need a flathead screwdriver here. Just twist this quarter turn. There should be two of 'em, and then this panel should just pop out. Gotta get your fascia put back in place. We're gonna be sliding this panel underneath and make sure that hitch goes through there. Now if you can tuck those into that underbody panel underneath, it'll make it a little bit easier, but you should still be able to kind of move it around once you have this in place. And then just kind of in the reverse order of how we took this off, you're gonna wanna work your way to the outside. So just make sure that you have those clips kind of pop in in place and as you work your way, it should kind of fit nice and tight. Now be careful these metal clips here these can cause a little bit scraping here. So just kind of pull down on this plastic. Make sure you have a gap. That way it's not scratching your rear quarter panel. Now if the fascia is not going on perfectly, a lot of times it's 'cause this underbody panel is hitting with the plastic. So make sure this one's tucked underneath it. So when putting the fascia on, if you can, try to find a way to get this to slide under, I kind of mentioned that earlier but it is gonna make it a little bit easier, so you can kind of bend that plastic in order for this to slide back in. But that should cinch up the hitch a little bit, or the fascia a little bit better. And you can also start to put the hardware underneath here to kind of get everything in place as well. Now at this point, just go ahead and get your hardware put back in, in the reverse order that we took it off. So make sure you get your fender liners back in, as well as your taillights. And also make sure to plug your taillights in. Once you have all that done, all that's left to do is start using your hitch. And that was a look at installation of the Draw-Tite Class One trailer hitch receiver on a 2023 Tesla Model 3.
Average Customer Rating: 5.0 out of 5 stars (3 Customer Reviews)
This fully welded, corrosion-resistant vehicle trailer hitch receiver is perfect for your light-duty towing needs. Draw-Tite's Tested Tough guarantee ensures that this hitch exceeds industry standards. Drawbar sold separately.Installed pretty much as shown in the video. Relatively easy to install, was able to do it without assistance. Thanks for a well designed product!

Do you have a question about this Trailer Hitch?
Info for this part was:
At etrailer.com we provide the best information available about the products we sell. We take the quality of our information seriously so that you can get the right part the first time. Let us know if anything is missing or if you have any questions.


Thank you! Your comment has been submitted successfully. You should be able to view your question/comment here within a few days.
Error submitting comment. Please try again momentarily.