
To see if this custom-fit item will work for you please tell us what vehicle you'll use it with.
Thank you! Your comment has been submitted successfully. You should be able to view your question/comment here within a few days.
Error submitting comment. Please try again momentarily.
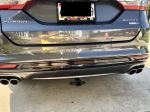
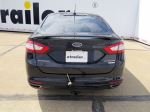
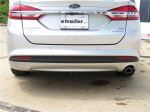
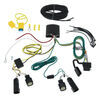
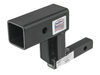
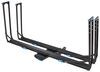
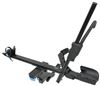
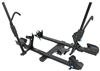
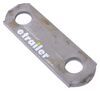
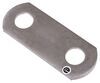
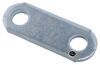
Perfect for light-duty towing, this custom, vehicle trailer hitch receiver features fully welded, gloss powder coated steel construction. Drawbar sold separately.
Features:
Specs:
At etrailer.com we're committed to the products we sell, and to our customers. Our experienced and knowledgeable staff are available via both phone and email to address your questions and concerns for the lifetime of your hitch. The technicians at etrailer perform hitch installations on a daily basis, making them a valuable resource for do-it-yourselfers. The one-on-one, personal service you'll receive comes straight from an expert in the towing and automotive field. We've installed it, we've wired it and we've towed with it, so whatever your question, we can answer it.

Average Customer Rating: 4.9 out of 5 stars (18 Customer Reviews)
Perfect for light-duty towing, this custom, vehicle trailer hitch receiver features fully welded, gloss powder coated steel construction. Drawbar sold separately.It is a very good product and Etrailer was wonderful to work with even through the return of the first hitch due to damage. I had to pay a shop to install it and even they felt it was not so easy to do. Mostly because Ford didn’t build this model Fusion with a hitch in mind I guess. Because the first hitch was damaged the shop charged me extra labor because they had to put everything back together and then repeat the process all over with the replacement hitch. In the end it is all good and I can now haul bikes.

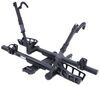
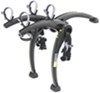
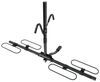
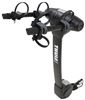
One year later, the hitch does it's job hooking up to a bike rack.
OK, so 40 minutes to install this unit might be a little ambitious. Excluding setup time, I'd say plan for 60-90 minutes and a quick assist from a friend. Oh, now is the time to stretch your arms, neck, and shoulders. Trust me on this one. You also need to wait until the car is cool if you drove it prior to starting the installation. You don't want to have to explain any "muffler burns" to a significant other (dad joke).
Each task is simple to accomplish but there are some things to be prepared for. etrailer really should make a video for the 2017 Fusion Sport as it requires some special tools and specific knowledge to lower the muffler. The air deflector is the first to go and presented no challenge. Keep the cheap formed nuts for later…
About the muffler, I would strongly recommend buying or borrowing a set of muffler hanger pliers to speed things up. The two rubber side hangers are easy enough to get off but the pliers make it much simpler. I got crafty with a set of channel locks and two wrenches but that was unpleasant. The center muffler hanger just needs to have the two 10mm bolts removed to lower the whole unit. Pro tip: Put a cargo strap under the center hanger prior to removing the two 10mm bolts. There are holes in the crossframe to hook into on either side of the hanger. Be prepared to support about 40lbs of muffler as you have to slightly lift and pull the hanger bracket away from the crossframe after removing the two hanger bolts. The hanger sits in a T saddle so push up, pull back, jiggle the hanger bracket, and gently lower it onto your cargo strap. You'll need about 12-18 " of clearance but don't go much lower than that.
The heats shield is simple to remove once the muffler is lowered, but be mindful of corrosion and the flimsy formed “nuts”. WD-40 goes a long way if you apply it first. My 2017 had one formed nut, way in the back of course, that was heavily corroded and stripped when I was taking it off. If it happens to you, get a set of side cutters, bend the flange, and twist it off or cut it while being careful not to damage the bolt or bolt thread. You can replace a damaged nut with one of the two you took from the air deflector as that piece won't be re-installed.
So now you finally have access to the body. I started by mounting the ½” bolts first as they are long and easy to bolt up. Get a buddy and you’ll have these mounted in about 5 minutes per side. Don’t tighten them as you’ll need to slide the hitch around a bit in the next part. You can start working on the 7/16 bolts now that the hitch is supporting itself. Just slide the wire through the hitch hole, the frame hole, and out the access hole. I started with the rear one first to avoid dragging it across the spacer and bolt head of the front one. Just rig it up according to the directions and pull it back through, easy peasy. The one thing to note is that you need to fiddle with the 7/16 bolt spacers to make sure they are aligned such that the bolts are fully seated in the carriage slot. You’ll know if they aren’t as the bolt will appear to be too short or at an odd angle. Just fiddle with them until the bolt is straight and enough is protruding to thread. That said, they aren’t that long so be very careful when threading the nuts on. I recommend holding the bolt with needle nose pliers until you get a thread or two of the nut onto the bolt. If you muck it up, get a magnet and pray you can work them back out. Again, don’t tighten these up, just secure them by a few threads. There is some interplay between the two sides that needs to be managed. Once both nuts on one side are loosely secured, move to the other side and start with the front-hole. Why? You’ll need to tighten it up a bit to ensure the bolt in the rear hole will go far enough through to get threaded. The hitch’s overall length is just a tiny bit short of the width of the frame. By loosely securing the other side and tightening the front bolt on the working side, you pull the hitch closer to the frame and the rear bolt will pop right through. It will make more sense when you see the gap. Trust me, keep everything loose on the other side until this back bolt is in. I read on some forum that some guy skipped these bolts because they were too short, don’t do that. Once all the nuts are threaded on, you can tighten them down until snug.
Now it’s time to get your torque wrench. You can get a loaner from Autozone or others if you don’t have one capable of 110ft lbs. I started by torqueing down the 1/2 bolts. 110 ft lbs while working overhead and under a car is pretty tough so be careful. There are lots of thread posts and hurty bits to smack your hands on. The front 7/16 bolts had enough clearance to get the wrench and socket onto but the movement was limited so just be patient. I don’t see how anyone could get a torque wrench and socket onto the back 7/16 bolt so I call BS on torqueing those down without a NASA rig. I instead measured the exposed thread on the properly torqued front bolt and matched it on the back bolt by using a pass through socket wrench. It was really tough to get the same amount of thread showing so I’m comfortable saying it’s "59 ft lbs" tight. All that is left is to put the heat shield back on, attach the two side muffler hangers, drop the center hanger back into the T-saddle, and replace the two 10mm bolts. The bolts went in at an angle at first but straightened out as they got tight. I think this is because they thread through some clip threads vice a tapped crossframe. I also lifted the muffler to ensure I didn’t cross thread the bolts. Check that everything looks correct, remove the cargo strap, clear the area, and lower the car. Ta da, “40 minutes” and you now have a new trailer hitch!
A little difficult to install but love it! Popped my bike rack on and off about 60 times this year and the hitch is fantastic. Discrete and hidden but rock solid!
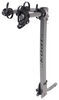
Website made it easy to find the right fit for my car. I had it shipped to my mechanic and he said the installation process was straight forward. It's been working fine for about a year mainly used to transport mountain bikes.

Jonathan V.

5/17/2020
Been working great for over a year
Great product. Fits under my vehicle perfectly. I would definitely recommend this hitch. Very sturdy.
Nancy
5/31/2020
After 1 year, product still functions great. No rust.
Installed on 2019 Fusion Sport. Fit was excellent, no problems at all. Instructions are good.

Duke
8/29/2020
Holding up well, no rust either. Would buy again
Perfect fit, it came with all the parts and easy guide to follow. They even included some wire guides to guide the nuts thru the chassis of my car.
The hitch came quickly. The price was the best I could find. I've not installed it yet, but I've used Curt products before so I'm sure it will be fine.
I’m very pleased with this hitch.
Super fast shipping. Great customer ser vice.
Do you have a question about this Trailer Hitch?
Info for this part was:
At etrailer.com we provide the best information available about the products we sell. We take the quality of our information seriously so that you can get the right part the first time. Let us know if anything is missing or if you have any questions.


Rick
5/23/2019
Still doing well.