
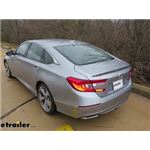
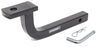
Curt Trailer Hitch Receiver - Custom Fit - Class I - 1-1/4"
(15 reviews)
Price: $203.07
In Stock
Curt Trailer Hitch Receiver - Custom Fit - Class I - 1-1/4"
Item # C11525
Retail:$306.95
Our Price: $203.07
You Save: $103.88
Will this fit?
To see if this custom-fit item will work for you please tell us what vehicle you'll use it with.
In Stock


- All Info
- Reviews (15)
- Q & A (0)
- Photos
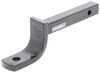
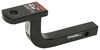
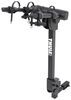
CURT Trailer Hitch - C11525
- Class I
- 1-1/4 Inch Hitch
- 2000 lbs GTW
- Visible Cross Tube
- CURT
- 200 lbs TW
- Custom Fit Hitch
Perfect for light-duty towing, this custom, vehicle trailer hitch receiver features fully welded, gloss powder coated steel construction. Drawbar sold separately.
Features:
- Custom fit is designed specifically for your vehicle
- Precision, robotic welding maximizes strength and improves fit
- Installation requires drilling, heat shield trimming, and temporary lowering of exhaust
- Complete hardware kit and installation instructions included
- Lifetime technical support from the experts at etrailer.com
- Gloss black powder coat finish over protective base coat offers superior rust resistance
- Stylish, round-tube design
- Drawbar, pin and clip sold separately
- Hitch assembled in the USA, bolts overseas
Specs:
- Receiver opening: 1-1/4" x 1-1/4"
- Rating: Class I
- Maximum gross trailer weight: 2,000 lbs
- Maximum tongue weight: 200 lbs
- Limited lifetime warranty
etrailer.com Technical Support
At etrailer.com we're committed to the products we sell, and to our customers. Our experienced and knowledgeable staff are available via both phone and email to address your questions and concerns for the lifetime of your hitch. The technicians at etrailer perform hitch installations on a daily basis, making them a valuable resource for do-it-yourselfers. The one-on-one, personal service you'll receive comes straight from an expert in the towing and automotive field. We've installed it, we've wired it and we've towed with it, so whatever your question, we can answer it.
11525 Curt Class 1 Trailer Hitch Receiver
Installation Details
This Product Fits The Following Vehicles
- 2018 - 2022 Honda Accord excluding Hybrid


Customer Satisfaction Score:
91% were satisfied with this product
9% of customers were not satisfied
- Wrong item was ordered
- etrailer mistake
- Product did not meet expectations
Customer Reviews
Curt Trailer Hitch Receiver - Custom Fit - Class I - 1-1/4" - C11525
Average Customer Rating: 4.8 out of 5 stars (15 Customer Reviews)
Perfect for light-duty towing, this custom, vehicle trailer hitch receiver features fully welded, gloss powder coated steel construction. Drawbar sold separately.by: Kevin 02/05/2024
Honda Accord
I ordered this trailer hitch for my Honda Accord so I could bring my bicycle to riding events. I installed the hitch myself in a couple hours.
I would recommend this item.
by: Matt M07/11/2018
2018 Honda Pilot
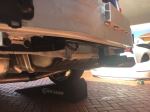
This is more of a review of my install rather than the hitch performance. I just finished installing the hitch on my 2018 Honda Accord Sport 2.0T Manual transmission. It took me about 2 hours and I am fairly handy. I didn't suffer any injuries. I followed the instructions except where noted below.
The first step is lowering the exhaust by removing the rubber isolators. There are isolators behind each muffler (between muffler and rear of the car) as well as in front of the mufflers (in the gap between the rear tire and the wheel well). The final one is where the exhaust pipes come together further underneath the car. The two in the wheel wells and the one under the car are easier than the ones behind the mufflers. I don't have the removal pliers that probably make this super simple and Autozone doesn't have them for loan. I watched all sorts of youtube videos about using channel lock pliers, but that didn't work on this car due to the design of the isolators and the space you have to work with, specifically those behind the muffler. What worked for me was I sprayed the rubber and the metal hanger with Windex and put gloves on (make sure you do this - there are all sorts of sharp metal parts there) and just worked the rubber back and forth until it got far enough that I was able to just get it off. I couldn't do this on the hangers rear of the muffler until I did the other 3 first - those in the wheel wells and the one under the car. Those were pretty easy with the brute force technique of just pulling the rubber and then twisting it to get it over the edge of the hanger. the rears were tough and I found it easiest to sit right behind the muffler and push it straight forward. You have to get your one arm up in the cavity between the exhaust tip and the side of the bumper which is tight, but I was able to do it and it helped a lot to exert even pressure on both sides of the isolator. Eventually I got all 5 off. The exhaust still didn't drop since the hangers that are attached to the mufflers were caught on the exhaust tips, which are actually completely separate from the muffler. I had to push the exhaust to one side to get around the drivers exhaust tip, then repeat with the passenger side. No harm done. All in all this probably took my 45 minutes, including my failed attempt using channel lock pliers.
The instructions call for removing the passenger muffler. Not sure why. I didn't. In fact, on my car it's the driver's muffler that is attached with the flange nuts whereas the passengers muffler is welded. Either way I didn't do a thing and they really didn't get in the way that much. I did support the exhaust with a couple 2x4s and some cardboard so it wasn't just hanging there (since it's still attached in the front of the car).
The next step is modifying the heat shield. The rear screw in the heat shield comes out and stays out. There are only 3 more screws that hold each heat shield on, so I just took the heat shield out to drill the 1.25" hole. I used a hole saw and actually drilled a 1.5" hole now that I think about it. But the aluminum heat shield is really easy to get through and my hole was super clean and easy. The instructions say to go 5" back from the rear edge of the heat shield, but that's actually a little much. I think 4.75" would have been better, but since my hole was a little big it didn't impede me at all. I reinstalled the heat shield, leaving the rear screw out (so 3 screws holding it up). The instructions say that flattening the heat shield around the screw that was removed aids in installing the forward flange nuts. I didn't get that at first, but now I understand. Because the hitch is curved a little whereas the frame is straight, there's a little gap between the shield and the frame. Since the hitch mounting bolt to the front of the car is just long enough to come through the frame and accept the flange nut (so it doesn't interfere with the muffler once it's back in place) there are hardly any threads sticking out when you try to get the flange nut on. If you crush the heat shield a little then it allows the bolt to stick out a little more. I actually think if you crush the heat shield to conform to the frame rail all along the length of where the hitch will install, that would be best. I didn't do this and still succeeded, but at least I know why they say this now.
Step 3 is to lift the hitch into position and mark your holes to drill. Not sure why you have to do this. I was on my own and had a hard time trying to lift the hitch into position and hold it steady on both sides to mark the holes. I was afraid that if it was in position on one side but a little off on the other, it would skew where the hole was supposed to be. So I just measured the distance between holes on the hitch and then measured back from the existing hole in the frame (that was exposed when you created the hole in the heat shield) and marked the spot. It was 6.75" for me. I marked it, and drilled a pilot hole and then enlarged. Other than the rubber isolators this was the hardest part of the install, mostly because my drill bits were either not that sharp, or were quickly dulled. Please wear safety goggles when doing this. A lot of metal debris (hot metal debris) was raining down, burning my arm a tiny bit by tiny bit...which was no big deal...but I wouldn't want them in my eye. Especially some of the bigger bits. I ended up drilling a 1/8" hole first, then expanding to 1/4, then 3/8, then 1/2. I did this mostly since the tip of the 1/2 drill bit was dull, but the rest of it was okay. I also tried to use a step drill bit but that only worked a little. Pretty sure I ruined each of the bits...but I didn't have to make a trip to the hardware store for this install, so I'm happy. A couple notes here to make things easier for you - there is a bulkhead about 6-6.25" back from the center of the pre-existing frame hole. Stay away from this. If anything, err to the rear of the car from where you marked your hole to drill. The existing hole in the frame is oblong, so it gives a little cushion for error. If you're too close for the bulkhead, then there will be no horizontal frame for the spacer to sit on and you'll be screwed. I ended up with about 1/4" of frame which seems like enough but any closer and I'm not sure. Secondly, the instructions say to enlarge the hole to get the bolt and spacer in. They say this so casually that I didn't think it would be any big deal, but you actually have to enlarge the hole to the point where you can get the entire bolt in the hole and the bolt head is maybe an inch or more across. I was surprised I was able to do this without resorting to a lot of swearing and gnashing of teeth. I widened the hole by using my 1/2" bit and tilting it side to side while in the hole, as much as I could before the drill hit part of the car. This made it almost wide enough. I then took my step drill and worked it as much as possible, then the 1/2" drill forward and back. The bolt just fit and I had no more room under the car before the muffler, gas tank, exhaust tip or other parts got in the way. Reverse fishwiring the bolts and spacers was easy. I left the fishwire on all 4 bolts just to make sure I didn't lose them in the frame rail. It doesn't say in the instructions, but you have to use the short spacers (with one side shorter than the other) in the rear holes that you drilled - and the short side goes to the front of the car since the bulkhead that I described earlier will prevent any other orientation.
I fed the hanging end of the fishwire through the hitch holes so I could move it into position, pulled the bolts through and then very carefully removed the fishwires one at a time to put a flange nut on, being extra careful not to push the bolt back up into the frame. The bolts toward the front of the car were the hardest since they're only just long enough and since I didn't crush the heat shield earlier, I only had maybe 1 thread exposed. Still I was very careful and eventually the nut caught a thread.
I torqued with a torque wrench. If you don't have a torque wrench, just know that 70 ft lbs is pretty tight. My torque wrench is about 15" long and with one arm it was about all I could muster, given the cramped conditions and inability to get leverage to push off something with my feet.
Reinstall of the mufflers was easier than removal. Just move the mufflers back on the top of the exhaust tips in the reverse of removal, spray the isolators with windex again and slide them back on. I did the wheel wells first to help hold the exhaust in position, then underneath the car, and then the ones to the back of the mufflers. On one side I forgot to spray with windex and I couldn't get it, but after spraying I had it on in about 30 seconds.
One other note - after drilling, clean up all the metal shavings. I didn't because I was lazy and I ended up with so many embedded in my skin (not a big deal since they're large and can be brushed off) and in my shirt and shorts (which I started picking through and eventually gave up and will just toss the clothes since they're old anyway.
That's it. Overall if I knew what I was doing with the isolators and had better drill bits it would have taken me much less time and aggravation but on a new car this wasn't too terrible.

by: Jon 05/03/2024
Fit perfectly, easy to install.
by: Ben 08/12/2023
Great service. Great product. No complaints. Would definitely recommend.
by: Mark07/23/2018
2018 Honda Accord
Great product that fits nicely once installed. Unfortunately installation was very difficult and ultimately required assistance from a professional. The instructions do not detail the bracing wall within the frame between the prefab opening and drilled opening required. Using the fishwire to set the rear bolt and spacer in place through the existing slot is not possible. A hole much larger than 1/2 inch must be made. Attached is the camera image captured by the mechanic.
by: Stanley K.01/13/2018
Buying from etrailer was a very good place to buy from,the prices are good with free shipping. This is the 3rd hitch I bought here and recommend anyone to buy their products.
by: Chase05/06/2021
2021 Honda Accord
Lightning fast shipping!
by: Dmitri06/10/2020
Everything good about this hitch, easy to install.
by: Dunewood01/11/2024
by: Anthony 10/31/2023
by: Richard 08/17/2022
by: Ben 10/13/2023
2022 Honda Accord
by: Josh 03/17/2023
by: Steve 09/04/2021
2018 Honda Accord
14
14
See what our Experts say about this CURT Trailer Hitch
- Is Wiring Harness Installed on Outside of 2018 Honda AccordI am not quite sure which part you are referring to specifically but the Curt T-Connector Vehicle Wiring Harness # C56402 or T-One Vehicle Wiring Harness # 118776 will install in the trunk of your 2018 Honda Accord, inside the car, as opposed to outside. To complete your towing set up, if you also need a hitch for your 2018 Honda Accord I recommend the Curt Trailer Hitch Receiver # C11525.
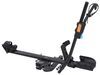
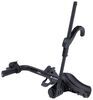
view full answer... - Availability of Hitch Adapter to Go from 1-1/4 inch Hitch to 2 inch Hitch for 2018 Honda Accord 1.5LUsing a 1-1/4 inch hitch to 2 inch hitch is not recommended as a best solution as the adapter cuts the capacity of the hitch by 50 percent and will add movement as well. It's really not ideal. We do have the adapters though as part # HTAD but I would recommend being cautious when using it if you go that route.
view full answer... - Can 4-Bike Thule Apex Bike Rack be Used as 2-Bike Rack with 2020 Honda Accord 2020 EXYes the Thule Apex 4-bike rack part # TH9025XT would work great for what you are looking for. Installed in a Class I hitch that fits your 2020 Honda Accord like the Curt part # C11525 you'd be able to carry up to 2 bikes but then in a future vehicle with a higher hitch Class you'd be able to take advantage of the 4 bike capacity. Class 1 hitches can only handle 2 bikes. If you plan on carrying any women's or alternative framed bikes without horizontal top tubes, you may also be interested...
view full answer... - Compatible Trailer Hitch Receiver for 2020 Honda Accord HybridWe do not have a hitch for your 2020 Honda Accord Hybrid. If you would like to carry bikes or cargo, we do have a hitch mounted bike rack like the Yakima FullBack # Y02634 or a roof rack if that would help you meet your goals.
view full answer... - Best Trailer Hitch Receiver For 2020 Honda Accord For Bike RackWe can absolutely get you a trailer hitch receiver for your 2020 Honda Accord so you can carry your Thule Apex XT 2-Bike Rack # TH9024XT. For a hitch for your '20 Accord we have the Curt - Custom Trailer Hitch # C11525. I also verified with the manufacturer that this hitch will fit all models of '20 Accord, including your sedan, as long as it is not a hybrid version, so it is the perfect option to carry your bike rack.
view full answer... - Recommended Trailer Hitch for 2018 Honda Accord HybridWe do have a solution for you. To carry bikes on your 2018 Honda Accord Hybrid, you could use a trunk mounted rack like the Yakima FullBack # Y02634 to carry 2 bikes or the FullBack # Y02633 to carry 3 bikes. I linked a review video for the FullBack for you to check out.
view full answer... - Will The Curt Trailer Hitch Receiver C11525 Fit a 2022 Honda Accord Sport Hybrid? Your 2022 Honda Accord Sport being a hybrid will require the Draw-Tite Sportframe Trailer Hitch Receiver # 24972. The Curt Trailer Hitch Receiver # C11525 you received for your 2021 Honda Accord Sport will not fit on hybrid models. The Curt T-Connector Vehicle Wiring Harness # C56402 will give you a 4-way flat connector on your 2022 Accord. This will allow you to connect to the tail lights on most small trailers or use Auxiliary Lights # C53201 if you are carrying a hitch mounted accessory...
view full answer... - Recommended Trailer Hitch Receiver and Bike Rack for 2019 Honda Accord Hybrid TouringUnfortunately, we do not have a hitch confirmed to fit for your 2019 Honda Accord Hybrid Touring model. But I do have a solution that will allow you to carry bikes. Take a look at the attached video of the Yakima FullBack # Y02634 trunk mounted bike rack for your 2019 Accord. We also have a roof rack to carry bikes or cargo if that would also help.
view full answer...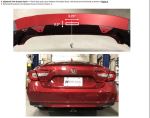
- Is There A Hitch Receiver That Is Compatible With The 2022 Honda Accord HybridWe do not currently (April 2023) have a hitch that will fit the 2022 Honda Accord Hybrid. We can offer a trunk mounted bike rack or a roof rack if that would help.
view full answer... - Does Curt Trailer Hitch Fit 2021 Honda Accord HybridThe Curt Trailer Hitch Receiver # C11525 will fit all models of the 2021 Honda Accord except the Hybrid. As of April of 2023, we do not have any hitch available for the hybrid models.
view full answer... - Wiring Harness Fit for 2018 Honda Accord TouringThe T-One Vehicle Wiring Harness with 4-Pole Flat Trailer Connector # 118776 will absolutely fit your 2018 Honda Accord Touring (non-hybrid); I checked with the manufacturer for you to confirm this. As for the installation and running the black wire to your Accord's battery, this is a common question and certainly understandable but it is necessary to run that wire directly to your battery. The reason is because the other 12 volt sources in a vehicle tie into the system's electrical systems...
view full answer... - What Bike Rack Options Are Available for the 2019 Audi A-6 QuattroThere are only 2 trunk mounted bike racks that are confirmed fits on your 2019 Audi A6 since there is not an aftermarket hitch option that would allow you to carry a hitch mounted bike rack. The best option would be the Malone Hanger Trunk Bike Rack for 3 Bikes - Adjustable Arms # MPG2139, which has adjustable arms to allow you to carry the bikes level and can hold up to 3 bikes. I really like that this comes with an integrated cable lock to keep the bikes secured to the rack. The only...
view full answer... - Can 2020 Honda Accord Tow 1200 lb Motorcycle and TrailerThe Curt # C11525 class I hitch you'd looked at has a 2000 lb towing/200 lb tongue weight capacity, so the hitch could handle it perfectly. However, Honda lists the towing capacity of the 2020 Accord as being limited to 1000 lbs per the owner's manual, which puts you about 200 lbs over. If you can somehow get the loaded trailer weight down to no more than 1000 lbs, you shouldn't have any problems. If you can make that happen, you'll also need a # 3593 ball mount, and a # 19256 for a 1-7/8...
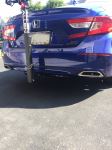
view full answer... - Picture Request for Curt Hitch # C11525 on a 2018 Honda Accord I attached a picture of the Curt Hitch part # C11525 installed on a 2018 Honda Accord just like yours for you to check out.
view full answer...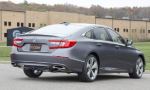
- Does Curt Hitch # C11525 Fit 2018 Honda Accord HybridUnfortunately, we still do not have a hitch to fit your 2018 Honda Accord Hybrid. Instead, we can recommend a hitch mounted bike rack or a roof rack to carry bikes or cargo if these would meet your needs.
view full answer...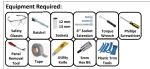
- What is the Ground Clearance with a Trailer Hitch Installed on a 2018 Honda AccordThe top of the 1-1/4" receiver opening of Curt trailer hitch # C11525 will be about 11 inches from the ground. You can see this on the attached video. One way to decrease the possibility of bottoming out, will be to obtain accessories with some rise in the shank or choose a ball mount will some rise when towing.
view full answer... - Trailer Hitch and Wiring for 2021 Honda Accord towing Small TrailerYes, the Curt hitch part # C11525 that fits your 2021 Honda Accord can tow a small trailer like you mentioned as it has more than enough needed capacity. You will need trailer wiring too which for that the part # 118776 is the easiest to install and most reliable so it would be your best option.
view full answer... - Recommended Way to Carry Enclosed Cargo Carrier with 2018 Honda AccordSince there are only Class I hitches that fit your 2018 Honda Accord you'd be best served with a roof rack and cargo box for extra cargo space that's still protected. For a roof rack the Yakima JetStream rack part numbers # Y00425, # Y28TR, # Y06123, and # Y06159 is a really solid choice that's high quality, easy to install, and has a bar shape that does great with wind noise. See attached install video link for this rack on a 2018 Accord just like yours as well. Then for a cargo box...
view full answer...
- Ground Clearance of Curt Trailer Hitch on 2018 Honda AccordThe Curt Round Tube # C11525 is a confirmed to fit your 2018 Honda Accord and is the only hitch available at this time (April 2023). It will sit so that the top of the receiver opening is 11 inches from the ground which is pretty standard for the Accords with hitches. It would be a good idea to choose accessories with a rise shank if possible. This would give you a little more height. I have attached an install video for you to see how the hitch sits with the bumper.
view full answer... - Is Trimming of the Rear Bumper Fascia Required to Install a Hitch on a 2018 Honda Accord SportUnfortunately, the Curt Hitch # C11525 does not fit your 2018 Honda Accor Sport Hybrid model. We do not have a hitch for it at this time. To carry your bikes, we can offer you the Yakima FullBack # Y02634 to carry your bikes and then a roof rack to carry your extra cargo. Please let me know if this will work for you and I will get you set up with a roof rack for your Accord. Check out the video of the FullBack and let me know how I can help.
view full answer... - Will Curt Class I hitch C11525 Fit Hybrid Model of 2018 Honda AccordThe Curt hitch # C11525 you'd looked at is not a fit for hybrid models of the Honda Accord and we do not currently have a hitch for the hybrid. Please let me know if a roof rack or a trunk mounted bike rack would meet your needs. We are here to help.
view full answer... - Trailer Hitch for a 2018 Honda Accord for a Bike RackIf the bike rack that you have is rated for use with a Class I trailer hitch then for your 2018 Honda Accord I recommend Curt hitch # C11525. Since your bike rack is for a 1-1/4 inch hitch, you would be all set. Along with the Curt hitch, you will also need to use stabilization strap # 18050 when using this hitch for any non-trailer load (such as a bike rack or cargo carrier) per Curt's warranty requirements.
view full answer... - Does Curt Trailer Hitch for 2018 Honda Accord Fit Hybid ModelUnfortunatley, we do not have a hitch to fit the Hybrid modles of the 2018 Honda Accord. You could carry bikes with a trunk mounted bike rack like the Yakima FullBack # Y02634 or you could use a roof rack to carry bikes or cargo.
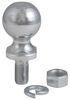
view full answer... - Will Fascia Still Line Up with Other Panels After Installing a Trailer Hitch on a 2018 Honda AccordYes, the rear fascia will still line up with other panels after installation of the Curt trailer hitch # C11525 on your 2018 Honda Accord. There is enough space in the stock set up to allow for the hitch to fit without compromising the fit of the fascia relative to the other panels. If you tow the recommended ball mount is # 3593 and you can use 1-7/8 inch ball # 19256 or 2 inch ball # 19258. For trailer wiring you can use # C56402 to add a 4-Way connector to the rear of the vehicle.
view full answer...
Do you have a question about this Trailer Hitch?
Info for this part was:

Expert Research:
Mike L

Expert Research:
Jameson C

Expert Research:
Adam R

Edited by:
Lindsey S

Video Edited:
Jacob T

Test Fit:
Randy B

Test Fit:
Clayton O

Video by:
Chris R

Updated by:
Wilson B

Updated by:
Kristina F

Updated by:
Isabelle B

Written by:
Ronnie R
At etrailer.com we provide the best information available about the products we sell. We take the quality of our information seriously so that you can get the right part the first time. Let us know if anything is missing or if you have any questions.
Product Experts Available Now!
Call 1-800-940-8924
Thank you! Your comment has been submitted successfully. You should be able to view your question/comment here within a few days.
Error submitting comment. Please try again momentarily.