
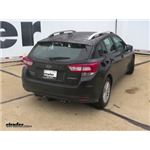
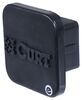
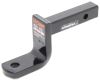
Curt Trailer Hitch Receiver with Standard Drawbar - Custom Fit - Class I - 1-1/4"
(0 reviews)
Price: $213.78
In Stock
Curt Trailer Hitch Receiver with Standard Drawbar - Custom Fit - Class I - 1-1/4"
Item # C114653
Retail:$328.95
Our Price: $213.78
You Save: $115.17
In Stock

- All Info
- Q & A (0)
- Videos (1)
- Photos
CURT Trailer Hitch - C114653
- Class I
- 1-1/4 Inch Hitch
- 2000 lbs GTW
- Visible Cross Tube
- CURT
- 200 lbs TW
- Custom Fit Hitch
Perfect for light-duty towing, this custom, vehicle trailer hitch receiver features fully welded, gloss powder coated steel construction. Standard drawbar included.
Features:
- Custom fit is designed specifically for your vehicle
- Precision, robotic welding maximizes strength and improves fit
- Bolt-on installation - no welding required
- Complete hardware kit and installation instructions included
- Lifetime technical support from the experts at etrailer.com
- Gloss black powder coat finish over protective base coat offers superior rust resistance
- Sturdy, square-tube design
- Standard drawbar included
- Pin and clip sold separately
- Assembled in the USA
Specs:
- Receiver opening: 1-1/4" x 1-1/4"
- Rating: Class I
- Maximum gross trailer weight: 2,000 lbs
- Maximum tongue weight: 200 lbs
- Limited lifetime warranty
etrailer.com Technical Support
At etrailer.com we're committed to the products we sell, and to our customers. Our experienced and knowledgeable staff are available via both phone and email to address your questions and concerns for the lifetime of your hitch. The technicians at etrailer perform hitch installations on a daily basis, making them a valuable resource for do-it-yourselfers. The one-on-one, personal service you'll receive comes straight from an expert in the towing and automotive field. We've installed it, we've wired it and we've towed with it, so whatever your question, we can answer it.
11465 Curt Class 1 Trailer Hitch Receiver
45521 Curt Ball Mount - 1-1/4"
Installation Details


Video of Curt Trailer Hitch Receiver with Standard Drawbar - Custom Fit - Class I - 1-1/4"


Videos are provided as a guide only. Refer to manufacturer installation instructions and specs for complete information.

Video Transcript for Curt Trailer Hitch Installation - 2018 Subaru Impreza
Speaker 1: Today on our 2018 Subaru Impreza, we're going to be taking a look at and showing you how to install the Curt class one custom fit trailer hitch receiver, part number C11465. My overall impression of the hitch is, that it's going to be great if you're only going to carry up to two bikes. Because it is a class one, so it is going to limit us on how much we can carry and the accessories. Now if you step up to a class two or three, it is going to open that to a lot more options. It is going to sit right below the bumper and we are going to see the cross tube.It's a class one hitch, which means it's going to give us that inch and a quarter by inch and a quarter receiver tube opening. And it is going to be pretty close to flush with our bumper.
This is going to be great for bike racks or cargo carriers. And the way we're going to attach it is going to be through the pin hole in the side here. It does come with a standard half inch pin and clip.Now per the manufacturer, Curt does recommend the use of a stabilization strap for any non trailer loads or any loads that are not supported by tires. Now if you need one of those stabilization straps, you can pick one up on our website using part number 18050. The safety chain connection points are going to be a plate style welded to the bottom of the cross tube and receiver tube.
And as you can see, we're not going to have too much trouble getting most sized hooks on or off.As far as weight capacity goes, our hitch is going to have a 200 pound tongue weight, which is going to be the maximum downward force at the receiver tube. It's also going to have a 2,000 pound gross trailer weight rating, which is the amount it can pull including the trailer and everything you have loaded on it. With that in mind, I want to mention you should double check your Subaru's owners manual to make sure you don't exceed the manufacturers recommended weight.I'd like to give you a few measurements and those are going to help you in deciding for accessories like a bike rack or a cargo carrier. From the center of the hitch pin hole to the outer most edge of the bumper, it's going to be right at three and 3/4 inches. And that's going to be helpful if you're looking at folding accessories, make sure you have the clearance and it doesn't come in contact with the back of your Subaru.Now from the ground to the inside top edge of your receiver tube opening, it's going to be right at 11 and 3/4 inches.
Now at that point, I would recommend getting a bike rack or a cargo carrier that has a rise in it, so you have adequate ground clearance. Now that we've seen what our hitch looks like and gone over some of the features, let's show you how to get it installed.If we come underneath our car, right above where our tailpipe is. On our frame rail we're going to have some plastic plugs. So on each side, we're going to have a total of three, but we're only going to be removing the very rear one and the one towards the front of the car. You take a flathead screwdriver, you just get underneath the side of it and we can pop them out.
And we'll do that same thing on the other side of our frame. Now the hole towards the front of our car is going to serve as our access hole to get our hardware in place. However, we're going to have to file it just a little bit so we can get our hardware through.So I'm going to take a file on a drill and just go enough just to go ahead and get my hardware. And periodically you want to double check to make sure it fits. Now if you don't have a power file like this, you can use a hand file or even a drill bit. Just enough to hollow out the edges so you can get your hardware in. We're going to take our half inch spacer block, double check that it fits. As well as the large of the two carriage bolts, which is going to be our half inch carriage bolt. And once we know that our hardware can fit through, we'll go ahead and do that for the other side as well.Now it's never a good idea to leave exposed metal on your car. So I'm going to come back with some spray paint and hopefully it'll prevent any kind of rust and corrosion from building up on the frame. So we're going to start getting our hardware in place. You're going to want to grab one of the smaller fish wires. We're going to take the coiled end and go through the hole towards the very back of our car. And we're going to feed it through until we can get it at the access hole. It may take a little finesse, maybe reach in. Just be careful because we did file it, so it's going to be sharp. Once you have that coiled end coming through, just kind of put a little bend in it. And you want to make sure that you leave the tail still hanging out. You don't want to pull it all the way through.And we're going to take one of our small square holed spacer blocks, slide it over the coiled end and take one of our 7/16 carriage bolts and thread it on there. One piece at a time, we're going to put our hardware into the frame. Push the space block in first. We can feed in the carriage bolt and we're going to pull our fish wire back towards the front. So the hardware drops through. For our forward mounting hole, we're going to do the same thing. But it's a little bit different. We're going to take our fish wire and we're going to take one of our half inch spacer blocks and we're going to slide it over the coiled end.Then we can take one of our half inch carriage bolts and thread it onto the end of the wire. And we're going to take our carriage bolt and feed it into the frame. Push our spacer block into the frame. And then we're going to pull everything down so it falls through. We're going to repeat that on the other side of our frame as well.Now we're going to have one more spacer and this round hole spacer is actually going to go on the forward attaching point. And it's going to go in between our hitch and our frame. So to make things a little bit easier on ourselves, so it's not moving around on us when we go to put our hitch in. I'm just going to take some tape and tape that spacer to the end of the hitch here. And this is just going to be temporary just to make sure it doesn't slide around. Use whatever you have electrical tape, packing tape. Just want to make sure that it's going to be secure on the hitch when we go to put it up. And we'll put that on both sides.With an extra set of hands, we're going to raise our hitch up. Just want to make sure you put your pull wires through the holes that are in the hitch. And we're going to raise it up over the exhaust. Then we can remove our pull wire with our hardware through the hitch. Just want to be careful not to push it back into the frame. With the front, we're going to grab a 7/16 flange nut. We're going to get at least one started on each side. That way the hitch will support itself.With the forward mounting hole, we're going to take our half inch flange nuts and secure it down. We're going to come back with a 3/4 inch socket and snug up our half inch hardware. For our 7/16 hardware at the back, I'm going to be using an 11/16 socket. Now we can come back and we can torque our hardware down to the specified amount in the instructions. You just want to pay attention because the half inch hardware is going to have a different specification than the 7/16. And that'll finish up your look at the Curt class one custom fit trailer hitch receiver, part number C11465 on our 2018 Subaru Impreza.
0
0
See what our Experts say about this CURT Trailer Hitch
Info for this part was:

Edited by:
Lindsey S

Video Edited:
Chris R

Updated by:
Wilson B

Updated by:
Kristina F

Updated by:
Isabelle B

Written by:
Amanda M
At etrailer.com we provide the best information available about the products we sell. We take the quality of our information seriously so that you can get the right part the first time. Let us know if anything is missing or if you have any questions.
Thank you! Your comment has been submitted successfully. You should be able to view your question/comment here within a few days.
Error submitting comment. Please try again momentarily.