

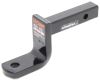
Perfect for light-duty towing, this custom, vehicle trailer hitch receiver features fully welded, gloss powder coated steel construction. Standard drawbar included.
Features:
Specs:
At etrailer.com we're committed to the products we sell, and to our customers. Our experienced and knowledgeable staff are available via both phone and email to address your questions and concerns for the lifetime of your hitch. The technicians at etrailer perform hitch installations on a daily basis, making them a valuable resource for do-it-yourselfers. The one-on-one, personal service you'll receive comes straight from an expert in the towing and automotive field. We've installed it, we've wired it and we've towed with it, so whatever your question, we can answer it.

Videos are provided as a guide only. Refer to manufacturer installation instructions and specs for complete information.
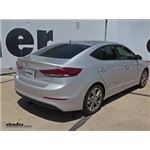
Today on our 2017 Hyundai Elantra, we're taking a look at installing a Curt Trailer Hitch Receiver Class I, part number C11424. Here's what it looks like once it's installed. You can see this nice round tubular design. It fits up faily close to the bottom side of our rear fascia. It's got some nice safety chain loops that's going to accommodate most of your safety chains. This is going to be our Class I hitch, so it's going to have a 1/2 inch hitch pin hole.
It's designed to have 200 pounds of tongue weight, which is our downward force, and 2000 pounds of towing weight. You want to make sure that your vehicle is rated to hold that amount of rate. You can check with your manufacturer or your auto manual. This is going to be a bolt-on design, no drilling required. Our hitch does come with this hitch pin and clip. We'll go ahead and do some measurements that's going to help you in selecting your accessories such as a bike rack or a cargo carrier. From the center of the hitch pin hole to the outermost part of the bumper is going to be about 4-1/2 inches.
From the ground to the inside of the top of the receiver tube, it's going to be about 10-1/4 inches. To begin our install, we need to remove this plastic panel here on the driver's side. It's going to have three clips or pushpins we're going to have to remove. We'll just take a flatblade screwdriver or a panel tool, pry in between and take them out. There's also going to be a couple of 10 mm nuts. We'll have one here, one here and there's going to be two more in the back side here.
We'll remove this panel. For later re-installation, we're going to have to put a notch in it so it will fit around our new hitch. Now on the back side of our bumper attachment here, we're going to have two 14 mm headed bolts. We have one on this side and one on this side. We're going to remove those two. We'll do this for both sides.
Then we're going to slide our hitch up into place and we'll install the new supplied hardware. We have this 3/8-inch U-bolt that's going to sit over the factory tow hook. Then we'll have some nuts and washers that will go on the bottom side there as well. When we've got that sitting in place, we can take our hitch and slide it into position and install it with our 10 mm hardware. Once we have all four of the bolts going into the back side here, two on each side, we're going to run those down and snug them up. Our U-bolt here is going to take a 3/8-inch flat washer and then a 3/8-inch nut. Now we'll take a 14 mm socket and we can snug these up as well. You want to make sure you tighten these evenly so it will sit nice and flush. Now we're going to go ahead and torque these down to specifications that are in our instructions. Once we've torqued all four bolts on the back side of our bumper, we can come down to our U-bolt here and we'll torque that to specifications as well. You want to go back and forth so you have it even. Now it's entirely up to you if you want to reinstall this plastic shield here. If you do, you're going to have to cut a notch in it. We've gone ahead and held it up in place. We've figured out we're going to have to cut out a slice there and we can slide it in from the back side and reattach it. We're going to take a pair of tin snips or you can use a sharp razor knife. We're just going to cut it out and then we can test fit it into place. We'll reinstall our nuts and our clips. That's going to do it for our look at and install of the Curt Trailer Hitch Receiver Class I, part C11424, on our 2017 Hyundai Elantra.
Info for this part was:
At etrailer.com we provide the best information available about the products we sell. We take the quality of our information seriously so that you can get the right part the first time. Let us know if anything is missing or if you have any questions.


Thank you! Your comment has been submitted successfully. You should be able to view your question/comment here within a few days.
Error submitting comment. Please try again momentarily.