
To see if this custom-fit item will work for you please tell us what vehicle you'll use it with.
Thank you! Your comment has been submitted successfully. You should be able to view your question/comment here within a few days.
Error submitting comment. Please try again momentarily.
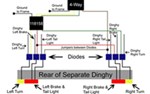
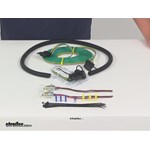
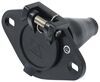
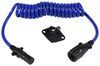
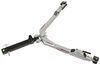
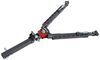
Use your towed car's signal lights without tapping into its wiring. This self-contained wiring kit bypasses your Toyota Sienna's electrical system, eliminating any concerns over violating the manufacturer's warranty.
Features:
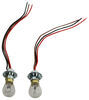
Note: Towed car must have enough room inside the tail light lens housing for an extra bulb and socket.

Videos are provided as a guide only. Refer to manufacturer installation instructions and specs for complete information.
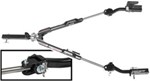
Today, on this 2009 Mini Cooper, we're going to install part number RM-155 from Roadmaster. The first thing we're going to do is start from the front of our car and work our way back. To help run our wire through our grill, we're going to use a piece of airline tubing. This could also be a piece of fish wire or another piece of wire, to help it through. We'll run it through the grill, and then underneath, where we can reach it. Next, we'll load our wire harness. It has two 4-pull ends on it. Doesn't matter which end, but we need to remove one.
So, we'll go ahead and cut it off and tape it to our pull wire, and pull it on through. Once we have it pulled all the way through, we'll leave some hanging out the front, and we'll put a loom around it. After we have our loom on our wire, we're going to end up pulling that behind the grill and out one of the slots. To help pull our wire through, behind the grill, we're going to take the shorter 4-pull lead that comes with the kit. This is actually the lead that goes between the RV and the towed vehicle. We're going to push that through the slot and then to the inside.
We push those two together and use it to pull the 4-pull harness back through the grill. Once we have it pulled through the grill, we'll go ahead and use some zip ties to attach it. We'll also use the zip tie around the outside of the 4-pull to help keep it from being pushed back in through the grill. We'll also leave a little bit of length out so we can pull it away from the grill as needed. Along the length of it, we'll go ahead and zip tie our wire. After that's done, we'll continue running our wire underneath the car, back towards the tail lights. As I run it underneath the car, we're going to run it underneath the subframe and out towards the back.
We'll also follow the brake line along the side of the gas tank, and over the rear suspension components, all the way back to our tail light on the driver's side. At this point, we'll go ahead and leave the wires alone, and we'll go ahead and remove the tail lights. To remove the tail lights, first off, we have to remove the chrome bezel around the tail light. Using a small, right-angle pick, we're going to work our way between the chrome and the tail light lens. This will unsnap, but it also helps to pull back the bezel a little bit. You can see the little red tabs that you can push down with a small screwdriver to help break it free.
It seems to work best to work at the top and work your way down. Once the bezel is removed, you'll see there's three screws that we have to remove next. We're removing three torque screws. On the inside, this is really hard to find, but there's a tab on top and bottom. It's best to push down, if you can, on the tab on top, as you push out the lens, and angle the bottom of the lens up so the bottom tab clears the sheet metal. This will take a little practice to get to the tabs. You have to get it at just the right angle, and it will come apart. Once we have our light free, we'll go ahead and disconnect the wire harness from the tail light. There's a small tab we have to push, and we can release it. We're done with our driver's side. Let's go ahead and repeat the same process over on the passenger side. Our tail light's out of the way. Look inside on the driver's side socket, and look down, you'll see a rubber grommet. We'll go ahead and poke that grommet out and let it fall to the ground. Then, we'll go ahead and retrieve the grommet, and we'll cut the center out of it. Using a utility knife, we'll work our way around and then pull it apart. In this case, we're using a pair of pliers to help pull it apart. We'll set that aside for now, and we'll go back to our 4-pull wire. Using our airline tubing again, we'll go ahead and run it down through the hole, and use it to pull up our wire. We'll pull it up and through, and then run our grommet through it. We'll make sure we take up all the slack, and then, we'll take our 4-pull wire and go right back through the grommet again, so we'll be making a loop with it, and we'll run it back down through the same hole. Once again, we'll make sure we take up all our slack, but leave enough wire inside that we can use to make our connections later. In this case, we're using maybe a little over a foot left over. Once we're satisfied with the length, we'll go ahead and reinstall our grommet with the wires inside of it. We'll leave that side alone for now, and we'll go ahead continuing running our wire over to the passenger side. Running to the passenger side, there's some factory wiring that we'll follow along the way. Make sure we stay above the heat shield, and away from the exhaust. Now, at the bottom of the socket on the passenger side, there's a large rubber grommet. We'll use a knife to cut it, and then use our airline tubing to pull our wire through, once again. We'll take up our slack and cut off our excess. Now, we've got our wires ran to both tail lights. Now, let's go ahead and start working on the tail lights themselves. We'll take one of the tail lights, in this case, the driver's side. We'll go ahead and mark for a hole. We'll use our one-inch hole saw to make our mark first. Then, we'll drill out a pilot hole first, with a quarter-inch bit, then follow it back up with the hole saw. Now, we'll take our light socket and bulb, and we'll do a quick test fit. When you put it in there, you can see the tabs are bent in, so it doesn't grip. What we're going to do is remove the tail light and pull out the tabs a little bit, working our way around. We'll take a small screwdriver to pry up the small tabs. We're only going to pull up the tabs just enough to where we start moving them, and then do a test fit on the tail light. If you look like it'll 00:07:28 start, we'll go ahead and reinstall the tail light bulb, and then install the socket for good. What you aim for is you want a nice, snug fit. We're done for the driver's side. Let's go ahead and repeat the same process over on the passenger side tail light. Now, we can go ahead and start hooking up our wires. Now, to prepare our wires on the driver's side, we're going to split our wires away from each other. We'll split all 4 wires, and we're going to tuck away the green wire, because that will not be used on the driver's side. Now, we have our yellow, our brown, and our white. Starting with our white wire for ground, we're going to take that wire and cut it in half. Using a butt connector, we'll connect those two ends together. We'll connect that to the ground wire on our new light socket. That's going to be the black wire. Next, we'll do the same thing with the brown wire. We'll cut it in half, use the butt connector to connect the two ends together, and the open end will go to the brown wire on our new socket. Now, on our yellow wire, we'll go ahead and cut it in half. I don't need to use both halves. We just need to use the one half that goes towards the front of the vehicle, to our 4-pull plug. We'll attach that yellow wire to our red wire on our new socket. All right, now, we'll go ahead and tape up all our wires, and then we'll go ahead and reinstall the tail light. Now, we'll go over to our passenger side and repeat the same process. However, we won't be using the yellow wire on that side, so we'll cut it away first and tuck it out of the way. We'll have our green, our brown, and white wires on the passenger side. Once again, we'll take our white wire, cut it in half, then reconnect the two ends with one end of the butt connector, and the other end will get the ring terminal. A ring terminal will run to some sheet metal on the inside of a car for ground. When we install our ground screw, it's a good idea to find an area where it has overlapping layers of sheet metal. We'll take our black wire from our new socket, and connect that to our white wire. Then, we'll do the same thing, brown to brown, and then our red wire on our socket will go to the green wire on the passenger side. Once our connections are made, we'll go ahead and tape up the wires. At any point in this process, it's a good idea to take a zip tie and tie up any wires and anchor them, to make sure they don't move anywhere. Then, we can go ahead and install the tail light. Okay. Now, apply power to the front and see how it works. First off, we'll go ahead and try our running light circuit. Then, we'll go ahead and try the right turn signal, and then show our left turn signal. Now, a turn signal is for the same circuit as a brake signal. Okay, looks like everything works. With that, that'll finish it for our install of part number RM-155 from Roadmaster, on our 2009 Mini Cooper. .
Average Customer Rating: 4.7 out of 5 stars (247 Customer Reviews)
Use your towed car's signal lights without tapping into its wiring. This self-contained wiring kit bypasses your vehicle's electrical system, eliminating any concerns over violating the manufacturer's warranty.Always completely satisfied with Etrailer service and products! Jamie B is very knowledgable and courteous!
This was a good option for our 2020 Chevy Equinox because it does not tie into the tow vehicle electrical system and runs directly from the Motorhome electrical system.
Went pretty easy. Holes for bulbs do fit in the rear lights. I had to use a 6way plug that had a 4way line on it also.
Put this into a 2002 Jeep Liberty. Good directions. Drilled out the lower part of tail light housing and install bulb sockets into it. You may have to deburr the tail light housing a bit and manipulate the tangs on the bulb socket but is fine. I put in 1157 LED bulbs :) Good stuff!
This product was easy to install but it took some time routing the wiring harness from the front bumper to the rear. Pick up some extra zip ties, you will need several. The lighting system is independent allowing for the use of LED bulbs. Great product.

easy install one year later still working perfectly
it worked well
very well made and packaged
Great customer service fast delivery and reasonable price. Been purchasing from ETrailer for years
Found this item was wired with the brake lights for the brown wires and turn/running lights for colored wires and this fact kept me from getting this done very rapidly. Once identified, went together really nicely and actually grounded to frame for higher light output. I upgraded 3 wire into 2 wire converter with "Roadmaster Brite-lite 3 to 2 Wiring Converter" and they are as bright as the lights already in the housing. Except for that wiring issue, it would have been excellent. As to performance after install, great. Customer service was nice from Roadmaster as well. Did receive a call back message from etrailer a couple days later.
I purchased a Blue Ox base plate, Air Force One braking system, and a light kit for my 2013 Durango. I could have not asked for an easier process with selecting and ordering, also the tutorials and videos were a great help in determining what was the best system for me . Everything arrived as planned and in great condition. This is not my first time using etrailer.com and my prior experience was equally good.

Ken G.

10/23/2017
After using the items I reviewed, about 6,000 miles, I am more than satisfied. The towing setup is easy to hook up and unhook and the braking system is second to none. All of the installation was completed by myself and a friend, both of us have a technical background him more than me and we found the videos of the installation extremely helpful.Thank you for following up and providing excellent products as well as support services.
great kit i have installed them before
I like this product and would definitely buy it again. I like not having to splice into the vehicle wiring and install diodes, etc. It is a clean installation with good instructions. All I have to do to hook up the lights is raise the hood of the towed car and pull out the pigtail and hook it to the motorhome. It is powered by the motorhome and does not run down the battery in the towed car. Great product.

Gary Y.
8/19/2017
Works great! Would definitely recommend it.
Great idea. After years of towing with magnetic lights now all I have to do is plug it in, and I'm done.
The kit kit comes with more parts and wire than I needed and was simple to install on my 2010 JK.

Frank S.
6/27/2014
Thanks Patrick. It works so well I forgot I had it.
This kit really simplifies wiring tail lights on a vehicle that will be towed. No cutting into the vehicle's wiring and adding isolation diodes. Very functional and easy to install.
Kim P.
1/26/2016
The parts are working perfectly. Thank you.
I have used the brake light wiring kit on 2 other towed vehicles. It is an easy install, does not compromise the original factory wiring and works well.

Robert
11/12/2018
Easy install, working well 1 year later.
Kit was of good quality components. I would recommend about twice a much protective wire wrap along with extra of the smaller butt connectors. Fortunitely I had what I needed on hand. I also used a larger ring terminal.

Jack M.
5/9/2020
Works great. 2002 Jeep Wrangler tail lights have plenty of room for the extra tail light bulbs.
Good instructions. Everything need is included for 4flat connections. One bulb socket arrived with the ground (black) wire loose in the bag. The solder joint had failed. Resoldered but had to remove the other wires and rubber insert from the bulb socket to avoid melting. Not a shining example for Roadmaster.
Joel
8/16/2015
no issues, working as expected
Great product, not a bad install and works great. I chose to cut off both 4 flat connectors and I installed a 4 round connector with spring cover on the front of my CRV. Looks and work out great.

W. D.
7/19/2017
Still working fine.
Nice to not have to splice into vehicle wiring harness. Separate bulb assembly in existing tail light housing works great for towing our "TOAD" behind motor home.
Kevin M.
9/2/2020
Still works great after a year of towing to many destinations.
A very clever idea for an easy, neat, simple installation to safely operate tail lights on a towed vehicle. We installed this kit on our 2017 Chevy Sonic and it works great.

Edp
8/15/2018
Thanks for the follow up. Everything is working just fine, no problems, nothing but good performance.
I really didn't want to install a separate bulb kit but our Equinox light was not compatible with our motor home. I was also installing a trailer lighting harness for the Equinox at the same time and doing them together made a lot of sense. I found this kit to be easy to manage and that drilling into the rear light housings not nearly as difficult as I had imagined. I would share a picture of the result but fortunately there is nothing to see - everything fit right into the Equinox's rear lamp structure. I compared the original lights with those from the kit driven by the RV and found them to be a great match. I upgraded the kit bulbs to LEDs for greater longevity.
This time it went without a hitch. last time was another thing. hopefully moving forward its all good.
thankyou
Good materials and instructions. There is a YouTube video that is very helpful. I would have liked a longer connector that goes between the motor coach and the towed vehicle.
Ron S.
6/15/2017
Still working great!
Watched video and installed with no issues. Great product! Will buy again for future vehicles.
Do you have a question about this Tow Bar Wiring?
Info for this part was:
At etrailer.com we provide the best information available about the products we sell. We take the quality of our information seriously so that you can get the right part the first time. Let us know if anything is missing or if you have any questions.


Robertbenita
6/30/2014
Continues to work as it should! Very pleased with end product after installation by myself and continue to be happy every time I hook up since! Nice item! And customer service...Well they checked back with me a year later to see if I needed anything. How is that for the best customer service around! A