
Custom Fit Roof Rack Kit With Y00409 | Y03536 | Y62CR | Y64AR
(195 reviews)
Price: $578.80
Custom Fit Roof Rack Kit With Y00409 | Y03536 | Y62CR | Y64AR
Item # Y25ZB
Our Price: $578.80
Will this fit?
To see if this custom-fit item will work for you please tell us what vehicle you'll use it with.


- All Info
- Reviews (195)
- Q & A (0)
- Videos (81)
- Photos
Yakima Roof Rack - Y25ZB
- Crossbars
- Round Bars
- 2 Bars
- 58 Inch Bar Space
- Yakima
- Black
- Overhang
These multipurpose, galvanized steel crossbars supply the backbone for your aftermarket roof rack system. Works with accessories that clamp around the bars. Pair with Yakima towers, fit kit, and RoundBar SL Adapter to create a complete roof rack.
Features:
Yakima 58" RoundBar MD:- Sturdy, round crossbars let you build an aftermarket roof rack for your vehicle
- Pair with Yakima towers, fit kit, and RoundBar SL Adapter (sold separately) to create a complete roof rack
- Accommodate accessories that clamp around the bars
- Optional RoundBar end caps (sold separately) keep out dirt and grime
- Constructed from vinyl-coated, galvanized steel
Yakima RoundBar SL Adapter:
- Adapters let you mount your Yakima RoundBars on BaseLine, SkyLine, TimberLine, or RidgeLine towers
- Easy installation - adapters slide onto bars and attach with bolts (included with towers)
- 4 Adapters and 4 RoundBar endcaps included
Yakima SightClip 31:
- Custom-fit clips and pads allow you to mount 4 SightLine or RidgeLine towers (sold separately) on your vehicle with flush, factory side rails
- Inner and outer clips tighten together with a single bolt for even, secure grip on rails
- Snap into place on DropHooks inside towers
- Powder coated stainless steel clips are durable and rust resistant
- Molded rubber pads fit the contour of your side rails
- Clip onto bottoms of towers
- Protect side rails from scratches and abrasions
Yakima SightLine Towers (4-pack):
- 4 Low-profile towers mount Yakima crossbars to your vehicle with flush, factory side rails
- Pair with 2 Yakima crossbars and SightClips or RidgeClips (sold separately) to create a complete roof rack
- Tower pitch can be adjusted 6 degrees forward and 6 degrees backward to level your crossbars
- Pivoting bases automatically adjust during installation to ensure towers are seated correctly
- Versatile BarBeds are curved to accommodate the elliptical shape of Yakima CoreBar and JetStream crossbars
- Also fit RoundBar crossbars with adapter (Y03536 - sold separately) or HD crossbars with adapter (Y03541 - sold separately)
- Safe and easy installation with included torque tool
- Clip holder adjusts on 3 axes for perfect fit on your flush rails
- SightClips or RidgeClips (sold separately) attach to hooks in tower assemblies and tighten together for even, secure grip on rails
- Torque tool clicks 3 times when clips are secure - eliminates fear of under- or over-tightening
- Lockable with Yakima Same Key System (SKS) lock cores (Y07204 - sold separately)
- Durable, weather-resistant stainless steel, glass-reinforced plastic, and elastomer construction
8000409 Yakima Round Crossbars - Steel - Black - 58" Long - Qty 2
8003536 RoundBar StreamLine Adapter for Yakima Base Line, Sky Line, Timber Line, and Ridge Line Towers - Qty 4
8006431 Custom Sight Clips and Pads for Yakima Sight Line and Ridge Line Towers
8001635 Yakima Sight Line Roof Rack Towers - Qty 4
Replaces Yakima RidgeLine Y00145
Video of Custom Fit Roof Rack Kit With Y00409 | Y03536 | Y62CR | Y64AR

Videos are provided as a guide only. Refer to manufacturer installation instructions and specs for complete information.


Video Transcript for Yakima JetStream Crossbars Roof Rack Installation - 2022 Mazda CX-9
Hey everybody. Cooper here at etrailer. Today we're going to be taking a look at our Yakima roof rack system and how to install it. It does come in three major components that we'll get into as we start to talk about 'em on our 2022 Mazda CX9. Now if you wanna carry around some of those longer items like skis or snowboards, maybe need some additional storage like your rooftop cargo basket, or just wanna keep some of those dirtier items outta your car like mulch or maybe fertilizer. The first thing we're going to need for all those accessories is a roof rack system.
The first component we're going to look at in our roof rack system is going to be our crossbar here. Now our crossbar is going to be the Jet Stream Yakima crossbar which just means it has this nice arrow design to it where kind of starts a little fatter in the front and tapers off towards the back. Now this is just to help with some of that wind drag and noise that usually comes with putting stuff on top of your roof. It's going to be made of aluminum, which just means it's going to stay lightweight and very rustproof as we take our roof rack through the elements. And we even do have a T track here up top and it's my favorite kind of T track where if you want to install accessory you just have to push it kind of down and set it to wherever you need.
We're not going to have to pull up our wind strip and cut it to different specs. A nice way that our crossbar does interact with our CX9 is that there is plenty of space here in case we wanna use any clamping accessories between our roof and our crossbar that they just fit right through. Don't have to worry about damaging your roof at all for that to clamp down. Also coming down to the bottom of the crossbar if you can see that there is no wind strip, your kit will come with one. But because there is no permanent installation on this we have opted not to put our wind strip in today.
Then it does fit nicely into our sightline tower here which is just what's going to be kind of the mid piece between our crossbar and our fit kit. It does have this plastic covering when you're all done. That just pops right off. Now all of our inner mechanisms and tie-down points are gonna be behind this guard which is kept in place by this plastic lock core which is just used by a flathead screwdriver to kind of unlock and lock. But you can replace this with the sand key system for Yakima, which is a metal lock core using a key in case you have any other Yakima products or just want to upgrade to a key system instead.
The last piece to talk about in terms of our overall roof rack system is going to be the fit kit which is going to sort of have that custom molding to our vehicle. You can see that there's a hole right here. There's actually one right behind our fit kit as well and there's a little piece of rubber that you'll be able to see during the install process that really helps secure it all down. And looking on the outside here too our clamp does kind of fit into a little ridge on top of our CX9 system. So overall it just allows our roof rack system to have a really secure and custom fit to our CX9. Speaking about our system overall, our crossbars are 50 inches here which I think do sit really nice and flush here with our CX9. But I think if you did want to go up to the next size just to get some more usable space if you have a lot of accessories you wanna carry around or just want more easable access to something like rooftop cargo bags, that would be possible. The only thing is remember as you go farther and farther out from your vehicle the more dangerous it is kind of getting in and out making sure you don't hit your head. Now the install process for this roof rack system is pretty involved. It might be a little time consuming but as long as you're patient and follow the step-by-step guides in the instruction you might still find yourself running to a couple of snags. But thankfully we're gonna show you how that install process works right now. Now the first thing we're gonna need to do is set up our legs so they can go onto our crossbars. Now this is how it's going to come out of the kit. So the first step is going to be that we're going to need to remove this outer shell here revealing its inner one, and we're going to go ahead and take our flathead screwdriver and unlock this which just does expose all of the internals. We're going to need to take our included Yakima tool and unscrew this right here. And that will reveal secret door that we're gonna point out later. And then we're gonna go ahead and unscrew this a little bit ahead of time because this is where we are going to set up our clamps on. And then if we flip this over we can see that this by unscrewing that first bolt this is the little secret door that we have revealed that is going to be for the top of this guy right here. We are going to go ahead and take our plastic piece here, kind of just make sure that it's centered up with that and then drop in this piece which is going to be what secures our leg to its crossbar. You just kind of have to jiggle that into place holding it in place, flipping this around and then taking our included Yakima tool and tightening it down just a little bit so that way they become secured to each other but not enough that we can't fit it into our crossbar. Now that our legs are ready we can install them on our crossbar. Looking at our crossbar we have an arrow crossbar here today which means it's gonna be a little bit fatter in the front and kind of taper off towards the back. That's going to be the easiest way to tell you which way is the front and back. But we're gonna go ahead and flip it over. And we went ahead and marked an arrow facing towards the front, which really helps us whenever we have to install using this crossbar. So if you're looking for something to help you out that could be a good idea as well. Taking off our end caps here on both sides we are then going to go ahead and grab one of our legs and then we are going to use the included measuring strips on here that you may or may not be able to see. They're kind of difficult. And then we are going to go ahead and take our included leg here, slide that in. And our measurement is 38 and seven eighths. So we're gonna go ahead and find that on our strip and making that measurement line up with the back of our leg. And now we can go ahead and take our include Yakima tool and tighten them down a little bit but we don't wanna tighten them down all the way 'cause we still need to set the pitch. So taking a look at the leg of our crossbar system we can see the little bolt down here. So what the pitch basically means is we go ahead and push our tower towards the front of our crossbar. This is going to be the A positioning, B is going to be with it kind of sitting in towards the center. And C is going to be if we move the bolt towards the back. Now the measurement here and the pitch can be different depending on the system and your vehicle specifically. So make sure that you are checking which ones you are going to need. And this case we are going to need the C so we're gonna go ahead and take our included tool and tighten it down in this position. Now with our legs installed, we're going to go ahead and put our pieces in that make up our fit kit. The first one is going to be this pad here that actually has the same number regardless of of it's the front crossbar, the back crossbar, left or right. They all have the same code on them. We're going to go ahead and take it, making sure that our arrow is pointing out of our crossbar and come to about the middle of our crossbar here where we'll be able to see where it's going to just clamp right down into place. You'll hear a little click. That'll let you know that you did that right. (click) The next one we are going to do is going to be one of the sides of our clamp and we need to go ahead and take our fingers real quick and remove the retaining clip right here. And then this guy should just slide right in. (clanging) But you may find yourself needing to loosen it up a little bit with that same bolt that we did earlier if it's giving you a little bit of trouble. (clanging) There we go. And then we should be able to fit our piece around those hooks down there and then when we give it a good tug up you'll notice that it is in place and then we'll go ahead and replace that back in. Now if we come over to the front you'll see a very similar system that we just go ahead and pinch and we'll have go ahead and loosen that up. And for this we actually want to tighten this bolt back down because we are going to be fitting this between this hole right here, which means that if we don't tighten down this bolt that our clip is not going to be able to get past that. The process is going to be the same over on this side here. I did just wanna go ahead and point out that our clip here, R9, is going to be the one that sits inside our inner crossbar and our clip R14 is going to be the one that sits outside of our crossbar. which is designated in the instruction manual. Now that our crossbar is ready to go we're gonna have to know where to put it. So by taking a soft tape measure we're going to start at the front of our front crossbar. And since we already took measurement out of our construction manual we're gonna know that that's 28 inches. We're gonna go ahead and mark that. And then reaching over here to zero, we know that this is going to be where the front of our rear crossbar starts. Now your kit is going to come with some stickers to temporarily place here for you to mark that, but since we don't have those, I'm just gonna go ahead and make a little mark with my finger knowing that's where the spot is that I have to come back to. One nice thing about our crossbar system is that one of our clamps here has a little bit of a nub on it that will actually fit into one of the holes on our rail system. So that's just nice to know as kind of a secondary measurement that you know you're placing your rails in the correct spot. And try to line it up with your mark the best you can. But make sure that you go ahead and check the other side, make that measurement, and maybe double check your measurement over here after you move that side a little bit to make sure that you didn't accidentally move your first side. Now that we've checked the measurement for our crossbars on both sides and know they're in the correct place we can go ahead and tighten them down. Now if you are doing this by yourself, you wanna go ahead and choose one side and maybe only tighten it down about 50%, then go around to the other side and do that kind of back and forth increasing in value because if you do it completely on one side, you'll end up pulling your system all one way. And we don't want that. We want it to be evenly distributed. So we are gonna go ahead and just tighten this down a little bit, until maybe we can start to feel some of that resistance. And we'll know once we are at the correct setting because our included tool is actually a torque tool, which will not allow us to tighten down anymore once we are at that appropriate setting. Now that our roof rack system is in place we're gonna go ahead and put all our covers back. The first one is going to loop around this little point right here. And swing around. There you go. And once you have that in place, we're gonna go ahead and take our flathead screwdriver that we used earlier to lock that into place. So putting our final caps on, this one just fits right on the front, (snapping) and snaps right into place. And then do not forget the one on your crossbars. And then go ahead and make sure you do this for all four of 'em and then go hit the road. Now overall I do think our Yakima roof rack system looks pretty good on our 2022 Mazda CX9. Once it's up there, I think it looks very sleek and it'll help you carry around some of those additional accessories that you're wanting to. The installation process, like we said before, is pretty involved and can be tricky at times, but if it's something that you find yourself just setting up or getting on your roof and never having to take off, it's not that big of a deal that it's only gonna be that first time installation, really setting everything up that's kind of a pain in the butt. But once you get through all that I think that's a really good option for us. But that was a look today here at our Yakima Roof Rack System on our 2022 Mazda CX9. My name's Cooper and thanks for watching.
Customer Reviews
Custom Fit Roof Rack Kit With Y00409 | Y03536 | Y62CR | Y64AR - Y25ZB
Average Customer Rating: 4.8 out of 5 stars (195 Customer Reviews)
These multipurpose, galvanized steel crossbars supply the backbone for your aftermarket roof rack system. Works with accessories that clamp around the bars. Pair with Yakima towers, fit kit, and RoundBar SL Adapter to create a complete roof rack.by: John K08/17/2012
Free delivery that showed up in 3 days!!! Can't beat it. The crossbars with the Control Towers and LandingPad 9 fit perfectly on my Honda Element. Had them installed in about 30 mins. Don't have my cargo box yet and wanted to test strength, so I had my 110lb wife standing on them with no issues (yes, the car was parked). Plan to take a long camping trip next week with a cargo box on top...wife will be in the vehicle:-)

by: TimN03/19/2024
Works perfectly. I am always impressed that Yakima continues to make parts for the "old roundbars" since they have since moved on to the superior JetStream bars.
by: Charles02/09/2024
Toyota 4Runner
Kimberly has shown that great customer service is not dead! etrailer and Kimberly are great to work with and have earned my business and will always be the 1st and last place I look for my rack+ needs!
As for the application, I needed more space to fit my cargo box on top of my 4Runner TRD Pro’s rack. I came up this this… Thank you!


by: Paul D.08/19/2012
A great company to do business with, and lots of merchandise in stock. I orderd a roof rack for my truck on Tuesday morning and it was on the porch when I returned from work on Thursday. I will deffinitely order more from etrailer.com


by: J-fan05/04/2024
Excellent selection of rack parts. Very useful installation videos help when choosing between products. Easy ordering process. Quick delivery.
by: Tim 10/18/2023
One quick phone call and Gwendolyn figured out exactly what I needed for our new car to use my old Yakima rack.
by: 04/01/2024
necessary for using the widest cross bar option (78"). East to install
by: Pat G08/29/2013
Great first experience dealing with you guys! Shipped fast, and was a faster install. You gave me the right parts and it went together in a flash.
Will definitely be doing business with you all again.


by: Debra09/10/2023
The rack has been so useful since I purchased it. Staff at etrailer.com were exceptionally helpful in getting the best option for my car and answering questions. I recommend this company, for its 110% customer service, excellent prices and timely delivery.
by: Roland01/08/2024
Haven’t used them yet but they should work as expected
by: Adam K05/14/2023
Pretty straight forward installation. Instructions were easy to follow.
by: Jay07/31/2023
Subaru Forester
Kit worked perfectly on my 2021 Subaru Forester. The whole install took 30 minutes. Never been disappointed with etrailer.
by: Nicholas07/11/2023
Order was easy to place and delivered in less than a week as promised. The sales advice was perfect fit despite multiple pieces having been ordered. Used the rack once and very sturdy
by: Deborah07/27/2023
Great service - great price
by: Deborah07/27/2023
Great service - great price
by: Lawrence B08/17/2017
Toyota Prius
I ordered a Yakima Roof Rack for my Toyota Prius from eTrailer.com. Part of the reason for purchasing from eTrailer.com was the promise that the racks were made specifically for the car and would not dent the roof.
I received the rack on July 31, and installed the racks on my Prius according to instructions included with the racks. Our tandem kayak is 65 lbs . The towers were placed on the outer most part of the roof as indicated by the instructions. Yakima saddles were attached to the crossbars to hold the kayak. Nothing was close or touching the top of the roof. We transported the kayak to a nearby lake, 6 miles, and back. The next day we removed the racks from the roof and noticed 4 dents on the top of the roof. It was obvious that transporting the kayak on the rack caused the dents.
We had to pay $100 to have the dents removed from the Prius roof.
I cannot continue to use this rack that puts dents in the car's roof. I was extremely disappointed in the racks. In reading the Toyota manual and contacting them by phone, there is no mention of using or not using roof racks.
I was shocked to learn from Rachel at eTrailer.com that your company takes absolutely no responsibility for this Yakima product they sell. The best they can do is to pass the buck and refer us to Yakima.
Very disappointed, and out a lot of money for a product that damages your car. Will not recommend or buy here again. eTrailer.com does not even deserve one star in this review.
by: John04/13/2019
Typical Yakima cross bars. Coating is a little too easy to cut or gouge, but probably needs to be that way to get the grip it provides. Good enough solution for me, and allows me to continue to use all the attachments I've accumulated over the years that require a round bar
by: Peter07/29/2023
first try was missing what was needed
Etrailer helped. It was great!
by: Mark07/19/2020
The Yakima roof rack system is an Outstanding product. I purchased the product to replace the OEM roof rack because it was too flimsy to carry the tandem bike mount and my bike. The Yakima roof rack is solid and provides me the peace of mind while hauling my bike on the roof of my car. etrailer provided the product for the best price as always.
by: D White06/20/2018
Ordered new towers and clips so as to use my old-school round bars (I bought these at least 18 years ago, maybe even earlier) and bike and canoe accessories on a new vehicle (naked roof 2018 CR-V). Installation was tedious, as usual, but not difficult and the written instructions were straightforward. Youtube helpful too but not necessary. Have hauled bikes and the canoe in high wind on the interstate (no more than 65 mph though) on the CR-V and so far so good. Have had excellent results with Yakima racks on 3 vehicles now (2 sedans and now the CR-V) over last 28 yrs. This is my first purchase through etrailer. Very pleased. Good price, excellent service online and via phone, rapid delivery. Highly recommend.
by: Joe C12/30/2012
The only reason I am not giving it an excellent rating is the considerable wind noise that occurs. While we had our luggage carrier atop our car it seemingly imperceptible, however after driving around for a week while on vacation with simply the bars breaking the wind it was quite loud. With that being said they were a breeze to install, aside from having to use allen tool tighten down the fittings. I later discovered that a wratcheting screwdriver with the correct bit size provided for much faster installation and removal. I would definitely recommend for purchase.
by: Victoria 07/13/2016
These bars made my car look awesome and was really easy to instal


by: Mark06/30/2023
Works as expected and feels solid
by: Rick U.07/24/2012
Thank you for the quick shipment of my new Yakima Q tower roof rack for my 2007 F150 King Ranch. Following the simple instructions it went together easily and works and looks great. The follow up after purchase has been great from etrailer and I felt like if there had been a problem they would have been there to help me through it.
Thank you!
by: Jerry F04/23/2023
I have been using Yakima racks for around 40 years and have never had any problems. However, I am amazed at the price increases over the years. Etrailer prices were by far lower than most. Overall, a very excellent purchase.
25
434
Show More Reviews
See what our Experts say about this Yakima Roof Rack
- Roof Rack Recommendation for 2020 Hyundai Palisade With No Rails or CrossbarsAlthough we don't offer a roof rack option that would provide the side rails, we do offer roof rack options that would work for your 2020 Hyundai Palisade. For a Yakima round bar roof rack, you'd need the following parts: • Yakima 58 inch round crossbars, part # Y00409 • Yakima BaseLine Towers, part # Y28TR • Yakima SL Adapters, part # Y03536 • Yakima Base Clips # Y06145 • Yakima Base Clips # Y06138 You might want to consider going with an aero-style crossbar, however. The round bars...
view full answer... - What is the Roof Weight Limit of the NuCamp TAB 320? I have a great solution for you. I went ahead and called my contact at NuCamp, and he confirmed that your 2021 NuCamp TAB 320 has a maximum weight capacity of 60 pounds (on top of the Round 58" CrossBars for Yakima Roof Rack # Y00409 where they attach on the camper). However, the Yakima Roof Rack # Y00409 has not been confirmed to fit your 2021 NuCamp TAB 320. For this reason, I recommend the Swagman Roamer LT Roof Rack for Pop-Up Campers and Camper Shells # S80510. The Roam LT Roof Rack...
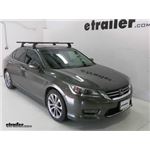
view full answer... - Recommended Fairing for Rola Roof rack on a 2009 Honda Accord SedanYes! Out of the variety of fairings that we have to offer I recommend the 40" long Inno Fairing # INA261 because it will fit perfectly with the 38" long Rola Sport Series Roof Rack # 59757 for your 2009 Honda Accord. If you let me know what you are wanting to use the roof rack for I can make additional recommendations for you. I have also attached an installation video and a picture of this roof rack on a 2009 Accord Sedan that you can reference.
view full answer...
- How to Use Yakima Round Crossbars on 2017 Honda Ridgeline With Naked RoofThe Q Towers have been retired by Yakima, so while we have a way for you to use your current Round 58" CrossBars for Yakima Roof Rack System # Y00409 on your 2017 Honda Ridgeline with a naked roof, you will need new towers, fit kit, and round bar adapter. The correct parts are the follwing: - BaseLine Towers for Yakima Crossbars - Naked Roofs # Y28TR - BaseClip Fit Kit for Yakima BaseLine Roof Rack Towers # Y06152 - RoundBar SL Adapter # Y03536
view full answer... - Will the Rhino-Rack SG Roof Rack for Rain Gutters Fit My 1998 Volvo S90?I have a solution for you. The Rhino-Rack SG Roof Rack for Rain Gutters - Vortex Aero Crossbars - Aluminum - Black # RRSG59 will only fit certain models and years of Jeeps. Unfortunately, it will not fit your 1998 Volvo S90. With that being said, there is a roof rack system that is compatible. For this route, I recommend the following parts: - Round 58" CrossBars for Yakima Roof Rack System (QTY 2) # Y00409 - Yakima 1A Raingutter Towers (QTY 4) # Y00101 With this roof rack system, you...
view full answer... - Roof rack for a 2008 Mazda 3 WITHOUT Fixed Mounting Points on the RoofSince your 2008 Mazda 3 sedan does not have the fixed mounting point on the roof you will need to use a different style of roof rack but not a raingutter mount system. I have included a link to all of the options for a 2008 Mazda 3 sedan without fixed mounting points. If you like the Yakima system you will need the following parts: 58 inch crossbars # Y00409 BaseLine Towers # Y28TR RoundBar Adapters # Y03536 BaseClips # Y06143 and # Y06111
view full answer... - Roof Rack for 2020 Jeep Wrangler 4-Door With With Sky One-Touch Power RoofFor a 4-door Jeep Wrangler, that would mean you have the Unlimited, and by retractable top I believe you are referring to the Sky One-Touch power top that is available on those models. If so, we do have one option for a roof rack that will work with a 2020 Jeep Wrangler Unlimited with the Sky One-Touch top, which is from Yakima and consists of the following parts: - Round 58" CrossBars for Yakima Roof Rack # Y00409 - Yakima 1A Raingutter Towers # Y00101 I confirmed with the manufacturer,...
view full answer... - Parts Needed for Yakima 58 Inch RoundBar Roof Rack on 2016 Toyota 4RunnerAll you'll need to do is order the # Y03536 RoundBar SL adapter kit which comes in a quantity of 4 and the # Y33TR TimberLine towers, also sold in a quantity of 4. Since you already have the 58 inch RoundBars, that's all you'll need. I've linked to the parts, just click each product link, add the parts to a cart and you'll be good to go!
view full answer... - What Yakima Rack Fits My 2016 Ford F-150 Super Crew CabThe Q Clip you need for your 2016 Ford F-150 Super Crew Cab is the Q-130. Please keep in mind that Yakima is no longer supporting Q-Clips and Q-Towers. Unfortunately, we no longer have any in stock. We do have a Yakima roof rack fit for your 2016 Ford F-150 Super Crew Cab, but it is not a Q-Tower fit. Unfortunately, these fit kits are not backwards compatible, so you cannot use the Baseline Fit Kits with the old Q-Towers. You will still be able to use round crossbars if you have them....
view full answer... - Parts Needed to Install Yakima Round Bar Roof Rack on 2012 Toyota Prius CYakima phased out the Q-Tower style roof racks so while we can help you reuse the round crossbars you have we don't have a fit kit for the towers you have now to fit your 2012 Toyota Prius. Instead the part numbers you need are # Y28TR, # Y03536, and # Y06117 to use with your round bars # Y00409.
view full answer...
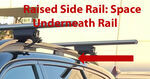
- Yakima Roof Rack Fitment on a 2013 Jeep Grand Cherokee OverlandI can help you find the right Yakima roof rack for your 2013 Jeep Grand Cherokee Overland. If your Overland has the E group package you will see a metal strip in the flush mounted rails, the Yakima kit you will need is the # Y00408 in combination with # Y53TR, # Y03536, and # Y00244. This kit will include the round crossbars, the RailGrab Towers, and the Raised Side Rail adapters. If your Overland doesn't have the E group it will have a black plastic rail and the Yakima kit you will need...
view full answer... - Yakima Round Bar Roof Rack Fit on 2018 Ram 1500The part number you mentioned is the same, but you'll actually need different towers for your 2018 Ram 1500 for a Yakima round bar roof rack, which will fit both the Crew Cab and Quad Cab versions of the truck. The exact parts you need to make up the roof rack on your '18 Ram 1500 are the following: - Round CrossBars for Yakima Roof Rack - 58" # Y00409 or 66" # Y00410 - BaseLine Towers for Yakima Crossbars # Y28TR - RoundBar SL Adapter # Y03536 - BaseClip Fit Kit for Yakima BaseLine Roof...
view full answer... - Longest Rhino Rack Roof Rack Track Availability and Can Yakima Racks fit ThemI'll use your numbering for each of your questions so that they are easy for you to find. A. The longest track is actually the part # RRRTS518 which measures 92-5/16 inches long. B. These tracks are compatible with Yakima roof rack setups. The Landing Pad1 part # Y00221, the control towers, # Y00152, and crossbars, # Y00409 and round bar adapter # Y03536 would be what you need to install a Yakima rack in the tracks. C. The tracks will be limited by the weight capacity of the rack installed...
view full answer... - Hard Tonneau Cover Bike Rack for 2019 Ram 2500 Short BedWe do not have a bike carrier that mounts directly to a hard tonneau cover, however there is another solution. If you have room on you bed rail outside of the tonneau cover you can mount the equivilent of a roof rack on your bed rails using the following parts. Skyline Towers # Y53TR Yaamkia Landing Pads and control towers # Y00221 Yakima 58" Crossbars # Y00409 Yakima Round Bar Adapter # 8003536 With a complete rack system built you need only to choose the "roof" bike carriers that...
view full answer... - Is Yakima Base Roof Rack System the Same for 2012 Ford Focus Sedan and HatchbackThe 2012 Ford Focus sedan and hatchback use the same Yakima base roof rack. The parts are: Round 58 Inch CrossBars (2) part # Y00409 BaseLine Towers part # Y28TR RoundBar Adapters # Y03536 BaseClips # Y06135 and # Y06105
view full answer... - Recommended Yakima Roof Rack for My 2010 Hyundai Genesis CoupeWhile we do have a great Yakima crossbar system that is confirmed to fit your 2010 Hyundai Genesis Coupe, Rhino-Rack does not have a roof rack option that fits your vehicle. With that being said, I saw that you were looking at the Yakima round crossbar system that includes the 58" Crossbars # Y00409. In order to have a complete setup with these crossbars that fit your roof, you also need the following parts: - RoundBar End Caps # Y8007026 - BaseLine Towers # Y28TR - RoundBar SL Adapters...
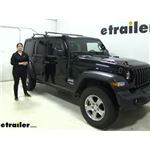
view full answer... - Yakima Roof Rack and Kayak Carrier Recommendation for a 2015 Jeep Wrangler Unlimited HardtopYes you can. I checked with Yakima and the Yakima Raingutter 1A Towers part # Y00101 are confirmed to fit the factory hardtop of your 2015 Jeep Wrangler Unlimited. The recommended crossbars would be the part # Y00409. Yakima says this rack setup has a weight capacity of 100 lbs. You will need to consult your owners manual to determine what Jeep says is your roof capacity and be sure to go with the lower of the two as the overall capacity. For a carrier that can carry up to 2 kayaks...
view full answer... - BaseClips for Yakima Baseline Towers and RoundBar Crossbars on a 2023 Ford MaverickThe correct clip kit for your 2023 Ford Maverick with naked roof to use the Yakima RoundBar Crossbars # Y00409 and the BaseLine Towers for Yakima Crossbars # Y28TR with the RoundBar SL Adapter # Y03536 is the BaseClip Fit Kit for Yakima BaseLine Roof Rack Towers # Y06180.
view full answer... - Will The iKamper 2.0 Fit Yakima CrossBarsAccording to iKamper's website, their product mounts to most cross bars due to its universal design, however since we do not carry their products I can not confirm this. With that being said, since they say it is universal, you can absolutely use the Flexible Track Rack System # Y01127, with the landing pads # Y00221, and the control towers # Y8890027 to mount the iKamper 2.0 on your 2008 Toyota Tundra. Depending how wide your roof is, you can use the 66" crossbars # Y00410, the 58"...
view full answer... - Roof Rack Recommendation for 2003 Ford F-150 SuperCrew CabFor a roof rack confirmed to fit your 2003 Ford F-150 SuperCrew Cab the Yakima part numbers # Y00409, # Y28TR, and # Y00714 would be a confirmed fit that would work well.
view full answer... - Roof Rack for 2012 Toyota Prius with Sun RoofI checked with Yakima and their roof racks including the round bar setup # Y00409, # Y00146, # Y03536, and # Y06117 are a fit for your 2012 Toyota Prius and also work with the sun roof you have as well. You won't be able to (or want to) open the sunroof with the rack installed as it would interfere and cause quite a bit of noise. For a more aerodynamic setup we have the Jetsream rack # Y00426, # Y28TR, and # Y06117 which also would fit and work well.
view full answer... - Available Roof Racks for Various Roof Styles on 1987 Jeep CherokeeWe can help you with a roof rack for your 1987 Jeep Cherokee. The rack fits depend on how the Cherokee's roof is set up. On the linked page just click on the picture that shows your roof style; you will then see only the racks that fit that type of roof. We have options from several brands but none of the roof configurations shows a fit for a SportRack brand roof rack. However, I can help you find the most cost-effective option for each type of roof. If you have a factory roof rack with...
view full answer... - Carrying 4 Bikes on A 2010 Honda AccordThere are only Class I Hitches available for the 2010 Honda Accord. The hitch manufacturers do testing for safety and have found that the 2010 Accord can only safely carry up to 200 pounds of tongue weight. The reason that only two bikes are recommended, on a hitch mounted bike rack, for Class I hitches is that the added torque applied to the hitch and vehicle frame will be too great for the setup, and will eventually if not immediately, cause damage to the hitch or the vehicle frame....
view full answer... - Recommended Roof Rack and Fairing for a 2020 Hyundai PalisadeAlthough the Rola 59762 roof rack isn't a fit for your 2020 Hyundai Palisade, I'd be happy to make a recommendation. The rack you need will depend on what's currently on the roof of your Palisade, if it's a bare roof or has flush mounted side rails. If you have a bare roof, a round-bar roof rack from Yakima would be your most economical option. The rack would consist of the following parts: -Round crossbars, part # Y00409 -BaseLine Towers, part # Y28TR -Round Bar Adapter, part # Y03536 -Vehicle...
view full answer... - Recommended Kayak Carrier for 2020 Mazda CX-5The only hitch mounted option wouldn't be an actual carrier, but a support like the Malone Axis # MAL32VR. This would require the installation of a trailer hitch like the # 76138 you looked at. More than likely you won't need this to mount your kayaks on your 2020 Mazda CX-5. Your kayaks will fit completely on a roof rack with a kayak carrier like the one seen in the picture below unless they are incredibly long. If that is the case, then by all means you could add the # MAL32VR to help...
view full answer...
- Are There 60" Crossbars for a 2018 BMX X3I do have an option for you but those are both pretty long crossbars for this vehicle, it's not something that you can add easily, or legally for that matter as the crossbars can't stick out further than the side mirrors in most states. That said, we do still have a setup for you such as the one below. Yakima CoreBar Crossbars part # Y00422 SightLine Towers for Yakima Crossbars part # Y64AR SightClip Fit Kit for Yakima SightLine and RidgeLine Roof Rack Towers part # Y62CR
view full answer... - Do Yakima Roof Racks Fit 2023 Acura RDXSo we were able to determine that the 2023 Acura RDX wasn't changed from the 2022 model and we then carried over the fits from the previous year. Sometimes one of the rack manufacturers does this first and since we know they did the correct research we know that other brands will also carry over even if they haven't had a chance to test it like with the Yakima Corebar roof rack part numbers # Y00421 # Y64AR, and # Y49AR that we have listed for your 23' RDX.
view full answer... - Quiet Roof Rack for 2023 Kia Sorento With Flush RailsFor an extremely quiet roof rack that fits the flush mounted rails on your 2023 Kia Sorento I recommend the Yakima JetStream roof rack. You will need the following: -Yakima JetStream Crossbars # Y00425 -SightLine Towers for Yakima Crossbars # Y64AR -SightClip Fit Kit for Yakima SightLine and RidgeLine Roof Rack Towers # Y77UR The JetStream bars use an asymmetrical shape making them very aerodynamic. This combined with the WindRidges built into the bars results in a dramatic reduction...
view full answer... - Parts Needed for Yakima JetStream Roof Rack on 2024 Mazda CX-5 With Flush RailsWe have exactly what you need to install the Yakima JetStream roof rack on your 2024 CX-5. You will need the following: -Yakima JetStream Crossbars # Y00425 -SightLine Towers for Yakima Crossbars # Y64AR -SightClip Fit Kit for Yakima SightLine and RidgeLine Roof Rack Towers # Y39AR You also have the option of adding the Yakima SKS Lock Cores # Y07204 for added security. I have attached an installation video below for your reference.
view full answer... - Is There A Trailer Hitch For 2023 Kia Soul GT Line With Center ExhaustIf you need to carry cargo with your Kia Soul, I do have a few potential solutions for you. I will tell you there is not a trailer hitch available anywhere that will fit the center exhaust model at this time (August 2023). The receiver would go exactly where the exhaust sits and there is no way to work around that. If your goal was to carry a few bikes we could set you up with a trunk mount bike rack like the Malone hanger # MPG2139. This can carry 3 bikes weighing up to 33 lbs apiece...
view full answer... - Recommended Roof Rack for a 2023 Acura MDX w/ Flush Side RailsTo add a set of Yakima Jetstream crossbars to the raised rails on the roof of your 2023 Acura MDX you will need the following parts: Yakima JetStream Crossbars - Aluminum - Black - 50" Long - Qty 2 item # Y00425 SightLine Towers for Yakima Crossbars - Flush Side Rails - Qty 4 item # Y64AR SightClip Fit Kit for Yakima SightLine and RidgeLine Roof Rack Towers item # Y49AR This aero bar roof rack system has a 165 lbs capacity. I recommend adding the Yakima Same Key System item # Y07204...
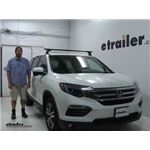
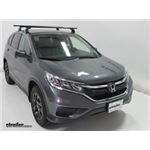
view full answer... - Recommended Roof Rack for a 2024 Honda CR-V w/ Flush Rails Yes, we do have the parts you will need and congrats on the new vehicle. To add a roof rack to the flush rails on your 2024 Honda CR-V you will need the following parts: Yakima JetStream Crossbars - Aluminum - 50" Long - Qty 2 item # Y00425 for Black or item # Y00428 for Silver SightLine Towers for Yakima Crossbars - Flush Side Rails - Qty 4 item # Y64AR SightClip Fit Kit for Yakima SightLine and RidgeLine Roof Rack Towers item # Y44UR This aero bar roof rack system has a 165 lbs capacity....
view full answer... - Recommended Yakima Roof Rack for a 2024 Hyundai Palisade w/ Flush Roof Rails Yes, it will and congrats on the new SUV. The parts listed below will add a Yakima roof rack to your 2024 Hyundai Palisade: Yakima JetStream Crossbars - Aluminum - Black - 50" Long - Qty 2 item # Y00425 SightLine Towers for Yakima Crossbars - Flush Side Rails - Qty 4 item # Y64AR SightClip Fit Kit for Yakima SightLine and RidgeLine Roof Rack Towers item # Y79AR This aero bar roof rack system has a 165 lbs capacity. I recommend adding the Yakima Same Key System item # Y07204 to prevent...
view full answer... - Recommended Roof Rack for a 2024 Kia Telluride w/ Flush Roof Rails Congrats on the new SUV! To add a roof rack to your 2024 Kia Telluride with flush rails you will need the following parts: Yakima JetStream Crossbars - Aluminum - 50" Long - Qty 2 item # Y00425 for Black or item # for Silver SightLine Towers for Yakima Crossbars - Flush Side Rails - Qty 4 item # Y64AR SightClip Fit Kit for Yakima SightLine and RidgeLine Roof Rack Towers item # Y34UR This aero bar roof rack system has a 165 lbs capacity. I recommend adding the Yakima Same Key System...
view full answer... - How to Determine Correct Roof Rack For 2024 Kia TellurideI'm going to go ahead and respectfully disagree that we're idiots, Paul. I'm confident we can figure out the combination for a roof rack on your 2024 Kia Telluride, and there are three possible options Kia has for your roof - flush-mounted rails, raised side rails, and a bare roof. I made some diagrams below showing test fits on a Kia Telluride with photos from the nice folks at Yakima so you can see the difference (please note these are just test fit photos, and not exactly how the rack...
view full answer...
- Recommended Roof Rack for 2024 Kia Telluride With Flush RailsFor an extremely quiet rack that will look good on your 2024 Telluride I recommend the Yakima JetStream roof rack. You will need the following parts: -Yakima JetStream Crossbars - Aluminum - Black - 50" Long - Qty 2 # Y00425 -SightLine Towers for Yakima Crossbars - Flush Side Rails - Qty 4 # Y64AR -SightClip Fit Kit for Yakima SightLine and RidgeLine Roof Rack Towers # Y34UR The JetStream bars have an asymmetrical shape making them very aerodynamic. Combine this with the WindRidges...
view full answer... - Kayak Carrier Recommendation for Hobie Mirage Compass Fishing KayakSince your Hobie Mirage Compass fishing kayak weighs 87 lbs you're either going to have to use a post-style carrier like the Yakima BigStack # Y04041 or use 2 sets of a J-Style carrier like the etrailer J-Style Kayak Carrier # e98878. I recommend going with 2 of the J-Styles simply because it will be easier to load an individual kayak on each one, especially with your heavier kayak. If you don't already have a roof rack then I recommend using a Yakima CoreBar roof rack. The correct parts...
view full answer... - Recommended Roof Rack and Fairing for a 2020 Hyundai PalisadeAlthough the Rola 59762 roof rack isn't a fit for your 2020 Hyundai Palisade, I'd be happy to make a recommendation. The rack you need will depend on what's currently on the roof of your Palisade, if it's a bare roof or has flush mounted side rails. If you have a bare roof, a round-bar roof rack from Yakima would be your most economical option. The rack would consist of the following parts: -Round crossbars, part # Y00409 -BaseLine Towers, part # Y28TR -Round Bar Adapter, part # Y03536 -Vehicle...
view full answer... - Aero Bar Roof Rack that Fits 2023 Kia Niro PHEVI have a roof rack solution that does fit your 2023 Kia Niro with flush bars but the Malone racks require a raised rail like you mentioned so it would not work. Instead you'd need a rack designed to attach to the flush rails like with the Yakima CoreBar roof rack part numbers # Y00421, # Y64AR, and # Y27AR which is a similar aero shaped crossbar to the Malone.
view full answer... - Picking Between 50 and 60 inch Yakima Jetstream Roof Racks for 2021 Kia TellurideGoing with a longer crossbar does give you more space to mount roof accessories and carriers but the longer bars do tend to get in the way a little more and create a little more wind noise. So really it comes down to considering how many things you plan to carry on the roof rack and how wide they might be. Now that said the 60 inch Jetstream rack Yakima offers part numbers # Y00426, # Y28TR, # Y06125, and # Y06165 is the correct rack for if you have a naked roof and the 50 inch rack part...
view full answer... - What Do I Need to Mount a Cargo Box on a 2020 Hyundai Palisade?In order to have a cargo box on your 2020 Hyundai Palisade, you will need a roof rack system with crossbars in order for you to mount the box and cargo. Compatible systems depend on whether your vehicle has a bare roof or flush factory side rails. If your vehicle has a bare roof, I recommend the following parts: - Yakima CoreBar Crossbars - Steel - Black - 60" Long - Qty 2 # Y00422 - BaseLine Towers for Yakima Crossbars - Naked Roofs - Qty 4 # Y28TR - BaseClip Fit Kit for Yakima BaseLine...
view full answer... - How to Transport 3 Bikes 1 E-Bike with a 2018 Subaru Outback WagonI do have a recommendation for you, but with your specific bike rack needs you don't be able to use your 1-1/4" trailer hitch on your 2018 Subaru Outback Wagon to carry all 3 bikes. Either the bike rack is way too heavy and requires a 2" receiver, like the Draw-Tite # 76227, or it doesn't have the attachment option you need, plus the weight capacity for your heavier bike. For your application you'll need to use a hitch bike rack and a roof mounted bike rack. The hitch mount bike rack I...
view full answer... - Recommended Roof Rack System Compatiable With Yakima SkyBox Lo 15 On 2019 Subaru Outback WagonThe Yakima SkyBox Lo Rooftop Cargo Box you purchased will fit the 50" Yakima CoreBar Crossbars # Y00421 you were looking at, and will allow you to open the rear hatch without interference. To install the # Y00421 on your 2019 Subaru Outback Wagon you will need the SightLine Towers for Yakima Crossbars # Y64AR, and Fit Kit # Y32CR if your Subaru is the Touring model. If you do not have the Touring Model you will need the SkyLine Towers for Yakima Crossbars # Y53TR, and Fit Kit # Y00241. Both...
view full answer... - How is Plastic Lock Core of Yakima Sightline Foot Accessed to Install SKS LockThe lock core location for the Sightline feet part # Y64AR is underneath the cover of the foot. So you'd just need to pull the cover off (no tools required) and then underneath it you would see the plastic core that you can remove with a flat screwdriver so that you can install new cores with the part # Y07204.
view full answer... - Equipment Needed to Carry Roof Cargo Box and 4 Pairs of Skis on 2013 Hyundai Santa Fe SportIf you used the Thule SnowPack ski carrier, part # TH7324 that can carry 4 pairs of skis or two snowboards and the Thule Pulse # TH615 with its 16 cubic foot capacity, you'd need roof crossbars that have at least 57 inches of space. If your Hyundai Sport has a bare roof, you can install a Yakima Roof Rack that would offer plenty of space for the ski rack and cargo box mentioned above. The rack would consist of the following parts: 66 Inch Long RoundBars, part # Y00410 BaseLine towers,...
view full answer... - Best Roof Rack for a 2022 BMW X3Thank you for reaching out! The best roof rack for your 2022 BMW X3 is the Yakima JetStream system that uses the following parts: 50" JetStream Crossbars - # Y00425 SightLine Towers - # Y64AR Fit Kit - # Y62CR Lock Cores - # Y07204 (optional) This system installs directly to the flush rails on the roof of your BMW X3 and gives you one of the quietest, sleek-looking roof racks on the market. Not only do you get the 165 lb weight rating, but you also get the most customized fit out there...
view full answer... - Fitment of 2 Rhino-Rack Kayak Carriers # S512-S512X to Transport 4 Kayaks on a 2022 Hyundai PalisadeYes! You can use 2 sets of the Rhino-Rack Kayak Carrier # S512-S512X to transport 4 kayaks on your crossbars. Since one of these sets takes up roughly 20" of crossbar space, you need to have al least 40" of usable crossbar length on your roof rack to accommodate 2 of the # S512-S512X. You do not need to worry about additional straps because the carriers come with all the straps you need. If you need a compatible crossbar system with the length you need, the parts you need depend on if...
view full answer... - Best Roof Rack For 2024 Subaru Impreza HatchbackThe best roof rack for your 2024 Subaru Impreza hatchback with a naked roof is from Yakima due to how quiet it is as well as its durability. The roof rack that fits your Impreza is made up of the following parts: - Yakima JetStream Crossbars - Silver # Y00428 or Black # Y00425 - SightLine Towers for Yakima Crossbars # Y64AR - Landing Pad 22 for Yakima Towers # Y00248 The JetStream bars are quiet because have what are called "WindRidges" on top that control the flow of the air both over...
view full answer... - Roof Rack Recommendation for 2020 Hyundai Palisade With No Rails or CrossbarsAlthough we don't offer a roof rack option that would provide the side rails, we do offer roof rack options that would work for your 2020 Hyundai Palisade. For a Yakima round bar roof rack, you'd need the following parts: • Yakima 58 inch round crossbars, part # Y00409 • Yakima BaseLine Towers, part # Y28TR • Yakima SL Adapters, part # Y03536 • Yakima Base Clips # Y06145 • Yakima Base Clips # Y06138 You might want to consider going with an aero-style crossbar, however. The round bars...
view full answer... - Can I Use Crossbars That Are Wider Than My 2019 Subaru Outback?As long as your 2019 Subaru Outback Wagon has the factory side rails running front to back, then you can install longer Yakima crossbars. The 78" crossbars may be too wide since you do not want to exceed the total width of your vehicle (due to safety and state laws). It looks like your vehicle is about 73" wide so I recommend cutting the 78" bars down to fit your vehicle's width. The complete kit is as follows: Round 78" CrossBars # Y00411, RidgeLine Towers # Y00145, Adapter # Y03536,...
view full answer... - Parts Needed to Install Yakima Round Bar Roof Rack on 2019 Ram 1500Sounds like you are looking for a way to install a Yakima round bar roof rack on a 2019 Ram 1500 which you'd have to use all Yakima components for since there isn't a way to adapt a Rhino Rack tower to accept a round bar. So you'd need the part numbers # Y00410, # Y28TR, # Y03536, and # Y06135 and you'd be set.
view full answer... - How to Attach Yakima Round Crossbars for a Thule Hullavator on a 2006 Toyota Highlander w/ RailsSince you already have the necessary round bars to mount the Thule Hullavator item # TH898 to the roof of your Highlander, you will just need the parts listed below. TimberLine Towers for Yakima Crossbars - Raised, Factory Side Rails - Qty 4 item # Y33TR RoundBar SL Adapter for Yakima BaseLine, SkyLine, TimberLine, and RidgeLine Towers - Qty 4 item # Y03536 The TimberLine Towers are confirmed to mount to the factory roof rails on your 2006 Toyota Highlander. You will need the adapter...
view full answer... - Roof Rack And Cargo Carrier Recommendation For 2014 Nissan Altima 4-DoorThe Yakima Roof Rack System Is a good fit for your 2014 Nissan Altima 4 door. The weight capacity for the roof rack is 100 lbs. That would include the weight of any cargo box you choose added to the weight of any cargo you place in the carrier. The front crossbar is placed 15-1/8 inches from the windshield. The crossbar spread is 24 inches. You need the following parts for the roof rack: 48 inch RoundBars # Y00408 BaseLine Towers # Y28TR RoundBar Adapter # Y03536 BaseClips # Y06137 and...
view full answer... - Cross Bar Options And Kayak Carrier For A 2022 Hyundai SonataWe do have a couple of cross bar options for your 2022 Hyundai Sonata that will work great for you. -First we have the Yakima JetStream Crossbars # Y00425 with the BaseLine Towers for Yakima Crossbars # Y28TR, the fit kit # Y06180 & # Y06153. These are aerodynamic cross bars that measure 50" long, and have a maximum weight capacity of 165lbs. -Next, we have the Yakima CoreBar Crossbars # Y00421, with the same towers # Y00146, and fit kits # Y06153 & # Y06180. These cross bars share...
view full answer... - Correct Yakima Round Bar Roof Rack for a 2013 Ram 3500 Crew CabThe Yakima Round Bar Roof Rack for a 2013 Ram 3500 Crew Cab consists of the following parts; Y00410, part # Y28TR, part # Y03536, and part # Y06135. The RoundBar SL Adapters are for BaseLine, SkyLine, TimberLine, or RidgeLine roof rack towers. The installation points are fixed and cannot be adjusted.
view full answer... - Recommended Fairing for Rola Roof rack on a 2009 Honda Accord SedanYes! Out of the variety of fairings that we have to offer I recommend the 40" long Inno Fairing # INA261 because it will fit perfectly with the 38" long Rola Sport Series Roof Rack # 59757 for your 2009 Honda Accord. If you let me know what you are wanting to use the roof rack for I can make additional recommendations for you. I have also attached an installation video and a picture of this roof rack on a 2009 Accord Sedan that you can reference.
view full answer... - Yakima Roof Rack Parts Needed for a 2017 Subaru Outback WagonYes, the recommended Yakima Landing pad for the 2017 Subaru Outback is the Landing Pad 15 part # Y00241 that you referenced. For crossbars you would want the part # Y00408, for towers part # Y53TR and adapters part # Y03536. All of these components would complete a roof rack for your vehicle.
view full answer... - How to Use Yakima Round Crossbars on 2017 Honda Ridgeline With Naked RoofThe Q Towers have been retired by Yakima, so while we have a way for you to use your current Round 58" CrossBars for Yakima Roof Rack System # Y00409 on your 2017 Honda Ridgeline with a naked roof, you will need new towers, fit kit, and round bar adapter. The correct parts are the follwing: - BaseLine Towers for Yakima Crossbars - Naked Roofs # Y28TR - BaseClip Fit Kit for Yakima BaseLine Roof Rack Towers # Y06152 - RoundBar SL Adapter # Y03536
view full answer... - Roof rack for a 2008 Mazda 3 WITHOUT Fixed Mounting Points on the RoofSince your 2008 Mazda 3 sedan does not have the fixed mounting point on the roof you will need to use a different style of roof rack but not a raingutter mount system. I have included a link to all of the options for a 2008 Mazda 3 sedan without fixed mounting points. If you like the Yakima system you will need the following parts: 58 inch crossbars # Y00409 BaseLine Towers # Y28TR RoundBar Adapters # Y03536 BaseClips # Y06143 and # Y06111
view full answer... - Roof Rack Recommendation for Rhino Rack Sunseeker II Awning on 2017 Ram ProMaster CitySince the Sunseeker II Awning Item # RR32105 only fits Rhino-Rack Heavy-Duty, Aero and Sportz crossbars; Thule and Inno square crossbars; Yakima round crossbars we have a solution, but it's not the Rola rack you mentioned. You'd want the Yakima Round Bar Rack part numbers # Y00408, # Y53TR, # Y03536, and # Y00233 which would fit and work well on your vehicle and with the Sunseeker. You will also need the adapter part # RR32105 too with the round bars.
view full answer... - Recommended Roof Rack And Carrier For Two Kayaks On 2013 Honda FitTo be able to carry two kayaks on your 2016 Fit I recommend a roof rack and a kayak carrier. The roof rack I recommend is the Yakima roof rack. This roof rack includes round 48-inch long crossbars along with the towers, base plates and fit kit. To order this roof rack you will need part # Y00408, part # Y28TR, part # Y03536, and part # Y06143. The kayak carrier I recommend is the Yakima JayLow, part # Y04073. This attaches to the crossbars and you can place a kayak on each side of the...
view full answer... - How to Use Longer Yakima or Thule Crossbars for a 2009 Dodge JourneyIf you have longer bars from Yakima, like the 70" JetStream part # Y00427OR the 70" CoreBar # Y00423, then all you need for your 2009 Dodge Journey are the TimberLine Towers # Y33TR. If you happen to have Yakima round bars then you need the adapter # Y03536 as well. For your Thule bars you will need to use the Evo Raised Rail Feet # TH710401 with the 69" ProBar Evo Crossbars # TH713600 as the aero-style Thule bars have a limited mounting space underneath them and I don't think it will...
view full answer...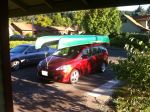
- Yakima Q Tower Roof Rack System for a 2017 Volkswagen GTI 4 DoorFits for vehicles change often, or the different body variations for a vehicle can have completely different fits, even if they are largely the same vehicle. At this time, Yakima has started to retire the Q-Clip system in favor of their newer BaseClip fits. However, for your vehicle, you will need Clips Q63 and Q112. If you have an existing round bar, or want to add a new kit to your vehicle, I recommend the following: If you don't have any raised siderails: Round CrossBars, 48...
view full answer... - Can Thule Hullavator Install on Yakima CrossbarsThe Thule Hullavator Pro # TH898 can fit round bars by grabbing around the crossbar and can fit aero shaped bars if the bars have a channel on top of them. Which the Yakima aero shaped bars don't have top channels so to go the Yakima route will require round bars which includes the part numbers # Y00408, # Y53TR, # Y03536, and # Y00241 and you'd be set.
view full answer... - Can the Yakima Q-Towers Be Used On a 2017 Honda Civic SedanI do have an option for you but there would be no way to reuse the entire Yakima Q-Tower Roof Rack on your 2017 Honda Civic because Yakima does not make a set of Q-Clips for this vehicle. The Q-Clips are actually the main vehicle specific part needed when transferring a system. The Yakima Q-Tower Roof Rack has been discontinued which is why you can no longer obtain new Q-Clips or replacement parts such as the Q-Pads. The good news is that you can still use your old Yakima Round Crossbars....
view full answer... - Parts Needed to Move Yakima Round Bar Roof Rack from 2008 Mercury Mariner to 2017 Ford EscapeThe Yakima Round crossbars roof rack for your 2017 Ford Escape includes the following: 48" Round Bars - # Y00408 BaseLine Towers - # Y28TR RoundBar SL Adapter - # Y03536 Fit Kit - # Y06190 Fit Kit - # Y06191 I compared this to what you would already have on your 2008 Mercury Mariner and You'll actually only need the Fit Kits # Y06190 and # Y06191 to move your roof rack to your Escape!
view full answer... - Which Roof Rack for Yakima Skybox 16 on 2017 Honda Pilot EXI have an option for you but unfortunately the Yakima Q towers, and Yakima Q clips will not fit on your 2017 Honda Pilot. If your Yakima 48inch bars are round you need Yakima Skyline Towers # Y53TR, Yakima Round Bar SL adapters # Y03536, and Yakima Landing Pad 19 # Y00245 for installation on your Pilot. This allows you to still use your Yakima Skybox 16. I recommend adding Yakima Single Key System Lock Cores # Y07204 that allow you to secure your rack to your vehicle with the one key. If...
view full answer... - Can "A" Pad Be Replaced for Yakima Q Tower Roof Rack on a 2004 Volkswagen GolfThe "A" pad you're looking for to pair with the Q Tower roof rack on your 2004 Volkswagen Golf naked roof is found as part 8810084 but was unfortunately discontinued towards the start of 2023. If these pads are broken or missing then you can either try finding them elsewhere or we can get you the newer towers and fit kit from Yakima so you can still utilize your 48" RoundBar Crossbars # Y00408. Yakima RoundBar Roof Rack - 48" RoundBar Crossbars # Y00408 - BaseLine Towers # Y28TR - RoundBar...
view full answer... - Parts Needed for Yakima 58 Inch RoundBar Roof Rack on 2016 Toyota 4RunnerAll you'll need to do is order the # Y03536 RoundBar SL adapter kit which comes in a quantity of 4 and the # Y33TR TimberLine towers, also sold in a quantity of 4. Since you already have the 58 inch RoundBars, that's all you'll need. I've linked to the parts, just click each product link, add the parts to a cart and you'll be good to go!
view full answer... - Can Thule Tandem Bike Rack be Used on Roof of 2020 Subaru Outback Wagon with OEM CrossbarsThe Thule Tandem Bike Rack part # TH558P requires an aftermarket roof rack so for your 2020 Subaru Outback Wagon with the current factory rack you'd also need the Yakima # Y00408, # Y53TR, # Y03536, # Y46VR to use the carrier.
view full answer... - What Yakima Rack Fits My 2016 Ford F-150 Super Crew CabThe Q Clip you need for your 2016 Ford F-150 Super Crew Cab is the Q-130. Please keep in mind that Yakima is no longer supporting Q-Clips and Q-Towers. Unfortunately, we no longer have any in stock. We do have a Yakima roof rack fit for your 2016 Ford F-150 Super Crew Cab, but it is not a Q-Tower fit. Unfortunately, these fit kits are not backwards compatible, so you cannot use the Baseline Fit Kits with the old Q-Towers. You will still be able to use round crossbars if you have them....
view full answer... - What is the Best 16 Cubic Foot Or More Cargo Box/Crossbars for My 2018 Nissan Murano SL?There are a couple options for a cargo box setup on your 2018 Nissan Murano SL with a bare roof. As far as the box, I recommend the Yakima SkyBox 16 Roof Cargo Box - 16 cu ft # Y95AV or the Yakima SkyBox 21 Rooftop Cargo Box - 21 cu ft # Y07337. The great thing about the SkyBoxes is that they include the SuperLatch system that ensures the lid is latched closed and locked. With this mechanism, the key cannot be removed unless the lid is closed properly. In addition, the SkyBoxes include...
view full answer... - Are There 60" Crossbars for a 2018 BMX X3I do have an option for you but those are both pretty long crossbars for this vehicle, it's not something that you can add easily, or legally for that matter as the crossbars can't stick out further than the side mirrors in most states. That said, we do still have a setup for you such as the one below. Yakima CoreBar Crossbars part # Y00422 SightLine Towers for Yakima Crossbars part # Y64AR SightClip Fit Kit for Yakima SightLine and RidgeLine Roof Rack Towers part # Y62CR
view full answer... - Best Roof Rack for a 2022 BMW X3Thank you for reaching out! The best roof rack for your 2022 BMW X3 is the Yakima JetStream system that uses the following parts: 50" JetStream Crossbars - # Y00425 SightLine Towers - # Y64AR Fit Kit - # Y62CR Lock Cores - # Y07204 (optional) This system installs directly to the flush rails on the roof of your BMW X3 and gives you one of the quietest, sleek-looking roof racks on the market. Not only do you get the 165 lb weight rating, but you also get the most customized fit out there...
view full answer... - Recommended Roof Rack for a 2023 BMW X5I checked with Yakima and yes, you can definitely swap out crossbars to adjust the look. The 50" Yakima JetStream Crossbars item # Y00425 will work with the legs and fit kit for the recommended Yakima roof rack set up we have listed for your 2023 X5. I have listed the other parts you will need below including the 60" crossbars: Yakima JetStream Crossbars - Aluminum - Black - 60" Long - Qty 2 item # Y00426 SightLine Towers for Yakima Crossbars - Flush Side Rails - Qty 4 item # Y64AR SightClip...
view full answer... - Recommended Roof Rack on a 2023 BMX X5 M50 w/ Flush Rails Thanks for the picture! The 60" crossbars might be a bit wide. The roof racks with the longer crossbars are typically used for kayak carriers or people that need to mount two bike racks. I recommend going with more of a flush mount set up and we do have one made by Yakima. It is the 2023 BMW X5 roof rack by Yakima and it includes the following parts: Yakima SightLine FX Roof Rack for Flush Side Rails - JetStream Aero Crossbars - Black - Qty 2 item # Y73UV SightClip Fit Kit for Yakima...
view full answer...
- Roof Rack Recommendation for 2023 BMW X5 with Flush Rails for Yakima Bike RackYakima has an OEM style roof rack that fits your 2023 BMW X5 with flush rails with the SightLine FX rack part # Y73UV and # Y62CR. This will give you a great looking and very quiet rack that will work well with your current Yakima bike rack.
view full answer... - Recommended Parts to Add a Roof Rack to a 2024 BMW X5 w/ Flush Roof Rails Since your 2024 BMW X5 has the flush roof rails, I recommend the roof rack by Yakima which includes the following parts: Yakima SightLine FX Roof Rack for Flush Side Rails - Aero Crossbars - Black - Qty 2 item # Y73UV SightClip Fit Kit for Yakima SightLine and RidgeLine Roof Rack Towers item # Y62CR This aero bar roof rack system has a 165 lbs capacity. I recommend adding the Yakima Same Key System item # Y07204 to prevent theft.
view full answer... - Will Roof Rack Work with a 2020 BMW X3 with a SunroofIf Thule warns against using the Thule AeroBlade Edge Roof Rack on your 2020 BMW X3 with a sunroof, then I will second them. Instead, I recommend going with a system that has been shown to work with your sunroof. It's the Yakima Roof Rack. The crossbars are the JetStream Crossbars, part # Y00425. The towers are the SightLine Towers, part # Y64AR. The fit clip is part # Y62CR.
view full answer...
Do you have a question about this Roof Rack?
Info for this part was:

Edited by:
Daron K

Written by:
Alex H
At etrailer.com we provide the best information available about the products we sell. We take the quality of our information seriously so that you can get the right part the first time. Let us know if anything is missing or if you have any questions.
Product Experts Available Now!
Call 1-800-940-8924
Thank you! Your comment has been submitted successfully. You should be able to view your question/comment here within a few days.
Error submitting comment. Please try again momentarily.