
To see if this custom-fit item will work for you please tell us what vehicle you'll use it with.
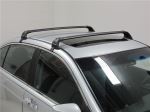
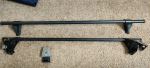
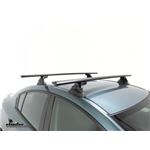
Extremely quiet, aerodynamic crossbars attach to Yakima towers to create a stylish roof rack for your vehicle. Rubber strips in T-slots push down to load carriers or accessories - no need to trim. Full-length aluminum bars maximize carrying capacity.
Features:
Yakima 60" JetStream MD - Black:Videos are provided as a guide only. Refer to manufacturer installation instructions and specs for complete information.
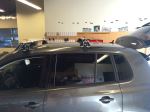
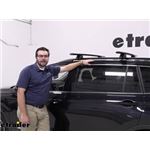
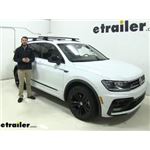
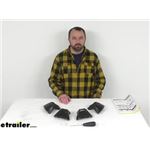
Hey, everybody, welcome to etrailer.com. I'm Bobby, and today we're taking a look at the Yakima JetStream 60 inch Crossbars, here on our 2021 Volkswagen Tiguan. Now guys, gonna be a nice little way of giving yourself a very nice roof rack system to go ahead and start mounting any of the accessories you might need. We're talking roof baskets. We're talking bike rack carriers. We're talking anything else you wanna throw up on here.
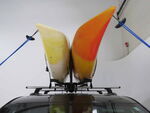
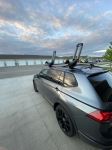
Kayak options are gonna be great, especially since we are on the 60 inch version here today. You are seeing a little bit of an overhang here. So, there are gonna be multitude of different lengths out there for yourself guys. There's a 48 inch. A couple of other ones out there too.
I highly recommend maybe going down to your maybe 52, 55 inches, are gonna be probably great for yourself. The 60 might be a little overkill, as you guys are seeing. Have a little bit of too much overhang on here. Now it's not really impacting us. The Tiguan kind of angles in and out.
So we're not really exceeding the side of our car, but if you're not quite looking at overhang that you're getting there, keep in mind, it can be right at height level for a lot of people. So it can be a little thing too work out for. You're getting in or out of your passenger side can be a slight little issue. So that's one little thing. What's nice about it though, there are gonna be a lot of other accessories out there.
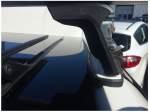
And we'll kind of break that down later too of what you want to throw up on here. So, can be nice to have that overhang, 'cause some certain accessories are gonna need it, but it might be just a little long for some. Now, what's awesome about this guy though, you are getting 165 pounds of weight capacity on here. But it also is made of aluminum. That means it's gonna be lightweight, very easy to throw up on here. And also what's nice about it, is it's gonna be somewhat corrosion resistant, just innately by that make of that metal. But also on top of that, we do have a nice little black powder coat finish that's been put on here. Now these guys have been in the studio for a very long time. One thing with that black powder coat, it can start to kind of chip and start showing your aluminum on the underside of it. Pretty, I don't want to say easily, but pretty often, if you're not quite treating this correctly, if you find yourself throwing up your items up on here pretty heavily, just kind of toss them willy nilly, you might start seeing just the look of it starting to degrade. Now that doesn't mean that we're gonna start messing with our structure too much because of the black powder coat finishing off. Again, it is made of aluminum. So it's gonna be corrosion resistant. Doubly so with that black powder coat, but if you want to keep it looking nice for the years to come, I highly recommend just being a little gentler as you set up your things up on there. It's only a powder coat, and it's only gonna last as long as we treat it well. Well, it doesn't take too much time to get these guys installed, which I really like. We also are utilizing the TimberLine towers here. That's allowing us to clamp onto our roof rail system here, of course, making it really easy to do so. And I am a very big fan of Yakima. They always make good products in my opinion. Haven't really had any instances where I've seen them have too many failings. And one thing I really like about these guys too, you can see each one of these towers is gonna have a locking core attachment for yourself. That becomes really easy to utilize with the Yakima same key system as well. So, not only can we get all of these guys keyed alike on each one of our towers to a single key system, we actually can start coupling that with a host and a whole bunch of different accessories that we have available here at etrailer.com. Now we're talking bike racks, like we said. Kayak carriers, the Yakima JayLow comes right to mind if you're talking about getting some keyed alike options. So that's kind of nice. We have that immediate security advantage that you might not see on some of those other carriers out there. So, not gonna take me too long to throw this guy up on here. Let's go ahead and see how we can get these on together. All right guys, to start getting this installed, first things first, you're gonna need to take a look at your TimberLine towers here. So, you guys may need to do a little bit more assembly at home. It's really straightforward though. It's pretty much just plug and play in a lot of these parts. They just want to start forming up like this. Of course, this is gonna be the big guy, making sure your T slot attachment is primed and ready for yourself. If you need to access that, there is a little bolt here. Really easy to go ahead and pull this guy tight. Get it out of the way. And that's gonna allow you access to that screw on the inside. And then go ahead and use your included tool to go ahead and tighten that down. Now that it is on there though, we can go ahead and start inserting this on our bar system. Make sure you are popping off your end caps, of course. So you can actually utilize your T slot attachment. I'm gonna, sorry, technically not your T slot yet. That's on the other side, guys. This is just gonna be your mounting that is utilizing the same kind of T slot-esque function. And all we gotta do is simply slot it in right here, guys. And just like that, we're pretty much installed. So, one thing you can do, keep this a little loose. So you might be tempted to go ahead and tighten this down. What really you need to do is go ahead and you can start getting this on your roof. Now, there's a couple of ways of doing it. You can go ahead and measure that distance between your crossbars and get that set. You are gonna have some nice little markings here to let you know where that is. Now personally, I just find it's really hard to get that to work. Even though you can go ahead and get a pretty good ballpark for yourself, it just seems to be that it doesn't quite like to actually work that way that well. So, usually what ends up happening, you get it pretty close, and then you gotta shift it around anyway. So what I prefer to do, just to go ahead and leave them loose. That way we can actually shift them around on our bar while they're on our vehicle. So what we're gonna do, just simply lift this up, sit in our vehicle, and start shifting around. So, let's do that together. So we just go ahead and grow our roof rack here, and start setting it across. Just like so. And one thing I'm looking for here, of course, we do want to get this pad, you guys can see right here. Fits really, really well on that side of our raised rails on the Tiguan for ourselves. So getting it in that position is gonna be great. As you can see though, on the other side, our pad's definitely not in the right position. So I'm gonna go ahead and walk myself over. And while I'm back here, this is a great time to kind of give yourself a look of what you want your bars to look like. So, we've already gone ahead and thrown the front ones on there, and we've got a pretty good set for ourselves. So we are looking pretty even here. So I'm just gonna go ahead and actually shift this pad over to where it's in that crook right up under this edge, just again. And I'm gonna go ahead and take a step back here guys, and just give myself another look. So yeah, it looks like I want to shift a little bit maybe to my left, of course. And that means I want to push my pad out just a little bit. So one thing you can try to do too, you can try to keep that crook there on that other side. It doesn't seem to want to cooperate. So I am gonna go ahead and I am gonna shift this guy just a little bit, like so here today. And then I'm gonna bring my pad in as well for myself guys, or my TimberLine tower, I should say, just by holding it and shifting it across. So we can go ahead and kind of repeat this process just 'til it gets set. Again, like I said, if you guys want, measure that distance with a tape measure from your crossbars, from that to edge to edge. Find that marking. It can kind of help you get in this ballpark just a little bit faster. But I'm gonna go ahead and shift it around a little bit, 'til we get it set to where we want. Then I'm gonna start to tightening these down. All right guys, when you are setting your bars on there, the one thing you want to do too, is make sure you are getting appropriate cross spread here for yourself. So, a lot of accessories are gonna need you to have around a minimum requirement of about 26 inches or so. And some of them are gonna vary, of course. So just make sure you are checking with your accessories of what you're needing. For today's purposes, we're gonna go ahead and just set it at 26 inches, as you guys saw. And all we got to do, is go center on center on that for ourselves. So, we have left this guy a little loose, as you guys can see. Now I've got a pretty good overhang spread here, as you guys can kind of see. I am very even with that front one, and I've gone ahead and evened that up on the other side as well. Now, one thing I will say to that too, when you are kind of keeping in mind what your overhang is, now that's also dependent on your accessories. So, sometimes, what can be nice, especially with these 60 inch bars, you can kind of shift them a little bit more to one side, and you actually can take quite advantage of a quite a cool system, like your kayak Lotus. So a lot of those are gonna need extensions from the side of your vehicle, which can be great. And there's a host of other applications out there as well. Tents, anything you can think of. So, can be nice to actually leave yourself a little bit of overhang. But now that I've gotten this where I want it, I can go ahead and actually take my bar here, and I'm gonna go ahead and actually spin it just like so. What I'm doing is, I'm also trying not to shift my tower that much guys. I want to keep it right where it's at. So then I can bring in here. I'm gonna try to find, there we are. And now I can go ahead and start tightening down on the inside here where I'm at. So I'm gonna have to actually get in your guys' way. 'Cause I need to see right here really quick, if I'm getting full access there. I am. A good thing to do is to pull your bolt back out of the way, this guy right here likes to hang in there. But once you found that groove guys, all we have to do start tightening down. And you can go ahead and wait for the clicks here on your Yakima tool. I usually don't have to go that crazy with it, as it seems like it pulls itself in really well here. And another thing to look out for too, make sure your tower is somewhat straight. It can shift a little bit just with that bolt. So now that we're not having that move at all, I can go ahead and actually flip these guys around, and recheck my positioning here. So, nice that it's sitting right there in that flush mark. I'm seeing the same on the other side. The only thing I need to check is once again, my measurement here. Looks like I shifted over just a little bit. So with a quick little readjustment to the right. I'm thinking we're sitting really good right there at 26 inches for ourselves. Now we want to take our metal coated, or I'm sorry, our rubber coated metal strip. We simply take it around, set it between these two flanges here. And what we want to do now is to take our, of course, Yakima tool once again here, and we just need to start tightening down this bolt here. What this is gonna do, tighten in this strip for ourselves, bringing it nice and tight. And going ahead and securing our tower to our roof rails. Now this one, you do want to go ahead and start going until you hear the clicking on your Yakima tool. Which becomes great, 'cause you know you're not over tightening it, and you know it is still gonna be nice and secure for ourselves. Can take a little bit, if you backed it off just as much as we did here today. But as you start getting down to the end, you're definitely gonna have a little resistance to it. And while it might seem like it's taking a little while, what's nice about this is we are securing this very, very well to the roof of our vehicle. So, I really like this system. I've utilized quite a few roof rack systems over the year now, or so. And I can definitely tell you, it's nice when these guys are easy. So, I am seeing I'm pulling myself up on the other end here. So I'm gonna go ahead, back it off just a little bit here. And then we're gonna go ahead and secure that other side. So, I know that we're gonna have too much trouble getting that back down in the position. Let me just back off just a little bit and secure that other side. One last little step that can be easy to overlook is just to go ahead and actually insert your rubber stripping here. So, you guys are gonna get some included at home. What you want to do is go ahead and actually cut it to size once you've actually gotten these set to where you want them. So, that's gonna be really important, because filling this in is really gonna reduce that whistling sound you guys are gonna hear. Trust me, it becomes very annoying. You definitely don't want that happening. It becomes really easy to set those in though. Like we said, just simply slide it up to here, snip it where you know it's filling in the rest of your gap, and then repeat the process for the rest of your bars. Last step is just to add our caps on here, of course, to prevent any kind of dirt, debris, anything getting inside of it. And just go ahead and latch it just like so. And then of course, to take our locking core plate here and just set it in place. All right, now that we've got our bars up on here, we can go ahead and see how they're interacting with our roof. So, big things we're looking for is gonna be how much height we're adding to our vehicle, and the clearance we have underneath it. So, to begin, we are looking at, let me go ahead and double-check myself here. Yup, looking right about 3 3/4 of an inch to the tallest point from the top of our corrugated roof. And to the bottom here, it looks like that's gonna be putting about 2 5/8 of an inch of clearance. So, what you're looking for there on that clearance right there, some accessories have some bolts that hang down and they just a little flange thing that go underneath your roof rack system and then come up on it. So the things to watch out for, make sure your bolts aren't gonna be too long there. And of course, if we have any other accessory needs, just watch that clearance for yourself guys. But that makes it really easy, of course. And we're not adding too much height on here, which I like to see. Less than four inches is great. That's gonna go ahead and still allow us to get our tall accessories on here without looking absurdly too high on here. I do like how the TimberLine towers kind of sit lower than some of the other carriers out there, which is great to see. And now that we're actually up here too, you guys can take a look and see, we have this little rubber stripping here at the top. What's gonna be great about this guys is that this guy is very, very easy to use. So the T slot attachments on here, I feel like you're gonna start seeing a lot more T slot accessories come out. The more I've used them, the more I've liked them. Now, not every accessory is gonna have that. A lot of them are still gonna have that clamp-on style, but that T slot attachment becomes really easy. You just gotta pop off one of your ends and walk it in. And one thing that I really like about the JetStreams here, a lot of times these guys come with them, your roof rack systems. But what ends up happening, is you have to take it out and cut it before where your accessories. What's nice about this guy, all we have to do, push down, depress it. We can slide our T slot all the way up where we want it to be. And what's great about that, we're not cutting it, so that's a little less work for us to do. But B, we're still gonna be filling in this hole the entire time. So, like we said earlier in that installation, you do want to go ahead and actually fill in this bottom hole as well, and at the top. It's gonna really prevent that whistle sound that you guys are gonna get, especially as you approach those high speeds. So, great that that guy is really easy to use. That's one of the advantages I see on it when you're comparing it to some of the other premium carriers out there. Well, as you guys saw, that installation didn't take too much time. And I am a really big fan of that T slot system. Just becomes really easy not to have to cut that out every time. Personally, it would really be the thing that dissuades me from getting those T slot attachments, just because sometimes when you have to end up cutting things, you don't cut it quite right. And then you have a whistle and it's annoying. So, nice that we can go ahead and combat that a little bit by just having a very easy system to utilize, which I do love to see. Again guys, these JetStream bars become a great little way of getting things up on there. I am a really big fan too, of Yakima's same key system. What's great, you can get those keyed alike to a host of different accessories that we actually want to get on top of our vehicle, which is great. So if you're kind of in the beginning stages here and you're like, man, I really want to build up my repertoire of stuff I can start taking on my roof, this is gonna be a great first step. Again, it's gonna have no trouble carrying a lot of heavy things on it. See, with 165 pounds capacity, that's more than standard for what lot of roof rack systems out there are putting out. Now, one thing I will say, of course, always make sure you're checking your vehicle's owner's manual guide to make sure your roof isn't exceeding that. We haven't seen anything to say the Tiguan can't handle it, of course, but just to be extra safe, make sure you guys are always checking that. Well, guys, I think this is the last that we need to talk about here today on our Yakima JetStream Crossbars, here on our 2021 Volkswagen Tiguan. I'm Bobby, thank you for watching..
Average Customer Rating: 4.8 out of 5 stars (192 Customer Reviews)
Extremely quiet, aerodynamic crossbars attach to Yakima towers to create a stylish roof rack for your vehicle. Rubber strips in T-slots push down to load carriers or accessories - no need to trim. Full-length aluminum bars maximize carrying capacity.Excellent solution for my 2023 Chevy Silverado. In the past, I have had rails installed on the roof of my pickup trucks, but I find the BaseLine towers to be a better solution, since they don't permanently change the truck. Plus, they are much more solid than SkyLine system on the rails.
Really easy to install & work as specified. So happy with the customer support/service at etrailer.
Follow the instructions, and you can't go wrong on the self installation
product was just what I needed The folks at etrailer were extremely helpufl!!

Love my Yakima roof rack!! It exceeds my expectations.great product. Also thank etrailer for the tec support! great staff always there to help thanks again!!
Easy to install. It probably took 45min. I bought them for my 2024 Expedition to haul a canoe. I have not done that yet but I expect no issues.
Ackage came 2 days early the install was somewhat easy (did it by myself)
Did not get to mount anything to it but seems really sturdy. One thing I can say is mark out your mounting points with provided stickers then put up and make adjustments to the roof rack.
Love it! We've made several long trips with full luggage loads.
Well packaged and on time
So far so good. Purchased these towers to use on a 2022 GMC Canyon with HD bars that I already had, primarily to carry my canoe. Yakima's fitting instructions worked perfectly and the whole system seems really solid.
Your notice of schemes was a lot better than the yakima site provided. They did not suggest the scheme you did.
But when the products arrived, the instructions were by yakima. Generally worked as instructed except the tower to tower transverse mounting dimensions needed to be tweaked for a perfect fit.
Not a bad setup. I dont believe you need the 60" bars i received as they hang over the edge of your Hyundai. You need to watch your head getting in and out of your vehicle. The Jetstream crossbars are very loud at speeds over 65 mph. Im probably used to it by now, but it is definitely noticeable. Much louder than an older Rhino Rack of similar dimensions i had. Install was simple and took about 30 minutes, just take your time and measure correctly like all roof racks.
Easy to order and quick to ship. Took a bit of time to get these installed correctly so they fit just right.
1 year later and still love my Yakima JetStream system. I've mostly used them to transport my kayak however I've also been able to transport some big box store items as well. They are very versatile. There is a t-track option as well as wrap around attachments. I've use ladder attachments, eyebolts, and Thule Hullavator in t-track. I've used Malone MegaWing and Yakima Skybox as wrap around attachment. What I really like about the t-track system is that you do not need to cut out the rubber track insert. You simply slide over the rubber, which allows you to adjust your system, on the fly, to load what you need to carry.
Great product fast shipping
Great! Easy to install!
Great service and great staff. They will have all the technical information you need.
Solid build quality and easy installation on my '21 Mazda CX-5.
These Yakima crossbars are a part of the Yakima towers I bought to install on my Jeep Cherokee to hold a pair of Kayaks. They fit great as advertised. In fact I got these discounted as an open box. I would have never known, they look brand new. Thank you etrailer for your great advice, customer service and quick shipping process.
SIMPLE & EASY1
Yakima clips provided a perfect fit for my
car. The roof rack is now solidly attached.
Also impressive was etrailer great
customer service
High quality bars that were easy to install to the Skyline towers and work great with our Yakima JayLow kayak carriers.
Very sturdy hold with a matte look and fine textured feel. Very light making for easy install.
I had a need for the Yakima Crossbars and Towers for my Expedition. With a short delivery time frame, I contacted etrailer knowing they are the best. Justin B. worked with me to get the correct parts then made sure that the products arrived in time, it did. The Towers, Bars and overall excellent customer service from etrailer made for a great experience. Thanks again for exceeding expectations etrailer!
Received order promptly thanks to help from Korren! Love Yakima products, well made, components all fit well. Instruction were easy to follow and the products have been well thought out in terms of markings, measuring distances to my specific car model and ease of assembly.


Do you have a question about this Roof Rack?
Info for this part was:
At etrailer.com we provide the best information available about the products we sell. We take the quality of our information seriously so that you can get the right part the first time. Let us know if anything is missing or if you have any questions.


Thank you! Your comment has been submitted successfully. You should be able to view your question/comment here within a few days.
Error submitting comment. Please try again momentarily.