
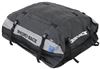
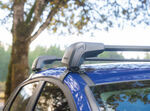
Yakima BaseLine FX Roof Rack for Naked Roofs - JetStream Crossbars - Aluminum - Black - Qty 2
Item # Y44MD
Our Price: $733.80
Confirmed to Fit
2016 Honda Pilot
Will this fit?
To see if this custom-fit item will work for you please tell us what vehicle you'll use it with.
In Stock


- All Info
- Reviews (18)
- Q & A (0)
- Videos (5)
- Photos
Yakima Roof Rack - Y44MD
- Aero Bars
- Crossbars
- 52 Inch Bar Space
- Yakima
- Black
- Flush
- 2 Bars
This aerodynamic, flush-mount roof rack lets you carry gear and cargo on your vehicle while maintaining a clean, factory look. Crossbars work with channel-mount and clamp-on accessories. Installs on your vehicle's naked roof.
Features:
Yakima BaseLine FX 2XL:- Integrated crossbar and tower system lets you carry cargo and accessories on your vehicle's naked roof
- Flush design provides a streamlined, factory look - no crossbar overhang
- JetStream crossbars with top channels accommodate channel-mount and clamp-on accessories
- Push-down rubber strips in top channels allow for easy attachment of channel-mount accessories
- Sleek towers with matte finish are weather resistant
- Custom installation to your vehicle's naked roof with Yakima BaseClips
- Aerodynamic, lightweight aluminum crossbars resist corrosion and reduce wind noise
- Yakima Same Key System (SKS) lock cores (sold separately) deter theft
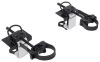
Yakima BaseClip 152:
- Custom-fit mounting clips and pads allow you to mount BaseLine towers on your vehicle with a naked roof
- Padded, stainless steel clips provide secure grip on your door jambs
- Snap onto DropHooks inside towers
- Protect door jambs from scratches and abrasions
- Powder coated for durability and rust resistance
- Molded rubber pads fit the contours of your roof
- Clip onto bottoms of towers
- Protect roof from scratches and abrasions
8006152 Custom Base Clips and Pads for Yakima Base Line Towers
8000169 Yakima Base Line FX XXL - Roof Rack Cross Bar for Naked Roofs

Video of Yakima BaseLine FX Roof Rack for Naked Roofs - JetStream Crossbars - Aluminum - Black - Qty 2


Videos are provided as a guide only. Refer to manufacturer installation instructions and specs for complete information.


Video Transcript for Yakima Roof Rack Review - 2016 Honda Pilot
Speaker 1: Today in our 2016 Honda Pilot, we're going to be test fitting the Yakima Round Bar Roof Rack System consisting of part numbers Y00409, these are the round crossbars on the top here, and these are 58 inches long.We'll also be using part number Y03536, and this is the Round Bar Adapter Kit for the Yakima towers.We'll also be using part number Y00146. These are the Baseline Towers designed for naked roofs.Finally, to attach it to the vehicle, we're using the Base Clip Fit Kit part number Y06152.This is going to be the same for the rear bars as well. These are great sturdy cross bars for your roof, and car carry a wide variety of accessories such as bike racks, cargo carriers, excuse me, cargo baskets, and cargo boxes.While, they are exceptionally sturdy, they do cause noise while you drive. Now, you can purchase fairings that you can find on etrailer.com to help cut down that wind noise and drag, or you can upgrade to the Yakima core bars that also utilize this tower system.Moving onto the towers themselves, at the end caps here, we do have these plastic portions that can be removed and replaced with the Yakima SKS Lock Core System, so you can secure it to your vehicle and make it key to like with the accessories that you're hauling.Removing our end cap here you can see how everything attaches to the vehicle itself. We have the clamp that attaches to the door frame, as well as the pad underneath. So, your vehicle isn't going to get damaged or scratched once this is installed, because the clamp is also padded once it's being installed.So, let's go ahead and show you how the rear bar gets put into place.
We already have it partially assembled on our lovely table over here, With all the parts that you need right in front of it. So, our first step is, we're going to take our adapter kit for the round bar and attach it to our tower.This is a very easy process. You simply take the plastic portion here, push it in on the top, you're going to hear a little bit of a click. We'll take our round bar adapter, attach it to the screw in the center. We'll pull out this tab here, so we can get to the screw, flip it upside down.
We're just going to loosely tighten it so we can get it in place on our bar.Move over to our bar, slide this into place. To help out with this, we're going to flip it on its side here like so. Now we'll take our measuring tape here and measure out the distance between the two towers. You'll find this in your instructions.Move this out a little bit. Now normally what you would do, is you would find the center of the bar and measure out to both sides.
We already know where we had to be at so, kind of cheated a little bit. There we go. Now we'll tighten it down. I'd like to point out something here in a second. That's the tightening tool that comes with the kit.
It does give those audible clicks so you know when everything is torqued to its specifications without overtightening it.Now, one thing I'd like to point out, looking at the underside of our tower here, you're going to see three notches on each side here. One, two three. One, two, three. Knowing which side is the front is very important because that determines the pitch and the tow that you set. The pitch is on this side and we have it set to B, which is the middle notch. The first notch, A, B, C, and so on.On the other side the tow is set to two. One, two, three. We tighten it down with this screw here, which has already been done. Just be sure to take a look at this in your instructions when you're tightening everything down.Next, we'll take our pad here, pointing out that the arrow's going to be facing away from the vehicle, we'll snap that into place on the bottom, and now we're ready to set this on the room of our vehicle.Set it down gently, as to not damage our vehicle while we're doing this. Now, at this point, we're going to measure from center to center of the bars on both side to keep it even, and then we'll make sure that's it's even side to side too.Alright, we're going to want to make a couple adjustments here. Double check the measurements since I kind of had to move it a little. Alright. Looks like we're even on both sides too. Now we can open up our rear doors and start installing our clamps. This isn't necessarily the steps that they have you do in the instructions, but, I find that it make it a little bit easier on us while we're installing this, so we don't have the clamps accidentally making contact while we're setting them into place.So, our first step is we're going to loosen up the bolt here. You can see how this raises up like so. We're going to take our included clamp. We're actually going to loosen this up a little bit, going to push that in, and then, we're going to tighten that bolt that we just loosened up. You see how it's now going against the vehicle. We'll repeat this process on the other side as well.There's some other items you can put on this roof rack system. It can be anything from your ski and snowboard carriers to your kayak carriers as well. A wide variety of objects. Once we have this loosely installed, we'll get it snug up against the door frame on both sides. We'll go back and forth until it's completely tight, and then you hear those clicks from the tool. See how it's tightening down around there There we go. Close that up.Now we can put on our end caps on both the bars and our towers. I'd like to give you a couple final measurements here to give you an idea of how high it sits off the roof once it's installed. From the center of the roof to the bottom of the bar's going to be about two and five eighths of an inch, and from the center to the top is going to be about three and five eighths inches as well. So, that's more than enough space for your accessories that wrap around your bars, so it's not going to make contact with your roof and scuff it up at all.Also, you can still utilize your sunroof once these are installed as well. These bars do have a carrying capacity of 220 pounds once installed, but you should always check your vehicle's manual to make sure your roof can take those weights and go by their recommendations.There you have it, for the Yakima Round Bar Roof Rack System on our 2016 Honda Pilot.
Customer Reviews
Yakima BaseLine FX Roof Rack for Naked Roofs - JetStream Crossbars - Aluminum - Black - Qty 2 - Y44MD
Average Customer Rating: 4.7 out of 5 stars (18 Customer Reviews)
This aerodynamic, flush-mount roof rack lets you carry gear and cargo on your vehicle while maintaining a clean, factory look. Crossbars work with channel-mount and clamp-on accessories. Installs on your vehicle's naked roof.by: Lee11/22/2021
The roof rack is great. Solid.
by: Ryan09/07/2022
Protected the paint and held on tight.
by: Richard 07/24/2020
Great service. Hally took good care of me. Letting me know when the order was processed, shipped, and delivered. When I had an issue, taken care of immediately. The product itself is as expected and with great Yakima quality.
by: Bryan03/20/2021
1 star. Extremely disappointed with it.
by: Matt10/18/2018
Awesome! Thank you!
by: Douglas01/05/2024
by: Donald 12/29/2021
by: Kevin02/01/2022
by: Dan07/24/2023
by: Cary02/14/2022
by: Richard 08/20/2020
by: Bryan09/08/2022
by: James 03/22/2021
by: Ronald 04/13/2021
by: Michele 07/25/2022
by: Daryl07/14/2021
by: Steven 08/06/2022
by: Jun08/07/2021
by: Eric04/26/2024
I purchased clips that were stated as being compatible with our 2010 Chevrolet Impala. The front clips fit well, however the rear clips do not.


by: Howard11/09/2023
From start to finish, the folks at etrailer -- and I spoke to several people there, so it was a consistent corporate vibe -- were fantastic to deal with.
There were delays in getting my product that were on the supplier side and out of eTrailer's control, yet etrailer folks kept me up to date and also worked on a customized solution.
My goal was to be able to carry my surfboard on the roof of our 2019 Hyundai Santa Fe to the beach more than 3 hours away. But the particular model we had had no existing racks, no recessed areas, nothing to fix racks to. Not even the dealer had a solution. I was sh*t out of luck.
But etrailer hooked me up. The racks did take me a while to put on, but most of that time was fine tuning to reduce “hum” while driving. I’m very happy with them.
Thanks to etrailer, I have gone surfing and can go surfing whenever I'd like to.

by: Jeff06/13/2024
Had two different vehicles to get ready for two different trips and Joshua diligently tracked dow the correct Yakima accessories and backorder challenges. No other provider came close to this level of service. Excellent work! Both trips made better!
by: Eric04/26/2024
I purchased clips that were stated as being compatible with our 2010 Chevrolet Impala. The front clips fit well, however the rear clips do not.


by: Anthony11/29/2020
I have a 10th gen Civic sedan and I was dying to get the perfect roof rack set for my car. At the time of my purchase there was not many visuals of what the rack system looked like on this car.
I purchased the:
•Yakima 50in Jetstream crossbars
•Yakima baseline towers
•bc182 & bc183 clips
•Yakima 46in fairing
Overall I love how it looks on my car! During This COVID pandemic I have been camping more, and this is the perfect foundation! First off, the 46in fairing is the perfect fit for the 10th gen civic! Wind noise is low also with the help of the aerodynamic crossbars. My main concern was the fuel efficiency. On long road trips I still average 38-40 mpg with the rack on. My daily commutes I average 34 mpg without Econ on.


by: Dave02/11/2024
Love my Yakima roof rack!! It exceeds my expectations.great product. Also thank etrailer for the tec support! great staff always there to help thanks again!!
by: JD03/07/2018
Hyundai Sonata - glass pano roof. These items have been on for about 1-year. So happy with the set up. I’ve take a road bike and a mountain bike on 500+ mile trips. The mounts do an excellent job.

25
513
Show More Reviews
See what our Experts say about this Yakima Roof Rack
- How to Add Crossbars to a 2024 GMC Sierra 3500To add a roof rack to your 2024 GMC Sierra 3500 Crew Cab or Double Cab, you will want the roof rack by Yakima which includes the following parts: Yakima BaseLine FX Roof Rack for Naked Roofs - JetStream Aero Crossbars - Black - Qty 2 item # Y99UV BaseClip Fit Kit for Yakima BaseLine Roof Rack Towers - Qty 2 item # Y27FR BaseClip Fit Kit for Yakima BaseLine Roof Rack Towers - Qty 2 item # Y06124 This aero bar roof rack system has a 165 lbs capacity. I recommend adding the Yakima Same...
view full answer... - Roof Rack and Kayak Carrier Recommendations for 2024 Ram 1500 with SunroofI highly recommend the Yakima BaseLine FX roof rack for your 2024 Ram 1500 because it easily clears the sunroof but it also has the crossbars integrated into the legs so it looks much more like a factory rack than the other options available for your truck. Here are the parts you need for this system: - BaseLine FX with JetStream Crossbars # Y99UV - BaseClip Fit Kit # Y06135 - Lock Core Kit # Y07204 (optional) The majority of the time people want to add a roof rack on their truck is...
view full answer... - Recommended Roof Rack for a 2024 Chevy Silverado 2500 To add a set of crossbars to the roof of your 2024 Chevy Silverado 2500, I recommend the roof rack by Yakima which includes the following parts: Yakima BaseLine FX Roof Rack for Naked Roofs - JetStream Aero Crossbars - Black - Qty 2 item # Y99UV BaseClip Fit Kit for Yakima BaseLine Roof Rack Towers - Qty 2 item # Y27FR BaseClip Fit Kit for Yakima BaseLine Roof Rack Towers - Qty 2 item # Y06124 This aero bar roof rack system has a 165 lbs capacity. It fits both the crew cab and double...
view full answer... - Recommended Roof Rack for a 2023 Ford Explorer With a Naked RoofThe Yakima BaseLine FX Roof Rack for Naked Roofs # Y99UV you're looking at will work just fine with your naked roof on your 2023 Ford Explorer. To complete this setup you are going to need the BaseClip Fit Kit for Yakima BaseLine Roof Rack Towers # Y06154 & # Y06132.
view full answer... - Recommended Roof Rack Systems For A 2023 Ford Explorer For a 2023 Ford Explorer we have a few different options depending on if your roof has raised rails or is "naked". For your size vehicle a medium size (58" to 60") crossbar is going to be the best size without being too much. I recommend the following components: Rhino-Rack Vortex Aero Crossbars - Aluminum - Black - 59" Long - Qty 2 # RRVA150B-2 Rhino-Rack SX Series Legs for Vortex Aero Crossbars - Raised Factory Side Rails - Qty 4 # RRSX100 For a naked roof I recommend the following...
view full answer... - Recommended Roof Rack for a 2024 Chevrolet Silverado 2500 Crew Cab To add a roof rack to your 2024 Chevrolet Silverado 2500 Crew Cab, you will want the roof rack by Yakima which includes the following parts: Yakima BaseLine FX Roof Rack for Naked Roofs - JetStream Aero Crossbars - Black - Qty 2 item # Y99UV BaseClip Fit Kit for Yakima BaseLine Roof Rack Towers - Qty 2 item # Y27FR BaseClip Fit Kit for Yakima BaseLine Roof Rack Towers - Qty 2 item # Y06124 I have attached a couple of pictures below that will give you an idea of what this system will...
view full answer...
- Naked Roof Rack Recommendation for 2013 Honda CRV to Carry Longer Roof Box for SkisThe naked roof racks that fit your 2013 Honda CR-V do put the front bar significantly closer to the windsheild like with the Rhino Rack part # RRVA137B-2, # RRRLKVA, and # DK284 we have installed on a 2013 CR-V so this would be the way to go. I attached a picture that shows the front bar is more than the amount of inches forward that you would need plus an install video on a similar 2014 CR-V as well.
view full answer...
- Roof Rack and Kayak/Canoe Carrier for 2018 Honda Pilot LX AWD with Naked RoofWe do have roof rack options for your leased 2018 Honda Pilot LX all-wheel-drive that has a naked roof with no fixtures. You can see all racks on the linked page and these include Yakima products. However the track-based roof racks like the item you referenced # Y01127 require drilling and permanent installation so they are not the best choice for a leased vehicle. The best option that you can easily remove when it is time to return the leased Pilot is the Yakima CoreBar system made of...
view full answer... - Recommended Yakima Roof Rack For 2015 Honda CR-V With Naked RoofFor a naked roof on your 2015 Honda CR-V, the only available fits involve the custom clips that attach above the windows as you mentioned. All of these systems from Yakima have a load capacity of 125 lbs max. I recommend the roof rack consisting of: Yakima JetStream Crossbars - Aluminum - Black - 60" Long - Qty 2 # Y00426 BaseLine Towers for Yakima Crossbars - Naked Roofs - Qty 4 # Y28TR BaseClip Fit Kit for Yakima BaseLine Roof Rack Towers - Qty 2 # Y06148 BaseClip Fit Kit for Yakima...
view full answer... - Recommended Roof Rack for a 2024 Ford Escape w/ No Roof Rails Congrats on the new SUV. It won't be a problem at all to add a roof rack to your 2024 Ford Escape that looks close to factory. To do so I recommend the roof rack by Yakima which includes the following parts: Yakima BaseLine FX Roof Rack for Naked Roofs - JetStream Crossbars - Black - Qty 2 item # Y56UV BaseClip Fit Kit for Yakima BaseLine Roof Rack Towers - Qty 2 item # Y06137 BaseClip Fit Kit for Yakima BaseLine Roof Rack Towers - Qty 2 item # Y06152
view full answer... - Widest Crossbar Spread Roof Rack Recommendation for 2013 Honda CRVFor your 2013 Honda CR-V the widest crossbar roof rack we have is going to be the Yakima roof rack part numbers # Y00409, # Y28TR, # Y03536, # Y06148, and # Y06152. The spread for this rack is 32 inches whereas most racks are around 27 inch. I can't recommend you widen the spread any more than that or use a track style rack as that will require permanent modification to the roof of your vehicle.
view full answer... - Recommended Yakima Roof Rack For A 2024 Ford EscapeWe can definitely set you up with a Yakima roof rack for your 2024 Ford Escape with a naked roof. I recommend the Yakima JetStream bar setup. The full roof rack will consist of the following parts: Crossbars - 60' Yakima JetStream # Y00426 Towers - Yakima Baseline Towers # Y28TR BaseClip Fit Kit # Y06137 BaseClip Fit Kit # Y06152 I prefer the JetStream bars over others because the aerodynamic shape will minimize drag and road noise. The Aero Bar shape is basically universal, and you...
view full answer... - What Rooftop Cargo Bag do You Recommend for Carrying Suitcases on My 2018 Honda Pilot?Yes! The attachment clips/straps that come with the Rightline Range 3 Rooftop Cargo Bag - Water Resistant - 18 cu ft # RL100R30 work with your 2018 Honda Pilot with a bare roof. If you have bags that are like the Thule Crossover Rolling Carry-On Suitcase and Backpack with Laptop Sleeve THTCRU-115STR that measures 23-3/16" tall x 15-3/8" wide x 9-1/8" deep, you only have enough room in the Range 3 to carry 2 of those bags. All this being said, if you are looking for a larger rooftop...
view full answer... - Roof Rack Recommendation for 2020 Honda PilotThe rack you need will depend on how the roof of your 2020 Pilot is fitted out. I really like the Yakima JetStream roof rack, because of how well they're built and designed. They may not be the least expensive option, but they work very well and are extremely durable which makes them the most popular choice for your vehicle. If you have a bare roof, you'll need the following parts: • Yakima 60 inch JetStream crossbars, part # Y00426 • Yakima BaseLine roof rack towers, part # Y28TR •...
view full answer... - Snowboard and Ski Rack Recommendations for Naked Roof 2019 Honda PilotFor your application I recommend using a Yakima setup because they produce high-quality products that are designed to make your life and hobbies easier in the long run. I like the JetStream roof rack which is what I recommend for your 2019 Honda Pilot with the naked roof: 60" JetStream Crossbars - Black # Y00426 BaseLine Towers - # Y28TR BaseClip - # Y06152 Lock Kit - # Y07204 (optional) Then for a ski and snowboard carrier I recommend the Yakima FreshTrack # Y03093 because it comes with...
view full answer... - Yakima Round Bar Roof Rack Recommendation for 2016 Honda CR-V with Flush RailsFor a Yakima round bar roof rack setup that is confirmed to fit your 2016 Honda CR-V with flush mounted roof rails you would want the Yakima kit part numbers # Y00409, # Y28TR, # Y03536, # Y06148, # Y06152 which is a confirmed fit.
view full answer... - Will the Erickson Ladder Rack Fit My 2021 Honda Ridgeline?I have a great solution for you. Unfortunately, I confirmed with Erickson that the Erickson Truck Bed Ladder Rack w/ Load Stops # EM07705 is not confirmed to fit your 2021 Honda Ridgeline with bed dimensions of 60"L x 50"W. In addition, we currently don't carry any truck-bed ladder racks that will fit your vehicle. For a great alternative solution for transporting a ladder rack or other long cargo, I recommend the Rhino-Rack T-Load Extender # RTL002 along with a single crossbar on your...
view full answer...
- What Roof Rack do You Recommend for Using a Hullavator # TH898 on My 2012 Honda CR-V?When considering a roof rack that will allow you to use a Thule Hullavator # TH898 on the naked roof of your 2012 Honda CR-V, one of the important factors you need to consider is the amount of crossbar space length you have past the feet of the crossbars. In order for the Hullavator to descend, you need to have at least 4 inches of length after the feet. With most systems, the longer the crossbars, the more length you have after the space of the feet. For this reason, I definitely recommend...
view full answer... - Recommended Roof Rack for a 2022 Ford Escape w/ a Naked Roof and Two Hullavators You don't need 70" crossbars if you go with a different roof rack system which I highly recommend. Mounting two Hullavators item # TH898 is feasible and you will most likely be breaking the law if you stick a 70" wide crossbar on your Escape's roof. For your 2022 Ford Escape with a naked roof, I recommend the roof rack by Rhino-Rack and it includes the following parts: Rhino-Rack Vortex Aero Crossbars - Aluminum - Black - 65" Long - Qty 2 item # RRVA165B-2 Rhino-Rack 2500 Series Legs...
view full answer... - Roof Rack Recommendation for 2016 Honda Pilot With Bare RoofWe don't offer any aftermarket side rails for your 2016 Honda Pilot, but you can still install a roof rack. Since your Pilot doesn't have the roof rails, you'll need a Yakima roof rack system for a bare roof that clamps to the inside top of the door jambs. This is a very effective mounting system that will work perfectly for your Pilot. The most cost-effective rack uses round crossbars, you'd use the following parts: Yakima Round 58 inch crossbars, part # Y00409 Yakima BaseLine towers,...
view full answer... - Recommended Roof Rack for a 2023 Honda Passport With Bare RoofYes, there is a way to add a roof rack to your 2023 Honda Pilot even though you do not have the side rails, and the best option is from Yakima, consisting of the Crossbars # Y36UV, Fit Kit # Y06152 and Fit Kit # Y06163. This rack has a flush design which means the crossbars do not extend past the mounting feet for a great look. This aero bar roof rack system has a 165 lbs capacity. The strips in the top channels dramatically reduce drag and wind noise.
view full answer... - Roof Rack Recommend for 2016 Honda CR-V to be Transferred to Truck Camper ShellI can definitely help you out with getting the most parts that will transfer over from your 2016 Honda CR-V! The Yakima roof rack is the way to go since it uses the longer 60" bars as they should transfer over to your truck cab nicely. The only problem is that the legs used for the naked roof on your CR-V won't be compatible with a track system so you will need to get new legs and a different fit kit for the tracks on your truck. A lot of truck camper shells do come with a track system...
view full answer... - Can Crossbars for a Thule Roof Rack be Spaced Further Apart on a 2012 Honda CR-VThe crossbar spread is 27-1/2 inches for the Thule AeroBlade system on a 2012 Honda CR-V. This is set by where the feet need to install on the roof. The specific locations are chosen because they are the most structurally sound. The fit kit is then made to fit the specific contours of the roof in those locations. Moving the crossbars further apart will lead to damage to the roof and a lower capacity. For a wider bar spread the Yakima system has a spread of 32 inches which is the largest...
view full answer... - Yakima Jetstream Roof Rack that Fits 2024 Ford Escape with Naked RoofYes, we do have a Yakima Jetstream roof rack that fits your 2024 Ford Escape with the part numbers # Y00429, # Y28TR, # Y06137, # Y06152. We recently installed all of the roof racks we offer and everyone agreed the Jetstream was the nicest and easiest to install.
view full answer... - How to Use Yakima Round Crossbars on 2017 Honda Ridgeline With Naked RoofThe Q Towers have been retired by Yakima, so while we have a way for you to use your current Round 58" CrossBars for Yakima Roof Rack System # Y00409 on your 2017 Honda Ridgeline with a naked roof, you will need new towers, fit kit, and round bar adapter. The correct parts are the follwing: - BaseLine Towers for Yakima Crossbars - Naked Roofs # Y28TR - BaseClip Fit Kit for Yakima BaseLine Roof Rack Towers # Y06152 - RoundBar SL Adapter # Y03536
view full answer... - Yakima Mounting Feet Location for Roof Box On 2019 Honda PilotI have attached below a photo of the REQUIRED installation points for a Yakima Roof Rack System like the JetStream part # Y00426, part # Y28TR, and part # Y06152 on a 2019 Honda Pilot. These are the points on the roof Yakima deemed strongest and what factor into their capacity ratings. They will provide a 32" crossbar spread which will work great with most cargo boxes like the Yakima SkyBox NX 16 Roof Cargo Box part # Y95AV which is what I recommend.
view full answer...
- Parts Needed to Carry Multiple Kayaks on a 2014 Honda CR-VIn order to carry kayaks on the roof of your 2014 Honda CR-V you will first need a roof rack if you do not already have one. The best option we have for this is the Yakima JetStream Crossbar System which is composed of part # Y00426, part # Y28TR, part # Y06148, and part # Y06152. This system has aero shaped crossbars which will work to reduce both wind noise/drag and they have integrated channels which will accept most channel mounted accessories. You should have no problems using this...
view full answer... - Recommended Roof Rack for 2019 Honda RidgelineThe roof rack I recommend for your 2019 Honda Ridgeline is from Yakima because it will give your truck a roof rack that is not only very sturdy, but also quiet and will keep your Ridgeline looking great. The correct parts for the roof rack will depend on if your '19 Ridgeline has a naked roof or factory installed rails that run front to back. For a 2019 Honda Ridgeline with a naked roof the Yakima roof rack consists of: - Yakima JetStream Crossbars # Y00426 - BaseLine Towers for Yakima...
view full answer...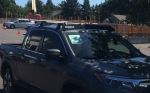
- Long Crossbar Roof Rack Recommendation for 2020 Honda Pilot with Naked RoofFor your 2020 Honda Pilot with a naked roof the roof rack we have with the longest crossbars is the Yakima Jetstream rack part # Y00426, # Y28TR, and # Y06152. This gives aerodynamically shaped bars that are 60 inches length which will work really great on your 2020 Honda Pilot. I attached a picture of what this looks like installed as well as an install video as well.
view full answer...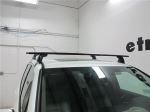
- Minimum Crossbar Length for Yakima Roof Rack on 2019 Honda RidgelineAccording to Yakima, the shortest crossbars that will work on your Ridgeline is their 'medium' crossbar which is the 60 inch long # Y00426. If you go any shorter than that, the bar won't be long enough to properly connect to the roof rack feet. To provide a rack, if you have the bare roof you'd need the following: 60 Inch Crossbars, part # Y00426 BaseLine Towers, part # Y28TR Vehicle Specific BaseClips, part # Y06152 If your Ridgeline has the side rails on the roof, you'd use the same...
view full answer... - Naked Roof Rack Recommendation for 2013 Honda CRV to Carry Longer Roof Box for SkisThe naked roof racks that fit your 2013 Honda CR-V do put the front bar significantly closer to the windsheild like with the Rhino Rack part # RRVA137B-2, # RRRLKVA, and # DK284 we have installed on a 2013 CR-V so this would be the way to go. I attached a picture that shows the front bar is more than the amount of inches forward that you would need plus an install video on a similar 2014 CR-V as well.
view full answer... - Roof Rack and Kayak/Canoe Carrier for 2018 Honda Pilot LX AWD with Naked RoofWe do have roof rack options for your leased 2018 Honda Pilot LX all-wheel-drive that has a naked roof with no fixtures. You can see all racks on the linked page and these include Yakima products. However the track-based roof racks like the item you referenced # Y01127 require drilling and permanent installation so they are not the best choice for a leased vehicle. The best option that you can easily remove when it is time to return the leased Pilot is the Yakima CoreBar system made of...
view full answer... - Recommended Yakima Roof Rack For 2015 Honda CR-V With Naked RoofFor a naked roof on your 2015 Honda CR-V, the only available fits involve the custom clips that attach above the windows as you mentioned. All of these systems from Yakima have a load capacity of 125 lbs max. I recommend the roof rack consisting of: Yakima JetStream Crossbars - Aluminum - Black - 60" Long - Qty 2 # Y00426 BaseLine Towers for Yakima Crossbars - Naked Roofs - Qty 4 # Y28TR BaseClip Fit Kit for Yakima BaseLine Roof Rack Towers - Qty 2 # Y06148 BaseClip Fit Kit for Yakima...
view full answer... - Recommended Roof Rack for a 2024 Ford Escape w/ No Roof Rails Congrats on the new SUV. It won't be a problem at all to add a roof rack to your 2024 Ford Escape that looks close to factory. To do so I recommend the roof rack by Yakima which includes the following parts: Yakima BaseLine FX Roof Rack for Naked Roofs - JetStream Crossbars - Black - Qty 2 item # Y56UV BaseClip Fit Kit for Yakima BaseLine Roof Rack Towers - Qty 2 item # Y06137 BaseClip Fit Kit for Yakima BaseLine Roof Rack Towers - Qty 2 item # Y06152
view full answer... - Widest Crossbar Spread Roof Rack Recommendation for 2013 Honda CRVFor your 2013 Honda CR-V the widest crossbar roof rack we have is going to be the Yakima roof rack part numbers # Y00409, # Y28TR, # Y03536, # Y06148, and # Y06152. The spread for this rack is 32 inches whereas most racks are around 27 inch. I can't recommend you widen the spread any more than that or use a track style rack as that will require permanent modification to the roof of your vehicle.
view full answer... - Recommended Yakima Roof Rack For A 2024 Ford EscapeWe can definitely set you up with a Yakima roof rack for your 2024 Ford Escape with a naked roof. I recommend the Yakima JetStream bar setup. The full roof rack will consist of the following parts: Crossbars - 60' Yakima JetStream # Y00426 Towers - Yakima Baseline Towers # Y28TR BaseClip Fit Kit # Y06137 BaseClip Fit Kit # Y06152 I prefer the JetStream bars over others because the aerodynamic shape will minimize drag and road noise. The Aero Bar shape is basically universal, and you...
view full answer... - What Rooftop Cargo Bag do You Recommend for Carrying Suitcases on My 2018 Honda Pilot?Yes! The attachment clips/straps that come with the Rightline Range 3 Rooftop Cargo Bag - Water Resistant - 18 cu ft # RL100R30 work with your 2018 Honda Pilot with a bare roof. If you have bags that are like the Thule Crossover Rolling Carry-On Suitcase and Backpack with Laptop Sleeve THTCRU-115STR that measures 23-3/16" tall x 15-3/8" wide x 9-1/8" deep, you only have enough room in the Range 3 to carry 2 of those bags. All this being said, if you are looking for a larger rooftop...
view full answer... - Roof Rack Recommendation for 2020 Honda PilotThe rack you need will depend on how the roof of your 2020 Pilot is fitted out. I really like the Yakima JetStream roof rack, because of how well they're built and designed. They may not be the least expensive option, but they work very well and are extremely durable which makes them the most popular choice for your vehicle. If you have a bare roof, you'll need the following parts: • Yakima 60 inch JetStream crossbars, part # Y00426 • Yakima BaseLine roof rack towers, part # Y28TR •...
view full answer... - Snowboard and Ski Rack Recommendations for Naked Roof 2019 Honda PilotFor your application I recommend using a Yakima setup because they produce high-quality products that are designed to make your life and hobbies easier in the long run. I like the JetStream roof rack which is what I recommend for your 2019 Honda Pilot with the naked roof: 60" JetStream Crossbars - Black # Y00426 BaseLine Towers - # Y28TR BaseClip - # Y06152 Lock Kit - # Y07204 (optional) Then for a ski and snowboard carrier I recommend the Yakima FreshTrack # Y03093 because it comes with...
view full answer... - Yakima Round Bar Roof Rack Recommendation for 2016 Honda CR-V with Flush RailsFor a Yakima round bar roof rack setup that is confirmed to fit your 2016 Honda CR-V with flush mounted roof rails you would want the Yakima kit part numbers # Y00409, # Y28TR, # Y03536, # Y06148, # Y06152 which is a confirmed fit.
view full answer... - Will the Erickson Ladder Rack Fit My 2021 Honda Ridgeline?I have a great solution for you. Unfortunately, I confirmed with Erickson that the Erickson Truck Bed Ladder Rack w/ Load Stops # EM07705 is not confirmed to fit your 2021 Honda Ridgeline with bed dimensions of 60"L x 50"W. In addition, we currently don't carry any truck-bed ladder racks that will fit your vehicle. For a great alternative solution for transporting a ladder rack or other long cargo, I recommend the Rhino-Rack T-Load Extender # RTL002 along with a single crossbar on your...
view full answer... - What Roof Rack do You Recommend for Using a Hullavator # TH898 on My 2012 Honda CR-V?When considering a roof rack that will allow you to use a Thule Hullavator # TH898 on the naked roof of your 2012 Honda CR-V, one of the important factors you need to consider is the amount of crossbar space length you have past the feet of the crossbars. In order for the Hullavator to descend, you need to have at least 4 inches of length after the feet. With most systems, the longer the crossbars, the more length you have after the space of the feet. For this reason, I definitely recommend...
view full answer... - Recommended Roof Rack for a 2022 Ford Escape w/ a Naked Roof and Two Hullavators You don't need 70" crossbars if you go with a different roof rack system which I highly recommend. Mounting two Hullavators item # TH898 is feasible and you will most likely be breaking the law if you stick a 70" wide crossbar on your Escape's roof. For your 2022 Ford Escape with a naked roof, I recommend the roof rack by Rhino-Rack and it includes the following parts: Rhino-Rack Vortex Aero Crossbars - Aluminum - Black - 65" Long - Qty 2 item # RRVA165B-2 Rhino-Rack 2500 Series Legs...
view full answer... - Roof Rack Recommendation for 2016 Honda Pilot With Bare RoofWe don't offer any aftermarket side rails for your 2016 Honda Pilot, but you can still install a roof rack. Since your Pilot doesn't have the roof rails, you'll need a Yakima roof rack system for a bare roof that clamps to the inside top of the door jambs. This is a very effective mounting system that will work perfectly for your Pilot. The most cost-effective rack uses round crossbars, you'd use the following parts: Yakima Round 58 inch crossbars, part # Y00409 Yakima BaseLine towers,...
view full answer... - Recommended Roof Rack for a 2023 Honda Passport With Bare RoofYes, there is a way to add a roof rack to your 2023 Honda Pilot even though you do not have the side rails, and the best option is from Yakima, consisting of the Crossbars # Y36UV, Fit Kit # Y06152 and Fit Kit # Y06163. This rack has a flush design which means the crossbars do not extend past the mounting feet for a great look. This aero bar roof rack system has a 165 lbs capacity. The strips in the top channels dramatically reduce drag and wind noise.
view full answer... - Roof Rack Recommend for 2016 Honda CR-V to be Transferred to Truck Camper ShellI can definitely help you out with getting the most parts that will transfer over from your 2016 Honda CR-V! The Yakima roof rack is the way to go since it uses the longer 60" bars as they should transfer over to your truck cab nicely. The only problem is that the legs used for the naked roof on your CR-V won't be compatible with a track system so you will need to get new legs and a different fit kit for the tracks on your truck. A lot of truck camper shells do come with a track system...
view full answer... - Can Crossbars for a Thule Roof Rack be Spaced Further Apart on a 2012 Honda CR-VThe crossbar spread is 27-1/2 inches for the Thule AeroBlade system on a 2012 Honda CR-V. This is set by where the feet need to install on the roof. The specific locations are chosen because they are the most structurally sound. The fit kit is then made to fit the specific contours of the roof in those locations. Moving the crossbars further apart will lead to damage to the roof and a lower capacity. For a wider bar spread the Yakima system has a spread of 32 inches which is the largest...
view full answer... - Yakima Jetstream Roof Rack that Fits 2024 Ford Escape with Naked RoofYes, we do have a Yakima Jetstream roof rack that fits your 2024 Ford Escape with the part numbers # Y00429, # Y28TR, # Y06137, # Y06152. We recently installed all of the roof racks we offer and everyone agreed the Jetstream was the nicest and easiest to install.
view full answer... - How to Use Yakima Round Crossbars on 2017 Honda Ridgeline With Naked RoofThe Q Towers have been retired by Yakima, so while we have a way for you to use your current Round 58" CrossBars for Yakima Roof Rack System # Y00409 on your 2017 Honda Ridgeline with a naked roof, you will need new towers, fit kit, and round bar adapter. The correct parts are the follwing: - BaseLine Towers for Yakima Crossbars - Naked Roofs # Y28TR - BaseClip Fit Kit for Yakima BaseLine Roof Rack Towers # Y06152 - RoundBar SL Adapter # Y03536
view full answer... - Yakima Mounting Feet Location for Roof Box On 2019 Honda PilotI have attached below a photo of the REQUIRED installation points for a Yakima Roof Rack System like the JetStream part # Y00426, part # Y28TR, and part # Y06152 on a 2019 Honda Pilot. These are the points on the roof Yakima deemed strongest and what factor into their capacity ratings. They will provide a 32" crossbar spread which will work great with most cargo boxes like the Yakima SkyBox NX 16 Roof Cargo Box part # Y95AV which is what I recommend.
view full answer... - Parts Needed to Carry Multiple Kayaks on a 2014 Honda CR-VIn order to carry kayaks on the roof of your 2014 Honda CR-V you will first need a roof rack if you do not already have one. The best option we have for this is the Yakima JetStream Crossbar System which is composed of part # Y00426, part # Y28TR, part # Y06148, and part # Y06152. This system has aero shaped crossbars which will work to reduce both wind noise/drag and they have integrated channels which will accept most channel mounted accessories. You should have no problems using this...
view full answer... - Recommended Roof Rack for 2019 Honda RidgelineThe roof rack I recommend for your 2019 Honda Ridgeline is from Yakima because it will give your truck a roof rack that is not only very sturdy, but also quiet and will keep your Ridgeline looking great. The correct parts for the roof rack will depend on if your '19 Ridgeline has a naked roof or factory installed rails that run front to back. For a 2019 Honda Ridgeline with a naked roof the Yakima roof rack consists of: - Yakima JetStream Crossbars # Y00426 - BaseLine Towers for Yakima...
view full answer... - Long Crossbar Roof Rack Recommendation for 2020 Honda Pilot with Naked RoofFor your 2020 Honda Pilot with a naked roof the roof rack we have with the longest crossbars is the Yakima Jetstream rack part # Y00426, # Y28TR, and # Y06152. This gives aerodynamically shaped bars that are 60 inches length which will work really great on your 2020 Honda Pilot. I attached a picture of what this looks like installed as well as an install video as well.
view full answer... - Minimum Crossbar Length for Yakima Roof Rack on 2019 Honda RidgelineAccording to Yakima, the shortest crossbars that will work on your Ridgeline is their 'medium' crossbar which is the 60 inch long # Y00426. If you go any shorter than that, the bar won't be long enough to properly connect to the roof rack feet. To provide a rack, if you have the bare roof you'd need the following: 60 Inch Crossbars, part # Y00426 BaseLine Towers, part # Y28TR Vehicle Specific BaseClips, part # Y06152 If your Ridgeline has the side rails on the roof, you'd use the same...
view full answer...
Do you have a question about this Roof Rack?
Info for this part was:

Edited by:
Daron K

Written by:
Alex H
At etrailer.com we provide the best information available about the products we sell. We take the quality of our information seriously so that you can get the right part the first time. Let us know if anything is missing or if you have any questions.
Product Experts Available Now!
Call 1-800-940-8924
Thank you! Your comment has been submitted successfully. You should be able to view your question/comment here within a few days.
Error submitting comment. Please try again momentarily.