
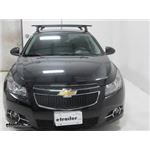
Yakima BaseLine FX Roof Rack for Naked Roofs - JetStream Crossbars - Aluminum - Black - Qty 2
Item # Y53PB
Our Price: $733.80
Will this fit?
To see if this custom-fit item will work for you please tell us what vehicle you'll use it with.


- All Info
- Reviews (26)
- Q & A (0)
- Videos (3)
- Photos
Yakima Roof Rack - Y53PB
- Aero Bars
- Crossbars
- 40 Inch Bar Space
- Yakima
- Black
- Flush
- 2 Bars
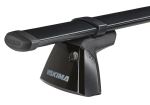
This aerodynamic, flush-mount roof rack lets you carry gear and cargo on your vehicle while maintaining a clean, factory look. Crossbars work with channel-mount and clamp-on accessories. Installs on your vehicle's naked roof.
Features:
Yakima BaseLine FX MD:- Integrated crossbar and tower system lets you carry cargo and accessories on your vehicle's naked roof
- Flush design provides a streamlined, factory look - no crossbar overhang
- JetStream crossbars with top channels accommodate channel-mount and clamp-on accessories
- Push-down rubber strips in top channels allow for easy attachment of channel-mount accessories
- Sleek towers with matte finish are weather resistant
- Custom installation to your vehicle's naked roof with Yakima BaseClips
- Aerodynamic, lightweight aluminum crossbars resist corrosion and reduce wind noise
- Yakima Same Key System (SKS) lock cores (sold separately) deter theft
Yakima BaseClip 127:
- Custom-fit mounting clips and pads allow you to mount BaseLine towers on your vehicle with a naked roof
- Padded, stainless steel clips provide secure grip on your door jambs
- Snap onto DropHooks inside towers
- Protect door jambs from scratches and abrasions
- Powder coated for durability and rust resistance
- Molded rubber pads fit the contours of your roof
- Clip onto bottoms of towers
- Protect roof from scratches and abrasions
Yakima BaseClip 137:
- Custom-fit mounting clips and pads allow you to mount BaseLine towers on your vehicle with a naked roof
- Padded, stainless steel clips provide secure grip on your door jambs
- Snap onto DropHooks inside towers
- Protect door jambs from scratches and abrasions
- Powder coated for durability and rust resistance
- Molded rubber pads fit the contours of your roof
- Clip onto bottoms of towers
- Protect roof from scratches and abrasions
8006127 Custom Base Clips and Pads for Yakima Base Line Towers
8006137 Custom Base Clips and Pads for Yakima Base Line Towers
8000166 Yakima Base Line FX MD - Roof Rack Cross Bar for Naked Roofs

Video of Yakima BaseLine FX Roof Rack for Naked Roofs - JetStream Crossbars - Aluminum - Black - Qty 2


Videos are provided as a guide only. Refer to manufacturer installation instructions and specs for complete information.


Video Transcript for Yakima Roof Rack Review - 2013 Chevrolet Cruze
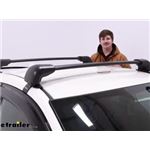
Speaker 1: Today on our 2013 Chevrolet Cruise, we're going to be doing a test fit of our Yakima Jet Stream roof rack system. That's going to consist of our 50 inch black Yakima Jet Stream crossbars and that's part number Y00425. They also come in silver, which is part number Y00428. It's also going to consist of our baseline towers, part number Y00146 and our base clip fit kits, part numbers Y06137 and Y06127.This Yakima roof rack system is going to allow you to carry many different types of roof mounted accessories, such as bike racks or cargo boxes. They feature and aerodynamic design, which is going to make them far quieter than our traditional round or square bars.It's going to work with your clamp on accessories. It's also going to accommodate your T squad accessories.
While other cross bars require you to trim and remove a section of your strip here, the nice thing about these is you can simply push down and slide in your T-bar accessories.Our cross bars are held in place by four baseline towers. Each tower has a foot pad that's going to protect our roof from any sort of damage. And it also features a cover to protect our hardware. The kit includes four clamps that are specially designed for our Cruise that are going to hold our cross bars in place. They feature a rubber pad so there's not going to be any damage to our frame.Now if you'd like to add increased security, you can buy Yakima cores for our locks, and that's part number Y07204.
This roof rack features a weight capacity of 165 pounds but you will want to check your owner's manual to make sure your roof can sustain that sort of weight.Now that we've gone over a few of the features, let's go ahead and look at how to install it. So we have our front bar installed already. After assembly, per our instructions, we measured from the top of our windshield to the front of our foot pad. We did that on both sides and then we went ahead and tightened it down.With our front bar installed, let's go ahead and look at how to install our rear bar. We already have one of our baseline towers installed on our jet stream cross bar, so I'm going to go ahead and show you how to install the other one.
We're going to flip that over and we're going to take our baseline tower and our first step is to insert our plastic adapter into the slot there.Once we get it lined up, we can click it in place. And then we're going to take our metal T-bracket there. One thing I do want to show you, this little window is covered up right now, so we're going to have to go to the back and pull out on this tab here, and that's going to open the window for us to insert our tool and tighten that down. We want to get it flush with the plastic adapter so that we can slide it onto our cross bar.There's a scale printed on our cross bar here, so we're going to go ahead and move to the correct measurement, and you can find that in your instructions.Next, we want to install our footpad, so there is a notch in our footpad that will line up with our bar on our foot. And then we'll simply click in place.
Next we're going to install our footpad on our foot piece. So as you can see, there's a little notch in the back here that's going to line up with our bar, so we're just going to go ahead and insert that in place.Now, this next part is a little bit confusing so I want to explain. The front of our bar is going to be the fatter part, that's kind of rounded. So all of our measurements are going to be based off of that. On the inside here, you'll see we have our pitch adjustment and our toe adjustment. That's just going to determine how straight our footpad is, and the level of our crossbars. So we want our toe adjustment to be centered here. We're going to go ahead and start tightening that down.And then our pitch is going to be pushed over so that our inside nut is the farthest away from the front of our bar possible. I'll go ahead and tighten that down. Now our tool is going to let us know when everything is properly tightened by clicking in place. And there we have it. Now that we have our baseline tower set, all we have to do is put on our end cap here, close that little door that we opened earlier, and set it in place.Now I'm just going to put this in the general vicinity and we can make adjustments here in a moment. Now that we have our roof rack on our roof, we want to make sure and measure to ensure our crossbar spread is where it should be. You can find that measurement in your instructions. And you want to measure from the same place on both, so either from the front or from the center or the rear, just make sure it's the same. And you want to do that on both sides.So now with our crossbar in the correct position, we want to make sure that our footpad is seated properly in our track there. And then we're ready to open our little plastic door there and open our vehicle door and insert our clip. Now you want to make sure that you have the correct clip, they are different on the front and the back. We're going to go underneath this middle portion to make sure that it bites in. So as you can see, our clip is not flush with our vehicle. There's some space in there, so we're going to go ahead and turn our bolt up here until it makes contact and then we're going to be able to go ahead and start tightening it down. You don't want to tighten it too far because you do want to make it equal on both sides.Now that we've got it pretty close to being even on both sides, we're going to use that included tool and tighten it down and listen for those clicks. Then all we have to do is close our little plastic piece here and then mount our cover. Gonna go ahead and do that on the other side as well.With it installed, we're now ready to load up any of our favorite roof mounted accessories and hit the road. And that's going to do it for our test fit of our Yakima jet stream roof rack system on our 2013 Chevrolet Cruise.
Customer Reviews
Yakima BaseLine FX Roof Rack for Naked Roofs - JetStream Crossbars - Aluminum - Black - Qty 2 - Y53PB
Average Customer Rating: 4.7 out of 5 stars (26 Customer Reviews)
This aerodynamic, flush-mount roof rack lets you carry gear and cargo on your vehicle while maintaining a clean, factory look. Crossbars work with channel-mount and clamp-on accessories. Installs on your vehicle's naked roof.by: Nicholas06/02/2020
I choose etrailer simply because they mailed to APO. I’m a AD SM, and a lot of companies don’t shop to APO. As soon as I ordered my product, I received an email as a courtesy from etrailer letting me know I had an individual that would be tracking my product every step of the way, reassuring a smooth process. Their site functionality was easy, their customer service was great. I wanted to know if they had bike racks that would fit my cross bars, I got a email right away with a suggestion and a link that would fit my needs. I’ll definitely order from etrailer if I ever need to again.
by: John01/02/2023
Thank you Tammie P for all your help in getting the right Product!!!


by: Tracy05/31/2020
2018 ChevroletCruze
These parts are exactly what we needed as part of our roofrack kit purchased from etrailer. The website made it easy to search and find exactly the right product for our particular needs - mounting a rooftop tent onto a 2018 Chevy Cruze "naked" roof. We called for assistance and received excellent information to get our camping season started.
by: Christopher03/15/2022
Very solid roof rack solution but the wind noise is mind-numbing. Ugh.
by: Nicholas06/02/2020
Great customer service, definitely order from etrailer again.
by: JD03/07/2018
Hyundai Sonata
Hyundai Sonata - glass pano roof. These items have been on for about 1-year. So happy with the set up. I’ve take a road bike and a mountain bike on 500+ mile trips. The mounts do an excellent job.
by: Collin03/19/2020
the product is excellent. very good quality material. the measurement given for my 2016 wrx are not exactly what they should be.
by: Herbert 02/10/2024
by: 02/10/2024
by: Andrew 06/21/2021
Great!
by: Mike 07/16/2023
by: Donald 12/29/2021
by: Jose09/06/2022
by: Richard 08/20/2020
by: Frank 02/10/2023
by: Justin10/29/2022
by: Kevin 11/14/2023
by: Kelvin 10/23/2021
by: Karen11/17/2023
by: Mark 03/22/2021
by: Jennifer 08/02/2021
by: Jonathan 09/12/2021
by: Paul09/04/2022
by: Eric04/26/2024
I purchased clips that were stated as being compatible with our 2010 Chevrolet Impala. The front clips fit well, however the rear clips do not.


by: Howard11/09/2023
From start to finish, the folks at etrailer -- and I spoke to several people there, so it was a consistent corporate vibe -- were fantastic to deal with.
There were delays in getting my product that were on the supplier side and out of eTrailer's control, yet etrailer folks kept me up to date and also worked on a customized solution.
My goal was to be able to carry my surfboard on the roof of our 2019 Hyundai Santa Fe to the beach more than 3 hours away. But the particular model we had had no existing racks, no recessed areas, nothing to fix racks to. Not even the dealer had a solution. I was sh*t out of luck.
But etrailer hooked me up. The racks did take me a while to put on, but most of that time was fine tuning to reduce “hum” while driving. I’m very happy with them.
Thanks to etrailer, I have gone surfing and can go surfing whenever I'd like to.


25
509
Show More Reviews
See what our Experts say about this Yakima Roof Rack
- Recommended Flush Mounted Roof Rack for a 2024 Hyundai Venue w/ No Roof Rails To add a flush roof rack to your 2024 Hyundai Venue with a naked roof you will need the following parts: Yakima BaseLine FX Roof Rack for Naked Roofs - Aero Crossbars - Aluminum - Black - Qty 2 item # Y27UV BaseClip Fit Kit for Yakima BaseLine Roof Rack Towers - Qty 2 item # Y06170 BaseClip Fit Kit for Yakima BaseLine Roof Rack Towers - Qty 2 item # Y06187 This aero bar roof rack system has a 165 lbs capacity. I recommend adding the Yakima Same Key System item # Y07204 to help prevent...
view full answer... - Can Two Sets of the Yakima JayLow Fit on a Yakima BaseLine FX Roof RackIn theory yes, since the Yakima JayLow Kayak Roof Rack w/ Tie-Downs # Y04073 are only 10.3" wide you would have plenty of room on the Yakima BaseLine FX Roof Rack for Naked Roofs # Y27UV to use two sets. The only thing you'd need to make sure is that they are spaced appropriately apart, and that you'll have enough room to fit both kayaks. As long as all of that checks out, then you'll be good to go.
view full answer... - Roof Rack with Yakima SweetRoll Kayak Saddles on 2016 Nissan AltimaThe Yakima SweetRoll Kayak Carrier # Y04074 will fit onto the SportRack Roof Rack # SR1010. The SportRack will fit on your 2016 Nissan Altima however it's a semi-custom fit so it's not designed specifically to fit the roof of your car. For a custom fit I suggest the Yakima Roof Rack: 48 inch Round CrossBars # Y00408 BaseLine Towers # Y28TR RoundBar Adapter # Y03536 BaseClip Fit Kits # Y06137 and # Y06127
view full answer... - Will Trailer Hitch Fit a 2023 Hyundai Elantra Hybrid LimitedI checked with all of our hitch manufacturers and while we have the Draw-Tite Hitch # DT75MR for a 2023 Hyundai Elantra, it isn't compatible with the N Line or Hybrid models. With that being said, we may still have a solution depending on what you planned to do with the hitch. For example, we have a roof rack fit from Yakima that would allow you to then mount a roof basket like the Rhino-Rack # RMCB or a bike rack like the Thule UpRide # TH599000. If you want to go with the roof rack here...
view full answer... - Yakima Roof Rack Recommendation for 2015 Volkswagen Passat and 2018 Kia SportageThere are some Yakima roof rack components that can be used on both a 2015 Volkswagen Passat and a 2018 Kia Sportage but they vehicles are pretty different so they'd take different fit kits and bar lengths. For the Passat you'd need the following: # Y00409, # Y28TR, # Y03536, # Y06137, and # Y06125 For the Sportage you'd need: # Y00408, # Y28TR, # Y03536, # Y06125, and # Y06153 The two components that fit both are # Y28TR and # Y03536.
view full answer... - What Kayak Carrier do You Recommend for My 85-Pound Kayak on My 2016 Hyundai Sonata?I have a great solution for you. While the Thule Hullavator # TH898 can be used with a crossbar system that uses clips on your 2016 Hyundai Sonata without a panoramic roof, it has a weight capacity of 75 pounds. Unfortunately, this is not enough weight capacity for our 85-pound kayak. We also do not carry a load-assist option that has enough weight capacity for your kayak. In addition, With that being said, the best option is to use the Yakima BigCatch Kayak Carrier w/ Tie-Downs - Saddle...
view full answer... - Recommended Roof Rack for a 2024 Ford Escape w/ No Roof Rails Congrats on the new SUV. It won't be a problem at all to add a roof rack to your 2024 Ford Escape that looks close to factory. To do so I recommend the roof rack by Yakima which includes the following parts: Yakima BaseLine FX Roof Rack for Naked Roofs - JetStream Crossbars - Black - Qty 2 item # Y56UV BaseClip Fit Kit for Yakima BaseLine Roof Rack Towers - Qty 2 item # Y06137 BaseClip Fit Kit for Yakima BaseLine Roof Rack Towers - Qty 2 item # Y06152
view full answer... - Recommended Yakima Roof Rack For A 2024 Ford EscapeWe can definitely set you up with a Yakima roof rack for your 2024 Ford Escape with a naked roof. I recommend the Yakima JetStream bar setup. The full roof rack will consist of the following parts: Crossbars - 60' Yakima JetStream # Y00426 Towers - Yakima Baseline Towers # Y28TR BaseClip Fit Kit # Y06137 BaseClip Fit Kit # Y06152 I prefer the JetStream bars over others because the aerodynamic shape will minimize drag and road noise. The Aero Bar shape is basically universal, and you...
view full answer... - What Crossbars and Cargo Carrier do You Recommend for My 2019 Chevy Cruze?In order to mount a roof top carrier for luggage, you definitely need a roof rack system on your 2019 Chevy Cruze LT. For a great crossbar system, I recommend the following parts if you have a sedan model Cruze: - Round 48" CrossBars for Yakima Roof Rack System # Y00408 - BaseLine Towers for Yakima Crossbars - Naked Roofs # Y28TR - RoundBar SL Adapter for Yakima BaseLine, SkyLine, TimberLine, and RidgeLine Towers # Y03536 - BaseClip Fit Kit for Yakima BaseLine Roof Rack Towers - Qty 2...
view full answer... - Compatibility of Thule Crossbars and Yakima and Inno Bases for a 2017 Chevy VoltYakima and Inno bases are not compatible with the Thule roof bars. In general, each manufacturer has its own mounting methodology and kits, so the bars are not usually compatible. Your roof box, however, would be likely to fit onto the available bars. If you can send me a little more information about it I can track down better fit information. I personally prefer Yakima racks as they are extremely adaptable and can angle to precisely fit the roof better than other brands. For your...
view full answer... - Roof Rack Fit for 2015 Hyundai Sonata with Glass Panoramic SunroofThe roof rack I recommend for you is the Yakima Roof Rack with JetStream Crossbars # Y00426, BaseLine Towers # Y28TR, BaseClip Fit Kit # Y06137, and BaseClip Fit Kit # Y06127. I confirmed with my contact at Yakima that they do not have any fit restrictions for the glass panoramic sunroof on your 2015 Hyundai Sonata and so this roof rack will work well for you. I have attached a photo showing where this rack mounts on the Sonata.
view full answer...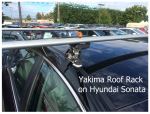
- Roof Rack And Cargo Carrier Recommendation For 2014 Nissan Altima 4-DoorThe Yakima Roof Rack System Is a good fit for your 2014 Nissan Altima 4 door. The weight capacity for the roof rack is 100 lbs. That would include the weight of any cargo box you choose added to the weight of any cargo you place in the carrier. The front crossbar is placed 15-1/8 inches from the windshield. The crossbar spread is 24 inches. You need the following parts for the roof rack: 48 inch RoundBars # Y00408 BaseLine Towers # Y28TR RoundBar Adapter # Y03536 BaseClips # Y06137 and...
view full answer... - Which Yakima Q Clips for Q Towers on 2017 Volkswagen JettaYou are correct that the Yakima Q Clips that you need for your 2017 Volkswagen Jetta, Q116 and Q127, have been discontinued by Yakima. I am not sure why the system is bringing up the Q114 Q Clips, but they are not compatible with your Jetta. I do have another option as Yakima discontinued most of the Q Clips and Q Tower systems and transitioned to their Baseline System. I recommend getting the Yakima Roof Rack System for your Jetta. I attached a video review of the Yakima Roof Rack System,...
view full answer... - How to Carry 4 Bikes With a 2016 Chevy CruzeI do have a solution for you to carry 4 bikes, but since the trailer hitch receivers that are available for your 2016 Chevrolet Cruz are 1-1/4 inch Class I receivers you will be limited to a 2 bike carrier for the hitch. To carry 4 bikes you will need to install a roof rack and carry 2 bikes on your roof. As far as which hitch receiver I recommend, If you are going to have a shop install it I recommend the Draw-Tite Sport Frame # 24943 because it doesn't require the use of the Support...
view full answer... - Recommended Roof Rack for a 2015 Hyundai Sonata with Panoramic RoofThe roof rack that I recommend using on your 2015 Hyundai Sonata with the panoramic roof is the Yakima JetStream roof rack. This consists of the 60" JetStream Bars # Y00426, along with the BaseLine Towers # Y28TR, and the BaseClip Fit Kits # Y06137 and # Y06127. If you would like to add locks to this then you also need part # Y07204. I spoke with my contact at Yakima and he said that right at where the roof rack bars sit you will have about 4" - 4-1/2" and then in the middle of the roof...
view full answer...
- How to Transport 4 Bikes on a 2012 Hyundai AccentThere are a lot of great options for bike carriers for use with your 2012 Hyundai Accent, but the only 4-bike carriers available for your vehicle are hitch-mounted carriers which require Class II or Class III hitches and the only hitches available to fit on your vehicle are Class I. Instead, I recommend using a hitch-mounted bike rack such as the Thule Camber 2 Bike Rack # TH9058 for two of your bikes and a roof-mounted bike rack such as the Rhino-Rack Road Warrior Rooftop Bike Carrier...
view full answer... - Recommended Roof Basket and Crossbars for a 2013 Volkswagen GLIFirst for a set of crossbars on your 2013 Volkswagen GLI, I recommend going with the Yakima JetStream Crossbars # Y00428 with the BaseLine Towers for Yakima Crossbars # Y28TR, and the BaseClip Fit Kit for Yakima BaseLine Roof Rack Towers # Y06137 & # Y06126. These crossbars are going to work with your Volkswagen's naked roof, measure 50" long x 2-3/4" wide x 1-1/8" tall, and has a dynamic weight capacity of 165 lbs. For a roof basket, I recommend going with the popular Thule Canyon XT...
view full answer... - Recommended Roof Rack for 2020 Ford Escape With Naked Roof and Load-Assist Kayak CarrierWe can get your 2020 Ford Escape set up with a roof rack and load-assist kayak carrier, and it sounds like you have a naked (bare) roof, so the best option for your Escape is going to be a rack from Yakima, which consists of the following parts: - Yakima JetStream Crossbars - # Y00426 - BaseLine Towers for Yakima Crossbars # Y28TR - BaseClip Fit Kit # Y06137 - BaseClip Fit Kit # Y06152 This rack is the best set up for your 2020 Escape because of its long 60 inch crossbars that allow you...
view full answer... - Will the Yakima Sidewinder Bike Rack Fit on Elliptical Style Crossbars on a 2013 Nissan AltimaThe Rhino-Rack Roof Rack with the Vortex Aero Crossbars, # RRVA126B-2, 2500 Series Leg Kit, # RRRLKVA, and the Custom DK Clamps and Pads, # DK381, will fit a 2013 Nissan Altima, however the Yakima Sidewinder Tandem Bike Rack is only compatible with round crossbars. According to my contact at Yakima, Yakima does not offer an adapter that will allow the Sidewinder bike rack to be used with elliptical style crossbars because the weight of the bike rack and a tandem bike would be too great...
view full answer... - Best Roof Rack Recommendation for a 2011 Dodge ChargerSince you already are familiar with the Yakima products, I recommend staying with that manufacturer but the Q clips from your current roof rack have been discontinued and they have updated to a newer system. For your 2011 Dodge Charger, I recommend the: JetStream aero crossbars # Y00425 BaseLine towers # Y28TR BaseClips # Y06137 BaseClips # Y06126 This roof rack will work with your old roof box, but you may need to adjust the mount positions.
view full answer... - Is It Normal for Roof Rack on 2020 Ford Escape to Not Be LevelThanks for reaching out! Roof rack manufacturers choose the strongest parts of the vehicle to have the roof racks positioned so while it will be a little uneven, you'll want to install the Yakima CoreBar roof rack for your 2020 Ford Escape (parts listed below) per the Yakima instructions. It's actually really common for the crossbars to be uneven height-wise due to the curve of the roof, like what you said. As long as you install it per the instructions you'll be good to go! Here are...
view full answer...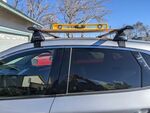
- Roof Rack Recommendation for 2015 Hyundai Sonata with Panoramic RoofYakima has roof racks for your 2015 Hyundai Sonata Limted that include the panoramic roofs like what you have. So for that you could use the Jetstream Crossbar kit # Y00426, # Y28TR, # Y06137, and # Y06127 and you'd be set.
view full answer... - Recommended Roof Rack For My 2015 Chevrolet CruzeI do have a roof rack that will fit your 2015 Chevrolet Cruze, but your Malone roof rack will not fit your vehicle. My roof rack recommendation will consist of the following: Yakima CoreBar Crossbars - Steel - Black - 50" Long - Qty 2, part # Y00421 BaseLine Towers for Yakima Crossbars - Naked Roofs - Qty 4, part # Y28TR BaseClip Fit Kit for Yakima BaseLine Roof Rack Towers - Qty 2, part # Y06137 BaseClip Fit Kit for Yakima BaseLine Roof Rack Towers - Qty 2, part # Y06127 Yakima Same Key...
view full answer... - Roof Rack Recommended for Carrying Kayak on 2018 Chevrolet VoltWe do indeed have a roof rack and a kayak carrying solution for your 2018 Chevy Volt. I'd recommend a Yakima CoreBar roof rack, which can be assembled from the following parts: • Yakima 50 Inch CoreBar Crossbars, part # Y00421 • Yakima BaseLine Towers, part # Y28TR • Roof Rack Fit Clips # Y06137 • Roof Rack Fit Clips # Y06126 Yakima makes a high-quality product that's very highly rated by our customers. The rack would provide you with many years of trouble-free service. For a kayak carrier,...
view full answer... - Best Roof Rack To Carry Two Kayaks On a 2017 Hyundai Accent SedanThe best roof rack for a 2017 Hyundai Accent Sedan is the Yakima JetStream Crossbar System part # Y00425, part # Y28TR, and part # Y06137. This system contains aero crossbars which are the least wind resistance and custom fit mounting clips for a sleek look. In order to carry two kayaks with the above setup you'll need to carry them on their side using a j-style kayak carrier, the Yakima JayLow Kayak Carrier part # Y04073 with the Yakima Bow/Stern Tie-Down Ropes part # Y04031 and the...
view full answer... - Replacement Pads For Yakima BaseClip Fit Kits 6126 & 6137 on 2017 VW Jetta The Yakima BaseClip Fit Kits that go with a Yakima roof rack on your 2017 Volkswagen Jetta are the BaseClip Fit Kit # Y06126 and # Y06137, like you mentioned, and we do have the correct replacement foot pad, though it's different than what you stated. The correct part for your application is the Replacement Foot with #5 Pad for Yakima BaseLine Roof Rack Tower # 8880646.
view full answer...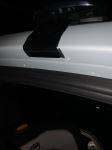
- Roof Rack Fit on 2014 Hyundai VelosterI checked with the roof rack manufacturers and was able to find a roof rack that is a confirmed fit for your 2014 Hyundai Veloster, which is from Yakima and consists of the following parts: - Yakima JetStream Crossbars Black # Y00425 - BaseLine Towers for Yakima Crossbars # Y28TR - BaseClip Fit Kit for Yakima BaseLine Roof Rack Towers # Y06180 - BaseClip Fit Kit for Yakima BaseLine Roof Rack Towers # Y06127 This roof rack has aerodynamic bars which are low profile, giving the rack a...
view full answer... - Roof Rack with Yakima SweetRoll Kayak Saddles on 2016 Nissan AltimaThe Yakima SweetRoll Kayak Carrier # Y04074 will fit onto the SportRack Roof Rack # SR1010. The SportRack will fit on your 2016 Nissan Altima however it's a semi-custom fit so it's not designed specifically to fit the roof of your car. For a custom fit I suggest the Yakima Roof Rack: 48 inch Round CrossBars # Y00408 BaseLine Towers # Y28TR RoundBar Adapter # Y03536 BaseClip Fit Kits # Y06137 and # Y06127
view full answer... - What Kayak Carrier do You Recommend for My 85-Pound Kayak on My 2016 Hyundai Sonata?I have a great solution for you. While the Thule Hullavator # TH898 can be used with a crossbar system that uses clips on your 2016 Hyundai Sonata without a panoramic roof, it has a weight capacity of 75 pounds. Unfortunately, this is not enough weight capacity for our 85-pound kayak. We also do not carry a load-assist option that has enough weight capacity for your kayak. In addition, With that being said, the best option is to use the Yakima BigCatch Kayak Carrier w/ Tie-Downs - Saddle...
view full answer... - Parts for Yakima JetStream Roof Rack on 2017 Land Rover Discovery Sport and How Many Bikes Will FitTo install the 50" Yakima JetStream crossbars # Y00425 on your 2017 Land Rover Discovery Sport you'll also need the BaseLine Towers # Y28TR as well as fit kits # Y06127 and # Y06154. When it comes to bike capacity there are a few factors that come into play, but if your bikes are lightweight then you can potentially fit 5 or 6 bikes on 50" crossbars. The factors that you need to take note of are the weight of your bikes, the width of the bike racks you plan on using, and the geometry of...
view full answer... - Roof Rack and Bike Carrier for 2012 Hyundai Veloster with Center ExhaustSince the 2012 Hyundai Veloster has center exhaust I do not recommend using a hitch mounted bike rack. The heat from the exhaust could damage the bike rack and bikes. The best option for carrying bikes on your Veloster is to use a roof rack. The roof rack that fits your vehicle is the Yakima system consisting of: Jetstream bars 50 inch # Y00425 Baseline Towers # Y28TR BaseClip 180 # Y06180 Baseclip 127 # Y06127 You could carry 2 bikes easily. Three bikes would require the center bike...
view full answer... - Roof Rack Fit for 2015 Hyundai Sonata with Glass Panoramic SunroofThe roof rack I recommend for you is the Yakima Roof Rack with JetStream Crossbars # Y00426, BaseLine Towers # Y28TR, BaseClip Fit Kit # Y06137, and BaseClip Fit Kit # Y06127. I confirmed with my contact at Yakima that they do not have any fit restrictions for the glass panoramic sunroof on your 2015 Hyundai Sonata and so this roof rack will work well for you. I have attached a photo showing where this rack mounts on the Sonata.
view full answer... - Roof Rack And Cargo Carrier Recommendation For 2014 Nissan Altima 4-DoorThe Yakima Roof Rack System Is a good fit for your 2014 Nissan Altima 4 door. The weight capacity for the roof rack is 100 lbs. That would include the weight of any cargo box you choose added to the weight of any cargo you place in the carrier. The front crossbar is placed 15-1/8 inches from the windshield. The crossbar spread is 24 inches. You need the following parts for the roof rack: 48 inch RoundBars # Y00408 BaseLine Towers # Y28TR RoundBar Adapter # Y03536 BaseClips # Y06137 and...
view full answer... - Recommended Roof Rack for a 2015 Hyundai Sonata with Panoramic RoofThe roof rack that I recommend using on your 2015 Hyundai Sonata with the panoramic roof is the Yakima JetStream roof rack. This consists of the 60" JetStream Bars # Y00426, along with the BaseLine Towers # Y28TR, and the BaseClip Fit Kits # Y06137 and # Y06127. If you would like to add locks to this then you also need part # Y07204. I spoke with my contact at Yakima and he said that right at where the roof rack bars sit you will have about 4" - 4-1/2" and then in the middle of the roof...
view full answer... - Will the Yakima Sidewinder Bike Rack Fit on Elliptical Style Crossbars on a 2013 Nissan AltimaThe Rhino-Rack Roof Rack with the Vortex Aero Crossbars, # RRVA126B-2, 2500 Series Leg Kit, # RRRLKVA, and the Custom DK Clamps and Pads, # DK381, will fit a 2013 Nissan Altima, however the Yakima Sidewinder Tandem Bike Rack is only compatible with round crossbars. According to my contact at Yakima, Yakima does not offer an adapter that will allow the Sidewinder bike rack to be used with elliptical style crossbars because the weight of the bike rack and a tandem bike would be too great...
view full answer... - Roof Rack Recommendation for 2015 Hyundai Sonata with Panoramic RoofYakima has roof racks for your 2015 Hyundai Sonata Limted that include the panoramic roofs like what you have. So for that you could use the Jetstream Crossbar kit # Y00426, # Y28TR, # Y06137, and # Y06127 and you'd be set.
view full answer... - What Kayak Load Assist Can I Use With My Lockrack For My 2016 Subaru WRXI do have a solution for you, but will not involve the Lockrack Loading Bar. You will still have to remove, or adjust the orientation, of the arms for this solution to work, but this method would be your only option. You can use the following items to help you load your kayak with the Lockrack Loading Bar. Yakima BoatLoader EVO Telescoping Load Assist - 28" Extension, part # Y04085. This load assist bar is stored in your crossbar when it is not in use. It has a weight limit of 80 lbs....
view full answer...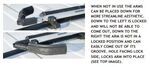
- Recommended Roof Rack For My 2015 Chevrolet CruzeI do have a roof rack that will fit your 2015 Chevrolet Cruze, but your Malone roof rack will not fit your vehicle. My roof rack recommendation will consist of the following: Yakima CoreBar Crossbars - Steel - Black - 50" Long - Qty 2, part # Y00421 BaseLine Towers for Yakima Crossbars - Naked Roofs - Qty 4, part # Y28TR BaseClip Fit Kit for Yakima BaseLine Roof Rack Towers - Qty 2, part # Y06137 BaseClip Fit Kit for Yakima BaseLine Roof Rack Towers - Qty 2, part # Y06127 Yakima Same Key...
view full answer... - Parts Needed to Install Yakima Round Bar Roof Rack on 2015 Nissan AltimaWe have parts to fit your Yakima round bars on your 2015 Nissan Altima, but not with the Q Towers as they were discontinued. According to Yakima you'll need the bars that you have already like part # Y00408. BaseLine Towers # Y28TR RoundBar SL Adapter # Y03536 BaseClip Fit Kit # Y06137 BaseClip Fit Kit # Y06127
view full answer... - Installation of Yakima Roof Rack on 2013 Nissan AltimaInstalling the Yakima JetStream roof rack on your 2013 4-door Nissan Altima does not require the weather to be a certain temperature and there should be no interference with your door putting the rack on. The accompanying photo shows how the clamps will look when installed properly and your door should shut completely. This rack is made up of: - Yakima JetStream Crossbars # Y00425 - BaseLine Towers for Yakima Crossbars # Y28TR - BaseClip Fit Kit for Yakima BaseLine Roof Rack Towers #...
view full answer...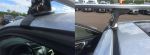
- Recommended Yakima Roof Rack That Will Fit 2012 Infiniti G37 And 2016 Nissan AltimaTo install a Yakima roof rack on your 2012 Infiniti G37 and your 2016 Nissan Altima, you will be able to use the same crossbars and towers. The only different parts you will need will be the fit kits for each vehicle. I recommend purchasing the roof rack for the 2016 Altima. You would need part # Y00425, part # Y28TR, part # Y06137, and part # Y06127. Then for the Infiniti you will only need to get part # Y06109. You can use the crossbars and towers from the Altima kit mentioned above.
view full answer... - Roof Rack Recommendation for 2018 Nissan Altima with SunroofFor your 2018 Nissan Altima with a sunroof the Yakima roof rack part numbers # Y00421, # Y28TR, # Y06137, and # Y06127 is a confirmed fit and would work great. The only tech tip that Yakima states is that when open, the sunroof may interfere with some accessories. The aero shape of these crossbars will give you a very quiet ride and minimize fuel mileage loss.
view full answer... - Recommendations For Carrying 4 Bikes On 2012 Hyundai VelosterWith a Class l hitch on your 2012 Hyundai Veloster, you are limited with the tongue weight capacity and any bike carrier you install in the hitch limits you to 2 bikes. You will want to check your owner's manual or with your dealership to make certain you do not exceed the vehicle's tongue weight capacity. The Saris Freedom 4 Bike Platform Rack, part # SA4414B, is rated to be used with higher rated hitches and would not be a fit for your Veloster. You will want to make sure any accessory...
view full answer... - Recommended Roof Rack For 2015 Nissan Altima With A SunroofWe do have a roof rack that's designed to fit your 2015 Altima and also work with your sunroof. I recommend the Yakima Jetstream roof rack. This rack is extremely quiet because it uses aerodynamic crossbars. The crossbars are 50 inches long and constructed of lightweight aluminum and have a black powder-coat finish. It is recommended not to open the sunroof when the roof rack is installed due to interference. To order this roof rack you will need part # Y00425, part # Y28TR, part #...
view full answer...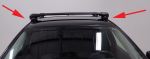
- Parts Needed to Install Yakima Jetstream Roof Rack on 2016 Hyundai VelosterYakima would be the final authority on the correct components to install one of their roof racks on your 2016 Hyundai Veloster. I checked with them just now and the correct Base Clips would be the part # Y06127 and # Y06180. The other components you'd need would be the Yakima JetStream crossbars part # Y00425 and Baseline Towers part # Y28TR.
view full answer... - Basic Roof Rack for a 2014 Nissan AltimaI have some potential solutions for you, however, there is not a Thule roof rack fit available for your vehicle. For basic racks that are similar to Thule, I recommend Yakima's Round Bar or JetStream kits. The base kit for your vehicle is made up of parts that will work with whatever bar style you choose. It is made up of: BaseLine Towers for Yakima Crossbars, part # Y28TR BaseClip Fit Kit for 2014 Nissan Altima, Front, part # Y06137 BaseClip Fit Kit for 2014 Nissan Altima, Rear,...
view full answer... - Yakima Roof Rack Recommendation for 2013 Nissan Altima SedanYakima does have a round bar roof rack for your 2013 Nissan Altima Sedan. It uses the part numbers # Y00408, # Y28TR, # Y03536, # Y06137, and # Y06127. Since you have bars already you would not need the part # Y00408. Since most likely what you have is the older Q-Tower style rack the bars would be the only thing that you could reuse. This rack uses the BaseLine style of feet which is their current style. Your Sunroof would not be an issue at all.
view full answer... - Yakima Roof Bike Rack Recommendation for 16 Kids Bike Wheels on a 2018 Subaru WRX SedanAs far as Yakima racks that work with 16" and 20" wheels, the best and only option is the fork-mounted Yakima HighSpeed # Y02115. With this rack, I confirmed with Yakima that it does not require a minimum or maximum wheel diameter as long as the bike's tires do not exceed 5" wide and the bike's wheelbase does not exceed 48". As far as compatibility with the kid's bike, it is compatible with 9 mm x 100 mm, 12 mm x 100 mm, 15 mm x 100 mm, 15 mm x 110 mm, 15 mm x 135 mm, 15 mm x 142 mm, 15...
view full answer... - Parts Needed to Install Yakima Roof Rack on 2017 Nissan AltimaYakima recently made some changes to their round bar roof racks but you can still install a round bar rack on your 2017 Nissan Altima but you will need new feet and fit kit. For that the # Y00408 if you needed new bars, # Y28TR for feet, # Y03536 for bar adapters, and fit kits # Y06137 and # Y06127 and you'd have everything you'd need.
view full answer... - Roof Rack and Cargo Carrier Options for 2013 Nissan Altima 4-Door Sedan with Moon RoofWe offer many roof rack options for your 2013 Nissan Altima 4-Door Sedan with moon roof; and we also offer a range of rooftop cargo products, some of which can be mounted to a roof rack and others which require only roof side rails. Since your Altima has a moon roof it is indeed a good idea to install a roof rack to support the cargo carrier, but if your cargo needs do not require a high weight capacity, and if your Altima owner's manual does not prohibit fabric bags like the Yakima being...
view full answer...
Do you have a question about this Roof Rack?
Info for this part was:

Edited by:
Daron K

Written by:
Alex H
At etrailer.com we provide the best information available about the products we sell. We take the quality of our information seriously so that you can get the right part the first time. Let us know if anything is missing or if you have any questions.
Product Experts Available Now!
Call 1-800-940-8924
Thank you! Your comment has been submitted successfully. You should be able to view your question/comment here within a few days.
Error submitting comment. Please try again momentarily.