


Thank you! Your comment has been submitted successfully. You should be able to view your question/comment here within a few days.
Error submitting comment. Please try again momentarily.
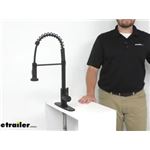
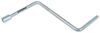
Clean all that tough food residue off your plates using the pull-down head on this kitchen faucet. The retaining bar secures spout while you are traveling to the next campsite. The rotating spout can be used from all angles of your island counter.
Features:
Specs:
Tackle that food caked onto your plates from all angles with the pull-down head. Toggle between the stream and spray options depending on how much pressure you need or how long that food has been sitting there. When you're done using it, the spout self-retracts with a hose weight that can be adjusted anywhere along the spray hose. And when you're finished with the dishes, you can secure the spout in place so that it doesn't swing around while you're traveling to the next campsite.
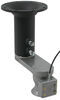
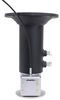
This faucet lets you upgrade the kitchen faucet in your RV or camper. Depending on your setup, this faucet can have either a 1-hole installation using the built-in round deck plate or a 3-hole installation using the included oval deck plate. Mounting hardware is also included. Using the inlet shank, drop the new faucet and deck plate in place of your existing faucet. Then connect the braided hot and cold water lines. The use of tub and tile caulk (not included) is required.

California residents: click here
Videos are provided as a guide only. Refer to manufacturer installation instructions and specs for complete information.
Hey guys, Kevin here with etrailer, and today I'm gonna be showing you how to install the Empire Faucets RV kitchen faucet. So this faucet comes in two different colors. The one we chose for today is our brushed nickel, it also comes in black. You can choose whatever's gonna look best with your sink and your kitchen setup. So the Empire faucet here is going to be an ideal replacement for your outdated, ugly, or frankly, just broken RV faucet. Obviously, times are changing, so the old knob system here doesn't really look that easy on the eyes.
Switching over to our newer faucet here with our adjustable head that we can slide around makes it a whole lot easier to do the dishes, clean anything that you may have while you're out camping, and just provides an overall better appeal. So our lever here can turn up and down for hot or cold. As you pull it out, it'll click on the water. Obviously you can do a little bit of pressure or go to pull away. Our nozzle right here has a button to switch from spraying mode just to standard faucet mode.
And actually this holder, you can pull right out of the way, go back and forth, clean stuff as needed and easily switch. The head also will come up and down, it has a weight down on the inside that'll help pull it back up into place, so that when I put it back on here, it'll stick properly in place. One thing I do wanna say is if you're experiencing any sputtering like that, while you're using your faucet, you can go ahead and pick up one of our water pressure regulators, which just simply screws into your water inlet on your RV. And then your hose can hook into this side. It's got a backcheck valve and a little filter there so that no debris gets up inside of your water system.
Or if you're running off of a pump, you can go ahead and pick up an acclimator tank which we also sell here at etrailer. So this installation is honestly very easy. Really, it's just taking off the old connections, putting on the new ones. The hardest part you're gonna have here is just getting down inside your tiny little cabinet and getting up to those connections. Other than that, this is something you can easily do at home.
All I needed was a Phillips head screwdriver and a crescent wrench, just to tighten up my connections, and that was it. So as you can see, our faucet in our RV today is obviously not working. The actual stem of the faucet is broken off. So we are going to start off our installation here by first removing our faucet. To do that, we first need to turn off the water 'cause we don't want any water coming out. Obviously we already have it off, since faucet is taken apart here a bit. And then we're gonna get down under the sink and start loosening up our faucet base. As you can see with our older faucet here, all we have is these two water lines. And then the faucet's actually held down by these white screw-on rings here. Those you're just gonna turn counterclockwise to get 'em off of the threads here and then that'll loosen up our sink, or our faucets so that we can pull it off. Some models you'll see will also have a ring in the center. This one doesn't, but our new one is going to, it's gonna tighten down right here in the center. So let's go ahead and start taking off our water lines. So as you're taking these off, it's definitely best if beforehand you blow out your water line system just so that you don't have any water coming off. These pipes here are a little more rigid and kind of holding themselves up. But if you had some loose hoses, you could have a lot of water all over the floor that you'd have to clean up. So now we've got those water lines off. Like I said, we're just going to twist these off and loosen up our faucet. All right, now that we have our clamps off, we can go ahead and pull off our faucet base. And this is also a time where you can come back and kind of clean up anything that may have gotten under the flange on here, or gasket, and just clean that all off, get yourself a nice clean surface for it to actually set on so that you're not having any gaps or anything like that. All right, so with our new faucet, all of our hoses are gonna go right down through this center hole. There's a weight right here which will help pull the faucet head back into place while not in use. We're gonna have to actually take that off right now, just so that we can get the hoses down into the hole, 'cause this is just a little bit too big. So I'm gonna go ahead and take this off right now. It's just simply got some screws, one on each side. You're gonna have to unscrew to take the weight off. And we'll set those to the side And we can test fit our faucet in here and make sure it actually fits before we go ahead and do anything else. So it looks like we're gonna be good. I'm gonna go ahead and pull this back out now, because we're actually gonna have a base to go in here with it too that's gonna cover up our holes May be a little tricky, just getting them all back out, though. So our base here is going to have a foam gasket. We're gonna set that right on top here. This is what's gonna end up covering those extra holes since we're going from two knobs and a faucet head to just the faucet head having all in one. So we're gonna go ahead and slide our hoses through, a little bit easier if you do that one at a time, slide that down. Our ring right here has a rubber gasket on the bottom which is going to prevent the water from leaking out onto the base here. Once you have that in place, I can drop it back down in the hole. All right, now that we're back down in the sink I'm gonna take my rubber gasket. I'm gonna put it up through each of my hoses, get it up onto my threads here. And then we can go ahead and take our washer and we're gonna do the same thing. Not as easy getting around that narrow point there, and now we can come with our threaded washer here. We're gonna put the screws facing down, that way, we have something to grip onto. And as we keep going, it's gonna keep being a little bit difficult, just because these washers are getting smaller. There we go. All right. Now we're gonna pull our sink up tight and start threading on our washer here, which can be a little bit difficult just to get started. May need to have a second set of hands up top holding your faucet in place. That way you can get a tight grip on it and start spinning your washer on here. All right, as I'm getting towards the end to tightening this down, like I said, you're definitely gonna wanna have a second pair of hands up top, kind of holding it in place, 'cause it does kind of spin a little bit. You wanna make sure it's sitting the right way but you also wanna make sure that your base is covering both of these holes. And as you tighten this down, it's gonna be a little bit harder to spin that base. Once you get this how you want it tight enough you can go ahead and screw these screws just a little bit, just to kind of put some pressure up against that washer so that your threaded washer doesn't untighten at all. All right, and that should prevent us from backing off at all and causing your faucet head to be loose. So we can go ahead and start making our connections. This hose right here is gonna click right up into our other hose here. So this is our, where our water's coming in. This is running up to our faucet head which is able to pull out and use the sprayer. That simply just pops into place, as you can hear it click. We are going to take our hot water and our cold here. So hot is going to be this tube right here. Luckily, we can just reuse our connection. Tighten that back down. May need to take just a crescent wrench or something to kind of hold on here. As you can see, these have some flat sides so that you can easily put a wrench on there to hold it in place while you're tightening down on your connection point. All right, now that we have our connections made, I'm gonna go ahead and I'm gonna put my weight back on. I'm gonna have it on this side, going up towards the faucet, so that way it pulls it back down while we're not using it. This just has a little indentation for you to sit right over the hose. Gotta line your hose back up and put your screws back in. All right, now that we've made sure it's nice and tight so that it won't slide down on the hose anymore, we can go up and test it out. As you can see, working just fine. So I think that about does it for our installation of the Empire Faucets RV kitchen faucet..
Average Customer Rating: 4.7 out of 5 stars (15 Customer Reviews)
Clean all that tough food residue off your plates using the pull-down head on this kitchen faucet. The retaining bar secures spout while you are traveling to the next campsite. The rotating spout can be used from all angles of your island counter.Much higher quality than expected. Very easy to install.

We love it!!!!
We absolutely LOVE this faucet we replaced previous to update! Very good construction, easy to install, great spray and regular flow. Highly recommend!
Good price and fast shipping.
This faucet is a great product! It moves easy and the faucet pulls smoothly. Very happy with it!!
Leaks

Katrina B.
8/16/2022
I see that our customer service department is in the process of getting a new faucet out to you under warranty with the manufacturer. We would appreciate your feedback once you receive the new faucet.
Very nice!!! Easy to install. Very fast shipping Thank you
Rasy install. looks great.
Do you have a question about this RV Faucet?
Info for this part was:
At etrailer.com we provide the best information available about the products we sell. We take the quality of our information seriously so that you can get the right part the first time. Let us know if anything is missing or if you have any questions.


Alan
4/11/2024
Its still great. Looks great. No issues. We are looking to get a new Camper. I will change to same thing, unless it already has one. I see some now have the same thing.