


Thank you! Your comment has been submitted successfully. You should be able to view your question/comment here within a few days.
Error submitting comment. Please try again momentarily.
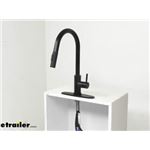
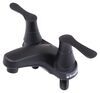
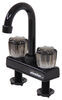
Clean all that tough food residue off your plates using the pull-down head on this kitchen faucet. The rotating spout can be used from all angles of your island counter. Maintenance-free ceramic disc cartridge that prevents the faucet from dripping.
Features:
Specs:
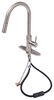
Tackle that food caked onto your plates from all angles with the pull-down head. Toggle between the stream and spray options depending on how much pressure you need or how long that food has been sitting there. When you're done using it, the spout self-retracts with a hose weight that can be adjusted anywhere along the spray hose.
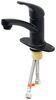
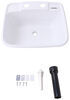
This faucet lets you upgrade the kitchen faucet in your RV or camper. Depending on your setup, this faucet can have either a 1-hole installation using the built-in round deck plate or a 3-hole installation using the included oval deck plate. Mounting hardware is also included. Using the inlet shank, drop the new faucet and deck plate in place of your existing faucet. Then connect the hot and cold water lines. The use of tub and tile caulk (not included) is required.

California residents: click here
Videos are provided as a guide only. Refer to manufacturer installation instructions and specs for complete information.
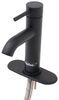
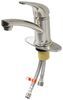
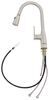
Hello neighbors. It's Brad here at etrailer and today we're taking a look at the empire faucets, single handle, pull-down spout kitchen faucet for your RV. Now this is gonna be available in this nice matte black finish and also a brush nickel as well. Now most campers don't have a dishwasher and that's where this comes into play. Whether your updating your kitchen with something new or replacing a broken one, this can be a great option because with pull-down spout you're able to actually get to those dishes and get in the crevices to really clean those out. Now, something else that's nice, is you have a option for a stream or a spray pattern.
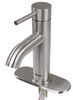
So having that spray pattern is really gonna knock down that food in the dish, helping clean it up and whenever you're done, you can simply retract this back and it goes back to being a normal faucet. Now the single handle has a very nice feel to it. It's kind of weighted in the right way and it's easy to go to either hot or cold and it feels great just operating it in general. Now this long goose neck is really nice for filling up glasses but also it just kind of gives you a little bit more working room with your hands. It's also able to swivel 360 degrees so you can kind of get wherever you need to.
Now, our old faucet has seen better days and this one is made out of plastic and it's got just kind of a metal coating on the outside but it does feel a little bit cheap and also our aerator has gone missing. Now that's something that's worth noting. Here is the aerator on here, it's actually going to be nice for putting a little bit of air in that water as it sprays and that's gonna help suds things up and just clean better overall. And something else that's nice about this is its stainless steel construction. So you're not gonna have to worry about any rust, long term it's gonna be rust free and it feels good.
Also having that stainless gives it a little more heavy feel and it just feels a little bit more robust. Now speaking of durable, there's also maintenance free diamond ceramic cartridges. So it's gonna be maintenance free for the life of the sink and it's also just going to have less friction. So it's gonna feel great overall anytime you operate the sink. Now, original faucet was a 3-hole and what's nice is this actually includes this deck plate here.
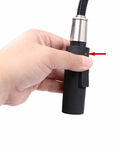
So even though it's a 1-hole, it's gonna cover up your old ones and it also has a nice foam on the bottom side. So when you tighten it down, it's gonna compress it. Now, I do recommend before tightening down, you can put a little bit of plumbers caulk here and that's just gonna make sure that this stays waterproof and you're not gonna have water running down, if water was to build up here. Now, speaking of the install, we're gonna show you how to get this installed in your camper right now. To remove your existing faucet, the first thing you're gonna wanna do is make sure that you shut off the water supply to the actual camper. Now from there, you're gonna wanna open your valves up just to make sure there's any excess water that is gonna come out. Now, I do recommend once we start unplugging some of the lines underneath, that you're gonna wanna have a bucket or some way to catch some of that water as there's always a little bit of residual there but let's get started. So to get this unhooked, it's gonna be pretty simple. It's gonna be hard to see but a lot of this we'll be doing by feel. So you're gonna find your water lines and just follow those and you're gonna find this little threaded connection piece here. Now pretty easily just with my thumbs, I'm able to loosen these up. And you shouldn't need any actual hand tools. Sometimes these can be on there pretty tight but you don't wanna put too much pressure on them as they can crack either the actual fitting or the actual threaded piece. So just use your thumbs and kind of work at it and make sure it come off pretty simple. Now, something else you're gonna wanna do is sometimes lines are not designated as far as letting you know which one's hot or cold. Ours is gonna be a little bit easier to tell because we have two different lengths but sometimes campers can be a little bit different and they may not be denoted as hot or cold. So I suggest making a mark if you need to, that way you're hooking up to the proper line. So now you're gonna reach up just a little bit higher and you're gonna feel the threaded spout there or the hookup and up top there's gonna be these keeper knots and same thing just with your thumb, you should be able to loosen those up pretty easily. Gonna be one on the other side as well. So now at this point, this should come off and sometimes there can be actual caulk under here, so you may have to pry, take a putty knife and kind of work your way on this but it should come out pretty simple and this little deck plate should also come along with it. Now, while you have your old faucet off, it's a good time to go back, kind of clean some of the buildup that might have kind of over time kind of just left marks and also that's gonna be better when you put your new one on. There's not gonna be any marks there that might stick out past the actual fascia or the plate of the sink itself. So, using just soap and a rag or maybe some alcohol or whatever you may have to kind of clean this up, it's a good time to do it now. Here we have our new empire faucet and we're gonna have to take this collar off as this is gonna go underneath the sink and actually clamp this kind of into place for us. So what we're gonna need to do is get our washer here and our retainer clip off. Now, it is pretty tight here. You can see all of this is meant to go through there but they do bunch up quite a bit. So what I've found, is loosen it up to where it's kind of free moving here. And all of these have connections here and this is where it really gets tight and they are staggered to make it a little bit easier but again, even just trying to to get this first one out is tricky. So to avoid that, this line, our weighted line that's gonna kind of connect into this. We can actually go ahead and remove this weight and that's gonna allow this one to slip through and that's gonna gain us a whole hose of access. So in order to do that, you're gonna have some Phillips head screws and go ahead and remove that. Now, there's an indentation on the hose kind of where this is setting just from being clamped down. But if you want, you can mark this but you can really adjust this once it's underneath your sink, no big deal. And also to get this through the retaining clip, this will need to be removed regardless because this was actually catching on the clip. So once this is off, now I should be able to slide this through. And you may need to find the middle ground between two lines like that. And one through, that's gonna really open that up for us to get the rest of 'em out one by one. You're gonna wanna get this washer off as well, so we're gonna do the same thing. Now, we do have a 3-hole here and this is obviously a single so we're gonna want to use our deck plate here, so we can go ahead and feed these through. We may have to do the same method. There we go. So we got all those through. Now we can take all of these and drop 'em in our center hole here. Now, if the whole size that is on your sink is binding up just because it is tight again, use that same method where we have this quick connect one out, feed all these in and then we can simply run this end after. So now we're gonna go underneath and we're gonna be feeding these through. So make sure you have your washer first and then we're gonna do our retaining nut here. So same thing we may have to put that long hose through last but we'll get this all on. And then once we get this threaded onto the shank you're gonna simply just tighten this down and it might help to have your screws in just a little bit. Have it flush, that way that they don't come out as you're tightening it but we're gonna be using that to kind of rotate this to tighten it up and then once it's tightened up, we'll be going back and tighten these, that way it's gonna cinch it all together. Here where we have our collar tightened down by hand, we are gonna go here with our Phillips and get these tightened down as well and that's just gonna take up any extra slack and really get this pressed down to where that fixture is not gonna move. So now, we're going to take our hot and attach it to our hot line. This is gonna be the same thread pitch as before so a simple hand twist should get this tightened up. Go ahead and do that for our cold one as well. Now this little guy is gonna be a quick connect here. You're gonna see when you push it in, it's gonna lock into place there with a little bit of tension. We may need to pull our clip out here. There we go. That nice audible click means that, that is attached, and we go to quick tub just to make sure. Now, something that's important is this is gonna be sliding up and down when you pull that spout. So what I've done in previous plumbing installations, I've actually gone ahead and taken these lines and kind of zip tied them out of the way, that way this isn't hanging up because you'll feel that rubbing against this when you pull that spout down. You know, we still have our weight, so let's go ahead and grab that. To get our weight installed, if you're not using the previous mark and you kind of wanna just custom tune it to your cabinet space, what I actually do, I pull it down all the way. What we'll do is this point here, this is gonna be that weight to where it's fully extended here. You want to make sure that it's actually going to fully retract back. So if I put the weight here, it still has slack. So we need to find that bottom point. So it looks with it retracted back up. We're gonna sit right about here. So let's go ahead, we'll attach it and see how it works. So, with the weight, you wanna make sure that it's gonna be on the edge that is actually pulling up. That way it always has that weight to kind of pull it back down and it's not gonna bottom out but you also wanna make sure you still have that full range of motion and it's not gonna bind you up top either. So now you can go ahead and turn the water back onto the RV. Now before opening the faucet, you're gonna want to make sure that, that pressure builds up and see if there's any water coming out of our quick connect or our threaded lines that we've tightened up. And if there is a little bit of leaking, you're gonna wanna make sure that that is seated properly. So you may have to shut the water off, purge it out and redo those fittings but it's a lot better than having water drip down. So once that's set, you're ready to use your faucet. And that was a look and installation of the empire faucets single handle RV kitchen faucet with a pull-down spout in matte black and fresh nickel..
Average Customer Rating: 4.7 out of 5 stars (23 Customer Reviews)
Clean all that tough food residue off your plates using the pull-down head on this kitchen faucet. The rotating spout can be used from all angles of your island counter. Maintenance-free ceramic disc cartridge that prevents the faucet from dripping.Delivered, after some USPS issues (you never really find out what happened), but product has been installed and looks great! The high neck and pull-down spout will help when cleaning up dishes and pans.
Look forward to using it once I receive my new pump (different supplier not trailer) for the fresh water tank!
Packaging was damaged and faucet has a little visual blemish. However, installation was straight forward if you put the sprayer hose in the nut and washer last. Happy with the product.

Works great.
Great service have purchased several times will do so in future
Great faucet. No issues after one year.
Very happy with this product. The product description was very detailed. The product works beautifully in our truck camper. Will definitely do business with this company in the future!
The sink works perfectly. It came exactly as described and was easy to install per my husband. We lived in the MH for six months after purchasing/installing and it worked great.
Product was a huge upgrade. The ordering process was smooth. Box came a little beat up but the contents were all there and in good condition.
Like using this
Fast delivery. It was priced cheaper than any other website. Its a great faucet for a RV, much better then the one that came with the RV. The pull-down spout is easy to use. Pretty easy to install yourself.
Great quality faucet. Very nice and works great. The box and the packaging looked like it had been opened and the faucet had a couple of chips in the finish. That’s the only thing that I found wrong with it. Other than that it’s a very nice faucet.
So much better than the faucet that came with the camper
When the faucet arrived it looked nice but after inspection it was pretty scratched up and the faucet head was very loose in the base.
Easy install. Works great in our RV.
exactly what I ordered and fast service, looks like original equipment
Super fast shipping! Arrived looking great, excited to install them for this season, seem very high quality
Do you have a question about this RV Faucet?
Info for this part was:
At etrailer.com we provide the best information available about the products we sell. We take the quality of our information seriously so that you can get the right part the first time. Let us know if anything is missing or if you have any questions.


Sierra K.
7/19/2022
Sorry to hear about the chipped faucet. I will send a note to Customer Service to check with you about that.