
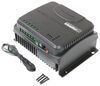
Go Power DuraCUBE Portable Power Station - LiFePO4 battery - 500 Watt
(2 reviews)
Price: $647.99
Go Power DuraCUBE Portable Power Station - LiFePO4 battery - 500 Watt
Item # GP82RR
Retail:$810.00
Our Price: $647.99
You Save: $162.01


- All Info
- Reviews (2)
- Q & A (0)
- Videos (2)
- Photos
Go Power Portable Chargers - GP82RR
- Power Stations
- Electric
- Solar
- AC Outlet
- DC Outlet
- USB A
- USB C
- USB Cable Not Included
- Go Power
- Large
- 2.4 Amps
- 10000 or More mAh
500-Watt power station keeps your devices charged and appliances running wherever you go. Charges with an AC plug or solar panel. Lithium battery has a longer life and more consistent performance compared to other battery styles.
Features:
- Power station provides silent, clean power for tailgating, off-grid camping, or emergency backup
- Features 2 AC plugs, USB A and USB C ports, DC jacks, and 12V vehicle plug
- Has output for the included cable to jump start or trickle charge a car battery
- Pure sine wave technology replicates household AC power, allowing you to run devices safely
- Perfect for sensitive electronics like HDTVs and computers
- Lithium iron battery is more efficient and lasts longer than lead acid or lithium-ion batteries
- AC wall outlet charger, MC4 solar adapter, and car charger cables included
- Built-in MPPT solar controller maximizes charging with a solar panel (sold separately)
- Devices can be used while battery is charging
- LED display monitors charging, watts used, battery level and more
- Built-in BMS keeps battery safe from electrical problems
- Protects against voltage, current, temperature, and reverse polarity issues
- Lightweight aluminum construction is durable and rustproof
Specs:
- Starting (surge) power output: 1,000 watts
- Running (rated) power output: 500 watts
- Ports:
- 2 AC outlets (output): 120V, 60 Hz
- USB Type-C port (output): 5 - 12V, up to 2.4A, regulated
- 4 USB-A ports (output): 5V, up to 2.4A (18W max per pair), regulated
- DC car port (output): 12V, 10A
- Solar charging port (input): 12 - 30V, up to 8A (120W max)
- Wall charging port (input): 12 - 30V, up to 8A (120W max)
- Charge time:
- Solar power: 10 hours
- AC charging: 7 hours
- Battery details:
- Cell type: LiFePO4
- Cell capacity: 537.6 watt hours (12.8V, 42Ah)
- Lifecycles: 2,000 cycles
- Shelf life: charge every 6 months
- Operating temperature: 32 F to 104 F
- Dimensions: 9-7/8" long x 7-1/2" wide x 7-1/2" tall
- Weight 18.7 lbs
- 2-Year limited warranty
Benefits of Using a Lithium-Iron Battery
When comparing to other power stations, the DuraCUBE stands out for using a lithium-iron battery (LiFePO4). Compared to other battery chemistries, this style of battery lasts so much longer. The DuraCUBE is rated for more than 2,000 charging cycles. Power stations that use a lithium-NMC battery are rated for about 500 cycles. Lithium batteries are also more reliable and efficient than systems that use lead acid batteries, since lithium provides more consistent power, regardless of charge.
Many Ways to Charge
The included AC wall plug lets you fully charge the DuraCUBE before you leave home, but you can keep it topped up while you travel too. There is also an included DC charge cable that plugs into your vehicles outlet so you can charge while you drive.

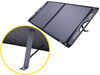
The DuraCUBE was also designed with a built-in solar charge controller for plug-and-play compatibility with a portable solar panel expansion from Go Power (GP76FR sold separately). If youre on a prolonged camping trip or overlanding excursion, you can keep your power station charged all day long.
Digital Display

The DuraCUBE's LED display lets you know the current state of the battery. The current charge is displayed as a percentage, and the power draw of anything you have plugged into it is given in watts. This lets you know how long you have before the battery runs dry. The DuraCUBE is rated for 500 watt hours, so if you are using 10 watts, for example, that device can be used for about 50 hours. You can check battery performance with the clock display, which tells you how long the battery has been on. There's also displays to indicate if AC or DC outputs are switched on or off. The display will also tell you if the battery is being charged when you have a charge cable or solar panel connected.
83033 Go Power! DuraCUBE Portable Power Station
Replaces GP-DURACUBE-500


Video of Go Power DuraCUBE Portable Power Station - LiFePO4 battery - 500 Watt


Videos are provided as a guide only. Refer to manufacturer installation instructions and specs for complete information.


Video Transcript for Go Power DuraCUBE Lithium Portable Power Station Review
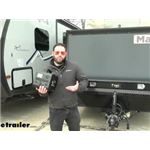
AJ What's up everybody It's AJ with etrailer.com. Today, we're going to be checking out the DuraCUBE. It's going to be a power station. So it's going to be a battery you can take anywhere with you. You can plug several things into it from USB to regular AC. Let's check it out.
The DuraCUBE is made to be portable. You got this nice handle here up top and it feels really sturdy, doesn't feel like it's going anywhere, and it only weighs 18 pounds. And it's a cube like it suggests, so it's going to fit anywhere that you have room for it. So, even in this Mantis. This is not the biggest camper, but, you can find a place for this.
And it's out of the way. Another nice thing about this is it's made for sensitive electronics, too, so if you want to power anything from the fridge in your camper, to make sure that runs all weekend, to something like your phone or a laptop, or even if you're out there shooting some video, some GoPro batteries or camera batteries, it can handle all that too. Before we start testing this out there's some things right away that I want to know about it. I want to know how much of a hassle it is to get this thing fully charged. How long is that going to take How easy is it going to be to chip away at that battery when I have a bunch of things plugged in What's it going to do How's it going to affect this I mean, I already like that it's lightweight and small compared to some of the other ones.
There's a Duracell one that was kind of bigger and bulkier to carry around. This one's got a handle, and it's a good handle, too. I feel like it's nice and sturdy. It's easy for me to carry this and find space for it when I'm going to store it or charge it. The other thing with charging would be, can I charge things like the battery, this whole station itself and still use it at the same time.
That way I can maximize what it's doing. We're going to find all that out. We're inside our camper with the DuraCUBE. So we're just going to go ahead and turn that on. Now we're going to plug in our cooler, turn on our DC. It has both options, but this is what is used to plug it into this camper. So, we're going to plug it in with that. And after, then you come up here and hit DC Because that's what we're using. You see how it's red and says it's off on both of those. We're going to hit this, , switch it to On. Hopefully you heard that ding. That means the cooler kicked on. We even see the wattage that it's using right here. And then there's a timer letting us know how long it's been powered on. I like that. But most of all, I like to see the big indication of how much power you have. So this is fully charged at a hundred percent and we're going to watch it as it drains down as we use it today. Go along with watching that wattage on there. Let's plug in my phone, and see if it changes at all. So, it's got standard USB-C right here, plug it into my phone, you see that power up, it's charging We're going up to eight watts now. Let's see what happens when I turn my screen on. Does it change anything Activate my phone. Yep, we're up to 11, and I'm just on the etrailer website, scrolling. Looking at the front of the DuraCUBE, I just want to point out, along with the display there, we have the buttons here for DC On and Off and AC On and Off, the power switch itself. Then we have four USB-A's right here. So you can hook up four devices with the USB-A plug-in, and then one USB-C for a little bit faster charging. You have that one right in the center. Coming down here, we have two AC outputs right there. We have a DC output right here with these. And then we have this portion, which I'm not a big fan of this, Because this rubber piece is going to be lost probably the first time you take it off there, but try and keep track of it. This also can be used to jump your car or trickle charge it. If it's not starting, you got a low battery, or even want to trickle charge it, it comes with the connectors you can use right here, plugs into the front. I've already removed that rubber cap. It's in my pocket so I can keep track of it. You push that all the way in there and then you can go ahead and hook it up to your battery. So, I got side posts on mine. Make sure you hook up the positive, or the red, first, and then the negative. So we'll attach that one here. I will say, the clips are kind of small, not the greatest for my side posts, but that's more on my battery. You see it's hard to get it in there and gripped onto something. There we go. There's a good fit. And this one's easier because there's less stuff in the way. So, those are all on there. We'll come back up to the front, flip our power switch. Now, right now nothing's happening with it. We have to turn on the DC power. So, we're going to do that and you'll see the wattage pop up, as it starts to trickle charge it. This is the portion, after the cables are hooked up, is where we'd fire up the vehicle. Well, the Envoy's not dead, so we're not going to fire up right now. Just wanted to show you how to hook those up, and what it would look like when you did that. Now, one other thing is, when you go to set this up, you want to make sure it has 100% power to help you jump your vehicle. Now, one jump's not going to drain the whole thing, but it's always good to keep it charged. Well, you can do that with this 12-volt port right here, and you can plug it inside. Let's go in there. One nice thing is, let's say you did jump your vehicle with this and took a little bit of chunk out of the DuraCUBE. Well, you can just use the adapter that came with it and can get it charged via the 12-volt adapter. So, you're going to put that one in right there. That's this one, this one's going to be used to charge it on a normal wall outlet. We'll take this end, plug it into 12-volt on the Envoy, and see, the light lights up there. Let's look up front, see what it's doing. Now you can see we've got the battery, even though it's off, and it's telling us it's charging; it's got that plus sign next to the battery. Now I thought it was going to be fun when you're using this. Jumping your car's not exactly fun. Camping is. Job site - it's just something you might need sometime, too. So we have some batteries here for impact. We can easily turn that on like we did before. Make sure you turn on the AC power, and then we'll plug in our batteries to charge them. There's going to be two ports we can use. So right now, this one's charging. The watts will go up here in a second. There we go, at 13, 19, as it's slowly charging this, these batteries. Looks like this one's still charging. This one looks like it's fully charged. I got the green light here. So, whenever these are done, you can go ahead and use them. Now you don't just have to use it for charging batteries. It's possible enough for you to plug in your circular saw or any power tools in here, and run it on there. Another cool feature that it does to have is, if things are plugged in and charging, you can still charge the DuraCUBE at the same time. So, it's plugged into the wall right now, and indicates on the LED that it is charging, while running these USB ports at the same time. So, it really works just fine with sensitive electronics. We also used it with the fridge and jumped the car with it. Now let's put it to a little stress test. We got a heat gun, kind of simulating a blow dryer. If you are camping and someone wants to blow dry their hair, that heating coil is going to spike really high when you first plug in and activate it and the longer you use it, it should put a little bit of wattage-or take away some wattage-sorry, from this battery. So let's check it out. Plug it in. Turn on the switch. We are at a hundred percent right now. So I'm going to turn on our power, and then turn on our heat gun. So, it's on the low setting right now. At the low setting, we're at 151 watts. I'm going to go up a setting. Slowly, go up on the heat gun. I'm not going to go all the way up, but it'll go 75% up. You can see those watts popping up there. 373, 371, it says now. Let's just go ahead all the way up and see what happens. We're going full blast on this heat gun. We've come up to 530 watts, somewhere in there. We've got the timer at the bottom telling us we've done this for about 50 seconds. Let's see how long it takes to go from 100 to 99. All right, so, we went down one. Now this is, I'm going to leave it at full blast and see how long it takes from that mark, to go down one more. All right, now, we're at 98. Here we learned was, it's going to take about 30 seconds to drop it one percentage. So, around 50 minutes at full blast is what you got with this heat gun, before this is completely drained, which, that's kind of extreme because, not everything's going to put the output of this one when it's full blast. So, like, a regular hair dryer is not going to get as hot as a heat gun, so you're going to have far more time with that. To break that down for other electronics, like a phone, that can charge fully up to 60 times, a digital camera, about 50 charges, a 50-inch TV, flat screen, would be about four hours, a laptop, fully charged, about six charges, a drone, about 30 hours, lights can be run about 60 hours, and a mobile fridge will be about 10 hours. The built-in BMS, which is the battery management system, protects against voltage, current, temperature, and reverse polarity issues. So, if you we're to hook it up to your battery and accidentally get those clips reversed, it's going to protect against anything coming back and damaging it. It also has operating temperatures from 32 Fahrenheit all the way up to 104 Fahrenheit. So, if you're in the Norther states where it's a little bit colder, you want to make sure you watch that temperature; it might not be the best for that. Or, in the hotter states, also watch out for that. You might not get the battery capacity you're supposed to out of this. Now, another thing about that, though, is, you should keep charging it every six months; check on it. So, maybe you don't use it that often, you just have it plugged in, you let it sit in the garage, until you absolutely need it, I would check on it every six months, and go ahead and recharge it. Now, helping with those extreme temperatures, if it does go to overheat, what's going to help out is its built-in fan here at the front. That's going to help get that air out of there and cool it off. Now, the DuraCUBE also works with other G0 Power accessories. For instance, the solar panels, it works with solar panels all the way up to 120 watts. So make sure you get one of those with the right kit. They have the cable that plugs right into the back. It's going to be made out of the aircraft grade aluminum. So that's going to help it be as lightweight as it is, and be durable at the same time. Now, another thing here on the bottom, they got these rubber strips. It helps it grip, which I like that. That way, it's not just this sitting on there Because it would slide back and forth. You see on this toolbox, it takes quite a bit to push it around. So it's just nice that it has that grip wherever you set it. So, you set it in the back of the camper, when you're towing it around, you don't have to worry about it going all over the place. Some of the power stations that come to mind is, I've also worked with the Duracell power station, and that one did a really good job, too. That one was just bigger and bulkier. So I think, the big appeal of this one is this nice handle on top, And again, I know I've said a few times how lightweight it is. It's super light, and easy to take anywhere you need to, whereas, the Duracell one was like a bigger cooler, so you need two hands to take that one and move that around. And you're going to need a little bit more space to store that one, too. Another comparison to make with this one, is going to be the Goal Zero Yeti. So, that one's a whole power system, too. It's got a handle, sort of like this one, except it goes from side to side. It looks more like a smaller lunchbox or cooler. So, it's still portable as well, but that one actually comes kitted with the solar panels included. So, if solar panels was the main point of this, and that was like the real appeal you wanted to use that, I would go with a Goal Zero Yeti because it has that all included, too. Overall, I was really impressed with this. All the tests we put it through, and did a really good job, how versatile it is. I mean, I can leave it in my apartment all the time, use it if the power goes out, I can take it camping, I can use it to jump my car, or even my battery in my car. If it was a little low because I left the lights on or something, I can plug this in and I can trickle charge, too. It has so many different options. You can easily run a bunch of electronics off of it, too. For those, all kinds of electronics, even the sensitive ones like a TV, a laptop, or your phone, can charge on there. You can charge this very easily, and, charge this and something else at the same time. So, that was something I was worried about too. Another thing I thought about is, if I do decide to go camping or I'm going somewhere, I haven't used it in six months, I left it off to the side, I can actually plug this in, in the car on the way there, and get a charge on there, in case I forgot, which I like that, because I do forget stuff, quite a bit. Now, another thing is expanding on it. So, I'm not really interested in solar panels right now. It's not the kind of setup I have, but, I can get that eventually, so this can kind of grow with me. So if I decide I get a camper, I want to start doing solar panel kind of stuff, I can plug that in and expand on this. I really like that option to have. It being portable makes it easy to go wherever I want it to go. And that's the whole point of this. So, I have power wherever I am. That's awesome. Well, I think that does it. Thanks for hanging out. I hope this helped..
Customer Reviews
Go Power DuraCUBE Portable Power Station - LiFePO4 battery - 500 Watt - GP82RR
Average Customer Rating: 5.0 out of 5 stars (2 Customer Reviews)
500-Watt power station keeps your devices charged and appliances running wherever you go. Charges with an AC plug or solar panel. Lithium battery has a longer life and more consistent performance compared to other battery styles.by: Bob W03/26/2022
This is a great product that will give you confidence when boondocking and traveling without having to find an RV park for the night for power!
A little back story: On two occasions I was boondocking and woke up with my Lithium batteries drained. (CPAP with humidifier and overlooked items draining battery.) Couldn't bring in the slide or raise the levelling feet. Couldn't start my built-in generator because a charge was needed on the battery. Fortunately, there were good samaritan rv'ers with a generator who kindly helped put a charge on as I carry a charger for lithium-ion batteries. I knew that I needed to be self-sufficient in order to boondock with confidence as the arrival of good samaritan rv'ers could not always be depended up. So, I embarked on a search for a back-up electric power source that would be powerful enough to charge my lithium-ion batteries sufficiently to start the generator and, hopefully, provide a power source for backing up other items and operating my CPAP, and would be small enough to not cause storage issues.
I searched different manufacturers for several days and focused on the Jackery 1000 as it appeared powerful enough to handle the battery recharge capability that I was looking for. I contacted the customer service representatives for the Jackery 1000 and told them what I was looking for. They asked that I send them the specs on my charger, batteries, and generator, which I did. They responded timely and kindly told me that the Jackery 1000 would not work. Dismayed, my search began anew.
I opened an etrailer email (although I have a small motorhome, I like to see the etrailer products that are available.). There was the Go Power DuraCUBE power station! I reviewed the specs on the DuraCUBE and its LiFePO4 Lithium battery and was confident that I had found what I was looking for. The compact size for easy storage was another major plus since my motorhome is a 25 foot class C. So I ordered it, hoping that I had made the correct choice as I could, at least, use it for my CPAP if it would not sufficiently charge the house batteries.
The DuraCUBE came and I depleted my motorhome's battery bank in order to replicate my dead battery experience on the road. I hooked up my Victron charger to the batteries, plugged the Victron charger into the DuraCUBE, and waited for the charger to light up (it takes a couple minutes) and start charging. After a couple of minutes, it lit up and started charging! Shortly thereafter, I could bring in the slide and raise the levellers. I was ready to get back on the road and could simply bring the DuraCUBE into the RV to continue the charging while I drove. It did take additional charging time before I had enough power in my battery bank before I could start the generator that could then take over the battery charging (and also recharge the DuraCUBE.) A total success!!!
by: Patricia 05/05/2024
2
2
See what our Experts say about this Go Power Portable Chargers
- Portable Power Station Recommendation for 500 Watt e-Bike BatteriesThe Go Power DuraCUBE Lithium Portable Power Station # GP82RR has a cell capacity of 537.6Wh so since your e-Bike batteries are rated for 500 Watts this power station will be able to charge 1 of your bike batteries on a full charge (there will be roughly 37.6Wh of power leftover technically). For your application you need to go with a battery bank with a larger capacity like the Goal Zero Yeti 1000X # GZ44FR rated for 983Wh or the Goal Zero Yeti 1500X # GZ27FR rated for 1,516Wh. The 1500X...
view full answer... - How Long Will Go Power DuraCUBE Lithium Portable Power Station Power Cooler That Uses 1 Amp HourSo from what I found on the Dometic CFX3 55IM it said that the you only need divide the battery's amp hour (Ah) capacity by the CFX3 coolers amp hours per hour (Ah/h) consumption. So based on that, the cooler could be powered for approximately 42 hours using the power station you asked about: - Go Power DuraCUBE Lithium Portable Power Station # GP82RR The reason it will last that long is the # GP82RR uses a LiFePO4 lithium battery that has a 42 Ah capacity, and with the cooler using just...
view full answer... - How to Determine if the Go Power DuraLite Portable Solar Panel Expansion is the Correct OptionThe Go Power DuraLite Portable Solar Panel Expansion # GP76FR was designed to expand DuraLite solar kits or to be used with the Go Power DuraCUBE Portable Power Station # GP82RR. If that is what you have, then this kit will work well. The Go Power DuraLite Portable Solar Panel Expansion # GP76FR kit will need the 2-Wire Trailer Adapter for Go Power Portable Solar Kits # GP72VR to work with the Go Power RV SAE Port for Portable Solar Panels # GP49QR and Extension Cable for Go Power Portable...
view full answer... - Can Go Power DuraCUBE Power Center Be Recharged w/ Solar Panel?It sure can! The Go Power DuraCUBE # GP82RR you were looking at can be recharged with a solar panel by purchasing theGo Power DuraLite Portable Solar Panel Expansion - 100 Watt # GP76FR separately. I included videos for both of these products for you to take a look at.
view full answer... - How Long Can the Go Power DuraCUBE Run a ResMed AirSense 10 CPAP MachineI had a hard time finding the information needed about the ResMed AirSense 10. But from what I was able to find, it looks like that model uses about 90 watts when running. But I do recommend verifying that. With the 42ah battery the Go Power DuraCUBE Portable Power Station # GP82RR has, that should give you approximately 5 hours. That being said, this is just an estimate from the numbers I could find and the actual amount of time could vary.
view full answer...
Do you have a question about this Portable Charger?
Info for this part was:

Installed by:
Andrew K

Installed by:
Michael B

Video Edited:
Chris R

Updated by:
Wilson B

Updated by:
Cody B

Edited by:
Daron K

Written by:
Alex H

Video by:
Thomas T
At etrailer.com we provide the best information available about the products we sell. We take the quality of our information seriously so that you can get the right part the first time. Let us know if anything is missing or if you have any questions.
Product Experts Available Now!
Call 1-800-940-8924
Thank you! Your comment has been submitted successfully. You should be able to view your question/comment here within a few days.
Error submitting comment. Please try again momentarily.