
Summer Starts Here - Save up to 70%
To see if this custom-fit item will work for you please tell us what vehicle you'll use it with.
Thank you! Your comment has been submitted successfully. You should be able to view your question/comment here within a few days.
Error submitting comment. Please try again momentarily.
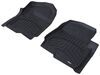
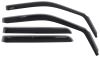
These premium mud flaps are easy to install and digitally designed for a perfect fit. Protect your vehicle and your trailer from road debris. Flaps are constructed of durable thermoplastic resin with stainless steel fasteners.
Features:
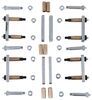
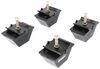
Precision fit, durable components and ease of installation make WeatherTech NoDrills your first choice in mud flaps. Installing mud flaps has never been this painless. Patent-pending QuickTurn stainless steel fasteners makes installation quick and easy - no drilling required.
 Alternate Instructions
Videos are provided as a guide only. Refer to manufacturer installation instructions and specs for complete information.
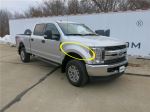
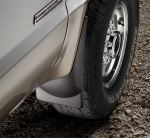
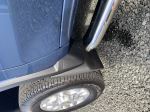
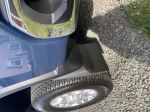
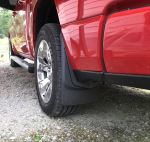
Hi there Ford owners. Today in your 2019 Ford FD50 super duty, we're gonna be taking a look at weather Tech's full kit package, which has mud flaps for both the front and rear, of your truck. And this is what our mud flap looks like when it's installed. You can see that it does hang down pretty far, giving us plenty of coverage to catch dirt and debris that would be flung off our tire, and that's just gonna help extend the life of our vehicles, paint and exterior, look here. 'Cause over time, if you don't have mud flaps here that dirt and debris can get flung up in this location here and you start to get scratches and abrasions, paint chips which could eventually lead to rust and corrosion, and further issues down the road. So by putting these on here now, especially if you live on like a dirty gravel road or you like to go off road in a lot, I would highly recommend them, to again prevent that dirt from getting on there.
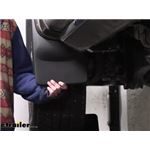
It's also good for moving mechanisms like this. These are powered running boards here, so if I open the door, you'll see that they pop out, and when you got moving mechanisms like this, dirt debris and moisture in these various joints leads to binding and issues with those. If they start to bind and it requires more power to pull it in that can be extra stress on your running board motor which could eventually lead to a burnout on that motor prematurely. So you can see we're keeping things clean and moving freely, and protecting your paint's gonna save you a lot in the long run. One thing that I'd be concerned about with these is, can say aren't like a rubber material as far as like real flexible.
How will they hold up over time And after messing with 'em here, I mean, boy, it sure looks like it's got plenty of flex to it to me, I don't even see any stress marks on there. So I would say this would be able to handle plenty of debris that you might run over fling off your tire even out there on the trail or something. You run over a little log or something, I think it would have plenty of flex, so I wouldn't worry about these cracking over time. So this is a great way to protect your investments not only on this vehicle, by protecting the back here, you can see our customers already got some marks on it. So you probably should have got these a little bit sooner, but it will still protect everything from there back, and when you're hauling really expensive, you got your campers there, even if it's a bumper pull camper it can be a very expensive camper and you don't wanna be throwing dirt and rocks on it the whole time you're driving down the road.
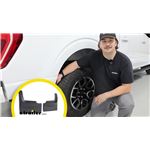
Same thing with bolts. Bolts are very expensive as well, you wanna keep that looking nice. And even if it's not for something you're hauling but maybe you do some offloading and stuff, and you're concerned about people around you, you don't wanna damage any vehicles just out there on the highway. This can help keep any of that dirt and debris that you picked up on the trail off of other people's vehicles. These do come as a pair, so you get one for each side and it's custom fit for your vehicle, so it'll attach directly to factory attachment points.
There's no drilling required to get this installed, It's extremely easy and fast. We'll begin our installation here on the driver's side, at the front of our vehicle. We're just behind the front driver's side tire here. Now I do recommend before you go to install any components, stuff like that give your truck a nice bath. Take it and wash it. Now we're gonna be cleaning up the area where we're working, 'cause we don't want any of this dirt debris left behind this water spots and stuff like that when your mud flaps on there it is gonna vibrate just a little bit, and that's gonna result in a lot of scratches and abrasions. The fasteners we need to remove to install our mud flap are located here, so we're gonna remove both of these with a five and a half millimeter socket. So now we've got those removed. We're not gonna take our opportunity to clean this up. I've just got a little bit of alcohol and a rag here that can be useful as well even if you've just washed your vehicle, to ensure that you good adhesion to the surface there is a protective sticker we're gonna be putting in place to protect it against those vibrations we we're just talking about, ensure that the mud plant doesn't cause any scratches or abrasions to the vehicle, and this can just help you sticker adhere. Now there's a couple ways you could install the sticker. You could put it right where you want it to, first try and the problem with doing that is that if you stick it in place wrong, it's hard to remove it. The other way that you can do it is you can actually take a little bit of soapy water and spray it right here and that'll let you kind of move it around like a water slide decal a little bit. Whichever way works best for you, either one works pretty well. Well then grab our mud flap here. When you make sure you have the appropriate one you can see there, it is labeled left hand which is our driver's side. I like to first just hold it up in place, and see what it looks like. So that's roughly where it's gonna sit. And when we look at it there, we can see it does have a wrap over all the way up until about this point here. So when we go to put our sticker in place we wanna make sure it's at least up to there, to prevent any abrasions from occurring. So we're gonna just peel off our sticker now, and they are side specific. You see your stickers right hand or left hand make sure you're peeling off the appropriate sticker. We'll then take our sticker, and we're gonna put it in place here, where we had our mark for our highest point there, and then this is just gonna run right on patent. Again, you can use that soapy water If you're more comfortable with that method, all those are gonna be acceptable. I just needed to just kind of wrap around the bottom here, All right. And that looks pretty good for protecting our body. So we'll now take our mud flap, raise it up into position, just verify and that all looks good. Looks like we're nice and protected there, so now we'll take our bolts here, that we had removed and we're just gonna reinsert those into the holes. And we're just trying to get it hand tight for now. Just get 'em to start in there, that's good enough. Okay. Now we need to get our piece here to rotate behind this panel here. And you can see this little tab. This little tab is towards us right now. It shows unlocked there. We want it to be in the locked position over here. So you can either push it with your hand. I like to do that just to start it and then we can take the tool that, they comes included with them, and use this to just kind of tighten it down. And a lot of times when you're tightening it it actually twists that into position for you. We'll see if it's gonna do it here for us, looks like it's not gonna do it for, It doesn't sometimes if it doesn't, just loosen it up. And then you can push, push inward. There we go. We we're able to rotate it by hand there, and it is behind the panel here the little plate that's located on the other side of the panel here. We've got it behind this, so when we tighten this bolt down it's pinching this plate there, pinching this panel between the plate and our mud flap. And then just snug that down a little bit, and that'll pinch that right on there for us, and then we can go back and tighten down our bolts. Once you've got this side all snored down, we're gonna perform the exact same procedures over on the other side to get that one installed. And now that we've finished our front set here, we're gonna move on and do our back set. We're just gonna be washing the areas where we're working. We'll do that after we get our hardware out though, we're gonna remove the pin here, we're on the driver's side, we're just behind the rear tire here, and there's a single pin kind of down here towards the lower section. We're just putting our trim panel tool in there to pop out the center of the pin, and it's pretty dirty If you got a lot of dirt debris you live on a gravel road, stuff like that. These are usually a little harder to pull out of there. There we go. We got that guy out. Now, if we just follow this straight guy down to the bottom here, there's a single fastener located here on the bottom, we're gonna remove that, with a 10 millimeter socket. Make sure you save your spacer here, that comes out with that bolt. You're gonna need it later. Now at this point, we're gonna go ahead and get all this cleaned up, so that way we can ensure we don't cause any damage to it while we're working by causing scratches through all the dirt that's there, we're just gonna use some alcohol to clean up the area. Again, I recommend just washing your whole vehicle. We're cleaning up the area with a little bit of alcohol here because we have a sticker that we're gonna be putting in place and we want it to adhere well. The sticker's gonna ensure that any vibrations that may be occurring as we're driving down the road from our mud flap, don't turn into abrasions here on our vehicle. So we're gonna get this cleaned up, to ensure good adhesion here, that looks pretty good. Now we can go ahead and grab our mud flap as well as these stickers. So here we've got our mud flap, they are labeled in your kit. You can see here, it says left hand side, so make sure you grab the appropriate one, your stickers here are also labeled right hand and left hand we're gonna be using the left on this side. Before I put the sticker on, I like to just hold it up here, just to get an idea of where it's gonna sit when it's installed. And when we're looking at it here, we can see this is kind of the point where it curves over the outside, so we want our sticker to kind of start at about that point and then wrap underneath. So we know roughly where we want our sticker, we're gonna peel the sticker off the backing here. And one of the things you can do with these stickers, is you can spray just a little bit of soapy water on here, and that'll let you kind of slide it around. You don't wanna lot just a little tiny bit and then you can slide it around if you're unsure on where you wanna put it. If you ever worked with like decals and stuff before, it's kind of similar, we know exactly where we're gonna put ours though, so we're just gonna run ours into position. All right, smooth out. Right there, and then that'll protect the side of our vehicle here, and now we can put our mud flap here, kind of into position. I'm gonna just temporarily set it back up here, and we can take the pin that we removed and pop that back in place. I'll just hold it up in here for us. I'm gonna put the center in as well. So it doesn't fall off of there. All right. So this bottom piece here we've got some hardware we need to assemble. So you'll see a bag in your kit. Go ahead and grab that and pull your hardware out. So here's the hardware we're gonna be using the long hick head bolt, place your washer on it. And we're gonna set that down just for a minute here 'cause you also get these spacers in your kit, they're labeled on one side, we want the 316th spacer, and we want the 116th spacer, you don't need the three eights. Set that aside. We're also gonna take our bolt here and we need this piece on the bolt. So just put the bolts out of there. All right. So now we've got our pieces that we can start to assemble here. These are both the spacers, plus the factory spacer that we pulled off the bolt. These are gonna go up into this location here, where our factory bolt used to be, and then we'll slide our new bolt here up through the bottom of all those, and thread it right into position there. One just grab our 10 millimeter socket once again to snug it down. You don't go too crazy with it there, just get it to where it snug, our mud flat feels nice and secure here. After we've put our bolt in on the other side here where you see it passes through, we're gonna take the nylon lock net that comes in our kit and just thread that into place. This will just ensure our bolt can't back out of there on us. Once we get this snug down, we're gonna head back to the other side where we pushed our clip in and we're gonna be replacing that with the bolt. That was just kind of a temporary little push pin to hold it up there while we we're working. So now we're just gonna pop this pin out of there again, just should just come right back out of there and we're gonna be replacing that, with the button head bolt that comes in our kit. We'll place a black flat washer on it, slide that through the hole, then on the back side, we're gonna take the silver flat washer, and then after we put our washer on there, we're gonna follow that up with another nylon locking nut. And this gonna be a little tricky, getting this on here might be easier to hold the nut and spin the bolt. It's gotta kind of figure out which is the easiest way for you there to get it started, all right, there we go. We got it started on there, well then grab a 10 millimeter wrench and a Phillip screwdriver to snug these down, and now we've got both our upper and lower fasteners in place. We'll repeat the same procedures over on the other side. And that completes our installation of weather tech mud flaps on our 2019 Ford FD50 super duty..
Average Customer Rating: 4.8 out of 5 stars (1381 Customer Reviews)
These premium mud flaps are easy to install and digitally designed for a perfect fit. Protect your vehicle and your trailer from road debris. Flaps are constructed of durable thermoplastic resin with stainless steel fasteners.
Great product installed easily requiring no modifications to my truck. Painted them to match my truck so they look factory installed.
This is the 2nd return for rear mud flaps, some one is not reading your inventory correctly. I keep getting front flaps. Hopefully you will fix the problem this time.

Jenny N.
12/21/2022
I sincerely apologize that the mud flaps were incorrect a second time. We have checked our warehouse and it will not happen a third time.
These look great! They fit great! I would have given a 5 rating except.......
Weather Tech should put new fasteners in the box for the front installation. The rear came with new hardware and installation went perfect. The front "factory" screws are long enough to work but I had a hard time getting them to start and there is not much engagement into the factory clip they thread into. I will keep an eye on them as I don't want the screws to come loose and I lose a mud flap!

Fred

11/28/2018
I have not had any issues with any of these items. All are good and I would recommend them.
Perfect fit on my F350 SRW with OEM fender flares. I had to buy 4 longer screws for the front set but that was not a big deal. Both front and rear were very easy to install. I didn't bother with the plastic "finish protectors" that they include. Lots of places you can select to buy these but the service at etrailer is FAR better than anyone out there.

Adam
3/2/2022
Still doing great! Survived a bunch of gravel, dirt and highway miles
Totally satisfied! Both with etrailer and Weather Tech. Product shipped quickly and installed as advertised! They look great and fit perfectly. If you have a Super Duty Ford you gotta have these Mud Flaps!
Front flaps fit and installed as directed. The rear flaps only had the lower bolt hole line up. No hole for the top of the mudflap

Sierra K.
11/22/2021
Do you have factory add-on fender flares on the rear of your vehicle?

William
11/23/2021
There are no flares on the truck. I believe the mudflaps I have are for flared trucks. No hole for rear upper attachment on truck for the rear flaps.
Love Weather Tech products made in the USA and work great
Rear flaps fit like a glove! I’d buy them again.
Front flaps fit snug, but the factory screws are not long enough to affix flap. I had to purchase longer screws from hardware store. I also used a hard rubber washer and snugged the two screws and that worked like a dream! Front factory screws are 1” and I bought #8 1 1/4” rounded head metal screw. That 1/4” was plenty extra to do the job right!
The front mud flaps went on as described easily. The rear mud flaps however required that holes be drilled (2) and sheet metal screws inserted to hold the flap on. My application? Maybe. Otherwise they are solid ,strong and good looking.
Great quality product. Rear flaps were simple and straightforward, front ones were a real challenge. Factory screws cannot be reused. I had to buy longer ones with washers for my 2019 F350. Very difficult to line up the flap with the two layers of liners on the fender wells. I ended up having to drill one to install properly.
Fast delivery and mud flaps appear to be exactly what we ordered. Christmas present so we have not installed them yet.
Husband installed them easily. They are still functioning perfectly.
Fit great and have not changed position in a year of driving.
Look great and pretty easy to install
Just like the description says...easy install, no drill, digital fit. Looks like they came with the truck. Highly recommend.
Did not fit well on the 2022 Dodge Ram 3500. The rear flaps did not quite fit the OEM fender flares on the vehicle. Too tight - not enough clearance to sit nicely against the flares. There was also no hole for the trim fastener so had to drill a 1/4" hole for little plastic fastener - not a big deal. Hoping the front ones fit better, but they were worse. Same story - the "digital fit" flaps did not fit the OEM fender flares. Tried a heat gun to hopefully warm the flap and maybe get them to fit together better, but couldn't quite get it. I'll need to get some longer fasteners, otherwise one bolt and the little plastic tab are all thats holding it on. Maybe if the weather warms a bit...? Def not as advertised.
Look great! Look OEM. Wish all the hardware was black. And in the front the two screws you pull out both sides, trash go get something a little longer and more girth. etrailer was great the arrived earlier then expected.
holes did not line up with pre existing holes on car
for installation. Very hard
to install. will NOT buy weathertec again
Fantastic product. Very easy installation. High quality. Very fast delivery! Etrailer is the best as always!
Delivery was quick. The mudflaps were very easy to install it took me about 15 minutes. Extremely happy with the way they look and no more rocks and debris flying up from my tires. Definitely recommend.
These mud flaps are great! Good Instructions and install went quickly. They look really good and should perform well, protecting the rocker panels and the side steps from mud and stones. Very pricey but good quality. Front Pair.
Took a little effort to get it to match up with the plastic wheel well fender flares but once I did I have not had any issues. Looks somewhat subtle but is pretty effective at stopping thrown debris onto the paint.
Great service item was shipped and received quickly. Mud flaps were easy to install.
Do you have a question about this Mud Flap?
Info for this part was:
At etrailer.com we provide the best information available about the products we sell. We take the quality of our information seriously so that you can get the right part the first time. Let us know if anything is missing or if you have any questions.


Tucker T.
2/10/2021
Great. I painted them so they look factory